Advertisement
Table of Contents
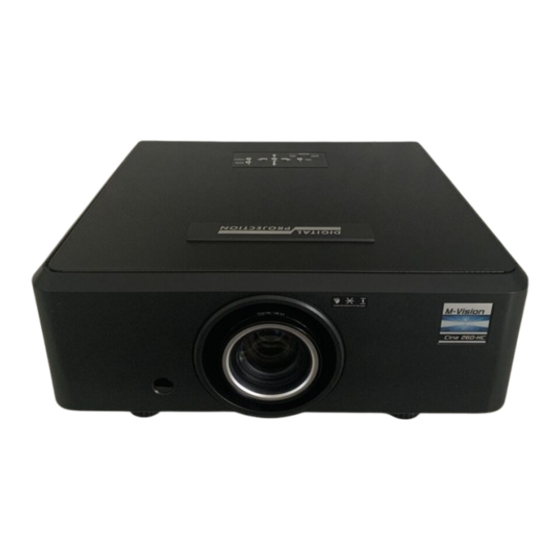
Highlite Cine 260
GETTING STARTED
Getting to know the projector
Front Infra-red
window
(remote control)
Lens
Remote
reception
angle
40°
40°
Air inlet
Projector
control
Remote
panel
control
Input
connections
connection
Rev A December 2010
Adjustable
feet
Power
Notes
For complete and detailed
information about how to use
and control the projector, see
the User Manual.
Air outlet
Rear Infra-red window
(remote control)
111-370A
Air inlet
Advertisement
Table of Contents

Related Manuals for Digital Projection Highlite Cine 260


Summary of Contents for Digital Projection Highlite Cine 260
- Page 1 Highlite Cine 260 GETTING STARTED Getting to know the projector Notes For complete and detailed information about how to use and control the projector, see the User Manual. Front Infra-red window Adjustable (remote control) feet Air inlet Lens Projector control...
- Page 2 Getting Started Digital Projection Highlite Cine 260 Positioning the screen and projector Notes • Install the screen, ensuring that it is in the best position for viewing by your audience. For more information about positioning the screen and • Mount the projector, ensuring that it is at a suitable distance from the screen for projector, see Positioning the image to fill the screen, and that it is perpendicular to the sceen.
- Page 3 Digital Projection Getting Started Highlite Cine 260 Selecting an input signal or test pattern Notes Input For more information about • Connect an video source to the projector. The signal should be automatically connecting input signals, see detected by the projector, and should be displayed within a two or three Signal Inputs, in section 2.
- Page 4 Getting Started Digital Projection Highlite Cine 260 Adjusting the projected image Notes Aspect ratio For more detailed information • Press on the remote control until the image is displayed in the corect aspect about: ratio. - using all the control keys...
Need help?
Do you have a question about the Highlite Cine 260 and is the answer not in the manual?
Questions and answers