Table of Contents
Advertisement
Available languages
Available languages
Quick Links
Advertisement
Table of Contents

Related Manuals for Gyration Cyberview3010


Summary of Contents for Gyration Cyberview3010
- Page 1 Cyberview3010 Smart Battery Camera Solar Recharging Kit User manual...
-
Page 2: Packing List
Packing list Camera: Solar panel: 1. Camera ×1 1. Solar Panel ×1 2. Bracket ×1 2. Mounting bracket ×1 3. Mounting kit ×1 3. Screws ×4 4. USB charging cable ×1 4. Wall Anchors ×3 5. Operation instruction ×1... -
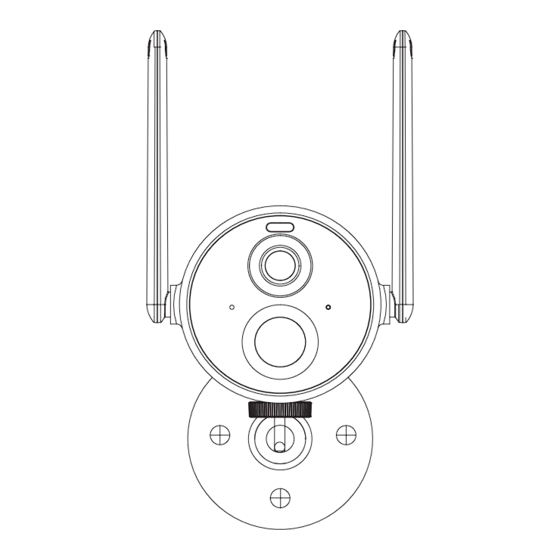
Page 3: Product Appearance
Product appearance Wi-Fi antenna Spotlight Lens Infrared light Indicator light Microphone Human body infrared sensor Solar panel Mounting bracket... - Page 4 Micro-USB Port Power button Reboot button DC-5V Micro-SD card slot...
-
Page 5: Quick Start
Quick start The wireless smart battery camera supports DC power supply. 1. Download and install the App The wireless smart battery camera supports Android and iOS App. For your best experience, please scan the QR code below with your mobile phone, install the app, and follow the instruction to complete the user registration. - Page 6 Power on/off and network configuration Long press the power button for 3s to power on/off the device. Double click the power button to enter the network configuration mode after the prompt tone. When connecting the camera for the first time, use the App and follow the instruction to configure the camera network.
- Page 7 Possible problems with binding: When you hear the "Wi-Fi Password Error", please check whether the Wi-Fi password you entered in the App is correct. When you hear the "Authentication error", please ensure that your Wi-Fi network is not an enterprise-level network, and the device supports only the network with the security level below WPA-2.
- Page 8 Bind the camera 1) Click the "Add Now" button in the app, press and hold the camera switch button for 3 seconds to turn on the camera, and the app will automatically search for devices that are on and not bound. Select the device you want to bind in the search results for the next step.
- Page 9 Please make sure that the Wi-Fi meets the requirements, click Next after completion, and the app can try to connect the camera to the Wi-Fi. 3) After a while, the camera will play a sound indicating that the connection is successful. At this point, please set a name for the camera on the app and select the location where you want to place the camera.
-
Page 10: Install The Camera
Install the camera You can place the camera on a shelf or other surfaces to use, or you can install it on a wall to use. (1) Select a good spot for your camera Select a good spot for your camera, please install the camera in a position where its view is not blocked and ensure that it is within the coverage of the WiFi network. - Page 11 (2) Install the bracket 1) Screw fixing Use the drilling tool to punch holes on the wall according to the hole distance of the base. It is recommended to mark the holes on the wall with a pencil before drilling. Screw the expansion nut into the holes on the wall, and then connect the bracket to the expansion nut with screws to complete the fixing.
- Page 12 3) Adjust the angle Adjust the camera to an appropriate angle, the best angle is about 15 degrees downward, and then tighten the base by rotating it in clockwise direction to fix the angle. About 15° downward...
-
Page 13: Install The Solar Panel
Install the solar panel When adjusting the solar panel left or right,loosen the locking screw cap,turn the sleeve rod,and tighten the locking screw cap when the panel is in position. Locking screw cap Sleeve rod Locking screw cap... - Page 14 Solar panel’s angle can be adjusted up and down up to 90°. Tip:After the installation is complete,please check that all locking mechanisms are tightly secured. ° How to position your solar panel Find the area that gets the most direct sunlight throughout the Angle the solar panel upward 30°.
- Page 15 Share the camera When you need to view the camera with other family members or friends, you can use this function. Only the administrator whose account is bound with the camera for the first time can share and set the device. Other members can only view the live or playbacks of the device.
-
Page 16: Charge The Camera
Charge the camera App will remind you to charge your camera when the battery is low. Please use the Micro USB cable to plug into the 5V/1.5A charging adapter to charge the camera. During charging, the camera's indicator light is solid yellow, and when the camera is fully charged, the indicator light will turn into solid green. -
Page 17: Indicator Light Status
Indicator light status Mode Status Working mode Blue Sleep mode Charging mode Yellow Fully charged mode Green Product specification Item Specification Field of view 95° horizontal, 55° vertical Image resolution 2304 X 1296 Video bit rate Adaptive Storage media Micro SD card (Up to 128GB) Battery capacity 9000mAh Adapter requirement... -
Page 18: Firmware Upgrade
Firmware upgrade When you connect your camera through the App, it will prompt you if the latest firmware is available. You can also manually check the firmware upgrade in the settings of the App. Please make sure that your camera is fully charged or connected to the power adapter before upgrading the firmware, please do not cut off the power supply duringthe upgrading FCC warning... - Page 19 Consult the dealer or an experienced radio/TV technician for help. To maintain compliance with FCC’ s RF Exposure guidelines, this equipment should be installed and operated with minimum distance between 20cm the radiator your body: Use only the supplied antenna. 1.
- Page 20 5. Q: How far should the camera be placed from the router? A: After testing, the Wi-Fi connection distance can normally reach up to 150 meters in the open area. However, the actual situation depends on the strength of Wi-Fi and its surrounding environment (thick walls, electromagnetic devices, large metal objects will all cause interference to the Wi-Fi signals).
- Page 21 Disclaimer and Safety Warnings Copyright Statement No part of this manual may be copied, reproduced, translated or distributed in any form by any means without prior content in writing from our company (referred to as us hereafter). The product described in this manual may contain proprietary software owned by our company and its possible licensors.
- Page 22 Power Requirements Installation and use of the device must be in strict accordance with your local electrical safety regulations. Use a UL certified power supply that meets LPS requirements if an adapter is used. Use the recommended cordset (power cord) in accordance with the specified ratings.
- Page 23 Cyberview3010 Caméra à batterie intelligente Kit de recharge Soral Manuel de l'Utilisateur...
-
Page 24: Liste De Colisage
Liste de colisage Caméra: Panneau solaire: 1. Caméra ×1 1. Panneau solaire ×1 2. Crochet ×1 2. Support de montage ×1 3. Kit de montage ×1 3. Vis ×4 4. Câble de chargement USB ×1 4. Ancrages muraux ×3 5. Instruction d’utilisation ×1... -
Page 25: Apparence Du Produit
Apparence du produit Antenne Wi-Fi Projecteur Lumière Lentille infrarouge Voyant Microphone Capteur infrarouge du corps humain Panneau solaire Support de montage... - Page 26 Micro-USB Port Bouton Bouton Redémarrer DC-5V d’alimentation Fente pour carte Micro-SD...
-
Page 27: Démarrage Rapide
Démarrage rapide La caméra à batterie intelligente sans fil prend en charge l’alimentation CC. 1. Téléchargez et installez l’application La caméra de batterie intelligente sans fil prend en charge les applications Android et iOS. Pour votre meilleure expérience, veuillez scanner le code QR ci-dessous et suivre les instructions pour terminer l’inscription de l’utilisateur. - Page 28 Allumer/éteindre et Configuration du réseau Appuyez longuement sur le bouton d’alimentation pendant 3s pour allumer / éteindre l’appareil. Double-cliquez sur le bouton d’alimentation pour entrer en mode de configuration réseau après la tonalité d’invite. Lorsque vous connectez la caméra pour la première fois, utilisez l’application et suivez les instructions pour configurer le réseau de caméras.
- Page 29 Problèmes possibles avec la liaison: Lorsque vous entendez le «Erreur de mot de passe Wi-Fi», veuillez vérifier si le mot de passe Wi-Fi que vous avez entré dans l’application est correct. Lorsque vous entendez «Erreur d’authentification», veuillez vous assurer que votre réseau Wi-Fi n’est pas un réseau de niveau entreprise et que l’appareil ne prend en charge que le réseau dont le niveau de sécurité...
- Page 30 Lier la caméra 1) Cliquez sur le bouton « Ajouter maintenant » dans l’application, appuyez et maintenez l’appareil photo enfoncé basculez pendant 3 secondes pour allumer l’appareil photo, et l’application recherchez automatiquement les appareils qui sont allumés et non liés. Sélectionnez l’icône appareil que vous souhaitez lier dans les résultats de la recherche pour l’étape suivante.
- Page 31 de l’entreprise. Veuillez vous assurer que le Wi-Fi répond aux normes , cliquez sur Suivant après l’achèvement et l’application peut essayer de connectez l’appareil photo au Wi-Fi. 3) Après un certain temps, la caméra émettra un son indiquant que le La connexion est réussie. À ce stade, veuillez définir un nom pour la caméra sur l’application et sélectionnez l’emplacement où...
-
Page 32: Installer La Caméra
Installer la caméra Vous pouvez placer la caméra sur une étagère ou d’autres surfaces à utiliser, ou vous pouvez l’installer sur un mur pour l’utiliser. (1) Sélectionnez un bon endroit pour votre appareil photo Sélectionnez un bon endroit pour votre caméra, veuillez installer la caméra dans une position où... - Page 33 (2) Installez le support 1) Fixation des vis Utilisez l’outil de perçage pour percer des trous sur le mur en fonction de la distance du trou de la base. Il est recommandé de marquer les trous sur le mur avec un crayon avant de percer. Vissez l’écrou d’expansion dans les trous du mur, puis connectez le support à...
- Page 34 3) Ajustez l’angle Ajustez la caméra à un angle approprié, le meilleur angle est d’environ 15 degrés vers le bas, puis serrez la base en la faisant pivoter dans le sens des aiguilles d’une montre pour fixer l’angle. Environ 15° vers le bas...
- Page 35 Installer le panneau solaire Lors du réglage du panneau solaire à gauche ou à droite, desserrez le bouton bouchon à vis verrouillant, tournez la tige de manchon et serrez le bouchon à vis verrouillable lorsque le panneau est en position. Bouchon à...
- Page 36 L’angle du panneau solaire peut être ajusté de haut en bas jusqu’à 90°. Conseil:Une fois l’installation terminée, veuillez vérifier que tous les mécanismes de verrouillage sont bien fixés. ° Comment positionner votre panneau solaire Trouvez la zone qui reçoit le plus de lumière directe du soleil tout au long de la journée Inclinez le panneau solaire vers le haut de 30°.
- Page 37 Partager la caméra Lorsque vous devez voir la caméra avec d’autres membres de votre famille ou des amis, vous pouvez utiliser cette fonction. Seul l’administrateur dont le compte est lié à l’appareil photo pour la première fois peut partager et configurer l’appareil. Les autres membres ne peuvent voir que les enregistrements en direct ou en lecture de l’appareil.
- Page 38 Chargez l’appareil photo L’application vous rappellera de charger votre appareil photo lorsque la batterie est faible. Veuillez utiliser le câble Micro USB pour brancher l’adaptateur de charge 5V / 1.5A afin de charger l’appareil photo. Pendant la charge, le voyant lumineux de l’appareil photo est jaune fixe, et lorsque l’appareil photo est complètement chargé, le voyant devient vert fixe.
-
Page 39: Spécifications Du Produit
État du voyant lumineux Mode Statut Mode de fonctionnement Bleu Mode veille Mode de charge Jaune Mode complètement chargé Vert Spécifications du produit Article Spécification Champ de vision 95° horizontal, 55° vertical Résolution de l’image 2304 X 1296 Débit binaire vidéo Adaptatif Supports de stockage Carte Micro SD (jusqu’à... -
Page 40: Mise À Jour Du Firmware
Mise à jour du firmware Lorsque vous connectez votre caméra via l’application, elle vous invite si le dernier firmware est disponible. Vous pouvez également vérifier manuellement le mise à niveau du micrologiciel dans les paramètres de l’application. Assurez-vous que votre appareil photo est complètement chargé ou connecté... - Page 41 Consultez le revendeur ou un technicien radio/TV expérimenté pour obtenir de l’aide. Pour maintenir la conformité avec les directives d’exposition aux RF de la FCC, cet équipement doit être installé et utilisé avec une distance minimale entre 20 cm du radiateur de votre corps: Utilisez uniquement l’antenne fournie.
- Page 42 5. Q:À quelle distance la caméra doit-elle être placée du routeur? R: Après les tests, la distance de connexion Wi-Fi peut normalement atteindre jusqu’à 150 mètres dans la zone ouverte. Cependant, la situation réelle dépend de la force du Wi-Fi et de son environne- ment (murs épais, appareils électromagnétiques, gros objets métalliques provoqueront tous des interférences aux signaux Wi-Fi).
- Page 43 Avis de non-responsabilité et avertissements de sécurité Déclaration de droit d’auteur Aucune partie de ce manuel ne peut être copiée, reproduite, traduite ou distribuée sous quelque forme que ce soit par quelque moyen que ce soit sans contenu écrit préalable de notre société (ci-après dénommée nous).
- Page 44 Exigences en matière d’alimentation Utilisation de la batterie L’installation et l’utilisation de l’appareil doivent être strictement conformes aux réglementations locales en matière de sécurité électrique. Utilisez un bloc d’alimentation certifié UL qui répond aux exigences LPS si un adaptateur est utilisé. Utilisez le cordon recommandé...
Need help?
Do you have a question about the Cyberview3010 and is the answer not in the manual?
Questions and answers