OneTouch Ultra2 - Blood Glucose Monitoring System Manual
- User manual (31 pages) ,
- Getting started manual (2 pages) ,
- Owner's booklet (74 pages)
Advertisement
- 1 Getting to know your system
- 2 Setting up your device
- 3 Testing your blood glucose
- 4 Attaching flags or comments to your results
- 5 Reviewing past results and averages
- 6 Control solution testing
- 7 Caring for your system
- 8 Troubleshooting
- 9 Detailed information about your system
- 10 Documents / Resources
Getting to know your system
INCLUDED WITH YOUR KIT


Ask for control solution where you obtain your test strips.
- OneTouch Ultra 2 Meter (batteries included)
- Lancing Device If another type of lancing device was included, see the separate instructions that came with that lancing device.
- Sterile Lancet
- Carrying Case
If any of these items are missing from your kit, contact LifeScan Customer Service at 1 800 227-8862 (7 days a week, 8 a.m. - 8 p.m. Eastern Time).
AVAILABLE SEPARATELY:
- OneTouch Ultra Test Strips
- OneTouch Ultra Control Solution

Keep the meter and testing supplies away from young children. Small items such as the battery door, batteries, test strips, lancets, protective covers on the lancets, and control solution vial cap are choking hazards.
DEVICE

OK button
 Turns the meter on/off
 Turns the backlight on/off
 Confirms menu selections
TEST STRIP

Turning your device on
To perform a test, insert a test strip as far as it will go. The meter will briefly perform system checks, then the display will turn on.
or,
With the meter turned off, press and hold for two seconds to access MAIN MENU. Check that the screen shows solid black for two seconds. If it does, the display is working properly. If the meter does not power on, try changing the meter battery.

If you see any light areas within the black start-up screen, there may be a problem with the meter. Contact LifeScan Customer
Service at 1 800 227-8862 (7 days a week, 8 a.m. - 8 p.m. Eastern Time).
Using the device display backlight
When the meter is already on, press and hold for two seconds to turn the backlight on or off.
Turning your unit off
There are several ways to turn your meter off:
- Press and hold
![]() for five seconds.
for five seconds. - Your meter will turn off by itself if left alone for two minutes.
- Go to MAIN MENU and press or to highlight METER OFF, then press
![]() .
. - Before
![]() or
or ![]() after completing a test, remove the test strip. If you advance from the test result screen to the MAIN MENU by pressing
after completing a test, remove the test strip. If you advance from the test result screen to the MAIN MENU by pressing ![]() , removing the test strip will not turn the meter off. Use one of the three methods above.
, removing the test strip will not turn the meter off. Use one of the three methods above.
Setting up your device
Setting the unit language, date and time
You can change many of the settings that came pre-set with your meter. Before using your meter for the first time or if you change the meter battery, you should check and update these settings. Make sure you complete steps 1 through 8 below to ensure your desired settings are saved.
- Turn the meter on
With the meter turned off, press and hold![]() for two seconds to access MAIN MENU.
for two seconds to access MAIN MENU.
![]()
- Get to the LANGUAGE screen
When using the meter for the first time, or after changing the meter battery, you will automatically start in the LANGUAGE screen.
In other cases, from the MAIN MENU, press![]() or
or ![]() to select SET UP and press
to select SET UP and press ![]() .
.
Then, press![]() or
or ![]() to select METER SETTINGS and press
to select METER SETTINGS and press ![]() .
.
![]()
- Choose a language
Now press![]() or
or ![]() to highlight the language of your choice and press
to highlight the language of your choice and press ![]() .
.
NOTE: If you select the wrong language, press![]() and hold for five seconds to turn the meter off. Then, turn the meter back on and re-start from step 1.
and hold for five seconds to turn the meter off. Then, turn the meter back on and re-start from step 1.
![]()
- Set the date format
Press![]() or
or ![]() to highlight the date format—choose month first (MM-DD-YYYY) or day first (DD-MM-YYYY). To confirm your selection, press
to highlight the date format—choose month first (MM-DD-YYYY) or day first (DD-MM-YYYY). To confirm your selection, press ![]() .
.
![]()
- Set the date
In the DATE SET UP screen, press or to change the first value and press![]() .
.
Press![]() or
or ![]() to change the second value and press
to change the second value and press ![]() .
.
Press![]() or
or ![]() to change the year and press
to change the year and press ![]() .
.
![]()
- Set the time format
Press![]() or
or ![]() to select the time format you prefer—AM/PM or 24 HR, and press
to select the time format you prefer—AM/PM or 24 HR, and press ![]() .
.
![]()
- Set the time
Press![]() or
or ![]() to set the hour and press
to set the hour and press ![]() . Press
. Press ![]() or
or ![]() to set the minutes and press
to set the minutes and press ![]() . If you selected the AM/PM time format, press
. If you selected the AM/PM time format, press ![]() or
or ![]() to select AM or PM. To confirm your selection, press
to select AM or PM. To confirm your selection, press ![]() .
.
![]()
- Confirm your settings
The choice YES will be highlighted at the bottom of the screen. If your settings are correct, press![]() to confirm and save the settings and return to the MAIN MENU.
to confirm and save the settings and return to the MAIN MENU.
![]()
![]()
The unit of measure mg/dL must be displayed here. If your display shows mmol/L rather than mg/dL, contact LifeScan Customer Service at 1 800 227-8862 (7 days a week, 8 a.m. - 8 p.m. Eastern Time).
You cannot change the unit of measure. Use of the wrong unit of measure may cause you to misinterpret your blood glucose level, and may lead to incorrect treatment.


If you want to cancel your settings and start the settings process over again, press  or
or  to highlight NO and press . You will be returned to the LANGUAGE screen. Note that none of the settings you entered will be saved.
Turning the flags/comments feature off or on
Your OneTouch Ultra 2 Meter allows you to attach optional notes to any blood glucose test result. See Attaching flags or comments to your resultsfor the types of meal flags and comments you can attach to a result, and the reasons for using this feature.
If you do not wish to track separate result averages for before and after meals, nor attach comments to any test result, you may turn this feature off. If you turn off the flags/comments feature, you will not see  on the test result screen after you complete a blood glucose test. You will be able to review the ALL RESULTS AVG screen, but not before - or after-meal averages. See Reviewing past results and averages, for more information about result averages.
To turn the flags/comments feature off or on:
- From MAIN MENU, press
![]() or
or ![]() to select SET UP and press
to select SET UP and press ![]()
- From the SET UP screen, select FLAGS/COMMENTS and press
![]()
![]()
- Press
![]() or
or ![]() to highlight your response
to highlight your response
Select YES if you wish to change the setting, or NO if you wish to leave it as it is.
Press![]() to confirm your selection and return to MAIN MENU.
to confirm your selection and return to MAIN MENU.
![]()


Coding your device
- Check the code on the test strip vial before inserting the test strip
Code numbers are used to calibrate your meter with the test strips you are using.
![]()
- Insert a test strip to turn on the meter
Remove a test strip from its vial. With clean, dry hands, you may touch the test strip anywhere on its surface. Do Not bend, cut or modify the test strips in any way. Use each test strip immediately after removing it from the vial. Insert the test strip into the test port as shown, with the three contact bars facing you. Push the test strip in as far as it will go.
![]()
After the black start-up screen appears, the meter will display the code from your last test. If a flashing "– –" appears instead of a code number, such as when you are first using the meter, follow the instructions in step 3 to change to a numerical code.
![]()
- Match the code on the meter with the code on the test strip vial
If the code on the meter does not match the code on the test strip vial, press![]() or
or ![]() to match the code number on the test strip vial. The new code number will flash on the display for three seconds, then briefly stop flashing, after which the display will advance to the APPLY BLOOD screen.
to match the code number on the test strip vial. The new code number will flash on the display for three seconds, then briefly stop flashing, after which the display will advance to the APPLY BLOOD screen.
![]()
If the codes already match, press![]() to go to the APPLY BLOOD screen. When you do not make a change after five seconds, the display will advance to the APPLY BLOOD screen. The meter is now ready to perform a blood glucose test.
to go to the APPLY BLOOD screen. When you do not make a change after five seconds, the display will advance to the APPLY BLOOD screen. The meter is now ready to perform a blood glucose test.
![]()


NOTE:
- If the APPLY BLOOD screen appears before you are sure the codes match, remove the test strip, and re-start from step 1.
- If you change APPLY BLOOD to APPLY CONTROL by mistake, press
![]() to change it back to APPLY BLOOD.
to change it back to APPLY BLOOD.
Matching the code on the meter and the code on the test strip vial is essential to obtaining accurate results. Each time you test, check to make sure the code numbers match.
Testing your blood glucose
Testing with a fingertip sample
Preparing for a test
Have these things ready when you test:
OneTouch Ultra 2 Meter
OneTouch Ultra Test Strips
Lancing device
Sterile lancets
NOTE:
- Use only OneTouch ® Ultra ® Test Strips.
- Make sure your meter and test strips are about the same temperature before you test.
- Testing must be done within the operating temperature range (43–111°F). For the most accurate results, try to test as close to room temperature (68–77°F) as you can (see Detailed information about your system).
- Tightly close the cap on the vial immediately after use to avoid contamination and damage.
- Store unused test strips only in their original vial.
- Do Not open the test strip vial until you are ready to remove a test strip and perform a test. Use the test strip immediately after removing it from the vial.
- Do Not return the used test strip to the vial after performing a test.
- Do Not re-use a test strip that had blood or control solution applied to it. Test strips are for single use only.
- Write the discard date (6 months after first opening the vial) on the vial label when you first open it.
- Do Not use your test strips if your vial is damaged or left open to air. This could lead to error messages or inaccurate results. Contact LifeScan Customer Service at 1 800 227-8862 (7 days a week, 8 a.m. - 8 p.m. Eastern Time) immediately if the test strip vial is damaged.
- If you cannot test due to a problem with your testing supplies, contact your health care professional. Failure to test could delay treatment decisions and lead to a serious medical condition.
- The test strip vial contains drying agents that are harmful if inhaled or swallowed and may cause skin or eye irritation.
- Do Not use test strips after the expiration date (printed on the vial) or the discard date, whichever comes first, or your results may be inaccurate.
Getting to know your Lancing Device

- Release button
- Slider control
- Depth indicator
- Depth wheel
- Lancing device cap
- Protective cover
The OneTouch Delica Plus Lancing Device uses OneTouch Delica or OneTouch Delica Plus Lancets.
- If another type of lancing device was included, see the separate instructions for that lancing device.
- The OneTouch Delica Plus Lancing System does not include the materials needed to perform Alternate Site Testing (AST). The OneTouch Delica Plus Lancing System should not be used on the forearm or palm with the OneTouch Ultra 2 Blood Glucose Monitoring System.
To reduce the chance of infection:
- Make sure to wash the sample site with soap and warm water, rinse and dry before sampling. Contaminants on the skin may affect results.
- Never share a lancet or a lancing device with anyone.
- Always use a new, sterile lancet each time you test – lancets are for single use only.
- Always keep your meter and lancing device clean (see Caring for your system).
- Do Not use lancets after the expiration date printed on the lancet packaging.
Getting a blood sample from the fingertip
Before testing, wash your hands thoroughly with warm, soapy water. Rinse and dry.
- Remove the lancing device cap
Remove the cap by rotating it and then pulling it straight off the device.

- Insert a sterile lancet into the lancing device
Align the lancet as shown here, so that the lancet fits into the lancet holder. Push the lancet into the device until it snaps into place and is fully seated in the holder.
![]()


Twist the protective cover one full turn until it separates from the lancet. Save the protective cover for lancet removal and disposal. See Removing the used lancet.

- Replace the lancing device cap
Place the cap back onto the device; turn the cap or push the cap straight on to secure it.
Ensure the cap is aligned as shown in the image.

- Adjust the depth setting
The device has 13 puncture depth settings (each dot shown between numbers 1 to 7 on the Depth Wheel indicates an additional available depth setting). Adjust the depth by turning the depth wheel. Smaller numbers are for a shallower puncture and larger numbers for a deeper puncture.
![]()
NOTE: Try a shallower setting first and increase the depth until you find the one deep enough to get a blood sample of the proper size. - Cock the lancing device
Pull the slider back until it clicks. If it does not click, it may already have been cocked when you inserted the lancet.
![]()
- Insert a test strip to turn the meter on
Insert a test strip into the test strip port as shown, with the three contact bars facing you.
If the code on the meter does not match the code on the test strip vial, see Coding your meter.
![]()
When the APPLY BLOOD screen appears on the display, you can apply your blood sample.
![]()
- Puncture your finger
Hold the lancing device firmly against the side of your finger. Press the release button.
Remove the lancing device from your finger.
![]()
- Get a round drop of blood
Gently squeeze and/or massage your fingertip until a round drop of blood forms.
NOTE: If the blood smears or runs, Do Not use that sample. Dry the area and gently squeeze another drop of blood or puncture a new site.
![]()


Applying blood and reading results
Once you have a blood sample and your meter shows the APPLY BLOOD screen, you are ready to obtain a blood glucose result. If your meter does not show the APPLY BLOOD screen, remove the unused test strip and re-start the test process.
See Getting a blood sample from the fingertip.
- Prepare to apply the sample
Keeping your finger extended and steady, move the meter and test strip toward the blood drop.
![]()
Do Not apply blood on the top of the test strip.
![]()
Do Not hold the meter and test strip underneath the blood drop. This may cause blood to run into the test port and damage the meter.
![]()
- Apply the sample
Line up the test strip with the blood drop so that the narrow channel on the edge of the test strip is almost touching the edge of the blood drop.
![]()
Gently touch the channel to the edge of the blood drop.
Be careful not to push the test strip against your fingertip or the test strip may not fill completely.
![]()


- Do Not smear or scrape the drop of blood with the test strip.
![]()
- Do Not apply more blood to the test strip after you have moved the drop of blood away.
- Do Not move the test strip in the meter during a test.

You may get an ERROR 5 message or an inaccurate result if the blood sample does not fill the confirmation window completely. See Troubleshooting. Discard the test strip and re-start the test process.
- Wait for the confirmation window to fill completely
The blood drop will be drawn into the narrow channel and the confirmation window should fill completely.
![]()
When the confirmation window is full, this means you have applied enough blood. Now you can move the test strip away from the blood drop and wait for the meter to count down from 5 to 1.
![]()
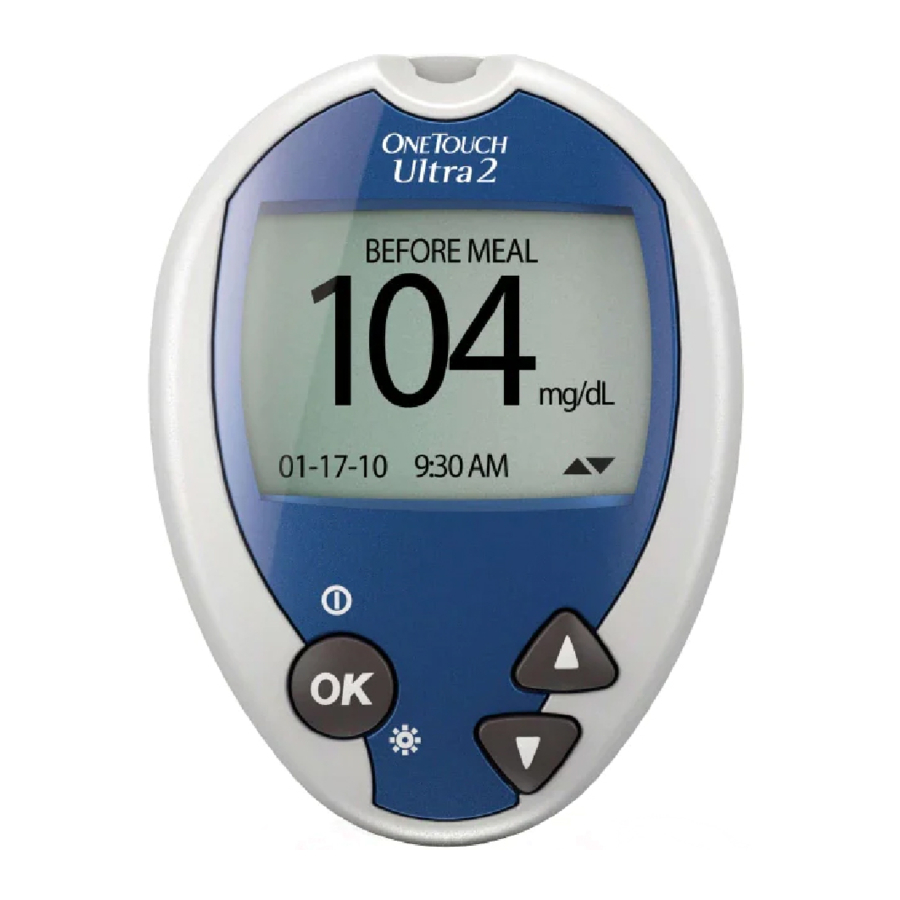
- Read your result on the meter
Your blood glucose level appears on the display, along with the unit of measure, and the date and time of the test. Blood glucose results are automatically stored in the meter's memory.
![]()


If mg/dL does not appear with the test result, contact LifeScan Customer Service at 1 800 227-8862 (7 days a week, 8 a.m. - 8 p.m. Eastern Time).
Use of the wrong unit of measure may cause you to misinterpret your blood glucose level, and may lead to incorrect treatment.
If you test at the low end of the operating range (43°F) and your glucose is high (over 180 mg/dL), the reading on your meter may be lower than your actual glucose. In this situation, repeat the test in a warmer environment with a new test strip as soon as possible.
Error messages
If you get an ERROR message on your screen rather than a result, see Troubleshooting.
After getting a result
Once you have read your result, you may:
- Attach notes to this result if the flags/comments feature is on, see Attaching flags or comments to your results, or
- Review your meter memory by pressing
![]() to go to MAIN MENU, see Reviewing past results and averages, or
to go to MAIN MENU, see Reviewing past results and averages, or - Turn the meter off by removing the test strip.
Removing the used lancet
NOTE: This lancing device has an ejection feature, so you do not have to pull out the used lancet.
- Remove the lancing device cap
Remove the cap by rotating it and then pulling it straight off the device.
![]()
- Cover the exposed lancet tip
Before removing the lancet, place the lancet protective cover on a hard surface thenpush the lancet tip into the flat side of the disk.

- Eject the lancet
Holding the lancing device directed downwards, push the slider forward until the lancet comes out of the lancing device. If the lancet fails to eject properly, cock the device then push the slider control forward until the lancet comes out.
![]()
- Replace the lancing device cap
Place the cap back onto the device; turn the cap or push the cap straight in to secure it.
Ensure the cap is aligned as shown in the image.

It is important to use a new lancet each time you obtain a blood sample. Do Not leave a lancet in the lancing device. This will help prevent infection and sore fingertips.


Disposing of the used lancet and test strip
It is important to discard the used lancet carefully after each use to avoid unintended lancet stick injuries.
Used test strips and lancets may be considered biohazardous waste in your area. Be sure to follow your health care professional's recommendations or local regulations for proper disposal.
Interpreting unexpected test results
Refer to the following cautions whenever your test results are lower or higher than what you expect.
Low glucose results
- If your test result is lower than 70 mg/dL or is shown as LOW GLUCOSE, it may mean hypoglycemia (low blood glucose). Treat this condition immediately, according to your health care professional's recommendations. Although this result could be due to a test error, it is safer to treat first, then do another test.
- If you test at the low end of the operating range (43°F) and your blood glucose is high, you may get an inaccurate low result. Re-test in a warmer environment with a new test strip.
Dehydration and low glucose results
- You may get false low glucose results if you are severely dehydrated. If you think you are severely dehydrated, contact your health care professional immediately.
High glucose results
- If your test result is higher than 180 mg/dL, it may mean hyperglycemia (high blood glucose) and you should consider re-testing. Talk to your health care professional if you are concerned about hyperglycemia.
- HIGH GLUCOSE is displayed when your blood glucose level is higher than 600 mg/dL. You may have severe hyperglycemia (very high blood glucose). Re-test your blood glucose. If the result is HIGH GLUCOSE again, this indicates a severe problem with your blood glucose control. Obtain and follow instructions from your health care professional immediately.
Repeated unexpected glucose results
- If you continue to get unexpected results, check your system with control solution. See Control solution testing.
- If you are experiencing symptoms that are not consistent with your blood glucose results and you have followed all instructions in this User Guide, call your health care professional. Never ignore symptoms or make significant changes to your diabetes control program without speaking to your health care professional.
Unusual red blood cell count
- A hematocrit (percentage of your blood that is red blood cells) that is either very high (above 55%) or very low (below 30%) can cause false results.
Attaching flags or comments to your results
Your OneTouch Ultra 2 Meter allows you to attach optional notes to any blood glucose test result. There are two kinds of notes and different reasons to apply them.
| Note type | Recommendation | Benefit |
| Meal Flag | Add a meal flag to every blood glucose result. | Allows you to link the effects of food to your blood glucose result. Provides you with separate averages for before-meal and after-meal tests. |
| Comment | Select an appropriate comment whenever you test under conditions that you or your health care professional feel are worth noting. | Helps track possible reasons for test results. |
We suggest you talk to your health care professional to see how meal flags and comments may help you manage your diabetes.
You can attach these notes just after a blood glucose test before you remove your used test strip from your meter. You can also modify notes when reviewing a past result.
You will not be able to add a meal flag or comment to a result marked as a control solution test.
You can choose not to attach a meal flag or comment after a blood glucose test. If you do not want to use this feature at all, you can turn it off so the meter will not prompt you to add notes or to select a type of result average to review. See Turning the flags/comments feature off for instructions.
Add or change a meal flag
If the flags/comments feature is turned on, the up arrow at the bottom right corner of the result screen will flash when a result is first displayed to remind you to enter a meal flag. To add or change a meal flag:
- While viewing a result, press
![]() to display the MEAL FLAG screen
to display the MEAL FLAG screen - Press
![]() or
or ![]() to highlight BEFORE MEAL or AFTER MEAL
to highlight BEFORE MEAL or AFTER MEAL
If you decide not to assign a flag to this result, select NO FLAG.
![]()
- To confirm your selection, press
![]()
The meal flag you chose will appear above the result on the result screen.
![]()
NOTE: Testing after a meal can show how the food you ate affects your blood glucose. These results can be flagged as AFTER MEAL and are usually obtained two hours after the start of the meal. Your health care professional may suggest another time period or other use for this feature.


Add or change a comment
The down arrow at the bottom right corner of the result screen will flash after you enter a meal flag for a new result to remind you to consider entering a comment. To add or change a comment:
- While viewing a result, press
![]() to display the COMMENT screen
to display the COMMENT screen - Press
![]() or
or ![]() to highlight an appropriate comment
to highlight an appropriate comment
![]()
The available choices are:

| NO COMMENT | STRESS |
| NOT ENOUGH FOOD | ILLNESS |
| TOO MUCH FOOD | FEEL HYPO |
| MILD EXERCISE | MENSES (period) |
| HARD EXERCISE | VACATION |
| MEDICATION | OTHER |
Highlight NO COMMENT if you decide not to add a comment, or if you want to erase a previously entered comment from the result.
Use OTHER when the available choices do not apply. You may want to write down what OTHER means to you so you can discuss it with your health care professional.
- To confirm your selection, press
![]()
The comment you chose will appear below the result.
![]()

Reviewing past results and averages
If you have just completed a test, press to get to the MAIN MENU screen. If your meter is off, press and hold to turn it on. From the MAIN MENU screen you can choose:
- LAST RESULT to view your most recent result,
- ALL RESULTS to review up to 500 of your most recent results four at a time, or
- RESULT AVG to select one of three types of result averages.

Press or to highlight LAST RESULT, ALL RESULTS, or RESULT AVG and press .
Last result
The meter will display your most recent result. Press to return to MAIN MENU. If you wish to add or change a meal flag or comment for this result, see Attaching flags or comments to your results.

All results
The meter will display four results at a time, in the order the tests were done, starting with the most recent. For each test result, the meter will display the date and time of the test. Results may also contain the following symbols:

| HI | if the result was above 600 mg/dL, |
| LO | if the result was below 20 mg/dL, |
| * | if a comment has been chosen for the result, |
| C | if the result is from a control solution test, |
| – | if the result is flagged BEFORE MEAL, and |
| + | if the result is flagged AFTER MEAL. |
The meter stores a maximum of 500 blood glucose or control solution test results. When the memory is full, the oldest result is dropped as the newest is added.
To view details of an individual result, press or to highlight the result you want, then press . If you wish to add or change a meal flag or comment for this result, see Attaching flags or comments to your results. To return to the list of all results from an individual result, press .
To view more recent results, continue to press after the top result on the display is highlighted. If you press when the most recent result is highlighted, you will see the oldest stored results.
To view older results, press after MENU is highlighted. Pressing and holding or allows you to move more quickly through the results. To return to the main menu, highlight MENU, then press .
Averages
If the flags/comments feature is on, the meter will display the three types of averages you can access:
- the average of all test results,
- the average of before-meal results, and
- the average of after-meal results.
To select the type of result average you want to see, press or to highlight your choice, then press .

If you have turned the flags/comments feature off, selecting RESULT AVG from the MAIN MENU will lead directly to the ALL RESULTS AVG screen.
The meter will display each of your 7-, 14-, and 30-day averages. The top of the display shows which type of average you are looking at. For each of the 7-, 14-, and 30-day periods leading up to the current date, the meter will display the number of results obtained (NUM) and the average of those results (AVG).
In result averages, a HIGH GLUCOSE result is counted as 600 mg/dL, and a LOW GLUCOSE result as 20 mg/dL. Control solution results are not part of your averages. From any screen showing averages, press to go back to the previous screen.
To return to the main menu from the RESULT AVG screen, press until MENU is highlighted, then press.
NOTE:
- Result averages provide information from past results. Do Not use result averages to make immediate treatment decisions.
- If you change your date setting, your averages may change too. The meter calculates averages based on the 7-, 14-, and 30-day periods ending on the current date setting.
- If you do not have results in the past 7-, 14-, and 30-day periods, the NUM and AVG columns will show 0. Also, if you do not use the meal flag feature, then the NUM and AVG columns will show 0 on the BEFORE MEAL and AFTER MEAL average screens.
To see averages for different parts of the day or over a different number of days, you can use diabetes management software and your home computer. See Downloading results to a computer in this Section.
Downloading results to a computer
Your meter can work with diabetes management software, which provides a visual way to track key factors that affect your blood sugar.
- Obtain the required software and cable
For order information and to learn more about diabetes management tools available to you, contact LifeScan Customer Service at 1 800 227-8862 (7 days a week, 8 a.m. - 8 p.m. Eastern Time). - Install the software on a computer
Follow the installation instructions provided with the Software. If using a OneTouch ® Interface Cable (USB format), install the software driver.
![]()
To avoid a possible shock, Do Not insert a test strip when the meter is connected to a computer with the OneTouch Interface Cable. - Get ready to transfer readings
Connect the OneTouch Interface Cable to the COM or USB port on your computer.
Make sure the meter is turned off. If you insert the cable while the meter is already on, the meter will not respond to computer commands. Then connect the other end of the OneTouch Interface Cable to the meter data port.

- Transfer data
Follow the instructions provided with the diabetes management software product to download the results from the meter.
Once the command to start the download is sent from the computer to the meter, the meter display will show "PC" indicating that the meter is in communication mode. You will not be able to perform a test when the meter is in communication mode.


Control solution testing
When to test with control solution
OneTouch Ultra Control Solution contains a known amount of glucose and is used to check that the meter and the test strips are working properly.
- Do a control solution test:
- whenever you open a new vial of test strips.
- if you suspect the meter and test strips are not working properly.
- if you have had repeated unexpected blood glucose results.
- if you drop or damage the meter.
NOTE:
- Use only OneTouch ® Ultra ® Control Solution with your OneTouch Ultra 2 Meter.
- Control solution tests must be done at room temperature (68–77°F). Make sure your meter, test strips, and control solution are at room temperature before testing.
- Write the discard date (3 months after first opening the vial) on the vial label when you first open it.
Do Not swallow control solution; it is not for human consumption. Do Not apply control solution to the skin or eyes as it may cause irritation.
How to test with control solution
Start with the meter off. If you have turned the meter on to change settings or review past results, turn it off.
- Check the code on the test strip vial before inserting the test strip
![]()
- Insert a test strip to turn on the meter
Make sure the three contact bars are facing you. Push the test strip in as far as it will go. Do Not bend the test strip.
![]()
- Match the code on the meter with the code on the test strip vial
If the code on the meter does not match the code on the test strip vial, press![]() or
or ![]() to match the code number on the test strip vial. The new code number will flash on the display for three seconds, then briefly stop flashing, after which the display will advance to the APPLY BLOOD screen.
to match the code number on the test strip vial. The new code number will flash on the display for three seconds, then briefly stop flashing, after which the display will advance to the APPLY BLOOD screen.
If the codes already match, press![]() to go to the APPLY BLOOD screen. When you do not make a change after five seconds, the display will advance to the APPLY BLOOD screen.
to go to the APPLY BLOOD screen. When you do not make a change after five seconds, the display will advance to the APPLY BLOOD screen.
![]()
- Mark the test as a control solution test
Press![]() to change APPLY BLOOD to APPLY CONTROL. You must mark the test before you apply control solution. Once you have completed the test, you cannot change the marking.
to change APPLY BLOOD to APPLY CONTROL. You must mark the test before you apply control solution. Once you have completed the test, you cannot change the marking.
The meter is now ready to perform a control solution test.
![]()
- Prepare and apply control solution
Shake the control solution vial before each test. Remove the cap and squeeze the vial to discard the first drop. Then wipe the tip with a clean tissue or cloth. Hold the vial upside down and gently squeeze a hanging drop.
![]()
Touch and hold the hanging drop of control solution where the narrow channel meets the TOP EDGE of the test strip. Make sure the confirmation window fills completely. Control solution should not be applied to the flat face of the test strip.

- Read your result
When the confirmation window is full, the meter will count down from 5 to 1.
Your control solution result will then appear on the display, along with the date, time, unit of measure, and the words CONTROL SOLUTION. The control solution results can be viewed in the list of past results, but are not counted in your result averages.
![]()
- Check if the result is in range
Compare the result displayed on the meter to the control solution range printed on the test strip vial. Each vial of test strips may have a different control solution range. If the results you get are not within this range, the meter and test strips may not be working properly. Repeat the control solution test.
![]()


Out-of-range results may be due to:
- not following the instructions detailed in steps 1–7,
- expired or contaminated control solution,
- expired or damaged test strip,
- use of a test strip or control solution past its discard date, or
- a problem with the meter.
The control solution range printed on the test strip vial is for OneTouch Ultra Control Solution only. It is not a recommended range for your blood glucose level.
If you continue to get control solution test results that fall outside the range printed on the test strip vial, Do Not use the meter, the test strips, or the control solution. Contact LifeScan Customer Service at 1 800 227-8862 (7 days a week, 8 a.m. - 8 p.m. Eastern Time).
Caring for your system
Replacing the batteries
Your OneTouch Ultra 2 Meter uses two 3.0 Volt CR 2032 lithium batteries (or equivalent). Replacement batteries can be found in most stores where batteries are sold. Your meter comes with two batteries already installed– one that powers the meter only and one that powers the backlight.

Low meter battery
The meter shows a battery icon (  ) in the upper right corner of the display or a low battery message to indicate the condition of the meter battery only. When the battery icon first appears, there is enough power for a minimum of 100 more tests. You should replace the meter battery as soon as possible.
When your meter displays the LOW BATTERY screen message, there is not enough battery power remaining to perform a test. You must install a new battery before using your meter.

Low backlight battery
Replace the backlight battery when you can no longer see the backlight coming on. There will not be any icon on the meter display to indicate a low backlight battery. Note that the meter will provide accurate blood glucose results even when the backlight battery needs to be replaced.
Replacing the batteries
- Remove the old battery
Start with the meter off. Open the battery door and pull up on the battery ribbon. The white ribbon is for the meter battery, and the black ribbon is for the backlight battery.
![]()
![]()
CHEMICAL BURN HAZARD. DO NOT INGEST BATTERY. This product contains a coin/button cell battery. If swallowed, it can quickly cause severe internal burns and can lead to death. Keep new and used batteries away from children. If you think batteries might have been swallowed, seek immediate medical attention.
![]()
To avoid a possible shock, Do Not change either battery while the meter is connected to a computer with the OneTouch ® Interface Cable. - Insert the new battery
With the "+" side facing up toward you, place the battery in the compartment within the fold of the ribbon. Push the battery until it snaps into the battery clasp. Insert the two battery door tabs into the matching holes on the meter, and push down until you hear the door click into place.
If the meter does not power on after you have replaced the meter battery, check that the battery is correctly installed with the "+" side up. If the meter still does not power on, contact LifeScan Customer Service at 1 800 227-8862 (7 days a week, 8 a.m. - 8 p.m. Eastern Time).
![]()
- Check your meter settings
Removing the meter battery will not affect your stored results. However, you may need to re-set your meter settings. See Setting the meter language, date and time. - Dispose of batteries
This product contains a lithium ion battery, which contains perchlorate materials—special handling may apply. Dispose of batteries according to your local environmental regulations.


Caring for your system
Your OneTouch ® Ultra ® 2 Blood Glucose Monitoring System does not need any special maintenance.
Storing your system
Store your meter, test strips, control solution and other items in your carrying case after each use. Store each item in a cool, dry place below 86°F, but Do Not refrigerate. Keep all items away from direct sunlight and heat.
Tightly close the cap on the test strip vial and/or control solution vial immediately after use to avoid contamination or damage. Store test strips only in their original vial.
Checking for expiration or damage to test strips and control solution
Expiration dates for test strips and control solutions are printed on their vial labels. When you first open a new vial of test strips or control solution, record the discard date on the label. Refer to the test strip or control solution vial for instructions on determining the discard date.
Do Not use the test strips or control solution after the expiration date printed on the vial or the discard date, whichever comes first, or your results may be inaccurate.
Cleaning your meter
To clean your meter, wipe the outside with a soft cloth dampened with water and mild detergent. Do Not use alcohol or another solvent to clean your meter.
Do Not get any liquids, dirt, dust, blood, or control solution inside the meter through the test port or the data port. Never spray cleaning solution on the meter or immerse it in any liquid.
Cleaning your lancing device and clear cap
To clean these items, wipe them with a soft cloth dampened with water and mild detergent. Do Not immerse the lancing device in any liquid.
To disinfect these items, prepare a solution of one part household bleach to nine parts water. Wipe the lancing device with a soft cloth dampened with this solution. Immerse the caps only in this solution for 30 minutes. After disinfecting, rinse briefly with water and allow both to air dry.*
*Follow manufacturer's instruction for handling and storage of bleach.
Troubleshooting
The OneTouch Ultra 2 Meter displays messages when there are problems with the test strip, with the meter, or when your blood glucose levels are higher than 600 mg/dL or lower than 20 mg/dL. Messages do not appear in all cases when a problem has occurred. Improper use may cause an inaccurate result without producing an error message.
- In this Section, screens that display "SEE OWNER'S BOOKLET" mean you should refer to this User Guide.
| Message | What it means | What to do |
 | You may have a very low blood glucose level (severe hypoglycemia), lower than 20 mg/dL. | This may require immediate treatment according to your health care professional's recommendations. Although this message could be due to a test error, it is safer to treat first and then do another test. |
 | You may have a very high blood glucose level (severe hyperglycemia), over 600 mg/dL. | Re-check your glucose level. If the result is HIGH GLUCOSE again, obtain and follow instructions from your health care professional without delay. |
 | Meter is too hot (above 111°F) or too cold (below 43°F) to work correctly. | Wait a few minutes and insert a new test strip. If you do not get another TEMPERATURE ERROR message, the meter is now within the operating range. |
 | There is a problem with the meter. | Do Not use the meter. |
 | Error message could be caused either by a used test strip or a problem with the meter. | Repeat the test with a new test strip; see Testing your blood glucose. |
 | The sample was applied before the meter was ready. | Repeat the test with a new test strip. Apply a blood or control solution sample only after APPLY BLOOD or APPLY CONTROL appears on the display. |
 | One of the following may apply: You may have high glucose and have tested in an environment near the low end of the system's operating temperature range (43–111°F). or, | If you tested in a cool environment, repeat the test in a warmer environment with a new test strip; see Testing your blood glucose. |
| There may be a problem with the test strip. For example, it may have been damaged or moved during testing. or, | If you tested in a normal or warm environment, repeat the test with a new test strip; see Testing your blood glucose. | |
| The sample was improperly applied. or, | If you applied the sample incorrectly, review pages on blood application (see Testing your blood glucose) or control solution testing (see Control solution testing) and repeat the test with a new test strip. | |
| There may be a problem with the meter. | ||
 | The meter has detected a problem with the test strip. Possible causes are test strip damage or an incompletely filled confirmation window. | Repeat the test with a new test strip. Refer to information on blood application (see Testing your blood glucose) or control solution testing (see Control solution testing). |
 | Meter battery is low but still has enough power to perform a test. | When the battery icon first appears, there is enough power for a minimum of 100 more tests. Test results will still be accurate, but replace the battery as soon as possible. |
 | Meter battery does not have enough power to perform a test. | Replace meter battery. |
 | No result in memory, such as the first time use of the meter or, your meter was unable to recall this result. This result will not be included in result averages. | You can still perform a blood glucose test and get an accurate result. Contact LifeScan Customer Service at 1 800 227-8862 (7 days a week, 8 a.m. - 8 p.m. Eastern Time) to report this occurrence, unless this is your first use of the meter. |
 | Your meter was unable to recall this result. This result will not be included in result averages. | You can still perform a blood glucose test and get an accurate result, but contact LifeScan Customer Service at 1 800 227-8862 (7 days a week, 8 a.m. - 8 p.m. Eastern Time) to report this occurrence. |
Detailed information about your system
Comparing the device and laboratory results
Test results with the OneTouch Ultra 2 Meter are plasma-calibrated. This helps you and your health care professional to compare your meter results with laboratory tests. If you have been using another type of meter—one that provides whole blood-calibrated results—you may notice that your test results with the OneTouch Ultra 2 Meter are approximately 12% higher.
OneTouch Ultra 2 Meter test results and laboratory test results both are expressed in plasma-equivalent units. However, your meter result may differ from your laboratory result due to normal variation. Meter results can be affected by factors and conditions that do not affect laboratory results in the same way.
Your OneTouch Ultra 2 Meter glucose value is considered accurate when it is within ±20% of the laboratory measurement. There are some specific situations that could cause a difference of more than ±20%:
- You have eaten recently. The blood glucose level from blood obtained from a fingertip can be up to 70 mg/dL higher than blood drawn from a vein (venous sample) used for a lab test.1
- Your hematocrit (percentage of your blood that is red blood cells) is high (above 55%) or low (below 30%).
- You are severely dehydrated.
- You tested at a temperature near the low end of the operating range (43°F) and you get a high glucose result (i.e., greater than 180 mg/dL). In this situation, repeat the test in a warmer environment with a new test strip as soon as possible.
For accuracy and precision data and for important information on limitations, see the insert that comes with your test strips.
- Sacks, D.B.: "Carbohydrates." Burtis, C.A., and Ashwood, E.R. (ed.), Tietz Textbook of Clinical Chemistry. Philadelphia: W.B. Saunders Company (1994), 959.
To maximize your chances of an accurate comparison between meter and laboratory results, follow a few basic guidelines:
Before going to the lab
- Perform a control solution test to make sure the meter is working properly.
- Do Not eat for at least eight hours before you test your blood.
- Take your meter with you to the lab.
While at the lab
- Conduct your meter test within 15 minutes of the lab test.
- Use only fresh, capillary blood obtained from the fingertip.
- Follow all instructions in this User Guide for performing a blood glucose test with your meter.
Technical specifications
| Reported result range | 20–600 mg/dL | Memory | 500 blood glucose or control solution test results |
| Calibration | Plasma-equivalent | Automatic shutoff | 2 minutes after last action |
| Sample | Fresh capillary whole blood | Size | 3.12 x 2.25 x 0.90 inches or 7.92 x 5.72 x 2.29 cm |
| Test time | 5 seconds | Weight | Approximately 1.5 ounces or 42.5 grams, with batteries |
| Assay method | Glucose oxidase biosensor | Operating ranges | Temperature: 43–111°F Relative humidity: 10–90% Altitude: up to 10,000 feet or 3,048 meters Hematocrit: 30–55% |
| Meter power source | One replaceable 3.0 Volt CR 2032 lithium battery (or equivalent) | Battery ratings | 2 x 3.0 V d.c., 60 mA (2 x CR 2032 batteries)  direct current direct current |
| Backlight power source | One replaceable 3.0 Volt CR 2032 lithium battery (or equivalent) | ||
| Unit of measure | mg/dL |
Electrical and safety standards
This meter complies with CISPR 11: 2003, Class B (Radiated Only). Emissions of the energy used are low and not likely to cause interference in nearby electronic equipment. The meter has been tested for immunity to Level 3 electrostatic discharge as specified in IEC 61000-4-2. This meter has been tested for immunity to radio frequency interference over the frequency range 80 MHz to 2.5 GHz at 3 V/m as specified in IEC 61000-4-3.
Degree of protection rating: IP32

Documents / ResourcesDownload manual
Here you can download full pdf version of manual, it may contain additional safety instructions, warranty information, FCC rules, etc.
Download OneTouch Ultra2 - Blood Glucose Monitoring System Manual
Advertisement


Need help?
Do you have a question about the Ultra2 and is the answer not in the manual?
Questions and answers