
Related Manuals for amzchef IF7208S-5B5B4B2B2B

Summary of Contents for amzchef IF7208S-5B5B4B2B2B
- Page 1 Induction Cooktop Instruction Manual MODEL: IF7208S-5B5B4B2B2B 220-240V~,50-60Hz PLEASE READ INSTRUCTIONS CAREFULLY BEFORE ASSEMBLY RETAIN THIS MANUAL FOR FUTURE REFERENCE...
-
Page 2: Table Of Contents
Contents 1.Safety Warnings...................1 2.Product Overview.................5 3.Choosing the right Cookware...............8 4.Using Instruction..................9 5.Cooking Guidelines….................23 6.Care and Cleaning................25 7.Technical Specification...............29 8.Installation instruction.................29 9.Warranty .....................34... -
Page 3: Safety Warnings
Ⅰ. Safety Warnings Your safety is important to us. Please read this information before using your cooktop. 1.Installation ①Electrical Shock Hazard • Disconnect the appliance from the mains electricity supply before carrying out any work or maintenance on it. • Connection to a good earth wiring system is essential and mandatory. •... - Page 4 2.Operation and maintenance ①Electrical Shock Hazard • Do not cook on a broken or cracked cooktop. If the cooktop surface should break or crack, switch the appliance off immediately at the mains power supply (wall switch) and contact a qualified technician. •...
- Page 5 • Do not place or leave any magnetisable objects (e.g. credit cards, memory cards)or electronic devices (e.g. computers, MP3 players) near the appliance, as they may be affected by its electromagnetic field. • Never use your appliance for warming or heating the room. •...
- Page 6 •WARNING: The appliance and its accessible parts become hot during use. Care should be taken to avoid touching heating elements. Children less than 8 years of age shall be kept away unless continuously supervised. •This appliance can be used by children aged from 8 years and above and persons with reduced physical, sensory or mental capabilities or lack of experience and knowledge if they have been given supervision or instruction concerning use of the appliance in a safe way and understand the hazards involved.
-
Page 7: Product Overview
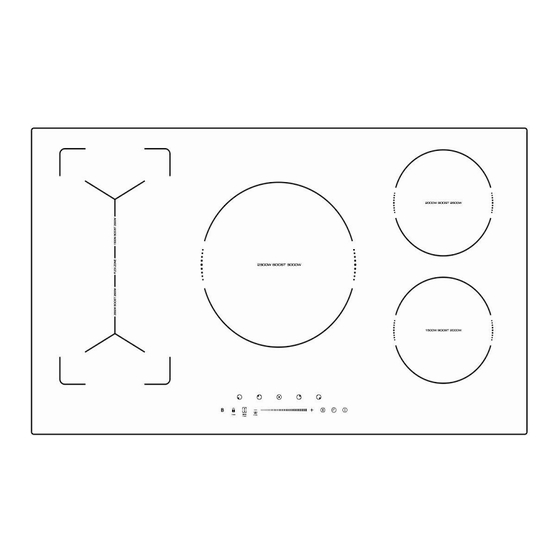
Ⅱ. Product Overview 1.Top View 1.2000 W zone, boost to 2600W 2.1500 W zone, boost to 2000W 3.2300 W zone, boost to 3000W 4.2000 W zone, boost to 2600W 5.1500 W zone, boost to 2000W 6. Flex Zone, 2500W boost 2800W 7. - Page 8 2.Control Panel 1. Heating zone selection controls 2. Timer control 3. Power/Timer regulating key 4. keylock control 5. ON/OFF control 6. Boost function control 7. Flex Zone control/BBQ function control 8. Pause function control 9. Keep warm function control...
- Page 9 A Word on Induction Cooking Induction cooking is a safe, advanced, efficient, and economical cooking technology. It works by electromagnetic vibrations generating heat directly in the pan, rather than indirectly through heating the glass surface. The glass becomes hot only because the pan eventually warms it up.
-
Page 10: Choosing The Right Cookware
Ⅲ. Choosing the right Cookware • Only use cookware with a base suitable for induction cooking. Look for the induction symbol on the packaging or on the bottom of the pan. • You can check whether your cookware is suitable by carrying out a magnet test. -
Page 11: Using Instruction
Pan dimensions The cooking zones are up to a limit, automatically adapted to the diameter of the pan. However the bottom of this pan must have a minimum of diameter according to the corresponding cooking zone. To obtain the best efficiency of your cooktop, please place the pan in the centre of the cooking zone. - Page 12 a. If you don’t select a heat zone within 1 minute, the induction cooktop will automatically switch off. You will need to start again at step 1. b. You can modify the heat setting at any time during cooking. c. If slide along the “—”, power will vary from stage 2 to stage 8. Press “-”, power will decrease by one stage each time till stage 0.
- Page 13 and then and then Make sure the power display shows “0”, then shows “H”. and then ③ Turn the whole cooktop off by touching the ON/OFF control. ④ Beware of hot surfaces ‘H’ will show which cooking zone is hot to touch.
- Page 14 power stage which was set before boost. ④ If you want to cancel the Boost during this 5 minutes, touch the heating zone selection button, an indicator next to the key will flash. And then touch the Boost button. The heating zone will go back to the power stage which was set before boost.
- Page 15 2.2 In group b, if you want to use boost function , you can only use two zone at the same time. 2.2.1 If you want to use the middle zone’s boost function, only one of the zone on the right side can be used at the same time.
- Page 16 2.3 In group b, you can use three zones at the same time if you don’t active the boost, but the max power level collocation is 7-level, 7-level, 7-level. Power management function • Cooking zones are grouped according to the two phases in the cooktop (see illustration). Each phase has a maximum electricity loading of 3500 W.
- Page 17 1.Using the Keep warm to get stable temperature Touch the heating zone selection button that you wish to use keep ① warm,an indicator next to the key will flash. Touch the keep warm button “-” and hold for 3 seconds , the cooking zone indicator ②...
- Page 18 ③ To cancel the pause status, touch the button , then the cooking zone will go back to the power stage which you set before. Flex zone • This area can be used as a single zone or as two different zones, accordingly to the cooking needs anytime.
- Page 19 1.As big zone ① Touch the heating zone selection button that you hope to go into flex zone cooking, an indicator next to the key will flash. ② Touch the flex Zone selection button, to activate the flexible area as a single big zone, the power level indicators of the front zone and the rear zone will indicate the same power level and the led indicator next to the flex zone button will light up .
- Page 20 Using the Barbecue function BBQ is the function that used at the flex zone mode which will allow the pan surface temperature stay at a reasonable level. 1.Touch the heating zone selection button that you wish to use BBQ , an indicator next to the key will flash.
- Page 21 When the cooktop is in the lock mode, all the controls are disable except the ON/OFF, you can always turn the induction cooktop off with the ON/OFF control in an emergency, but you shall unlock the cooktop first in the next operation. 3.Over-Temperature Protection A temperature sensor equipped can monitor the temperature inside the Induction cooktop.
- Page 22 Using the Timer You can use the timer in two different ways: • You can use it as a minute minder. In this case, the timer will not turn any cooking zone off when the set time is up. • You can set it to turn one cooking zone off after the set time is up. •...
- Page 23 Cooking zones set for this feature will: ①Touching the heating zone selection control that you want to set the timer for. (e.g. zone 1#) ② Touch timer control , the minder indicator will start flashing and “30” will show in the timer display. ③...
- Page 24 ① If use this function to more than one heating zone, the timer indicator will show the shortest time. (e.g. zone 1# setting time of 3 minutes, zone 2# setting time of 6 minutes, the timer indicator shows “3”.) NOTE: The flashing red dot next to power level indicator means the timer indicator is showing time of the heating zone.
-
Page 25: Cooking Guidelines
Ⅴ. Cooking Guidelines Take care when frying as the oil and fat heat up very quickly, particularly if you’re using Power Boost. At extremely high temperatures oil and fat will ignite spontaneously and this presents a serious fire risk. Cooking Tips •... - Page 26 • Cook any meat first, put it aside and keep warm. • Stir-fry the vegetables. When they are hot but still crisp, turn the cooking zone to a lower setting, return the meat to the pan and add your sauce. •...
-
Page 27: Care And Cleaning
Ⅵ. Care and Cleaning What? How? Important! Everyday soiling 1. Switch the power to the • When the power to the cooktop on glass cooktop off. is switched off, there will be no (fingerprints, 2. Apply a cooktop cleaner ‘hot surface’ indication but the marks, stains left while the glass is still cooking zone may still be hot! - Page 28 Spillovers on the 1. Switch the power to the • The cooktop may beep and turn touch controls cooktop off. itself off, and the touch controls 2. Soak up the spill may not function while there is 3. Wipe the touch control liquid on them.
- Page 29 The glass is being Rough-edged cookware. Use cookware with flat and scratched. smooth bases. See ‘Choosing the right cookware’. Unsuitable, abrasive scourer See ‘Care and cleaning’. cleaning products being used. Some pans make This may be caused by the This is normal for cookware and crackling or clicking construction of your does not indicate a fault.
- Page 30 The induction Technical fault. Please note down the error cooker or a cooking letters and numbers, switch zone has turned the power to the induction cooker itself off off at the wall, and contact a unexpectedly, a tone qualified technician. sounds and an error code is displayed (typically alternating...
-
Page 31: Technical Specification
Ⅶ. Technical Specification Cooking cooktop IF7208S-5B5B4B2B2B Cooking Zones 5 Zones Supply Voltage 220-240V~, 50-60Hz Installed Electric Power 6800-7400W Product Size L×W×H(mm/in) 900X520X60 / 35.4X20.47X2.36 Building-in Dimensions A×B (mm/in) 870X490 / 34.25X19.29 Weight and Dimensions are approximate. Because we continually strive to improve our products we may change specifications and designs without prior notice. - Page 32 Note: The safety distance between the hotplate and the cupboard above the hotplate should be at least 760mm A(mm) B(mm) C(mm) D 50 mini 20 mini Air intake Air exit 5mm Before you install the cooktop, make sure that • the work surface is square and level, and no structural members interfere with space requirements •...
- Page 33 When you have installed the cooktop, make sure that • the power supply cable is not accessible through cupboard doors or drawers • there is adequate flow of fresh air from outside the cabinetry to the base of the cooktop •...
- Page 34 Cautions 1. The induction hotplate must be installed by qualified personnel or technicians. We have professionals at your service. Please never conduct the operation by yourself. 2. The cooktop will not be installed directly above a dishwasher, fridge, freezer, washing machine or clothes dryer, as the humidity may damage the cooktop electronics 3.
- Page 35 • If the cable is damaged or to be replaced, the operation must be carried out the by after- sale agent with dedicated tools to avoid any accidents. • If the appliance is being connected directly to the mains an omnipolar circuit-breaker must be installed with a minimum opening of 3mm between contacts.
Need help?
Do you have a question about the IF7208S-5B5B4B2B2B and is the answer not in the manual?
Questions and answers