
Related Manuals for GATEXPERT INDUS-E Series


Summary of Contents for GATEXPERT INDUS-E Series
- Page 1 INDUSTRIAL DOOR OPERATOR WITH ELECTRONIC LIMIT SWITCH USER MANUAL INDUS-E SERIES Website: www.gatexpertstore.com E-mail: sales@gatexpertstore.com...
- Page 2 All personal information you provided will be only used for warranty service and kept strictly confidential. Refer to this list when contacting GATEXPERT for technical service or assistance with your automatic gate opener. Order Number Product Model...
- Page 3 Instructions for INDUS-E SERIES Industrial Door Operator Safety Instruction 1. The industrial door operator should be installed and put into operation by qualified personnel. Otherwise, serious personal injury or property damage may occur. 2. Installation and wiring must be in accordance with the construction standards and electrical standards, diameter ≧...
-
Page 4: Table Of Contents
Instructions for INDUS-E SERIES Industrial Door Operator CONTENTS 1.TECHNICAL PARAMETER TABLE……….…………………………………….………...…1 2.DIMENSION AND COMPONENT OF INDUSTRIAL DOOROPERATOR…....……2 3.INSTALLATION GUIDE OF INDUSTRIAL DOOR OPERATOR……………………..…4 4.INDUSTRIAL DOOR OPERATOR WIRING…………………………………………..…..8 5.OPERATION INTERFACE ILLUSTRATION…………………………………….…..…..11 6.OPEN AND CLOSED LIMIT SWITCH SETTING…..……………………….……...…..12 7.WORKING MODE SETTING……………………………....…….…….…..……..15 8.DIP SWITCH SETTING…………………………….....…….…….…..……....15 9.PARAMETERS SETTING......…………..………………..….…..….…..16... -
Page 5: Technical Parameter Table
Instructions for INDUS-E SERIES Industrial Door Operator Technical Parameter Table of Door Operator Model (Single Phase AC220V±10%) INDUS40E INDUS60E INDUS100E Rated Power 300W 400W 550W Torque 40N.m 60N.m 100N.m No-load Continuous Running Time 15 min. 8 min. Max. gate area Model (Three Phase AC380V±10%) -
Page 6: Dimension And Component Of Industrial Dooroperator
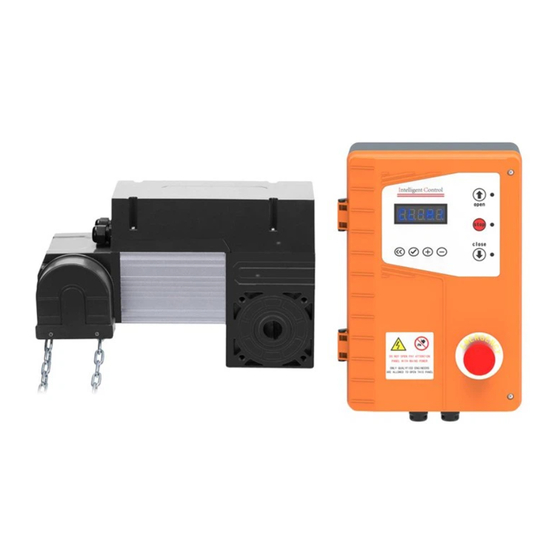
Instructions for INDUS-E SERIES Industrial Door Operator Technical Parameter Table of Control Unit Model GKB220E GKB380E Power Supply AC220V/50Hz AC380V/50Hz Remote Control Available Available Applicable Model INDUS40E/60E/100E INDUS60SE/100SE/150SE External Three Button Switch Terminal Available (Optional) Available (Optional) External Single Button Switch Terminal... - Page 7 Instructions for INDUS-E SERIES Industrial Door Operator Electronic limit switch part ② Gearbox ③ Plastic cover ④ Wiring terminals ⑤ Door operator ⑥ Adjusting screw ⑦ Hand-pulled chain Component Control Unit Dimension www.gatexpertstore.com...
-
Page 8: Installation Guide Of Industrial Door Operator
Instructions for INDUS-E SERIES Industrial Door Operator Installation Guide of Industrial Door Operator This product is commonly used for the industrial sectional door which was equipped with balance spring and lifting industrial door. There are two installation ways for this product: shaft drive installation and chain drive installation. - Page 9 Instructions for INDUS-E SERIES Industrial Door Operator Step 1. Check the door After the door is installed, adjust the torsion spring, ensure manually opening or closing the door is flexible without stagnation, observe the rotation direction of the rope sheave which should be consistent with the opening and closing direction of the industrial door operator.
- Page 10 Instructions for INDUS-E SERIES Industrial Door Operator Step 3. Trial installing the door operator Install a fixing sleeve on door shaft first, and insert the industrial door operator into the door shaft. Step 4. Pre-fix the industrial door operator Fix the industrial door operator on mounting bracket with 4pcs hexagon head flange bolts M10×20, do not tighten at this step.
- Page 11 Instructions for INDUS-E SERIES Industrial Door Operator Step 5. Find the direction of key slot Rotate the output shaft of the industrial door operator by pulling the hand-pulled chain up and down until the key slot of the output shaft is fully aligned with the key slot of the door shaft.
-
Page 12: Industrial Door Operator Wiring
Instructions for INDUS-E SERIES Industrial Door Operator Industrial Door Operator Wiring Wiring Between Door Operator and Control Unit 1. Motor Wire 2. Encoder Wire 3. Power Supply Wire www.gatexpertstore.com... - Page 13 Instructions for INDUS-E SERIES Industrial Door Operator Wiring of Single Phase Operator ——Motor Wire: U(blue) V(brown) W(black) ——Encoder Wire: GND(white) A(yellow) B(red) VCC(green) ——AC220V(single phase) Power Supply Wire Note: Please make sure the wirings are tight and in good connection. After wiring, remember to tighten up the IP plug to ensure all wirings completely fixed.
- Page 14 Instructions for INDUS-E SERIES Industrial Door Operator Wiring of Three Phases Operator ——Motor Wire: U(blue) V(brown) W(black) ——Encoder Wire: GND(white) A(yellow) B(red) VCC(green) ——AC380V(three phases) Power Supply Wire Note: 1. Please make sure the wirings are tight and in good connection. After wiring, remember to tighten up the IP plug to ensure all wirings completely fixed.
-
Page 15: Operation Interface Illustration
Instructions for INDUS-E SERIES Industrial Door Operator Operation Interface Illustration DIGITAL SCREEN OPEN STOP STOP DOWN NEXT CLOSE INDICATOR LIGHT INCREASE REDUCE CONFIRM Opening status Working mode Input status display display display OPEN STOP CLOSE www.gatexpertstore.com... -
Page 16: Open And Closed Limit Switch Setting
Instructions for INDUS-E SERIES Industrial Door Operator Open and Closed Limit Switch Setting After powering on, the digital will display E-03 (hasn’t set the OPEN limit switch) STOP CLOSE Press and hold OPEN “NEXT” for 3 seconds, the digital STOP... - Page 17 Instructions for INDUS-E SERIES Industrial Door Operator OPEN Press “confirm” once; The digital will display P1-F1; press “confirm” once again; STOP The digital will display — — CLOSE Shortly press “OPEN” to check OPEN opening direction, if it’s correct, then press and hold “OPEN” to set...
- Page 18 Instructions for INDUS-E SERIES Industrial Door Operator Release the “OPEN” when OPEN motor arrives at the open STOP limit switch position, press “CONFIRM”, the digital will CLOSE display the encoder value for 1 second and then show — —, then you can set the closed limit switch position.
-
Page 19: Working Mode Setting
Instructions for INDUS-E SERIES Industrial Door Operator Working Mode Setting Press and hold “-” for 4 seconds, you can select manual control or automatic control mode. OPEN 1. Automatic(A): Press “OPEN”, the door will run to the open limit switch position,... -
Page 20: Parameters Setting
Instructions for INDUS-E SERIES Industrial Door Operator Input Status: Input Status Instruction Stop Open Close Photo Sensor Air Bag Loop Detector Partial Opening Single Cycle Interlock Parameters Setting Parameters Value Range Default P1-F1 Electronic limit switch setting Pre-stop before arriving at the open... - Page 21 Instructions for INDUS-E SERIES Industrial Door Operator P2-F8 Restore to factory setting of P2 0=No;1=Yes P3-F1 Multi-function of F1 0=NO;1=NC P3-F2 Multi-function of F2 0=NO;1=NC Close Fault output Door completely open in place output Door partially open in place output...
-
Page 22: External Accessories Wiring
Instructions for INDUS-E SERIES Industrial Door Operator External Accessories Wiring 1. External three-buttons switch terminal: “STOP” terminal type is NO by default, if you need NC type, please modify the setting of “P2-F1” to be “1”. External three-buttons switch Partial opening button switch... - Page 23 Instructions for INDUS-E SERIES Industrial Door Operator 4. Safety photocell terminal: terminal type is NO, if you need NC type, please modify the setting of “P2-F4” to be “1”. The valid height of photocell can be adjusted under “P3-F6”. Safety aibag...
-
Page 24: Remote Control Passward Setting
Instructions for INDUS-E SERIES Industrial Door Operator 8. Relay terminal output: default is NO, if require NC type, please modify the setting of “P3-F1” or “P3-F2”to be “1”. Output logic function can be selected under “P3-F3” and “P3-F4”. 9. Two doors interlock: connect terminal “ILIN”of control unit 1 to terminal “ILOUT” of control unit 2. -
Page 25: Use Of Hand-Pulled Chain
Instructions for INDUS-E SERIES Industrial Door Operator Note: Only need to pair “button A”, the pairing of the remote control is finished meanwhile. b、 Remote control delete: Press and hold AN button on the receiver, LED light will be on, release the button until the LED light is off, all paired remote controls are deleted. -
Page 26: Common Faults And Countermeasures
Instructions for INDUS-E SERIES Industrial Door Operator Common Faults and Countermeasures Trouble Possible Cause Countermeasures The power supply is not Tighten the screw of the wiring and connected or the wires is re-power on. loose. The emergency stop terminal Reinsert the emergency stop... -
Page 27: Packing List
Instructions for INDUS-E SERIES Industrial Door Operator PACKING LIST Door Operator Packing List INDUS40E、INDUS60E、INDUS100E、 INDUS60SE、INDUS100SE、INDUS150SE Name Qty. Note Door operator Mounting bracket Contain M6×10 Fixing sleeve fastening screw Special flat key 6×70 Hexagon bolts M10x20 User manual Motor four-core wire...
Need help?
Do you have a question about the INDUS-E Series and is the answer not in the manual?
Questions and answers