Advertisement
- 1 Features
- 2 Parts
- 3 Turning Power On / Off
- 4 Mode Selection
- 5 CCT Mode
- 6 HSI Mode
- 7 EFFECT Mode
- 8 Scenario Effect List
- 9 Cold Shoe Adapter Installation
- 10 Mounting on a camera /cold shoe /light stand
- 11 Removing from a camera /light stand
- 12 Charging the Phottix M200R RGB Light
- 13 Charging External Devices
- 14 Tech Specs
- 15 What's included
- 16 Warranty Card
- 17 Documents / Resources
Features
The Phottix M200R RGB Light is a compact and powerful light source for still and video photography. It uses the latest in flicker-free LED technology, making it more efficient and durable. The Phottix M200R RGB Light features:
- Long-life, Low-Heat LEDs
- Long-Life Built-In Battery
- Adjustable brightness and color temperature
- Full 0-360 º color hue and saturation adjustment
- 21 preset scenario e ects
- Use as a power bank to charge other devices
Please note:
- Do not shine the LED directly at people's eyes at short distances.
This can cause short-term vision issues. Use at distances of at least 1m from subject – or use a diffuser to soften the light. - Do not place the LED close to alcohol or flammable objects.
- Do not place liquids on or near the LED. The product is not water, splash ordust resistant.
- Use a soft cloth and neutral cleaner to clean the LED Light.
- Do not use strong cleaning agents or solvents such as thinner gasoline oralcohol to clean the LED Light.
- Do not store the LED at temperatures of +40C as high temperatures maydamage the product components.
- Do not use the LED in outdoors in direct sunlight for an extended period oftime to prevent the product from overheating and possible damage.
- Because of the built-in Lithium-Ion Battery - do not disassemble, crushor incinerate.
- Please use the specified charger within the specified voltage and temperaturerange.
- To keep the battery in proper working order use the product and charge thebattery at least once per month.
- If left unused for a long period of time recharge before using.
- Lithium-ion battery cells lose capacity over a product's lifetime. Performancewill be reduced.
- In non-emergency situations, it is not recommended to use the LED whilecharging. It will cause rapid heat generation, the product will work improperly or automatically power off.
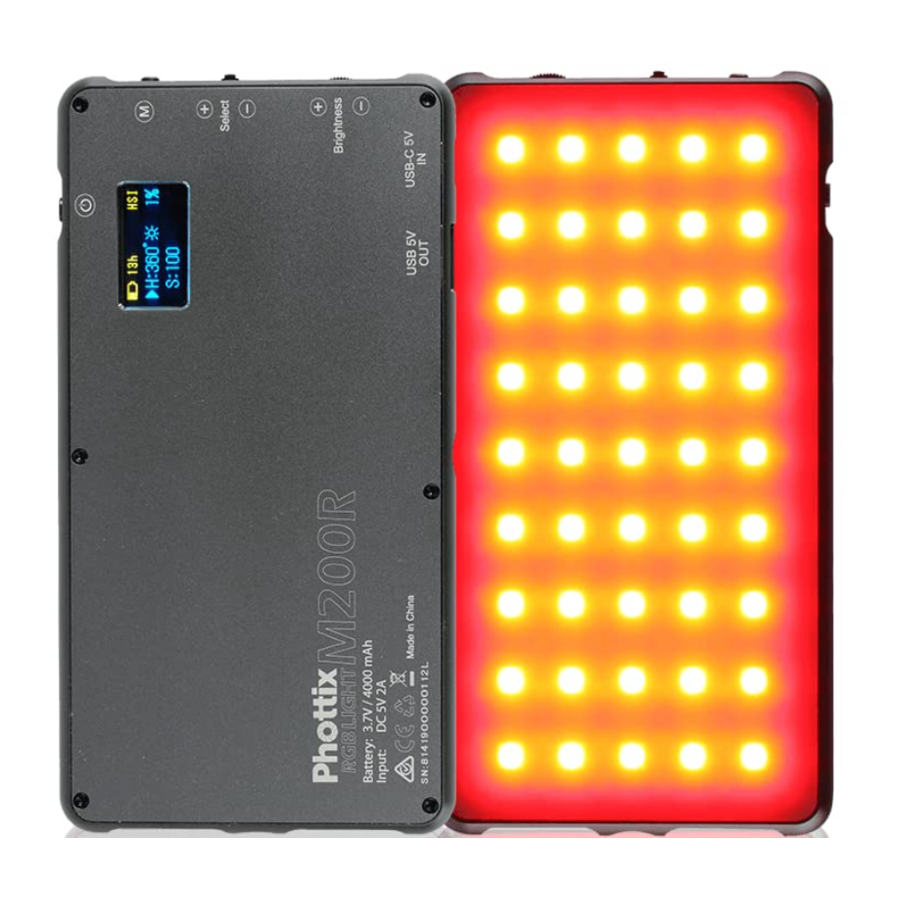
Parts
Back

- OLED Display
- Power Switch
- Mode Button
- Select / Adjustment Knob
- Brightness Knob
- ¼" threaded mounting lug
- USB-C Charging Port
- USB Output Port
Display Interface

- Estimated Time Remaining
- Battery Capacity
- Mode Selected (CCT / HSI / Effect)
- Color Temperature Display (CCT)
- Brightness Display (CCT)
- Color Hue (HSI)
- Color Saturation (HSI)
- Scenario Effect Group (Effect)
- Effect Name (Effect)
 Notes on temperature warning
- Phottix M200R RGB Light is used in an environment with a high ambient temperature, or if the product is used continuously for a long period of time. This will automatically turn of the product until it cools down.
- Phottix M200R RGB Light is used in an environment with a low ambient temperature. In such environments, the product may not operate properly.
Turning Power On / Off
Slide Power knob to power on / off the LED.
Mode Selection
Press Mode button to change mode between CCT / HSI / EFFECT.
CCT Mode

- Turn Brightness knob to set the desired brightness level from 1%-100%.
- Turn Set / Adjustment Knob to set the desired color temperature from 3200K – 5600K.
HSI Mode

- Press Select / Adjustment Knob to select between H (Hue) and S (Saturation).
- Turn Select / Adjustment Knob to set the desired Color Hue from 0-360º
- Turn Select / Adjustment Knob to set the desired Color Saturation from 0-100.
- Turn Brightness knob to set the desired brightness level from 1%-100%.
EFFECT Mode

- Press Select / Adjustment Knob to select Scenario Effect Group from A - G.
- Turn Select / Adjustment Knob to set the desired Scenario Effect. Each group has 3 different effects and will display the effect name on OLED.
- Turn Brightness knob to set the desired brightness level from 1%-100%.
Scenario Effect List
Group A: Flash / Flash Fast / TV screen
Group B: Candle / Flame 1 / Flame 2
Group C: Police / Ambulance / Fire truck
Group D: Strobe Lights 1 / Strobe Lights 2 / Strobe Lights 3
Group E: Chase slow / Chase mid / Chase fast
Group F: Fire work 1 / Fire work 2 / Fire work 3
Group G: Club 1 / Club 2 / Romantic
Cold Shoe Adapter Installation
- Align the Cold Shoe Adapter with the threaded lug on Phottix M200R RGB Light.
- Turn the lock screw clockwise to attach the Adapter to the Phottix M200R RGB Light.
Mounting on a camera /cold shoe /light stand
- Turn off the LED Light
- Slide the Cold Shoe adapter into a camera hot shoe or cold shoe mount.
- Turn the locking ring clockwise to secure the adapter
Removing from a camera /light stand
- Turn off the Phottix M200R RGB Light
- Turn the locking ring counterclockwise and remove
Charging the Phottix M200R RGB Light
The Phottix M200R RGB Light will charge from 5V USB-C input.
- Attach the appropriate cable to the Phottix M200R RGB Light
- Attach the cable to a power source
- The OLED display will display flashing battery icon while being charged.
- Charging time varies depending on power source
Charging External Devices
The Phottix M200R RGB Light has a 5V USB Output port. This can be used to charge other portable devices such as smart phones, headphones, etc.
- Attach the USB cable to the Phottix M200R RGB Light. The connected devicewill start to charge.
- The Phottix M200R RGB Light does not need to be powered on to chargeexternal devices.
Tech Specs
| Color temperature: | 3200K - 5600K º |
| Color model: | 0-360 full color control (HSI) º |
| Brightness range: | 1% - 100% |
| Max. brightness / illuminance: | 1200 Lux @ 0.5m (5600K) |
| Max. Power: | 10W |
| Color rendering index: | 96+ |
| Battery Capacity: | 3.7V 4000mAh |
| Charging / Input power: | 5V 2A USB-C |
| External Output power: | 5V 2A USB |
| Dimension: | 151 x 80 x 11.5mm |
| Weight: | 200g |
What's included
- M200R LED Panel unit
- USB-C recharge cable
- Cold shoe adaptor.
- Pouch bag
- Hand strap
- Printed user manual
Warranty Card
Phottix offers warranty service and / or replacements that comply with local regulations. For full information see: phottix/warranty
Keep this card - DO NOT LOSE.
Phottix.com
 PhottixPPA
 @phottixjournal
 @Phottix
 PhottixHQ

Documents / ResourcesDownload manual
Here you can download full pdf version of manual, it may contain additional safety instructions, warranty information, FCC rules, etc.
Advertisement


Need help?
Do you have a question about the M200R and is the answer not in the manual?
Questions and answers