Raymarine Ray240 User Manual
Vhf radio with digital selective calling
Hide thumbs
Also See for Ray240:
- User manual (80 pages) ,
- Manual (20 pages) ,
- Installation manual (2 pages)

Subscribe to Our Youtube Channel
Related Manuals for Raymarine Ray240


Summary of Contents for Raymarine Ray240
-
Page 1: Selective Calling
Ray240 VHF Radio with Digital Selective Calling Users Manual Document # 81219_1 Date: June 2004... -
Page 2: Trademarks And Registered Trademarks
Trademarks and registered trademarks Autohelm, HSB Raymarine, RayTech, RayTech RNS, Sail Pilot, SeaTalk and Sportpilot are registered trademarks of Raymarine Limited.Apelco is a registered trademark of Raymarine Holdings Limited (Registered in all major marketing territories). AST, Autoadapt, Auto GST, Autoseastate, Autotrim, Bidata,... -
Page 3: How To Make A Dsc Distress Call
Step 5 V0:10 SQ:05 auto DISTRESS TX Step 6 MAYDAY, MAYDAY, MAYDAY This is... (repeat name of vessel 3 times) Press RAY240 LAST/ MENU 16/9 1/25 THIS IS... (name of vessel spoken once) Hold SCAN WATCH MY POSITION IS... (latitude and longitude) or... -
Page 4: How To Make A Mayday Call
THEN SLOWLY and CLEARLY Step 3 V0:10 SQ:05 D6790_1 Ray240 User Manual MAYDAY, MAYDAY, MAYDAY This is... (name of vessel, spoken 3 times) MAYDAY This is...(name of vessel spoken once) MY POSITION IS...(latitude and longitude. or true bearing and distance from a known point - IF YOU DON'T KNOW, DON'T GUESS). -
Page 5: Table Of Contents
Group calls ... 16 Safety broadcasts ... 16 Distress alerts ... 16 1.3 Can I use the Ray240 as part of an integrated system? ... 16 1.4 How do I use the Ray240? ... 17 Which menu do I need? ... 19 What does the display tell me? ... - Page 6 Can I get optional extras? ...45 3.3 Where should I install my radio? ...46 3.4 Typical installation ...48 3.5 How much space does the Ray240 need? ...49 3.6 How do I make the electrical connections? ...51 3.7 How do I get position data? ...52 3.8 Setting up the Ray240 ...53...
- Page 7 Chapter 4: Maintenance and Troubleshooting ...55 4.1 Introduction ... 55 4.2 What maintenance can I do? ... 55 4.3 How do I troubleshoot the Ray240? ... 55 4.4 How do I get the radio serviced? ... 56 4.5 How do I contact Raymarine? ... 57 Appendix A:VHF Channels ...59...
-
Page 9: Important Information
Purpose This handbook contains important information on the installation, operation and maintenance of the US and European versions of the Ray240 VHF radio, which is intended for light marine use and covers the following models: • E42001 Ray240 System - US and Canadian version. -
Page 10: Antenna Mounting And Eme Exposure
2. This device must accept any interference received, including interference that may cause undesired operation. Changes or modifications to this equipment, not expressly approved in writing by Raymarine Inc., could violate compliance with FCC rules and void the operator’s authority to operate the equipment. EMC conformance All Raymarine equipment and accessories are designed to the best industry standards for use in the recreational marine environment. -
Page 11: Additional Information
Canada A license is not required to operate this radio within the sovereign waters of Canada. You will require a license to operate this radio outside of these waters. To obtain Industry Canada licensing information, contact the nearest field or... -
Page 12: Maritime Mobile Service Identity
BoatUS (www.boatus.com), or MariTEL (www. maritelusa.com). Once obtained, you can program the MMSI number into your Ray240 using the Menu Operation described in this handbook. Canada You can obtain an MMSI number from your nearest Industry Canada Office. -
Page 13: Handbook Information
For the latest product information visit our website: Warranty To register your new Raymarine product, please take a few minutes to fill out the warranty card. It is important that you complete the owner information and return the card to us to receive full warranty benefits. - Page 14 Ray240 User Manual...
- Page 15 European Parliament and Council Directive: 1999/5/EC on radio equipment and telecommunication terminal equipment and the mutual recognition of their conformity. Product Name:...
- Page 16 Ray240 User Manual...
-
Page 17: Chapter 1: General Information
Chapter 1: General Information 1.1 What is the Ray240? The Ray240 is a combined VHF radio and Class D Digital Selective Calling (DSC) system, using a phone style handset to access and control all functions. It enables you to make digitally selected calls, which are quicker and simpler to make than traditional voice calls using Channel 16. -
Page 18: Calls To Other Ships
To call another ship or a coast station, you simply enter their dedicated Maritime Mobile Service Identity (MMSI) number, select your chosen VHF working channel and send the call - it’s like using a telephone. Both your radio and the one you are calling automatically switch to the chosen channel for conversation. -
Page 19: How Do I Use The Ray240
PQRS WXYZ Front You can access all of the functions of the Ray240, with the exception of adjusting the active speaker volume, from the handset. The clearly marked buttons and alpha-numeric keypad make operation simple. The DISTRESS button can be found beneath a sliding cover on the back of the handset. - Page 20 8. SCAN starts the scanning of available channels. Press to start priority scanning. Press and hold to start non-priority scanning. 9. 16/9 (16) Press to power up the radio. Press and hold for 5 seconds to power off the radio. When using the radio, press to re-tune to the priority channel.
-
Page 21: Which Menu Do I Need
Intercom Hailer Foghorn - Auto Foghorn - Manual Add new entry Call Position request Select name from list View Delete Radio Sensitivity Frequency Group Call Urgency Call All Ships Safety Call log Position Position Request My MMSI Group Settings... -
Page 22: What Does The Display Tell Me
Power setting Shows the power level. 1 watt (low) or 25 watts (high). Operating mode Shows which operating mode the radio is in, transmit (TX), or receive (RX). Active channel Shows the channel on which the radio is currently operating. -
Page 23: Chapter 2: Operations
Chapter 2: Operations 2.1 Introduction This chapter shows you how to operate the controls of the Ray240 and use it to make the common Digital Selective Calling (DSC) calls. There are many other useful functions accessed through the Menus, which are listed in detail at the end of this chapter. -
Page 24: Set The Squelch
The optimum squelch setting is obtained by turning the squelch down until background noise is heard. Then increase the setting by one level to reduce this noise. It is not possible to adjust the squelch setting while the radio is in Note: ‘Menu’ mode. -
Page 25: Monitor Channels
PRESS and HOLD this button to access the Weather channels. Use the channel button to select W0 through to W9 depending upon which weather channel is required. This function is available on US/Canadian versions of the Ray240, Note: or the European version with the appropriate license. -
Page 26: Scan The Channels
Priority scanning PRESS this button to start priority scanning. The radio scans the priority channel in between scanning each channel in sequence. If activity is detected on a channel the radio automatically tunes to that channel. Create a channel list... -
Page 27: Navigate The Menus
Chapter 2: Operations How do I ...navigate the menus? MENU PRESS this button to access the menus or to accept a menu option. CHANNEL UP/DOWN PRESS this button to scroll through the menu options. LAST/WX (PRIV) PRESS this button to return to the previous screen. 16/9 (16) PRESS this button to return to the priority channel... -
Page 28: Use The Menu Shortcuts
Turn the active speaker knob clockwise to turn the speaker on and VOL/PWR increase the volume. Turn the knob counter-clockwise to decrease the volume and turn the speaker off. Ray240 User Manual How do I ...make a DSC phone call? -
Page 29: Using The Handset - Making And Receiving Calls
How do I STEP 1 MAIN MENU Intercom/hailer/fog Phone Book VHF Operations DSC Operations EXIT STEP 3 THEN RAY240 LAST/ MENU 16/9 1/25 SCAN WATCH PQRS WXYZ The intercom function is only available when a second station is installed. Note: ...receive a routine call? -
Page 30: Using The Handset - Dsc Operations
STEP 4 MAKE CALL CHANNEL ENTER CHANNEL NUMBER STEP 6 AUTOMATICALLY RE-TUNES TO SELECTED CHANNEL WHEN AN ANSWER IS RECEIVED Ray240 User Manual MAIN MENU Intercom/hailer/fog Phone Book VHF Operations DSC Operations EXIT STEP 3 PHONE BOOK Call View details... -
Page 31: View Phone Book Details
Chapter 2: Operations How do I ...view phone book details? STEP 1 Press and hold Either STEP 2 PHONE BOOK Add an entry Flying fox Wave dancer Sun chaser EXIT STEP 4 PHONE BOOK Name: Flying fox MMSI: 33678085 CANCEL Boat names are limited to 15 characters Notes: (1) MMSI numbers can be entered as boat, group or shore numbers. -
Page 32: Add An Entry To The Dsc Phone Book
Boat names are limited to 15 characters. Notes: (1) MMSI numbers can be entered as boat, group or shore numbers. When setting up a group MMSI, the number must be pre-fixed by a zero. Ray240 User Manual MAIN MENU Intercom/hailer/fog Phone Book... -
Page 33: Call Another Ship
DSC Operations EXIT STEP 3 MAKE CALL MMSI: 336789085 STEP 5 SHIP-SHIP CALL 235899931 Press MENU to make DSC call STEP 7 Press THEN RAY240 LAST/ MENU Hold 16/9 1/25 SCAN WATCH PQRS WXYZ ...call another ship? STEP 2 DSC OPERATIONS... -
Page 34: Make A Specified Distress Call
DISTRESS sent WAIT WHILE RADIO AUTOMATICALLY RE-TUNES STEP 6 V0:10 SQ:05 auto DISTRESS TX LISTEN ACKNOWLEDGEMENT AND SEND VOICE MAYDAY MESSAGE Ray240 User Manual STEP 2 DISTRESS Fire/Explosion DISTRESS Flooding Collision Grounding Listing Sinking Disabled/Adrift Undesignated Abandoning ship Piracy Man Overboard... -
Page 35: Cancel A Distress Call
Intercom/hailer/fog Phone Book VHF Operations CANCEL STEP 3 V0:10 SQ:05 STEP 4 Press ALL STATIONS, ALL STATIONS, ALL STATIONS RAY240 Hold LAST/ MENU 16/9 1/25 SCAN WATCH THIS IS.. (MMSI number and Vessel name or Call sign spoken 3 times) -
Page 36: Make An All Ships Call (Urgency)
RAY240 LAST/ MENU Hold 16/9 1/25 SCAN WATCH PQRS WXYZ THEN SLOWLY and CLEARLY Ray240 User Manual STEP 2 DSC OPERATIONS Call Call all ships Position Settings EXIT STEP 4 URGENCY Press 'MENU' button to send 'urgency' Press'16' to exit... -
Page 37: Make A Position Request
Chapter 2: Operations How do I ...make a position request? STEP 1 MAIN MENU Intercom/hailer/fog Phone Book VHF Operations DSC Operations EXIT STEP 3 POSITION REQUEST MMSI:_ EXIT STEP 5 TRANSMISSION COMPLETE STEP 7 POSITION RESP POSITION RESPONSE LONG RECEIVED TIME Position Request STEP 2... -
Page 38: Access The Dsc Call Log
A maximum of 20 calls can be stored in the call log. Notes: (1) Calls are stored as they are received. If the call log is full then the oldest entry will be discarded. Ray240 User Manual STEP 2 DSC OPERATIONS Call all ships... -
Page 39: Delete An Entry From The Dsc Call Log
Chapter 2: Operations How do I ...delete an entry from the DSC call log? STEP 1 MAIN MENU Intercom/hailer/fog VHF Operations DSC Operations Settings EXIT STEP 3 DSC CALL LOG Distress Individual call Position request CANCEL STEP 5 DSC CALL LOG Delete logged DSC message CANCEL... -
Page 40: Receiving Distress Alerts
CANCEL and sounds an audible two-tone alarm. Your action should be, either: • Press MENU, and accept the call. The alarm is cancelled and the radio will automatically re-tune to Channel 16. • Press LAST/WX (LAST/PRIV), and reject the call, if for example you are unable to offer any assistance. -
Page 41: Distress Acknowledgement For Another Vessel
2.7 Additional functions In addition to those already described in this chapter, the Ray240 has further functions that can be accessed from the Main menus. This section gives a brief description of these functions and what they do. -
Page 42: Intercom/Fog/Hailer
27 Fog warnings The Ray240 has in-built fog warning tones that an be transmitted through a hailer horn. These tones can be used in manual or automatic modes, but any volume adjustments will need to be made in manual mode before selecting automatic mode. -
Page 43: Set Up The Automatic Fog Signal
Chapter 2: Operations How do I ...set up the automatic fog signal? Step 1 MAIN MENU Intercom/hailer/fog VHF Operations DSC Operations Settings EXIT Step 3 AUTO FOG AUTO FOG OFF PWR MAKING WAY PWR NOT MAKING WAY SAIL/FISHNG RESTRICTED/TOWING UNDER TOW PILOT AT ANCHOR Hailer... - Page 44 VHF Settings Radio Sensitivity Enables the receiving sensitivity of the Ray240 to be reduced in areas of high traffic to decrease unwanted reception. This is also known as local mode. DSC Operations Position Enables you to manually enter your position and time using the alpha-numeric keypad, if no external position data is being received.
-
Page 45: Chapter 3: Installation
Raymarine equipment. Always use the ferrites supplied by Raymarine. D7166_1 Connections to other equipment If your Raymarine equipment is to be connected to other equipment using a cable not supplied by Raymarine, a suppression ferrite MUST always be attached to the cable near to the Raymarine unit. -
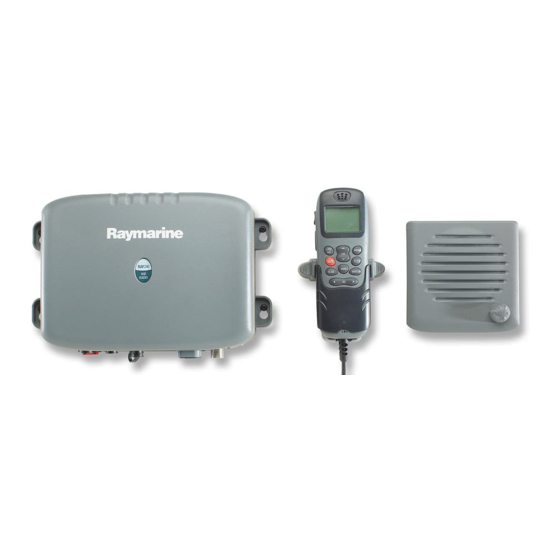
Page 46: What's In The Box
3.2 What’s in the box? You will find these items in the box: Transceiver Handset Handset Connector plate Cradle Ray240 User Manual Active Gasket speaker 5 m extension cable Dust cover Power/NMEA/Hailer cable Stud (x2) Thumb nut (x2) Screw, Screw, No.4 x 3/8"(x3) -
Page 47: Can I Get Optional Extras
Chapter 3: Installation Can I get optional extras? You can obtain the following optional extras for the Ray240: Description Second station includes handset, cradle and speaker and 5m extension cable Ray240 Ray240E Handset only Ray240 Ray240E Active speaker Extension cable, 3m... -
Page 48: Where Should I Install My Radio
CAUTION: Compass safe distance The compass safe distance, measured in accordance with EN60945, for the Ray240 is 0.9 m. Before installing the Ray240 you should plan the installation, considering the following points: Transceiver Unit You should mount the transceiver unit on a bulkhead, below decks that is: •... - Page 49 • ensure that the antenna is connected to the radio before transmitting. • Raymarine declares a Maximum Permissible Exposure (MPE) radius of 1.5 meters (per OET Bulletin 65) for this system, assuming 25 watts output to an omnidirectional antenna of 3dBi gain or less.
-
Page 50: Typical Installation
3.4 Typical installation A typical installation for the Ray 240 is shown below: Power 12V DC Black 0V NMEA Hailer horn VOL/PWR Ray240 User Manual To Antenna SeaTalk/GPS Optional 2nd station VOL/PWR D7175-1... -
Page 51: How Much Space Does The Ray240 Need
Chapter 3: Installation 3.5 How much space does the Ray240 need? To help you plan the installation of your Ray240 and its associated components the dimensions are: Transceiver Unit 273 mm (10.75 in) A 50mm air space should be left around the transceiver when installed to enable airflow and ventilation for cooling the heatsink. - Page 52 Handset and Cradle RAY240 LAST/ MENU 16/9 1/25 SCAN WATCH PQRS WXYZ 99.5 mm (3.9 in) Ray240 User Manual D6818-1 46 mm (1.8 in)
-
Page 53: How Do I Make The Electrical Connections
For optimal installation, use screened cables throughout, ensuring that the screen connection is continuous and terminates at the boat’s earth. The Ray240 base transceiver does not have an ON/OFF switch. It is therefore strongly recommended that your radio is connected to the boat’s power supply through a dedicated power breaker to avoid unnecessary drain on the electrical system when your boat is not in use. -
Page 54: How Do I Get Position Data
You should connect the White and Blue (NMEA + and -) wires of the combined cable to the input wires of the positioning device using a suitable connector block. The following sentences are used by the Ray240: Received - GGA, GLL, RMC, ZDA. -
Page 55: Setting Up The Ray240
Step 5 MY MMSI 1st MMSI CANCEL Notes: (1) To change the MMSI number the radio must be returned to your Rayma- rine dealer. When setting up a group MMSI, the number must be pre-fixed by a zero. Step 2 Handset... -
Page 56: Enter My Atis Number
Step 3 MY ATIS ATIS UNDEFINED CANCEL MORE Step 5 MY ATIS 2nd input ATIS CANCEL This procedure is only applicable to the European version of the Ray240. Note: Ray240 User Manual Step 2 Handset Display DSC Operations ATIS CANCEL... -
Page 57: Chapter 4: Maintenance And Troubleshooting
4.2 What maintenance can I do? The Ray240 has no user serviceable parts or adjustments. Never remove the cover or attempt to service the product. Your attention to a few basic points should ensure many years of service: •... -
Page 58: How Do I Get The Radio Serviced
4.4 How do I get the radio serviced? In the US/Canada In the unlikely event of your Ray240 developing a problem, contact the Raymarine dealer from where it was purchased. Service may also be obtained by returning the unit to: Product Repair Center Raymarine Inc.,... -
Page 59: Rest Of The World
Chapter 4: Maintenance and Troubleshooting In Europe In the unlikely event of your Ray240 developing a problem, contact the Raymarine Dealer from where it was purchased. Service may also be obtained by returning the unit to: Raymarine Ltd. Anchorage Park Portsmouth, Hampshire England, PO3 5TD. -
Page 60: On The Internet
Monday to Friday 0815 hours to 1700 hours Eastern Standard Time. In Europe and the Rest of the World In Europe and the Rest of the World you can contact Raymarine as follows: Technical Support The Technical Services Department handles enquiries concerning installation, operation, fault diagnosis and repair. -
Page 61: Appendix A: Vhf Channels
Appendix A: VHF Channels Appendix A: VHF Channels US Marine VHF Channels Type of Message DISTRESS, SAFETY and CALLING Use this channel to get the attention of another station (calling) or in emergencies (distress and safety) INTERSHIP SAFETY Use this channel for ship-to-ship safety messages and for search and res- cue messages. -
Page 62: Important Notice
Channels 3A, 21A, 23A, 61A, 64A, 81A, 82A, and 83A are not for use by the general public in U.S. waters. These frequencies may be used only under authorization by the U.S Coast Guard or under private land mobile license. Ray240 User Manual Appropriate Channel(s) 13, 67 Wx-1 162.55... -
Page 63: International Marine Vhf Channels
Appendix A: VHF Channels International Marine VHF Channels Type of Message DISTRESS, SAFETY and CALLING Use this channel to get the attention of another station (calling) or in emergencies (distress) and safety) INTERSHIP SAFETY Use this channel for bridge to bridge communications under the Global Maritime Distress Safety System (GMDSS). - Page 64 The international frequency mode is not legal for use while operating in U.S waters. The TX/RX frequencies available in the International frequency mode were agreed upon by the attending countries at the 1968 International Telecommunications Union meeting in Geneva, and are legal for use in International waters only. Ray240 User Manual...
- Page 65 Appendix A: VHF Channels Canadian Marine VHF Channels Type of Message DISTRESS, SAFETY and CALLING Use this channel to get the attention of another station (calling) or in emergencies (distress and safety) INTERSHIP SAFETY Use this channels for ship-to-ship safety messages and for search and res- cue messages.
- Page 66 6. Pacific Coast, Atlantic Coast and Great Lakes only. 7. St. Lawrence River, power limited to 1 watt. Operators should check order of preference for channel use with local information Note: for chosen area of operation. Ray240 User Manual Appropriate Channel(s) 72, 73 19, 22, 81, 82, 83...
- Page 67 These National channels have been allocated for the specific use within those countries listed. To use them you must have the appropriate license and your Ray240 must be programmed by an authorized Raymarine dealer to use the national channels that are approved for your country.
- Page 68 Ray240 User Manual...
-
Page 69: Appendix B: Technical Specification
Appendix B: Appendix B: Technical specification Transmitter Channels All available US, International and Canadian VHF Marine Band Frequency Stability ± 1.5 kHz Frequency Range 155.000 - 165.000 MHz Channel Spacing 25 kHz Power Output 25 W / 1 W Modulation Frequency modulation Modulation Audio Response +1 to -30dB of 6db/ octave 300 Hz to 3000 Hz... -
Page 70: Operating Requirements
Temperature Range Water Protection Handset - submersible to IPX 7 Active speaker - waterproof to CFR 46 Transceiver unit - drip resistant Ray240 User Manual F to + 122 F (-10 C to +50 C) operational F to + 158... -
Page 71: Appendix C: Hints And Tips
Appendix C: Hints and Tips Appendix C: Hints and Tips Phonetic Alphabet To help make call letters more clearly understood, and to assist in spelling out similar sounding or unfamiliar word, radiotelephone users employ the international phonetic alphabet. ALPHA BRAVO CHARLIE DELTA ECHO... - Page 72 Prowords Prowords can be used to simplify and speed up radio communications. Proword Meaning ACKNOWLEDGE Have you received and understood? CONFIRM My version is... is that correct? CORRECTION An error has been made; the correct version is... I SAY AGAIN I repeat...
-
Page 73: Appendix D: List Of Abbreviations
Global Maritime Distress and Safety System Global Positioning System Hertz Kilo Hertz Liquid Crystal Display Mega Hertz millimeters MMSI Maritime Mobile Service Identity NMEA National Marine Electronics Association NOAA National Oceanographic and Atmospheric Administration Push To Talk Radio Frequency Receiver Standing Wave Ratio Transmit... - Page 74 Abbreviation Meaning United Kingdom Volts Very High Frequency Ray240 User Manual...
-
Page 75: Limited Warranty Certificate - Vhf Products
1. Limited Product Warranty Raymarine warrants that all of its product, in the course of normal use, will be free from defects in material and workmanship for a period of 3 years (36 months) from date of sale to the original end user, subject to the limitations set forth in this warranty. -
Page 76: Warranty Limitations
Subject to the limitations and other provisions set forth in this warranty, the product will be either repaired or replaced by Raymarine within a reasonable period of time and at no further cost to the customer. the determination of whether to repair or replace a product shall be at the sole discretion of Raymarine, and shall be the sole remedy of the customer under this warranty. - Page 77 The Raymarine warranty terms and conditions as described herein do not affect the customers statutory rights and comply with EU Directive 1999/44/EC. Raymarine is the sole author of this policy and makes no further warranties, express or implied unless a separate, specific warranty has been written and provided to the customer. This warranty supersedes and replaces all previous warranties.
- Page 78 Factory Service Centers United States of America Raymarine Inc 22 Cotton Road, Unit D, Nashua, NH03063-4219, USA Telephone: +1 603 881 5200 Fax: +1 603 864 4756 www.raymarine.com Sales & Order Services Telephone: + 1 800 539 5539 Ext. 2333 or...
Need help?
Do you have a question about the Ray240 and is the answer not in the manual?
Questions and answers