Table of Contents
Advertisement
Quick Links
Advertisement
Table of Contents

Subscribe to Our Youtube Channel
Related Manuals for Avsl Adastra RM Series


Summary of Contents for Avsl Adastra RM Series
- Page 1 RM-SERIES Rackmount 100V mixer-amplifiers with Bluetooth Item ref: 953.213UK, 953.214UK, 953.215UK, 953.216UK User Manual Version 3.2 Caution: Please read this manual carefully before operating Damage caused by misuse is not covered by the warranty...
- Page 2 Introduction Thank you for choosing the Adastra RM-series rackmount 100V amplifier as part of your public address system. This amplifier is designed to offer high quality, dependable service for mobile and installed systems. Please read this manual fully and follow the instructions to achieve the best results with your new purchase and to avoid damage through misuse. SAFETY SYMBOL AND MESSAGE CONVENTIONS CAUTION AVIS...
-
Page 3: Front Panel
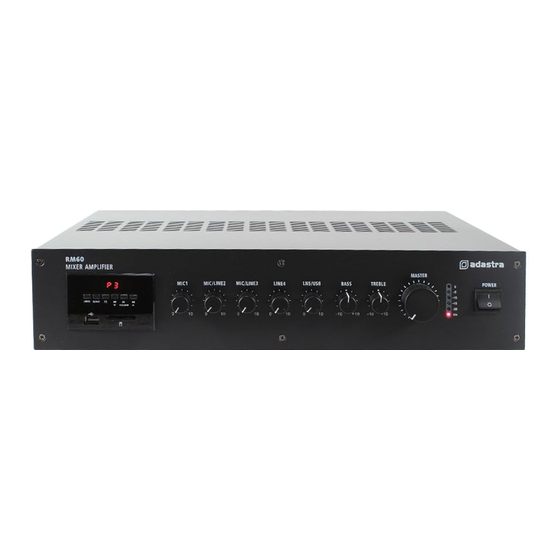
Front panel USB/SD/FM/BT media player BASS EQ control MIC 1 volume control TREBLE EQ control MIC/LINE 2 volume control MASTER volume control MIC/LINE 3 volume control VU level meter LINE 4 volume control POWER on/off switch LN5/USB volume control Speaker zone selector buttons (RM240S/RM360S only) Rear panel Mains voltage switch LINE 4 input (RCA) -
Page 4: Connection And Setup
Connection and setup Connect the rear IEC inlet (14) to the mains using the supplied mains lead (or an equivalent approved type). Ensure that the correct voltage is indicated on the voltage selector (13) and the mains outlet is switched on. Alternatively, the amplifier can be powered by a 24V battery, such as a lorry or boat battery, by connecting the “+”... -
Page 5: Low Impedance Systems
Speaker switching zones (RM240S and RM360S) The RM240S and RM360S have 4 separate terminals for 100V speakers. Any 100V speakers connected to the terminals labelled 100V or ZONE 1 / ZONE 2 / ZONE 3 / ZONE 4 (+) and COM (-) will be governed by 4 front panel speaker switches (12) (e.g. -
Page 6: Media Player
If a microphone is connected to MIC 1 input, make sure it is switched on and if it requires phantom power, make sure this feature is enabled on the DIP switch. Gradually increase the MIC 1 control (2) whilst speaking into the microphone until the required volume level is reached. -
Page 7: Usb/Sd Player
The Previous, Next and Play/pause buttons will operate in Bluetooth as remote playback controls. Holding the Previous track or Next track buttons (29, 31) will adjust the output volume of the player. The Bluetooth name can be customized to enable identification of individual nearby amplifiers. To customize the Bluetooth number press and hold the Play/Pause button until adastra 0000 is displayed with one of the characters flashing. -
Page 8: Specifications
Electronic equipment and should not be disposed with other household or commercial waste at the end of its useful life. The goods must be disposed of according to your local council guidelines. Errors and omissions excepted. Copyright© 2019. AVSL Group Ltd. RM Series User Manual...
Need help?
Do you have a question about the Adastra RM Series and is the answer not in the manual?
Questions and answers