Advertisement
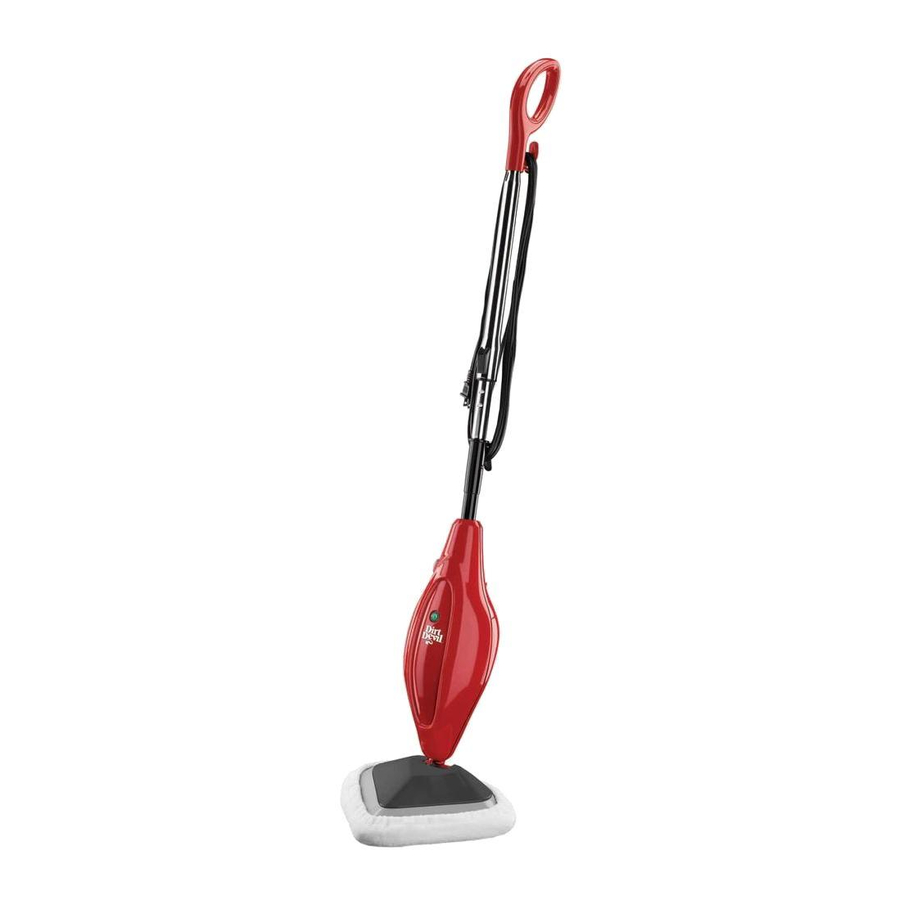
CLEANER DESCRIPTION

- Ergonomic Hand Grip
- Quick-Release Upper Cord Wrap
- Telescoping Handle
- Telescoping Handle Lock
- Locking Metal Pin
- Lower Cord Wrap
- Pin Set Hole
- Lower Body
- Water Tank Cap (roped)
- Steam Pump Switch
- Water Tank Viewing Window
- Green/Red Indicator Light
- Water Tank
- Mop Head
- Power Cord
- 2 Microfiber Cleaning Pads
Accessories
- Funnel
- Water Fill Cup
- Carpet Glider*
- Dusting Pad*
*Included with select models only
BEFORE USING FOR THE FIRST TIME
- Carefully unpack the Steam Mop.
![]()
- Remove all parts from the carton and familiarize yourself with all of the components listed. Make sure all components and accessories are present before discarding packing materials. (See Cleaner Description)
- Following the instructions outlined in the Microfiber Cleaning Pads Care & Cleaning section of this Instruction Manual, wash the microfiber cleaning pads. During the manufacturing process the fabric has a tendency to become flat as it picks up contaminants from the air and machinery. Trim any loose pad threads with sharp scissors.
- Attach the cleaning pad by fitting the mop head into the cleaning pad. Tighten the cleaning pad by pressing the circular lock (A) in one hand, while pulling the black drawstring with the other. When a tight fit is achieved, release the lock to secure in place.

ASSEMBLY
- The Steam Mop comes in 2 pieces: telescoping upper handle and the lower body.
![]()
- To assemble the Steam Mop for first time use, locate and line up the locking metal pin on the bottom of the telescoping handle with the pin set hole on the top of the lower body.
- Depress the metal pin to insert the telescoping handle into the lower body. Push firmly until the locking pin pops up through the hole and locks into place.
NOTE: The fit will be tight.

HOW TO USE
Filling the Water Tank
NOTE: In hard water areas, or to prevent calcium and mineral deposits from accumulating on the heating element and mop head, you may use distilled or demineralized water in place of tap water.
- Always make sure the Steam Mop is unplugged.
![]()
- Make sure the microfiber cleaning pad is properly attached to the mop head. And install following the procedure described in the (Before Using for the First Time) section of this Instruction Manual.
![]()
NEVER USE THE STEAM MOP WITHOUT THE MICROFIBER CLEANING PAD PROPERLY ATTACHED. - Turn the water tank cap counter-clockwise to open. Lift roped cap up and off the tank.
- Using the water fill cup and funnel, pour one full water fill cup into the water tank.
![]()
Check the water tank viewing window to make sure water level does not exceed the MAX fill line. DO NOT OVERFILL. - Replace the water tank cap. Turn clockwise to tighten until snug.


HOW TO USE ON FLOORS

Never use the Steam Mop without the microfiber cleaning pad properly attached to the mop head.
Check the water tank viewing window to sure there is adequate water in the water tank.
- For best results, thoroughly sweep or vacuum floor(s) prior to cleaning with the Steam Mop.

- Twist the quick-release upper cord wrap to either side and unwrap the power cord completely.
- Lengthen the telescoping handle by pushing the lock forward and then pulling the handle out to extend to the desired length.
NOTE: The telescoping handle's length may be adjusted at any time during cleaning. - Plug the unit into a 120V AC electric outlet. The indicator light will illuminate green.
- Press the steam pump switch to the ON (I) position. After 30 seconds, an audible hissing noise can be heard as the unit heats and steam production begins. Steam will wet microfiber cleaning pad.
- Tilt the ergonomic handle to a 45-degree angle and clean the floor area slowly. For best results: The cleaning pad should be changed when it gets too wet or if it is noticeably dirty.
- Pay attention to the water tank's viewing window to monitor remaining water/steam. As the water tank empties, a special water sensor will cause the unit to work intermittently and eventually stop running in order to protect the pump inside the unit. A vibrating sound may be heard, and the green/red indicator light will turn red. The pump will turn OFF.
![]()
Never leave the Steam Mop in one spot on any surface for an extended period of time with a damp or wetmicrofiber cleaning pad attached as this may damage the floor surface. - Press the steam pump switch to the OFF (O) position. Unplug the Steam Mop.
- Refill the water tank using the water fill cup and funnel as previously described. (How To Use) The indicator light will change to green. Continue steam cleaning.
- When cleaning with the Steam Mop is completed press the steam pump switch to OFF (O).
Unplug the unit from the electrical outlet. - Carefully remove the microfiber cleaning pad from the Steam Mop head.
![]()
Cleaning pad and mop head may be hot.
![]()
Do not store unit with a damp or wet microfiber cleaning pad attached.

HOW TO USE ON CARPETS
Your Steam Mop is designed to clean carpets or rugs that will withstand high heat. Be sure to check the Use and Care Instructions from the carpet manufacturer before steam cleaning.

The carpet glider accessory is for use on carpeting and rugs only. Use of the carpet glider on other floor surfaces will cause streaking and possible scratching of the floor's surface.
Never use the Steam Mop without the microfiber cleaning pad properly attached to the mop head.
Check the water tank viewing window to BE sure there is adequate water in the water tank.
For best results, thoroughly vacuum the carpets or rugs prior to steam cleaning.
- Place the mop head (with microfiber cleaning pad in place) on top of the carpet glider.
- Do not attempt to use the Steam Mop on carpet/rug surfaces without the carpet glider in place!
![]()
Never use the carpet glider on surfaces that are prone to scratching.
![]()
The Steam Mop emits steam and creates moisture.
If the Steam Mop operates too long in one place, water marks can result. - Steam clean carpets or rugs following the detailed instructions outlined in the (How To Use On Floors) section. *Included with select models only
GENERAL MAINTENANCE
This appliance requires little maintenance. It contains no user serviceable parts. Do not try to repair it yourself. Any servicing that requires disassembly other than cleaning must be performed by a qualified appliance repair technician.
MICROFIBER CLEANING PADS CARE & CLEANING
To ensure long life and continued cleaning ability, proper care of your microfiber cleaning pad is required. Read and follow cleaning instructions.
- Microfiber cleaning pads can be machine washed in warm water with a mild detergent after each use or when dirty. CAUTION: Never use bleach or fabric softener.
![]()
Only use liquid detergent or soap. - Air dry pads for 24 hours.
NOTE: Cleaning pads may be machine tumble dried on low heat. - To avoid passing or picking up lint from the cleaning pads, wash the microfiber cleaning pads separately or place them in a garment bag.
![]()
Wash microfiber cleaning pads regularly. As with any fabric, dirt particles can cause the fibers to break down. Therefore regular cleaning will help preserve the cleaning efficiency of the microfiber cleaning pads. - As the microfiber cleaning pad is used, sometimes a thread will loosen or pull out. This is normal. Never pull loose threads as this can cause the weave to come undone. Simply trim any loose threads with a pair of sharp scissors.
- Dusting Pad* can be cared for and cleaned in same manner as microfiber pads.*Included with select models only
CARE & CLEANING
- Always unplug and allow the Steam Mop to cool completely before cleaning or moving.
- Press the round black lock and pull it downwards to loosen the microfiber cleaning pad's drawstring.
![]()
Carefully remove the cleaning pad from the mop head, as mop pad and lower assembly may be hot.- Any water remaining in the water tank should be emptied before storing the Steam Mop.
- Wipe all exterior surfaces of Steam Mop with a damp or dry, soft cloth.
STORAGE
- Never store the Steam Mop while it is still plugged in. Remove the plug from the electrical outlet.
- Empty water from the water tank before storing.
- Twist the quick-release upper cord wrap to face upwards. Wrap cord for storage.
- Store upright in a protected, dry area. Keep water fill cup and funnel handy for future use.
TROUBLESHOOTING GUIDE
| PROBLEM | POSSIBLE REASON | POSSIBLE SOLUTION |
Reduced steam or no steam |
|
|
|
| |
Steam Mop worked intermittently and then stopped |
|
|
The indicator light is red |
|
|
| Cleaning pad is very wet and no longer picking up dirt from the floor or carpet |
|
|
Steam mop left white spot on floor |
|
|

Documents / ResourcesDownload manual
Here you can download full pdf version of manual, it may contain additional safety instructions, warranty information, FCC rules, etc.
Advertisement


Need help?
Do you have a question about the PD20000B and is the answer not in the manual?
Questions and answers