
Related Manuals for Daikin Airzone EazyZone AZEZ6DAIST07


Summary of Contents for Daikin Airzone EazyZone AZEZ6DAIST07
- Page 1 Quick Installation Guide Español English Français EASYZONE Italiano Português Deutsch P d r a o b p il C u N e g a r e b m...
-
Page 3: Table Of Contents
ÍNDICE Precauciones y política medioambiental ..................................2 Precauciones ............................................2 Política medioambiental ........................................2 Requisitos generales ..........................................2 Introducción ..............................................3 Instalación del sistema ..........................................4 Montaje Easyzone ............................................4 Montaje a la unidad interior ......................................5 Montaje de toma de aire de ventilación ..................................5 Montaje termostatos (AZCE6BLUEZEROC / AZCE6THINK [C/R] / AZCE6LITE [C/R])..................6 Conexión central del sistema .........................................6 Reset de la zona ..........................................8 Reset del sistema..........................................8... -
Page 4: Precauciones Y Política Medioambiental
PRECAUCIONES Y POLÍTICA MEDIOAMBIENTAL PRECAUCIONES Por su seguridad y la de los dispositivos, respete las siguientes instrucciones: • No manipule el sistema con las manos mojadas ni húmedas. • Realice todas las conexiones o desconexiones con el sistema de climatización sin alimentar. •... -
Page 5: Introducción
• Respete la polaridad de conexión de cada dispositivo. Una conexión errónea puede dañar seriamente el producto. • Para elementos con alimentación externa a 110/230 Vac, solo es necesario conectar los polos “A” y “B” del bus para las comunicaciones. No es recomendable conectar los polos “+” y “-” de alimentación. •... -
Page 6: Instalación Del Sistema
INSTALACIÓN DEL SISTEMA Antes de realizar la instalación del sistema Airzone, compruebe que: • El equipo a controlar se ha instalado según el criterio del fabricante y funciona correctamente sin el sistema Airzone. • En instalaciones con unidades de expansión directa, el termostato de máquina cableado se encuentra instalado. Para realizar una correcta instalación de su sistema Airzone siga los siguientes pasos: Instale el Easyzone (Ver apartado Montaje Easyzone). -
Page 7: Montaje A La Unidad Interior
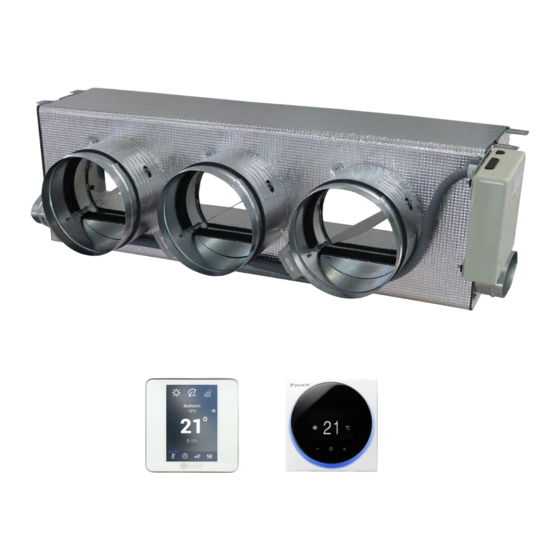
MONTAJE A LA UNIDAD INTERIOR Localice los taladros de fijación, en el caso de encontrarse cubiertos, utilice un destornillador para descubrirlos y facilitar la fijación del Easyzone en la unidad. Importante: En el caso de que su unidad posea frontal con adaptadores circulares, retire este y monte el adaptador suministrado. Sitúe el Easyzone en la boca de impulsión del equipo y fíjelo a este mediante tornillos. -
Page 8: Montaje Termostatos (Azce6Bluezeroc / Azce6Think [C/R] / Azce6Lite [C/R])
MONTAJE TERMOSTATOS (AZCE6BLUEZEROC / AZCE6THINK [C/R] / AZCE6LITE [C/R]) Los termostatos Airzone se montan en superficie mediante soporte. La distancia máxima recomendable para este dispositivo es de 40 metros. Para su fijación siga los siguientes pasos: • Separe la parte trasera del termostato. •... - Page 9 1.- Conexión de los termostatos Si su termostato es cable, conéctelo en cualquiera de las 3 bornas del bus de conexión Airzone. La conexión se puede realizar tanto en modo bus como en estrella. Utilice cable Airzone de 2x0,5+2x0,22 mm .
-
Page 10: Reset De La Zona
Reset de la zona En caso de que necesite resetear una zona, siga los pasos indicados en el apartado Configuración avanzada, Parámetros de zona para los termostatos Blueface zero y Think, y el apartado Reset termostato Lite en caso de los termostatos Lite. Reset del sistema En caso de que necesite devolver el sistema a valores de fábrica, mantenga pulsado SW1 hasta que el LED D19 deje de parpadear. -
Page 11: Configuración Inicial
CONFIGURACIÓN INICIAL TERMOSTATOS AIRZONE BLUEFACE ZERO Y THINK Importante: Una vez empezada la configuración, deberá finalizarla. Podrá modificar los parámetros que desee posteriormente. Idioma/País Seleccione el idioma que desee y su ubicación. Los idiomas disponibles son: español, inglés, francés, italiano, alemán y portugués. - Page 12 Blueface zero Think Importante: Utilice para confirmar y para volver atrás en el caso de que se encuentre en submenús.
-
Page 13: Termostato Airzone Lite
TERMOSTATO AIRZONE LITE Importante: Para realizar la configuración del termostato Lite debe retirarlo de la base. Una vez configure los microswitch colóquelo nuevamente en su base. Canal radio (solo para termostatos radio) Abra el canal de asociación radio. Para ello pulse sobre SW1, el LED D19 se encenderá en color rojo fijo. Una vez abierto dispone de 15 minutos para realizar la asociación, en el caso de que se le agote el tiempo realice de nuevo esta operación. -
Page 14: Reset Termostato Lite
Salidas asociadas Seleccione otras salidas de control asociadas a la zona en caso de necesitarlo. La dirección de la zona será la de menor valor seleccionado. Otras configuraciones Configure las demás funcionalidades del termostato LITE a través del menú de configuración avanzada de su zona desde un termostato Blueface zero (ver apartado Configuración avanzada, Parámetros de zona). -
Page 15: Ajuste De Caudal (Reg)
AJUSTE DE CAUDAL (REG) Encienda y genere demanda en todas las zonas para abrir todas las compuertas. Apague la zona/compuerta que vaya a ajustar. Ajuste la apertura máxima deseada con la palanca REG (I/II/III/IV). Encienda la zona y compruebe que el caudal es correcto. AJUSTE DE AIRE MÍNIMO (A-M) Encienda y genere demanda en todas las zonas para abrir todas las compuertas. -
Page 16: Parámetros De Sistema
Dentro de este menú podrá actuar sobre parámetros de sistema y de zona. PARÁMETROS DE SISTEMA • Dirección de sistema (no disponible en sistemas con pasarela BACnet). Permite definir el número del sistema en su instalación. La opción de Súpermaestro (disponible en instalaciones con central de control de producción Airzone, AZX6CCP) permite imponer el modo de funcionamiento de ese sistema al resto de los sistemas conectados a la AZX6CCP de forma semi-forzada. -
Page 17: Parámetros De Zona
En unidades Fancoil 0-10 V. Permite configurar la tensión mínima (1,5 V por defecto) y máxima (10 V por defecto) de trabajo del ventilador de la unidad controlada, en pasos de 0,1 V. El voltaje mínimo corresponderá con la velocidad mínima deseada para la unidad y el voltaje máximo corresponderá con la velocidad máxima. La velocidad media corresponderá... -
Page 18: Parámetros De Producción
PARÁMETROS DE PRODUCCIÓN Importante: Los parámetros de configuración de la Central de Control de Producción solo están disponibles en AZX6CCPWSCC para el termostato Blueface zero maestro del sistema nº1. • Lógica de funcionamiento. Permite configurar la lógica de funcionamiento con la que trabajarán los relés de control de la central de control de producción: Aerotermia (Por defecto) 2 tubos... -
Page 19: Incidencias
• Función ACS. (Disponible únicamente en instalaciones con pasarela AZX6GAW XXX) Permite activar o desactivar (On/Off) la función de Agua Caliente Sanitaria (ACS) en los sistemas conectados a la CCP. Función activada por defecto. • Válvula mezcladora frío (disponible solo en instalaciones con pasarela de Aerotermia). Permite configurar el funcionamiento de su instalación en función de si se dispone o no de válvula mezcladora de frio. -
Page 20: Anulación Compuerta Para Adaptadores Motorizados Y Pack Combo
ANULACIÓN COMPUERTA PARA ADAPTADORES MOTORIZADOS Y PACK COMBO Asegúrese que la compuerta que se va a anular está cerrada. Desconecte el motor. Introduzca la tapadera de estanqueidad en la compuerta. ANULACIÓN COMPUERTA PARA PLENUMS MOTORIZADOS Los plénums con compuertas anuladas se fabrican y se entregan con la anulación ya realizada, quedando los plénums del siguiente modo: Para los plénums de 7 compuertas, la compuerta que se anula es la nº8, por lo que a la hora de realizar la configuración inicial deberá... - Page 21 CONTENTS Warnings and environmental policy ....................................20 Precautions ............................................20 Environmental policy ........................................20 General requirements ..........................................20 Introduction ............................................... 21 System installation ........................................... 22 Easyzone assembly ..........................................22 Assembly to indoor unit ........................................23 Ventilation air intake assembly ....................................23 Thermostats assembly (AZCE6BLUEZEROC / AZCE6THINK [C/R] / AZCE6LITE [C/R]) ................
-
Page 22: Warnings And Environmental Policy
WARNINGS AND ENVIRONMENTAL POLICY PRECAUTIONS For your security, and to protect the devices, follow these instructions: • Do not handle the system with wet or damp hands. • Disconnect the power supply before making any connections. • Take care not to cause a short circuit in any of the system connections. ENVIRONMENTAL POLICY Do not dispose of this equipment in the household waste. -
Page 23: Introduction
• Do not place the system bus close to lines of force, fluorescent lights, LED lamps, motors, etc. It might cause interference on the communications. • Respect the connection polarity of each device. A wrong connection may seriously damage the product. •... -
Page 24: System Installation
SYSTEM INSTALLATION Before performing the Airzone system installation, check: • The equipment to control has been installed according to the manufacturer’s criteria and it works correctly without the Airzone system. • In direct expansion unit systems, the indoor unit wired thermostat has been installed. In order to install the Airzone system, carefully follow these steps: Install the Easyzone (see section Easyzone assembly). -
Page 25: Assembly To Indoor Unit
ASSEMBLY TO INDOOR UNIT Locate the fixing holes. If they are covered, use a screwdriver to uncover them in order to assemble the Easyzone in the unit. Important: If your unit has circular adapters in the front part, remove it and mount the adapter to Easyzone provided by Airzone. Place the Easyzone in the pressure port of the unit and attach it to this using the screws. -
Page 26: Thermostats Assembly (Azce6Bluezeroc / Azce6Think [C/R] / Azce6Lite [C/R])
THERMOSTATS ASSEMBLY (AZCE6BLUEZEROC / AZCE6THINK [C/R] / AZCE6LITE [C/R]) Airzone thermostats are mounted on the wall through a support. It is recommended not to locate it more than 40 meters away from the main control board. To fix it to the wall, follow these steps: •... - Page 27 1.- Thermostat connection If using a wired thermostat, connect it in one of the 3 Airzone connection bus terminals. The connection can be both a Bus connection or a star connection. Use (2x0.5+2x0.22 ) Airzone wire. For added security, secure the wires using the turrets. In case of wireless element, check it has the battery on.
-
Page 28: Zone Reset
Zone reset If needed, to reset a zone follow the steps shown in the section Advanced Settings, Zone Parameters for Blueface zero and Think thermostats and the section Lite thermostat Reset if using Lite thermostats. System reset If you want to return to factory values, press and hold SW1 until LED D19 stops blinking. Wait for the LEDS to go back to their normal state before starting with the initial configuration process. -
Page 29: Initial Configuration
INITIAL CONFIGURATION AIRZONE BLUEFACE ZERO AND THINK THERMOSTATS Important: Once the setup has been started, it must conclude. You will be able to modify the desired parameters later. Language/Country Select your language and country. These are the available languages: Spanish, English, French, Italian, German and Portuguese. To associate a wireless Think thermostat, start the radio channel search: Setting wireless device Open the radio channel. - Page 30 Blueface zero Think Important: Use to confirm and to return.
-
Page 31: Airzone Lite Thermostat
AIRZONE LITE THERMOSTAT Important: To configure a Lite thermostat you must move it away from its base. Once the microswitches are configured, put it back in its original position. Setting wireless device (only available for wireless thermostat) Open the radio channel. To do that, press on SW1. The LED D19 will remain solid red. Once open, you have 15 minutes to make the association. -
Page 32: Lite Thermostat Reset
Associated outputs If required, select other control outputs associated to the zone. The address zone will be the one with a lower value. Other settings Configure other functionalities of the LITE thermostat from the advanced configuration menu of a Blueface zero thermostat (see section Advanced Settings, Zone parameters). -
Page 33: Flow Adjustment (Reg)
FLOW ADJUSTMENT (REG) Turn on and generate demand in all zones to open all the dampers. Turn off the zone/damper to be adjusted. Adjust the maximum opening you want with the REG lever (I/II/III/IV). Turn on the zone and check the flow is correct. MINIMUM AIR SETTING (A-M) Turn on and generate demand in all zones to open all the dampers. -
Page 34: System Parameters
From this menu you can change the system and zone parameters. SYSTEM PARAMETERS • System address (not available on systems with BACnet gateway). Use this parameter to define the system number in your installation using this parameter. The Supermaster option (available in installations with Airzone production control board, AZX6CCP). -
Page 35: Zone Parameters
0-10 V Fancoil units. Allows to control the minimum (1.5 V by default) and maximum (10 V by default) working fan voltage of the controlled unit, in steps of 0.1 V. The minimum voltage corresponds with the desired lowest speed for the unit and the maximum voltage corresponds with the highest speed. The medium speed corresponds with the mid point between both of them. - Page 36 Aerothermal unit (Default preset) 2 pipes 4 pipes RadianT (Recommended for RadianT365 systems) Aerothermal Control Relays Mode Demand FRIO_Y CALORB_W AIRE_Y RADIANTE_Y AIRE_W RADIANTE_W Stop Cooling Radiant mode Heating Radiant mode Ventilation 2 pipes / 4 pipes Control Relays Mode Demand FRIO_Y CALORB_W...
-
Page 37: Incidences
• DHW function. (Only available in installations with AZX6GAW XXX control gateways) It allows to turn on/off the Domestic Heat Water (DHW) function in the systems connected to the CCP. Activated by default. • Cooling mixing valve (only available in installations with aerothermal gateway). It allows you to configure the operation of your installation depending on whether or not you have a cooling mixing valve. -
Page 38: Annul Damper For Motorized Adapters And Pack Combo
ANNUL DAMPER FOR MOTORIZED ADAPTERS AND PACK COMBO Check the gate that is going to be annulled is closed. Switch off the actuator. Put the sealing lid at the gate as shown in the picture. ANNUL DAMPER FOR MOTORIZED PLENUMS Plenums with null dampers are manufactured and delivered with the annulment already performed, remaining the plenums as it follows.: For 7 dampers plenums, the null damper is the number 8, so, when performing the initial configuration,... - Page 39 SOMMAIRE Précautions et politique environnementale ................................. 38 Précautions ............................................38 Politique environnementale ......................................38 Prérequis générales ..........................................38 Introduction ............................................... 39 Installation du système .......................................... 40 Montage Easyzone ..........................................40 Montage sur l'unité intérieure ...................................... 41 Montage de la prise d'air de ventilation ................................... 41 Montage du thermostats (AZCE6BLUEZEROC / AZCE6THINK [C/R] / AZCE6LITE [C/R]) ................
-
Page 40: Précautions Et Politique Environnementale
PRÉCAUTIONS ET POLITIQUE ENVIRONNEMENTALE PRÉCAUTIONS Pour votre sécurité et celle des dispositifs, veuillez respecter les instructions suivantes : • Ne manipulez pas le système avec les mains mouillées ou humides. • Réalisez toutes les connexions ou déconnexions sans alimenter le système de climatisation. •... -
Page 41: Introduction
• Évitez de placer le bus du système à proximité de lignes de force, tubes fluorescents, lampes LED, moteurs, etc. Ceux- ci sont susceptibles de provoquer des interférences dans les communications. • Respectez la polarité de connexion de chaque appareil. Une mauvaise connexion peut sérieusement endommager le produit. -
Page 42: Installation Du Système
INSTALLATION DU SYSTÈME Avant de procéder à l'installation du système Airzone, veuillez vérifier que : • L'unité à contrôler est installée selon les critères du fabricant et fonctionne correctement sans système Airzone. • Sur les installations équipées d'unités à expansion directe, le thermostat filaire de l'unité est installé. Pour installer correctement votre système Airzone, suivez les indications suivantes : Installez Easyzone (Voir la section Montage Easyzone). -
Page 43: Montage Sur L'unité Intérieure
MONTAGE SUR L'UNITÉ INTÉRIEURE Localisez les trous de fixation. S'ils sont bouchés, utilisez un tournevis pour les déboucher et faciliter la fixation d'Easyzone sur l'unité. Attention : Si votre unité est équipée d'un cache frontal avec adaptateurs circulaires, retirez-le et montez l'adaptateur fourni. Placez l'Easyzone au niveau de la bouche de soufflage de l'unité... -
Page 44: Montage Du Thermostats (Azce6Bluezeroc / Azce6Think [C/R] / Azce6Lite [C/R])
MONTAGE DU THERMOSTATS (AZCE6BLUEZEROC / AZCE6THINK [C/R] / AZCE6LITE [C/R]) Les thermostats Airzone sont montés en saillie au moyen d'un support. Veuillez noter que la distance maximale recommandée pour ce dispositif est de 40 mètres. Pour le fixer au mur, veuillez suivre les étapes suivantes : •... - Page 45 1.- Connexion du thermostat Dans le cas d'un thermostat filaire, connectez le thermostat à n’importe quelle borne du bus d’expansion. La connexion peut être réalisée en étoile ou en bus. Utilisez un câble Airzone de 2 x 0,5 + 2 x 0,22 mm .
-
Page 46: Réinitialisation De La Zone
Réinitialisation de la zone Pour réinitialiser une zone, veuillez suivre la procédure indiquée à la rubrique Configuration avancée, Paramètres de zone pour les thermostats Blueface zero et Think, ou à la rubrique Réinitialisation du thermostat Lite pour les thermostats Lite. Réinitialisation du système Si vous avez besoin de réinitialiser le système, appuyez sur SW1 jusqu'à... -
Page 47: Configuration Initiale
CONFIGURATION INITIALE THERMOSTATS AIRZONE BLUEFACE ZERO ET THINK Attention : Une fois la configuration amorcée, vous devrez l'achever. Vous pourrez modifier les paramètres souhaités ultérieurement. Langue / Pays Sélectionnez la langue que vous souhaitez et votre pays. Les langues disponibles sont les suivantes : français, espagnol, anglais, italien, allemand et portugais. - Page 48 Blueface zero Think Important : Utilisez pour confirmer et pour revenir en arrière lorsque vous vous trouvez dans un sous-menu.
-
Page 49: Thermostat Airzone Lite
THERMOSTAT AIRZONE LITE Important : pour configurer le thermostat Lite, vous devez au préalable le retirer de son support. Une fois que les microswitchs ont été configurés, replacez l’interface sur son support. Configuration dispositif radio (disponible uniquement pour thermostat radio) Vous devez ouvrir le canal d'association radio. -
Page 50: Réinitialisation Du Thermostat Lite
Sorties associées Sélectionnez d'autres sorties de contrôle associées à la zone lorsque c’est nécessaire. L'adresse de la zone sera celle de valeur inférieure sélectionnée. Autres configurations Configurez les autres fonctionnalités du thermostat LITE au travers du menu de configuration avancée de la zone par l'intermédiaire d'un thermostat Blueface zero (voir section Configuration avancée, Paramètres de zone). -
Page 51: Régulation De Débit (Reg)
RÉGULATION DE DÉBIT (REG) Allumez et générez une demande dans toutes les zones pour ouvrir les registres. Éteignez la zone/le registre à réguler. Régler l'ouverture maximale souhaitée au moyen du levier REG (I/II/III/IV). Allumez la zone et vérifiez que le débit est correct. RÉGULATION D'AIR MINIMUM (A-M) Allumez et générez une demande dans toutes les zones pour ouvrir les registres. -
Page 52: Paramètres Du Système
Dans ce menu, vous pourrez modifier les paramètres du système et zone. PARAMÈTRES DU SYSTÈME • Adresse du système (non disponible dans les systèmes avec la passerelle BACnet). Cette fonctionnalité permet de définir l'adresse du système de votre installation. L'option Supermaître (disponible dans les installations qui disposent d'une platine centrale de contrôle de production Airzone AZX6CCP) permet d'imposer le mode de fonctionnement de ce système au reste des systèmes connectés à... -
Page 53: Paramètres De Zone
Silence : Le système travaille à une vitesse inférieure à celle du mode Standard afin de privilégier la diminution du bruit. Minimum : Le système travaille à vitesse minimale, indépendamment du nombre de zones. Sur les unités à ventilo-convecteur 0-10 V. Permet de configurer la tension minimale (1,5 V par défaut) et maximale (10 V par défaut) de régime du ventilateur de l'unité... -
Page 54: Paramètres De Production
• Offset. Rectification de la température ambiante des différentes zones du système aussi bien en mode refroidissement qu'en mode chauffage, avec un facteur de correction compris entre -2,5 ºC et 2,5ºC par pas de 0,5 ºC (par défaut 0ºC.) • Réinitialisation thermostat (non disponible dans les zones à... -
Page 55: Erreurs
Rayonnement en mode refroidissement : 18 ˚C Air en mode chauffage : 50 ˚C Rayonnement en mode chauffage : 35 ˚C • Fonction ECS. (Disponible uniquement dans les installations avec pasarelle AZX6GAW XXX) Permet d’activer / désactiver (On/Off) la fonction d’Eau chaude sanitaire (ECS) sur les systèmes connectés à la CCP. Activeé par défaut. •... -
Page 56: Annulation De Registre Pour Adaptateurs Motorisés Et Pack Combo
ANNULATION DE REGISTRE POUR ADAPTATEURS MOTORISÉS ET PACK COMBO Veillez à ce que le registre à annuler soit fermé. Débranchez le moteur. Introduisez le couvercle d'étanchéité dans le registre. ANNULATION DE REGISTRE POUR PLENUMS MOTORISÉS Les plénums dont les registres sont annulés sont fabriqués et livrés en l'état. Voici leur aspect : En ce qui concerne les plénums à... - Page 57 INDICE Precauzioni e politica ambientale ..................................... 56 Precauzioni ............................................56 Politica ambientale ........................................... 56 Requisiti generali ............................................. 56 Introduzione .............................................. 57 Installazione del sistema ........................................58 Installazione Easyzone ........................................... 58 Installazione a unità interna ......................................59 Installazione della presa d'aria di ventilazione ............................... 59 Installazione Termostati (AZCE6BLUEZEROC / AZCE6THINK [C/R] / AZCE6LITE [C/R]) ................
-
Page 58: Precauzioni E Politica Ambientale
PRECAUZIONI E POLITICA AMBIENTALE PRECAUZIONI Per la sicurezza dell'utente e dei dispositivi, si prega di rispettare le seguenti istruzioni: • Non maneggiare il sistema con le mani bagnate o umide. • Effettuare tutti i collegamenti o scollegamenti con il sistema di climatizzazione non connesso alla rete elettrica. •... -
Page 59: Introduzione
• Non collocare il bus di sistema vicino a linee di forza, fluorescenti, motori ecc., poiché possono generare interferenze nelle comunicazioni. • Rispettare la polarità dei connettori di ogni dispositivo. Una connessione errata può danneggiare gravemente il prodotto. • Per gli elementi con alimentazione esterna da 110/230 VAC è necessario collegare i poli A e B del bus per le comunicazioni. -
Page 60: Installazione Del Sistema
INSTALLAZIONE DEL SISTEMA Prima di effettuare l'installazione del sistema Airzone, si prega di verificare che: • L’unità da controllare è stata installata secondo il criterio del fabbricante e funziona correttamente senza il sistema Airzone. • Nelle installazioni con unità a espansione diretta il termostato dell'unità cablato si trovi installato. Seguire le seguenti indicazioni per realizzare una corretta installazione del sistema Airzone: Installare Easyzone (vedi sezione Installazione Easyzone). -
Page 61: Installazione A Unità Interna
INSTALLAZIONE A UNITÀ INTERNA Localizzare i fori di fissaggio. Se sono coperti, scoprirli con un cacciavite per agevolare il fissaggio di Easyzone nell'unità. Importante: Se l'unità è dotata di frontalino con adattatori circolari, rimuoverlo per montare l'adattatore fornito. Collocare Easyzone nella bocchetta di mandata dell'unità e fissarlo con delle viti. Dopo aver fissato le viti, isolare il collo del collegamento per evitare la formazione di condensa. -
Page 62: Installazione Termostati (Azce6Bluezeroc / Azce6Think [C/R] / Azce6Lite [C/R])
INSTALLAZIONE TERMOSTATI (AZCE6BLUEZEROC / AZCE6THINK [C/R] / AZCE6LITE [C/R]) Il termostati Airzone vengono montati in superficie mediante supporto. Si prega di ricordare che la distanza massima raccomandabile per questi dispositivi è di 40 metri. Per fissarli alla parete è necessario seguire le seguenti indicazioni: •... - Page 63 1.- Collegamento del termostato In caso di termostato con cavo, collegarlo in uno dei 3 morsetti del bus di collegamento Airzone. Il collegamento può essere realizzato in modo bus e a stella. Utilizzare il cavo Airzone da 2x0,5 + 2x0,22 mm2. Fissare i cavi nelle torrette della scheda centrale per una maggiore sicurezza.
-
Page 64: Reset Della Zona
Reset della zona Se è necessario resettare una zona, si prega di seguire le indicazioni mostrate nella sezione Configurazioni avanzate, Parametri di zona per i termostati Blueface zero e Think, e nella sezione Reset del termostato Lite per i termostati Lite. Reset del sistema Nel caso in cui sia necessario riportare il sistema ai valori di fabbrica, mantenere premuto SW1 finché... -
Page 65: Configurazioni Iniziali
CONFIGURAZIONI INIZIALI TERMOSTATI AIRZONE BLUEFACE ZERO E THINK Importante: Portare a termine la configurazione una volta iniziata. È possibile modificare successivamente i parametri desiderati. Lingua/Stato Selezionare la lingua desiderata e la località. Le lingue disponibili sono: spagnolo, inglese, francese, italiano, tedesco e portoghese. - Page 66 Blueface zero Think Importante: Utilizzare per confermare e per tornare indietro nel caso in cui l'utente si trovi nei sottomenu.
-
Page 67: Termostato Airzone Lite
TERMOSTATO AIRZONE LITE Importante: Per configurare il termostato Lite è necessario rimuoverlo dalla base. Una volta configurati i microswitch, collocarlo nuovamente nella sua base. Configurazioni dispositivi radio (disponible solo per termostatos radio) Aprire il canale radio per associare i termostati radio. A tale scopo premere SW1, il LED D19 sarà di colore rosso fisso. -
Page 68: Reset Del Termostato Lite
Uscite associate Selezionare altre uscite di controllo associate alla zona in caso di bisogno. L'indirizzo della zona sarà quello del valore minore selezionato. Altre configurazioni Configurare le altre funzionalità del termostato LITE mediante il menu delle configurazioni avanzate della sua zona da un termostato Blueface zero (vedi sezione Configurazioni avanzate, Parametri di zona). -
Page 69: Regolazione Della Portata (Reg)
REGOLAZIONE DELLA PORTATA (REG) Accendere tutte le zone in regime di domanda per aprire tutte le serrande. Spegnere la zona/serranda da regolare. Regolare l'apertura massima desiderata con la leva REG (I/II/III/IV). Accendere la zona e verificare che la portata sia corretta. REGOLAZIONE DELL'ARIA MINIMA (A-M) Accendere tutte le zone in regime di domanda per aprire tutte le serrande. -
Page 70: Parametri Di Sistema
In questo menu è possibile agire sui parametri di sistema e di zona. PARAMETRI DI SISTEMA • Indirizzo del sistema (non disponibile nei sistemi con interfaccia BACnet). Consente di definire il numero del sistema nella sua installazione. L'opzione Supermaestro (disponibile nelle installazioni con la centrale di controllo produzione Airzone AZX6CCP) permette di imporre il modo di funzionamento di questo sistema al resto dei sistemi collegati alla AZX6CCP in modo semiforzato: Modo di funzionamento:... -
Page 71: Parametri Di Zona
Minimo: Il sistema lavora alla velocità minima disponibile, indipendentemente del numero di zone aperte. In unità Fancoil 0-10 V. Consente di configurare la tensione di lavoro minima (1,5 V per difetto) e massima (10 V per difetto) del ventilatore dell’unità controllata a intervalli di 0,1 V. Il voltaggio minimo corrisponde alla velocità minima desiderata per l’unità... -
Page 72: Parametri Di Produzione
PARAMETRI DI PRODUZIONE Importante: I parametri di configurazione della centrale di controllo di produzione sono disponibili solo per il termostato Blueface zero maestro del sistema nº1. • Logica di funzionamento. Permette di configurare la logica di funzionamento per i relè de controllo della centrale di controllo di produzione: Aerotermia (Per difetto) 2 tubi... -
Page 73: Incidenze
• Funzione ACS. (Disponibile solo nelle installazioni con interfaccia di controllo AZX6GAW XXX). Permette di attivare / deattivare (On/Off) la funzione di Acqua Calda Sanitaria (ACS) nei sistemi collegati alla CCP. Funzione attivata per difetto. • Valv. miscelatrice freddo (disponibile solo negli impianti con interfaccia di aerotermia). Permette di configurare il funzionamento dell’impianto in base alla presenza o meno della valvola miscelatrice freddo. -
Page 74: Annullamento Della Serranda Per Adattatori Motorizzati E Pack Combo
ANNULLAMENTO DELLA SERRANDA PER ADATTATORI MOTORIZZATI E PACK COMBO Assicurarsi che la serranda da annullare sia chiusa. Scollegare il motore. Inserire la copertura a tenuta stagna nella serranda. ANNULLAMENTO DELLA SERRANDA PER PLENUM MOTORIZZATI I plenum con serrande annullate vengono fabbricati e integrati con l’annullamento già realizzato, si presenteranno quindi nel modo seguente: Per i plenum a 7 serrande, la serranda annullata è... - Page 75 ÍNDICE Precauções e política ambiental ......................................74 Precauções ............................................74 Política ambiental ..........................................74 Requisitos gerais ............................................74 Introdução ..............................................75 Instalação do sistema ..........................................76 Montagem Easyzone ..........................................76 Montagem na unidade interior ....................................77 Montagem da entrada de ar de ventilação ................................77 Montagem termostato (AZCE6BLUEZEROC / AZCE6THINK [C/R] / AZCE6LITE [C/R]) ................
-
Page 76: Precauções E Política Ambiental
PRECAUÇÕES E POLÍTICA AMBIENTAL PRECAUÇÕES Para sua segurança e de seus dispositivos, siga as seguintes instruções: • Não manipule o sistema com as mãos molhadas ou húmidas. • Faça todas as conexões ou desconexões com o sistema de climatização sem alimentá-lo. •... -
Page 77: Introdução
• Não coloque o barramento do sistema próximo a linhas de força, iluminação fluorescente, motores, etc., para que não haja interferência na comunicação. • Respeite a polaridade da ligação de cada dispositivo. Uma ligação incorreta pode danificar o produto. • Para elementos com alimentação externa a 110/230 Vac, é... -
Page 78: Instalação Do Sistema
INSTALAÇÃO DO SISTEMA Antes de realizar a instalação do sistema Airzone, verifique se: • O equipamento a ser controlado foi instalado de acordo com os critérios do fabricante e funciona perfeitamente sem o sistema Airzone. • Em instalações com unidades de expansão direta, o termostato de máquina com cabos encontra-se instalado. Para instalar o sistema Airzone corretamente, siga os passos a seguir: Instale o Easyzone (Ver secção Montagem Easyzone). -
Page 79: Montagem Na Unidade Interior
MONTAGEM NA UNIDADE INTERIOR Localize as brocas de fixação. Caso estejam cobertas, utilize uma chave de fenda para descobri-las e facilitar a fixação do Easyzone na unidade. Importante: Caso a parte frontal da unidade tenha adaptadores circulares, retire-os e monte o adaptador fornecido. Posicione o Easyzone na boca de impulsão do equipamento e fixe-o com parafusos. -
Page 80: Montagem Termostato (Azce6Bluezeroc / Azce6Think [C/R] / Azce6Lite [C/R])
MONTAGEM TERMOSTATO (AZCE6BLUEZEROC / AZCE6THINK [C/R] / AZCE6LITE [C/R]) Os termostatos Airzone são montados na superfície através de suporte. Lembre-se que a distância máxima recomendada para este dispositivo é 40 metros. Para fixá-lo à parede, execute os passos a seguir: •... - Page 81 1.- Conexão do termostato Se seu termostato for cabo, conecte os em qualquer um dos três terminais do barramento de conexão Airzone. A conexão pode ser realizada tanto em modo Barramento como em estrela. Utilize cabo Airzone de 2x0,5+2x0,22 mm .
-
Page 82: Reset Da Zona
Reset da zona Caso necessite fazer o reset de uma zona, siga os passos indicados na secção Configuração avançada, Parâmetros de zona, no caso dos termostatos Blueface zero e Think, e na secção Reset termostato Lite, no caso dos termostatos Lite. Reset do sistema Caso necessite que o sistema retorne aos valores de fábrica, mantenha SW1 pressionado até... -
Page 83: Configuração Inicial
CONFIGURAÇÃO INICIAL TERMOSTATOS AIRZONE BLUEFACE ZERO E THINK Importante: Se a configuração for iniciada, ela deverá ser finalizada. É possível modificar os parâmetros que desejar posteriormente Language/país Selecione o idioma que deseja e sua localização. Os idiomas disponíveis são: espanhol, inglês, francês, italiano, alemão e português. - Page 84 Blueface zero Think Importante: Utilize para confirmar e para voltar atrás, caso se encontre nos submenus.
-
Page 85: Termostato Airzone Lite
TERMOSTATO AIRZONE LITE Importante: Para realizar a configuração do termostato Lite, deve-se retirá-lo da base. Quando os microswitch tiverem sido configurados, ele deverá ser recolocado em sua base. Configuração dispositivo radio (disponível apenas em termostatos rádio) Deverá abrir o canal rádio previamente. Para isso, pressione SW1, o LED D19 ficará vermelho. Quando o canal estiver aberto, terá... -
Page 86: Reset Termostato Lite
Saídas associadas Selecione outras saídas de controlo associadas à zona, caso necessite. O endereço da zona será o de menor valor selecionado. Outras configurações Configure as outras funcionalidades do termostato LITE através do menu de configuração avançada de sua zona a partir de um termostato Blueface zero (ver secção Configuração avançada, Parâmetros de zona) ou Webserver Cloud (Ver manual de instalação do Webserver Cloud). -
Page 87: Ajuste De Fluxo (Reg)
AJUSTE DE FLUXO (REG) Ligue e gere demanda em todas as zonas para abrir todas as comportas. Desligue a zona/comporta que será ajustada. Ajuste a abertura máxima desejada com a alavanca REG (I/II/III/IV). Ligue a zona e verifique se o fluxo está correto. AJUSTE DE AR MÍNIMO (A-M) Ligue e gere demanda em todas as zonas para abrir todas as comportas. -
Page 88: Parâmetros De Sistema
Neste menu, poderá atuar sobre os parâmetros de sistema e de zona. PARÂMETROS DE SISTEMA • Endereço do sistema (não disponível em sistemas com gateway BACnet). Permite definir o número do sistema em sua instalação. A opção de Supermaestro (disponível em instalações com central de controlo de produção Airzone, AZX6CCP) permite impor o modo de funcionamento desse sistema ao resto dos sistemas conectados à... -
Page 89: Parâmetros De Zona
Em unidades Fancoil 0-10 V. Permite configurar a tensão mínima (1,5 V por padrão) e máxima (10 V por padrão) de trabalho do ventilador da unidade controlada em intervalos de 0,1 V. A tensão mínima corresponderá à velocidade mínima desejada para a unidade e a tensão máxima corresponderá à velocidade máxima. A velocidade média corresponderá... -
Page 90: Parâmetros De Produção
PARÂMETROS DE PRODUÇÃO Importante: Os parâmetros de configuração da central de controlo de produção cloud só estão disponíveis para o termostato Blueface zero mestre do sistema nº1. • Lógica de funcionamento. Permite configurar a lógica de funcionamento com a qual trabalharão os relés de controlo da central de controlo de produção: Aerotermia (Por padrão) 2 tubos... -
Page 91: Incidências
• Função AQS. (Disponível apenas em instalações com gateway de controlo AZX6GAW XXX) Permite ativar ou desativar (On/Off) a função de Água Quente Sanitária (AQS) nos sistemas ligados à CCP. Função ativada por padrão. • Válv. misturadora frio (disponível apenas em instalações com gateway de aerotermia). Permite-lhe configurar o funcionamento da sua instalação dependendo de ter ou não uma válvula misturadora de frio. -
Page 92: Anulação Comporta Para Adaptadores Motorizados E Pack Combo
ANULAÇÃO COMPORTA PARA ADAPTADORES MOTORIZADOS E PACK COMBO Certifique-se de que a comporta que será anulada está fechada. Desconecte o motor. Introduza a cobertura de estanqueidade na comporta. ANULAÇÃO COMPORTA PARA PLENUMS MOTORIZADOS Os plenums com comportas anuladas são fabricados e entregues com a anulação já realizada, e ficam do seguinte modo: Para os plenums de 7 comportas, a comporta que se anula é... - Page 93 INDEX Vorsichtsmaßnahmen und Umweltrichtlinie ................................92 Vorsichtsmaßnahmen ........................................92 Umweltrichtlinie..........................................92 Allgemeine Anforderungen ........................................ 92 Einführung..............................................93 Systeminstallation ............................................ 94 Easyzone-Montage ..........................................94 Montage an Innengerät ........................................95 Montage des Lufteinlasses für die Lüftung ................................95 Montage des thermostate (AZCE6BLUEZEROC / AZCE6THINK [C/R] / AZCE6LITE [C/R]) ..............96 Montage und Zentralanschluss des Systems ................................
- Page 94 VORSICHTSMAßNAHMEN UND UMWELTRICHTLINIE VORSICHTSMAßNAHMEN Für Ihre eigene Sicherheit und die der Geräte beachten Sie bitte die folgenden Anweisungen: • Bedienen Sie das System nicht mit nassen oder feuchten Händen. • Führen Sie alle Anschluss- oder Trennarbeiten am Klimatisierungssystem ohne Stromversorgung durch. •...
- Page 95 • Verwenden Sie das Airzone-Kabel für den Anschluss der Verbindung mit dem System: Abgeschirmtes, umflochtenes, ). Der Anschluss zwischen den Zonenmodulen muss im Bus-Modus vierdrähtiges Kabel (2x0,22 mm + 2x0,5 mm erfolgen. • Legen Sie den Systembus nicht neben Stromleitungen, Leuchtstoffröhren, Motoren etc., welche die Verbindungen stören können.
- Page 96 SYSTEMINSTALLATION Vor Installation des Airzone-Systems prüfen Sie, dass: • Das zu steuernde Gerät wurde nach Kriterien des Herstellers installiert und funktioniert ordnungsgemäß ohne Airzone- System. • In Anlagen mit Direkterweiterungsgeräten der Kabel-Maschinenthermostat installiert ist. Beachten Sie die folgenden Schritte für eine sachgerechte Installation Ihres Airzone-Systems: Installieren Sie Easyzone (siehe Abschnitt Easyzone-Montage).
- Page 97 MONTAGE AN INNENGERÄT Suchen Sie die Befestigungsbohrungen. Wenn sie verdeckt sind, nehmen Sie einen Schraubendreher zu Hilfe, um sie zu finden und die Befestigung des Easyzone an dem Gerät zu erleichtern. Wichtig: Falls Ihr Gerät eine Front mit kreisförmigen Adaptern hat, nehmen Sie diese ab und montieren Sie den mitgelieferten Adapter.
- Page 98 MONTAGE DES THERMOSTATE (AZCE6BLUEZEROC / AZCE6THINK [C/R] / AZCE6LITE [C/R]) Die Airzone-Thermostate werden über eine Halterung an Oberflächen montiert. Beachten Sie, dass die maximale Entfernung für diese Vorrichtung nicht über 40 Meter betragen sollte: • Trennen Sie die Rückseite des Thermostats. •...
- Page 99 1.- Thermostateanschluss Wenn es sich um ein Kabel-Thermostat handelt, schließen an eine der 3 Klemmen am Airzone Anschlussbus an. Der Anschluss kann sowohl im Bus-Modus als auch als Sternschaltung erfolgen. Verwenden Sie das Airzone-Kabel 2x0,5+2x0,22 mm Befestigen Sie die Kabel zur Sicherheit an den Haltern der Zentrale. Kontrollieren Sie bei den Funkelementen, dass die Batterie eingelegt ist.
- Page 100 Beachten Sie: Nach Durchführung aller Anschlussarbeiten prüfen Sie, dass die Abdeckung der Systemzentrale wieder ordnungsgemäß angebracht ist. Zonen-Reset Zum Zurücksetzen einer Zone folgen Sie den Hinweisen im Abschnitt Erweiterte Konfiguration, Zonenparameter für Blueface zero- und Think-Thermostate und dem Abschnitt Lite-Thermostat-Reset bei Lite-Thermostaten. System-Reset Falls Sie das System auf Werkseinstellungen zurücksetzen müssen, halten Sie SW1 gedrückt, bis die LED D19 aufhört, zu blinken.
- Page 101 ERSTKONFIGURATION THERMOSTATE AIRZONE BLUEFACE ZERO UND THINK Wichtig: Wenn die Konfiguration einmal begonnen wurde, muss sie abgeschlossen werden. Sie können die gewünschten Parameter später ändern. Sprache/Land Wählen Sie die gewünschte Sprache und den Standort. Folgende Sprachen stehen zur Verfügung: Spanisch, Englisch, Französisch, Italienisch, Deutsch, Portugiesisch.
- Page 102 Blueface zero Think Wichtig: Verwenden Sie bitte zum Bestätigen und um zurückzugehen, falls Sie sich in Untermenüs befinden.
- Page 103 THERMOSTAT AIRZONE LITE Wichtig: Um den Lite-Thermostat zu konfigurieren, müssen Sie ihn von seiner Basis entfernen. Nachdem Sie die Mikroschalter konfiguriert haben, setzen Sie ihn wieder auf seine Basis. Konfiguration Funkgeräte (nur für Funk-Thermostate verfügbar) Müssen Sie zunächst den Funkkanal öffnen. Drücken Sie dazu auf SW1; die LED D19 leuchtet dann rot ohne Unterbrechung.
- Page 104 Verbundene Ausgänge Wählen Sie gegebenenfalls andere Steuerausgänge, die mit der Zone verbunden sind. Die Zonenadresse ist diejenige mit dem niedrigsten ausgewählten Wert. Andere Konfigurationen Konfigurieren Sie die übrigen Funktionen des LITE-Thermostats über das Menü für erweiterte Konfiguration Ihrer Zone mit einem Blueface zero-Thermostat (siehe Abschnitt Erweiterte Konfiguration, Zonenparameter) oder Webserver Cloud (siehe Installationsanleitung für Webserver Cloud).
- Page 105 DURCHFLUSSMENGENEINSTELLUNG (REG) Schalten Sie ein und erzeugen Sie Bedarf in allen Zonen, um alle Ventile zu öffnen. Schalten Sie die Zone/das Ventil aus, die/das Sie einstellen möchten. Stellen Sie die gewünschte maximale Öffnung mit dem Hebel REG ein (I/II/III/IV). Schalten Sie die Zone ein und kontrollieren Sie, dass die Durchflussmenge richtig ist. EINSTELLUNG DER MINDESTLUFT (A-M) Schalten Sie ein und erzeugen Sie Bedarf in allen Zonen, um alle Ventile zu öffnen.
- Page 106 In diesem Menü können Sie die System- und Zonenparameter einstellen. SYSTEMPARAMETER • Systemadresse (nicht in Anlagen mit dem BACnet-Gateway verfügbar). Ermöglicht die Festlegung der Systemnummer in Ihrer Anlage. Die Option Supermaster (verfügbar in Anlagen mit steuerzentrale produktion airzone, AZX6CCP) ermöglicht, den Betriebsmodus dieses Systems den übrigen, mit der AZX6CCP verbundenen Systemen, halb- verbindlich vorzuschreiben: Betriebsmodus: Verfügbare Betriebsmodi:...
- Page 107 In 0-10 V Fancoil-Geräten. Ermöglicht die Konfiguration der Mindestbetriebsspannung (Standardwert 1,5 V) und Höchstbetriebsspannung (Standardwert 10 V) des Lüfters des gesteuerten Geräts in 0,1-V-Schritten. Die Mindestspannung entspricht der für das Gerät gewünschten Mindestgeschwindigkeit und die Höchstspannung entspricht der Höchstgeschwindigkeit. Die mittlere Geschwindigkeit entspricht dem Zwischenwert beider Spannungen.
- Page 108 PRODUKTION-PARAMETER Wichtig: Die Konfigurationsparameter der Steuerzentrale Produktion (CCP) sind nur für den Blueface zero-Thermostat, der Master des Systems Nr. 1 ist, verfügbar. • Funktionslogik. Ermöglicht die Konfiguration der Funktionslogik, mit der die Steuerrelais der Steuerzentrale Produktion arbeiten werden: Aerothermie (standardmäßig) 2 Rohre 4 Rohre RadianT (empfohlen für RadianT365-Systeme)
- Page 109 • WBW-Funktion (nur in Anlagen mit AZX6GAW-Gateway XXX verfügbar). Ermöglicht das Aktivieren oder Deaktivieren (Ein/Aus) der Warmbrauchwasserfunktion (WBW) in den an die CCP angeschlossenen Systemen. Diese Funktion ist standardmäßig aktiviert. • Kältemischventil (nur in Anlagen mit Luft-Wasser-Wärmepumpen-Gateway verfügbar). Ermöglicht die Konfiguration des Betriebs der Anlage in Abhängigkeit davon, ob sie über ein Kältemischventil verfügt.
- Page 110 VENTILANNULLIERUNG FÜR MOTORISIERTE ADAPTER UND PACK COMBO Kontrollieren Sie, dass das zu annullierende Ventil geschlossen ist. Trennen Sie den Motor ab. Führen Sie den Dichtungsdeckel in das Ventil ein. VENTILANNULLIERUNG FÜR MOTORISIERTE PLENUM Die Plenums mit außer Kraft gesetzten Ventilen werden bereits mit erfolgter Annullierung hergestellt und ausgeliefert, wobei die Plenums folgendermaßen ausfallen: Bei den Plenums mit 7 Ventilen ist das Ventil Nr.
- Page 112 Parque Tecnológico de Andalucía Parc Tertiaire Silic – Inmeuble Panama C/ Marie Curie, 21 – 29590 45 Rue Villeneuve Via Fabio Filzi, 19/E – 20032 Campanillas – Málaga - España 94573 Rungis - France Cormano – Milano - Italia Teléfono: +34 900 400 445 Téléphone : +33 184 884 695 Telefono: +39 02 56814756 Fax: +34 902 400 446...
Need help?
Do you have a question about the Airzone EazyZone AZEZ6DAIST07 and is the answer not in the manual?
Questions and answers