Table of Contents
Advertisement
Quick Links
Advertisement
Table of Contents

Related Manuals for Garmin ECHOMAP 60 Series


Summary of Contents for Garmin ECHOMAP 60 Series
- Page 1 ECHOMAP™ 40/60/70/90 SERIES Owner’s Manual...
- Page 2 © 2017 Garmin Ltd. or its subsidiaries All rights reserved. Under the copyright laws, this manual may not be copied, in whole or in part, without the written consent of Garmin. Garmin reserves the right to change or improve its products and to make changes in the content of this manual without obligation to notify any person or organization of such changes or improvements.
-
Page 3: Table Of Contents
Customizing Pages ..............2 Contours Feature ..............11 Customizing a Combination Page .......... 2 Adding a Label to a Garmin Quickdraw Contours Map .... 11 Creating a New Combination Page with the ECHOMAP Plus Garmin Quickdraw Community ..........11 70/90 ..................2... - Page 4 Playing Sonar Recordings ........... 21 Setting the Fuel Capacity of the Vessel ....... 28 Traditional, Garmin ClearVü, and SideVü Sonar Setup ... 21 Synchronizing the Fuel Data with the Actual Vessel Fuel ... 28 Setting the Zoom Level on the Sonar Screen ...... 21 Viewing the Wind Gauges ............
- Page 5 Muting the Media Volume ............ 31 Sharing and Managing User Data....... 36 VHF Radio ................31 Connecting to a Garmin Device to Share User Data ....36 Scanning VHF Channels ............31 User Data Sharing Cable Wiring Diagram ......36 Adjusting the VHF Squelch ..........
- Page 6 NMEA 0183 Information ............39 Registering Your Device ............39 Software Update ............... 39 Loading the New Software on a Memory Card ....40 Updating the Device Software ..........40 Garmin Support Center ............. 40 Index ................41 Table of Contents...
-
Page 7: Introduction
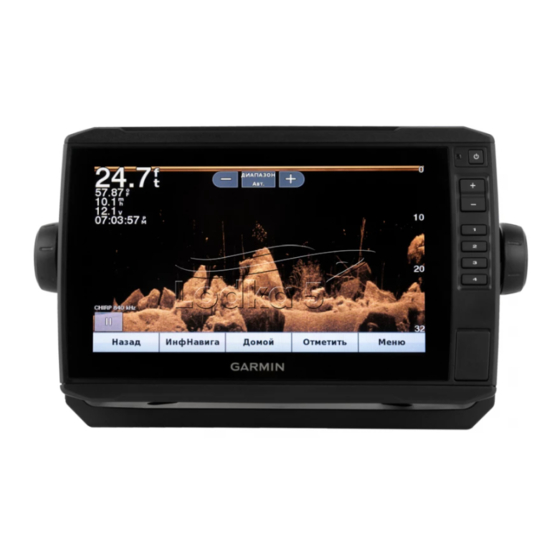
Introduction ECHOMAP Plus 60 Front View WARNING See the Important Safety and Product Information guide in the product box for product warnings and other important information. ECHOMAP Plus 40 Device View Power key Automatic backlight sensor Keys microSD memory card slot NOTICE Each time you place the device in the cradle, you should make sure the device is firmly secured in the cradle, the cables are... -
Page 8: Device Keys
Overlay Numbers (Overlay Numbers Settings, page For more information about GPS, go to garmin.com/aboutGPS. Creating a New Combination Page with the ECHOMAP For help acquiring satellite signals, see (My device will not... -
Page 9: Creating A New Combination Page With The Echomap Plus 40
You can use the app to easily and quickly transfer user data, such as waypoints and routes, connect to the Garmin Quickdraw Select an area. Contours Community, and update device software. You can also plan your trip, and view and control the ECHOMAP Plus device Select a function for the area. -
Page 10: Receiving Smart Notifications
Garmin device, using device. When you reconnect the app to the ECHOMAP Plus the name and password you entered in the Garmin device. device, the update is transferred to the device. After the transfer is complete, the updated charts are available for use. -
Page 11: Zooming In And Out Of The Chart
Zooming In and Out of the Chart When using Go To, a direct course and a corrected course may pass over land or shallow water. Use visual sightings, and steer The zoom level is indicated by the scale number at the bottom of to avoid land, shallow water, and other dangerous objects. -
Page 12: Setting The Heading And Course Over Ground Lines
Viewing Tide Station Information Setting the Heading and Course Over Ground Lines You can show the heading line and the course over ground on the chart indicates a tide station. You can view a detailed (COG) line on the chart. graph for a tide station to help predict the tide level at different times or on different days. -
Page 13: Viewing Aerial Photos Of Landmarks
• Select Photo Map Blend to show photos on both the Symbol Description water and the land at a specified opacity. Use the slider Dangerous target is lost. A red X indicates that the AIS bar to adjust the photo opacity. The higher you set the transmission from the vessel is lost, and the chartplotter percentage, the more the satellite photos cover both land displays a message banner asking whether the vessel should... -
Page 14: Activating A Target For An Ais Vessel
Quickdraw Contours: Turns on bottom contour drawing, and minutes before it will likely occur, set Time To to 10, and the allows you to create fishing map labels (Garmin Quickdraw alarm will sound 10 minutes before the vessel intersects the Contours Mapping, page 10). -
Page 15: Chart Appearance Settings
the chartplotter is connected to a compatible marine wind Overlay Numbers Settings sensor. When in sailing mode, true and apparent wind are From a chart, 3D chart view, the Radar screen, or a shown on the wind rose. Combinations screen, select MENU > Overlay Numbers. Lake Level: Sets the present water level of the lake. -
Page 16: Waypoints And Tracks Settings On The Charts And Chart Views
AIS receiver or VHF radio. You can purchase maps from Garmin. If you purchase maps From a chart or 3D chart view, select MENU > Other Vessels. from a seller other than Garmin, investigate the seller before purchasing. -
Page 17: Mapping A Body Of Water Using The Garmin Quickdraw Contours Feature
ECHOMAP Plus device, your contour maps are transferred to Contours Map the community automatically. You can add labels to a Garmin Quickdraw Contours map to Connecting to the Garmin Quickdraw Community with mark hazards or points of interest. Garmin Connect From the Navigation chart, select a location. -
Page 18: Garmin Quickdraw Contours Settings
Survey Coloring: Sets the color of the Garmin Quickdraw the destination. The path may run over land and other Contours display. When this setting is turned on, the colors obstacles. -
Page 19: Basic Navigation Questions
Auto Guidance (Setting CAUTION and Following an Auto Guidance Path, Garmin recommends using Guide To only under motor power. page 15). Using Guide To while under sail can cause an unexpected gybe, How do I change the Auto (Auto Guidance, page 15). -
Page 20: Stopping Navigation
If you are off course, follow the purple line (corrected course) • To create a route to the location, including turns, select to go to your destination, or steer back to the magenta line Route To. (direct course). • To use Auto Guidance, select Auto Guidance. Review the course indicated by the magenta line. -
Page 21: Browsing For And Navigating A Saved Route
Select an option: Deleting a Saved Route Select Nav Info > Routes & Auto Guidance Paths. • To change the name, select Name, and enter the name. Select a route. • To select a waypoint from the turn list, select Edit Turns > Use Turn List, and select a waypoint from the list. -
Page 22: Setting A Timed Arrival
TIP: You can select BACK to quickly cancel the calculation. reposition the Auto Guidance line, unless the destination selected requires navigation through a narrow waterway. Setting a Timed Arrival Repeat steps 3 through 9 at least once more, using a You can use this feature on a route or an Auto Guidance path to different destination each time, until you are familiar with the get feedback about when you should arrive at a selected point. -
Page 23: Editing A Saved Track
Editing a Saved Track fills the track log faster. The resolution interval is recommended for the most efficient use of memory. Select Nav Info > Tracks > Saved Tracks. Select Nav Info > Tracks > Active Track Options > Record Select a track. -
Page 24: Setting A Boundary Alarm
For more information about which transducer is best for your needs, go to garmin.com/transducers. NOTE: To receive Garmin ClearVü scanning sonar, you need a compatible chartplotter or fishfinder and a compatible Different sonar views can help you view the fish in the area. The transducer. -
Page 25: Sidevü Scanning Technology
Left side of the boat Panoptix down view history in a scrolling sonar view Right side of the boat Boat Range The transducer on your vessel Trees Trails Old tires Drop shot rig Logs Bottom Distance from the side of the boat LiveVü... -
Page 26: Realvü 3D Down Sonar View
Dual Frequency (200/50 kHz). particular sonar view, you can select the source to use for that sonar view. For example, if you have two sources for Garmin • If you have another type of transducer, select it from the ClearVü, you can select the source to use from the Garmin... -
Page 27: Renaming A Sonar Source
Recording > Stop Recording. The source is renamed for the present view only. For example, Deleting a Sonar Recording to rename the Garmin ClearVü sonar source, you must open the Garmin ClearVü sonar view. Insert a memory card into the card slot. -
Page 28: Setting The Scroll Speed
You can adjust the range of the depth scale traditional and of the water and from the bottom. Garmin ClearVü sonar views and the range of the width scale for the SideVü sonar view. Fish: Sets an alarm to sound when the device detects a suspended target. -
Page 29: Sonar Frequencies
Restore Sonar Defaults: Restores the factory default settings From a sonar view, select MENU > Frequency. for the sonar view. Select Add. Transducer Type: Allows you to select the type of transducer Enter a frequency. that is connected to the device. Turning On the A-Scope Shift: Allows you to set the depth range on which the sonar is focused. -
Page 30: Setting The Livevü And Frontvü Transducer Transmit Angle
bottom can appear on the screen as long as it appears within You can select a higher color gain value to see targets higher the range you have set. in the water column. A higher color gain value also allow you to differentiate low intensity returns higher in the water Forward Range: Adjusts the range of the forward scale. -
Page 31: Setting The Bow Offset
When the compatible chartplotter is connected to a compatible Setting Up and Following the Circles Pattern Garmin autopilot system, you can engage and control the You can use the circles pattern to steer the boat in a continuous autopilot from the chartplotter. -
Page 32: Setting Up And Following The Zigzag Pattern
Setting Up and Following the Zigzag Pattern • To mark the port and starboard starting line marks as you sail past them, select Ping Marks. You can use the zigzag pattern to steer the boat from port to starboard and back, over a specified time and angle, across •... -
Page 33: Sailboat Autopilot Operation
If you want to know the water depth below the keel or the lowest Select Apparent or True. point of your boat and the transducer is installed at the water Engaging Wind Hold line or anywhere above the end of the keel, measure the Before you can enable the wind hold type, you must connect a distance from the transducer location to the keel of the boat. -
Page 34: Viewing Trip Gauges
Viewing Trip Gauges Setting the Fuel Capacity of the Vessel Select Settings > My Vessel > Fuel Capacity. Trip gauges show information for odometer, speed, time, and fuel for your present trip. Enter the combined total capacity of the fuel tanks. Select Gauges >... - Page 35 Digital Selective Calling Select an option: • To set the maximum and minimum values that appear when the upwind close-hauled wind gauge appears, select Chartplotter and NMEA 0183 VHF Radio Change Upwind Scale, and set the angles. Functionality • To set the maximum and minimum values that appear When your chartplotter is connected to a NMEA 0183 VHF when the downwind close-hauled wind gauge appears, radio, these features are enabled.
- Page 36 Repeats all songs Individual Routine Calls Repeats one song When you connect the chartplotter to a Garmin VHF radio, you Scans for stations can use the chartplotter interface to set up an individual routine call.
- Page 37 NOTE: You can play media only from sources that are page 32). For instructions on connecting a SiriusXM Connect connected to the device. Vehicle Tuner, see the stereo installation instructions. NOTE: Not all features are available on all media sources. To listen to DAB stations, you must have the appropriate equipment (DAB Playback, page...
- Page 38 Select the DAB source. You should be able to hear the preview channel. If not, check the SiriusXM Connect Tuner and antenna installation and Select Scan to scan for available DAB stations. connections, and try again. When scanning is complete, the first available station in the Tune to channel 0 to locate the Radio ID.
- Page 39 You can view the software version, the basemap version, all supplemental map information (if applicable), the software Device Configuration version for an optional Garmin radar (if applicable), and the unit ID number. You may need this information to update the system software or to purchase additional map data information.
- Page 40 If the wheel turns freely, check the cable connections. measure the distance from the transducer to the water If you continue to get the message, contact Garmin product line. Enter this value in as a negative number. support.
- Page 41 Select the limit value. Naming Devices and Sensors on the Network You can name devices and sensors connected to the Garmin Repeat steps 4 and 5 to set additional gauge limits. Marine Network and the NMEA 2000 network. Communications Settings Select Settings >...
- Page 42 You can connect the ECHOMAP Plus 40/60 device to a Time Zone: Sets the time zone, or allows automatic selection compatible Garmin device to share user data, such as based on GPS location. waypoints. If the devices are mounted near each other, you can connect the blue and brown wires.
- Page 43 Copy the backup file on the card and paste it to any location on the computer. Select GPX. To transfer data with Garmin devices again, select the ADM file Restoring Backup Data to a Chartplotter type. Insert a memory card into a card reader that is attached to Copying User Data from a Memory Card the computer.
-
Page 44: My Device Does Not Display The Correct Time
From Windows ® Explorer, open the Garmin\scrn folder on the • Press , and ensure sonar is enabled. memory card. • Select the correct transducer type (Selecting the Transducer Copy a .bmp file from the card and paste it to any location on... -
Page 45: Nmea 0183 Information
Wait a few moments. 130313 Humidity The chartplotter opens the card management page and 130314 Actual pressure creates a file named GarminDevice.xml in the Garmin folder on the memory card. 130576 Small craft status This data applies only to NMEA 2000-compatible products. -
Page 46: Loading The New Software On A Memory Card
Select Next. Select the drive associated with the memory card, and select Next > Finish. A Garmin folder containing the software update is created on the memory card. The software update can take several minutes to load onto the memory card. -
Page 47: Index
0183 29, 35, 39 boundary line 17, 18 NMEA 2000 35, 38 Garmin ClearVü 18 boundary lines 17 notifications 4 Garmin Marine Network 35 Garmin product support. See product support gauges celestial information 29 off course alarm 35 engine 28 charts 4, 6, 8, 10, 11 other vessels fuel 28, 34 appearance 9 AIS 10 limits 34... - Page 48 FrontVü 20 weather 8 gain 21 Wi‑Fi 3 Garmin ClearVü 18 Wi‑Fi technology 35 interference 22 wind gauges 28 noise 21, 22 wind hold 27 overlay numbers 21 adjusting 27 Panoptix 19, 20, 23, 24 wireless devices 35 recording 21 connecting a wireless device 35...
- Page 50 October 2017 190-02242-00_0A...
Need help?
Do you have a question about the ECHOMAP 60 Series and is the answer not in the manual?
Questions and answers