Garmin echomap 40 series Owner's Manual
Hide thumbs
Also See for echomap 40 series:
- Pilot's manual (22 pages) ,
- Declaration of conformity (1 page) ,
- Owner's manual & reference (68 pages)

Related Manuals for Garmin echomap 40 series


Summary of Contents for Garmin echomap 40 series
- Page 1 echoMAP 40/50/70/90 Series ™ Owner’s Manual December 2014 Printed in Taiwan 190-01834-00_0B...
- Page 2 All rights reserved. Under the copyright laws, this manual may not be copied, in whole or in part, without the written consent of Garmin. Garmin reserves the right to change or improve its products and to make changes in the content of this manual without obligation to notify any person or organization of such changes or improvements.
-
Page 3: Table Of Contents
Table of Contents Deleting a Waypoint or an MOB ..........9 Deleting All Waypoints ............9 Routes ..................9 Introduction..............1 Creating and Navigating a Route from Your Present Front View ................... 1 Location ................. 9 Device Keys ................1 Creating and Saving a Route ..........9 Downloading the Manuals ............ - Page 4 Sonar Appearance Settings ..........15 Units Settings ................20 Advanced Sonar Settings ............ 15 Navigation Settings ..............21 Sonar Installation Settings ........... 16 Other Vessel Settings ............... 21 Sonar Alarm Settings ............16 Restoring the Original Chartplotter Factory Settings ....21 Sonar Recordings ..............
-
Page 5: Introduction
You can use blank memory cards to record sonar data and transfer data such as waypoints, routes, and tracks to another compatible Garmin chartplotter or a computer. Open the access flap on the front of the chartplotter. -
Page 6: Gps Satellite Signals
The Navigation and Fishing charts allow you to plan your For more information about GPS, go to www.garmin.com course, view map information, and follow a route. The Fishing /aboutGPS. chart is for offshore fishing. -
Page 7: Navigating To A Point On The Chart
• To view tide, current, celestial, chart notes, or local Icon Description services information near the cursor, select Information. Tide station Viewing Details about Navaids Current station From the Navigation chart, Fishing chart, Perspective 3D chart Overhead photo available view, or Mariner’s Eye 3D chart view, you can view details about various types of navigation aids, including beacons, lights, and Perspective photo available obstructions. -
Page 8: Showing Satellite Imagery On The Navigation Chart
You can view indicators for animated tide station and current • To view a perspective photo, select . The photo was direction on the Navigation chart or the Fishing chart. You must taken from the location of the camera, pointed in the also enable animated icons in the chart settings (Showing and direction of the cone. -
Page 9: Showing Ais Vessels On A Chart Or 3D Chart View
course line does not appear. Changes in the speed, course over A message banner appears and an alarm sounds when an ground, or rate of turn information transmitted by the vessel can AIS-activated vessel enters the safe-zone area around your impact the calculation of the projected course line. -
Page 10: Chart And 3D Chart View Settings
Chart and 3D Chart View Settings Navigation Inset: Shows the navigation inset when the vessel is navigating to a destination. NOTE: Not all settings apply to all charts and 3D chart views. Navigation Inset Setup: Allows you to configure the navigation Some options require premium maps or connected accessories. -
Page 11: Setting The Heading And Course Over Ground Lines
Symbols: Shows and configures the appearance of various Projected Heading: Sets the projected heading time for AIS- symbols on the chart, such as the vessel icon, navaid activated vessels. symbols, land POIs, and light sectors. Trails: Shows the tracks of AIS vessels, and select the length of Style: Sets how the chart appears over 3D terrain. -
Page 12: Basic Navigation Questions
CAUTION Setting and Following an Auto Guidance Path. Garmin recommends using Guide To only under motor power. How do I change the Auto Auto Guidance Line Using Guide To while under sail can cause an unexpected gybe, Guidance settings for my boat? Configurations. -
Page 13: Stopping Navigation
Stopping Navigation NOTE: When using Auto Guidance, a gray segment within any part of the magenta line indicates that Auto Guidance From the Navigation chart or Fishing chart, select MENU > cannot calculate part of the Auto Guidance line. This is due to Stop Navigation. -
Page 14: Browsing For And Navigating A Saved Route
• To select a turn using the chart, select Edit Turns > Deleting All Saved Routes Route Using Chart, and select a location on the chart. Select User Data > Manage Data > Clear User Data > Routes. Browsing for and Navigating a Saved Route Before you can browse a list of routes and navigate to one of Tracks them, you must create and save at least one route. -
Page 15: Retracing The Active Track
Retracing the Active Track Select Start Navigation. The track currently being recorded is called the active track. Follow the magenta line, steering to avoid land, shallow water, and other obstacles. Select User Data > Tracks > Follow Active Track. NOTE: When using Auto Guidance, a gray segment within Select an option: any part of the magenta line indicates that Auto Guidance •... -
Page 16: Auto Guidance Line Configurations
Review the placement of the Auto Guidance line, and Safe Height: Sets the minimum height (chart height datum) of a determine whether the line safely avoids known obstacles bridge that your boat can safely travel under. and the turns enable efficient travel. Shoreline Distance: Sets how close to the shore you want the Select an option: Auto Guidance line to be placed. -
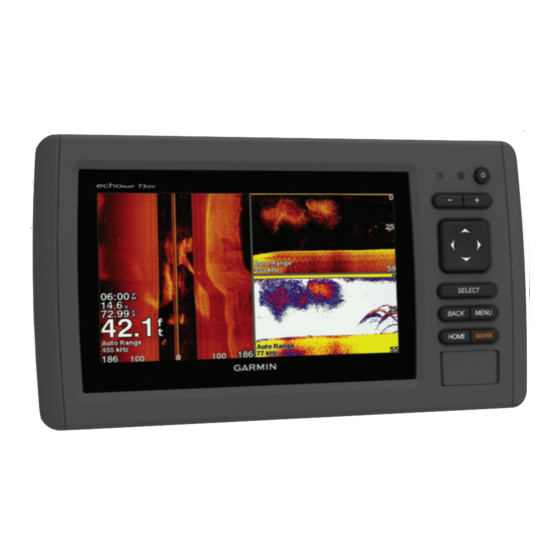
Page 17: Sonar Views
The adjustments you can make to each sonar view vary depending on the view you are in and the chartplotter model and transducer you have connected. Sonar Views The sonar views available vary depending on the type of transducer and optional sounder module connected to the chartplotter. -
Page 18: Creating A Waypoint On The Sonar Screen Using The Device Keys
From a sonar view, select MENU > Sonar Setup > adjusted the level of detail shown on the screen using the gain Installation > Transducer Type. or brightness settings. Select an option: If you want to highlight smaller fish targets or create a higher intensity display of a target, you can increase the color gain or •... -
Page 19: Sonar Frequencies
Sonar Settings From a sonar view, select MENU > Sonar Setup > Scroll Speed. NOTE: Not all options and settings apply to all models, sounder Select an option: modules, and transducers. • To adjust the scroll speed automatically using speed-over- From a sonar view, select MENU >... -
Page 20: Sonar Installation Settings
appearance of noise near the surface. When the value of this Remove the memory card from the device. setting is increased, the colors associated with low-level Insert the memory card into a card reader attached to a noise and fish targets appear more consistent through computer. -
Page 21: Digital Selective Calling
Viewing Tide Station, Current Station, or Celestial sent with the distress call, that information is also available and recorded with the call. Information for a Different Date Select Navigation Info > Tides & Currents. designates a distress call in the DSC list and marks the position of the vessel on the Navigation chart at the time of the Select Tides, Currents, or Celestial. -
Page 22: Individual Routine Calls
Individual Routine Calls Copying Waypoints, Routes, and Tracks to a Memory Card When you connect the chartplotter to a Garmin VHF radio, you can use the chartplotter interface to set up an individual routine Insert a memory card into the card slot. -
Page 23: Restoring Backup Data To A Chartplotter
Viewing System Software Information Insert a memory card into the card slot. Select Settings > System > System Information > Select Settings > System > System Information > Garmin Software Information. Devices > Save to Card. My Vessel Settings If necessary, select the memory card to save system information to. -
Page 24: Setting The Water Temperature Offset
Route: Enables NMEA 0183 output sentences for routes. System: Enables NMEA 0183 output sentences for system information. Garmin: Enables NMEA 0183 output sentences for Garmin proprietary sentences. Posn Precision: Adjusts the number of digits to the right of the decimal point for transmission of NMEA output. -
Page 25: Navigation Settings
Auto Guidance line with many frequent turns or at From Windows Explorer, open the Garmin\scrn folder on the ® higher speeds. For straighter routes or slower speeds, memory card. -
Page 26: Nmea 0183 Information
Select the correct map datum and position format settings. the product. Title, ownership rights, and intellectual property Create the waypoint again. rights in and to the Software remain in Garmin and/or its third- party providers. NMEA 0183 Information You acknowledge that the Software is the property of Garmin... -
Page 27: Index
10 panning 2 collision 5 navigating parallel to 10 setup 6 deep water 16 sharing 18 navigation 20 viewing list of 9 course 20 waypoints 18 Garmin product support, contact information 1 shallow water 16 gauges, trip 16 sonar 16 To 8 safe depth 21 water temperature 16 GPS 21 safe height 21 anchor drag alarm 20 EGNOS 19... - Page 28 list 10 navigating 10, 11 recording 11 saving 10 saving as route 10 showing 6, 10 transducer 12, 13, 16 trip gauges 16 trip planner. See routes troubleshooting 21 unit ID 19 units of measure 20 updates, software 1 user data, deleting 11 vessel trails 7, 17 radio 17 calling an AIS target 18 distress calls 17 channel 18 individual routine call 18...
- Page 30 +27 (0)11 251 9999 + 46 7744 52020 +886 2 2642-9199 ext 2 +49 (0)180 6 427646 0808 238 0000 20 ct./Anruf. a. d. +44 (0) 870 8501242 deutschen Festnetz, Mobilfunk max. 60 ct./Anruf 913-397-8200 1-800-800-1020 © 2014 Garmin Ltd. or its subsidiaries...
Need help?
Do you have a question about the echomap 40 series and is the answer not in the manual?
Questions and answers