
Related Manuals for Hoover HLSI 460PW


Summary of Contents for Hoover HLSI 460PW
- Page 1 Guida pratica all’uso ® User instructions Mode d’emploi Bedienungsanleitung HLSI 460PW LAVASTOVIGLIE DISHWASHER LAVE-VAISSELLE GESCHIRRSPÜLER...
- Page 3 INDICE Norme generali di sicurezza pag. 4 Alimentazione idrica pag. 7 Caricare il sale pag. 9 Regolazione del cesto superiore pag. 10 Caricamento delle stoviglie pag. 11 Informazioni per laboratori di prova pag. 13 Caricamento detersivo pag. 14 Tipi di detersivo pag.
- Page 4 scano i pericoli del suo utilizzo. NORME GENERALI DI Evitare che i bambini giochino con SICUREZZA l’apparecchio o che si occupino della sua pulizia e manutenzione Questo apparecchio è destinato senza supervisione. ad un uso in ambienti domestici e simili come per esempio: I bambini dovrebbero essere - nelle aree ristoro di negozi, uffici e supervisionati per assicurarsi che...
- Page 5 In generale è sconsigliabile l'uso di Per il numero massimo di coperti adattatori, prese multiple e/o pro- fare riferimento alla tabella "DATI lunghe. TECNICI". Non tirare il cavo di alimentazione, o l'apparecchio stesso, per stac- care la spina dalla presa di cor- ATTENZIONE! rente.
- Page 6 Questo apparecchio è confor- Qualora fosse necessario traspor- me alle Direttive Europee: tare manualmente la macchina disimballata, non impugnare la 2006/95/EC (LVD); porta in basso, ma aprire legger- 2004/108/EC (EMC); mente la porta e sollevare impu- gnando il ripiano superiore. 2009/125/EC (ErP);...
- Page 7 ALIMENTAZIONE IDRICA IMPORTANTE L’apparecchio deve essere connesso alla rete idrica, solo con i nuovi tubi di carico forniti in dotazione. I vecchi tubi di carico non devono essere riu- tilizzati. I tubi di carico e scarico possono esse- re orientati indifferentemente verso destra o verso sinistra.
- Page 8 L'estremità ricurva del tubo di scarico Collegamento allo scarico può essere appoggiata al bordo di un d'acqua lavello, ma non deve rimanere immersa nell'acqua, per evitare il risucchio nell'apparecchio durante il programma di lavaggio (fig. 4Y). Infilare il tubo nell'impianto di scarico, senza creare pieghe (fig.
- Page 9 CARICARE IL SALE Il contenitore ha una capacità di circa 1,5÷1,8 kg di sale e, per una efficace utilizzazione dell'apparecchio, è neces- sario riempirlo periodicamente a secon- La comparsa di macchie biancastre do della regolazione del proprio impian- sulle stoviglie è generalmente un indice to di decalcificazione.
- Page 10 REGOLAZIONE DEL CESTELLO SUPERIORE Utilizzando abitualmente piatti da 29 cm a 32,5 cm di diametro, caricarli nel cesto infe- riore dopo aver spostato quello superiore nella posizione più alta, procedendo nel seguente modo: 1. Estrarre il cesto superiore; 2. Impugnare il cesto da entrambi i lati e tirarlo verso l’alto (fig.
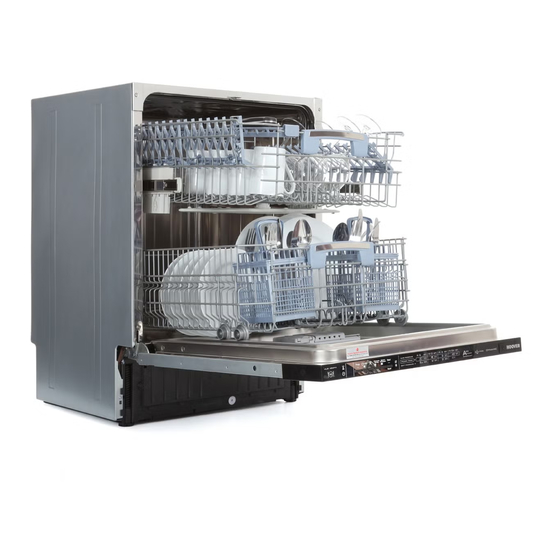
- Page 11 CARICAMENTO DELLE Un carico standard giornaliero è rappre- sentato nelle fig. 1, 2 e 3. STOVIGLIE Cesto superiore (fig. 1) Utilizzo del cesto superiore A = piatti fondi B = piatti piani Il cesto superiore è dotato di supporti C = piatti dessert mobili agganciati alla sponda laterale, in D = sottotazze grado di assumere 4 posizioni.
- Page 12 Cesto superiore (fig. 3) - POSIZIONE "B": per piatti di forma par- ticolare anche se di dimensioni standard A = bicchieri (fondine molto profonde, quadrate o B = sottotazze senza bordo, ecc…). C = tazze D = coppa piccola - POSIZIONE "C": per piatti piani più E = coppa media grandi della media e/o di forma particola- F = coppa grande...
- Page 13 Un carico standard giornaliero è rappre- La disposizione razionale e corretta delle sentato nella fig. 7 e 8. stoviglie è condizione essenziale per un buon risultato di lavaggio. Cesto inferiore (fig. 7) A = pentola media IMPORTANTE B = pentola grande Il cesto inferiore è...
- Page 14 CARICAMENTO DETERSIVO Il detersivo IMPORTANTE Utilizzare esclusivamente detersivi in polvere, liquidi o in pastiglie spe- cifici per lavastoviglie. Nella lavastoviglie si trova una confezione campione di ”FINISH” che assicura ottimi risultati di lavaggio. Dopo aver versato il detersivo nel contenitore, richiudete lo sportellino, prima Detersivi non idonei (come quelli per il spingendolo (1) ed infine premendo lavaggio a mano) non contengono gli...
- Page 15 e alle avvertenze indicate sulla confezione TIPI DI DETERSIVO del detersivo combinato che si intende utilizzare; Detersivi in pastiglie l’efficacia dei prodotti che rendono non I detersivi in pastiglie di differenti produttori necessario l’utilizzo del sale dipende si sciolgono a velocità diverse, quindi nei dalla durezza dell’acqua di alimentazione programmi brevi,...
- Page 16 CARICAMENTO BRILLANTANTE Il brillantante Questo additivo, che viene immesso automaticamente nell'ultima fase di risciacquo, favorisce una rapida asciugatura delle stoviglie evitando il formarsi di macchie e sedimenti opachi. Caricare il brillantante Alla sinistra della vaschetta del detersivo, si trova contenitore brillantante (fig.
- Page 17 PULIZIA DEI FILTRI Il sistema filtrante (fig. A "4") è costituito da: Bicchierino centrale, che trattiene le parti- celle più grosse di sporco; Piastra, che filtra continuamente l'acqua di lavaggio; Microfiltro, posto sotto la piastra, che trat- tiene anche le particelle di sporco più pic- cole assicurando un'ottimo risciacquo.
- Page 18 CONSIGLI PRATICI Consigli utili per risparmiare Consigli per ottenere ottimi Nel caso si volesse lavare a pieno cari- co, riponete le stoviglie nella macchina risultati di lavaggio appena terminati i pasti, sistemandole in più riprese, effettuando eventualmen- Prima di disporre le stoviglie nella mac- te il programma AMMOLLO per ammor- china, asportare i residui di cibo (ossici- bidire lo sporco ed eliminare i residui...
- Page 19 PULIZIA E MANUTENZIONE ORDINARIA Per pulire l'esterno della lavastoviglie non si devono usare, né solventi (sgras- santi) né abrasivi, ma solo un panno imbevuto di acqua tiepida. La lavastoviglie non richiede alcuna manutenzione speciale, poichè la vasca di lavaggio è autopulente. Pulire regolarmente la guarnizione in gomma dello sportello con un panno umido, eliminando accuratamente even-...
- Page 20 DESCRIZIONE DEI COMANDI G H I A B C D E FM DISPLAY DIGITALE Spia "PARTENZA DIFFERITA" Pulsante "SELEZIONE PROGRAMMA" Spia "SELEZIONE OPZIONE" Pulsante "PARTENZA DIFFERITA" Spie "POWER WASH"/ "SOFT PROGR." Pulsante opzione "SUPER ECO" Spia "ESAURIMENTO SALE" Pulsanti "POWER WASH"/ Spia "ESAURIMENTO BRILLANTANTE"...
- Page 21 SCELTA DEL PROGRAMMA Impostazione dei programmi E FUNZIONI PARTICOLARI Aprire lo sportello ed introdurre le stovi- Pulsante "POWER WASH" glie da lavare. Pulsante "SOFT PROGR." Questi pulsanti permettono di variare l'in- Premere il tasto "AVVIO/ARRESTO" tensità di lavaggio, a seconda del grado di Sul display verranno visualizzati due sporco delle stoviglie, modificando di con- trattini.
- Page 22 Il programma in corso verrà annullato. Sul Programmi "IMPULSE" display verranno visualizzati due trattini. I programmi "IMPULSE" utilizzano una tecnica di lavaggio ad impulsi, che riduce i A questo punto sarà possibile impostare consumi, il rumore e migliora le prestazioni. un nuovo programma.
- Page 23 Pulsante Esclusione segnalazione "PARTENZA DIFFERITA" acustica di FINE PROGRAMMA La segnalazione acustica di fine programma Questo pulsante permette di programmare può essere disattivata nel seguente modo: l'avvio del ciclo di lavaggio, con un ritardo compreso tra 1 e 23 ore. Per impostare la partenza ritardata proce- IMPORTANTE dere nel seguente modo:...
- Page 24 4. Premere nuovamente lo stesso pulsante (sul Memorizzazione dell'ultimo display verrà visualizzato "A1" che sta ad programma utilizzato indicare che la memorizzazione è attivata). Per abilitare la memorizzazione dell'ultimo 5. Spegnere la lavastoviglie premendo il programma utilizzato procedere tasto "AVVIO/ARRESTO" per rendere seguente modo: effettiva la nuova impostazione.
- Page 25 AQUASTOP-DISPOSITIVO DI BLOCCAGGIO DELL’ACQUA Il tubo di carico dell’acqua è provvisto di un dispositivo di sicurezza che blocca l’afflusso dell’acqua qualora il tubo di carico si deteriori. Questo fatto viene segnalato dall’apparizione di una tacca rossa nella finestrella In questo caso il tubo di carico acqua dovrà essere necessariamente sostituito. Se la lunghezza del tubo non è...
- Page 26 ELENCO DEI PROGRAMMI Lavaggio con prelavaggio Per i programmi con prelavaggio, si consiglia di aggiungere una seconda dose di detersivo (MAX. 10 grammi) direttamente nella lavastoviglie. Programma Descrizione Ciclo con azione antibatterica, adatto a lavare ed Hygiene+ igienizzare stoviglie (anche particolarmente 75°C incrostate) biberon, ecc…...
- Page 27 Durata Funzioni media in Operazioni da compiere Svolgimento del Programma Facoltative Minuti • • • • • 75°C • • • • • 75°C • • • • • 65°C • • • • 70°C • • • • 60°C •...
- Page 28 IMPIANTO DI DECALCIFICAZIONE La regolazione è stata impostata dalla fabbrica al livello 4 (d4) in quanto questo L'acqua contiene in misura variabile, a soddisfa la maggior parte dell'utenza. seconda delle località, sali calcarei e minera- li che si possono depositare sulle stoviglie A seconda del livello di appartenenza della lasciando macchie e depositi biancastri.
- Page 29 RICERCA PICCOLI GUASTI Se la Vostra lavastoviglie non funzionasse, prima di chiamare il Servizio Assistenza, fare i seguenti controlli: ANOMALIA CAUSA RIMEDIO Spina corrente elettrica non inserita Inserire spina nella presa 1 - Non funziona con qualsiasi Tasto O/I non inserito Inserire tasto programma Sportello aperto...
- Page 30 ANOMALIA CAUSA RIMEDIO Vedi cause 5 Controllare Fondo di pentole non Croste troppo tenaci, da ammorbidire perfettamente lavato prima del lavaggio in lavastoviglie Bordo di pentole non Posizionare meglio la pentola perfettamente lavato Smontare i bracci di lavaggio, Spruzzatori parzialmente otturati svitando le ghiere di fissaggio in senso orario e lavare il tutto sotto un getto d’acqua...
-
Page 31: Table Of Contents
CONTENTS pag. General safety rules Water connection pag. Loading the salt pag. pag. Adjusting the upper basket pag. Loading the dishes pag. Information for test laboratories pag. Loading the detergent Types of detergent pag. Loading the rinse aid pag. Cleaning the filters pag. -
Page 32: General Safety Rules
above and persons with reduced GENERAL SAFETY RULES physical, sensory or mental capabilities or lack of experience This appliances is intended to be and knowledge if they have been used in household and similar given supervision or instruction applications such as: concerning use of the appliance in a safe way and understand the - staff kitchen areas in shops,... - Page 33 In general it is not advisable to use For the maximum place loading, adaptors, multiple plugs and/or please refer to the "TECHNICAL extension cables. DATA" table/section. Do not remove the plug from the mains supply socket by pulling the WARNING ! mains cable or the machine itself.
- Page 34 Appliance complies with If it you need to move the machi- European Directives: ne after removing the packaging, do not try to lift it by the bottom of the door. 2006/95/EC (LVD); Open the door slightly and lift the 2004/108/EC (EMC); machine by holding on the top.
-
Page 35: Water Connection
WATER CONNECTION IMPORTANT The appliance must be connected to the water mains using new hose-sets. The old hose-sets should not be reused. The inlet and drain hoses can be directed to left or right. IMPORTANT The dishwasher can be connected to either cold or hot water, as long as it is no hotter than 60°C. - Page 36 The hose can be hooked over the side of Connecting the outlet hose the sink, but it must not be immersed in water, in order to prevent water from being syphoned back to the machine The outlet hose should disharge into a when this is in operation (fig.
-
Page 37: Loading The Salt
The salt dispenser has a capacity of LOADING THE SALT between 1.5 and 1.8 kg and, for efficient use of the appliance, it should be refilled from time to time according to the The appearance of white stains on dishes regulation of the water softener unit. -
Page 38: Loading The Dishes
ADJUSTMENT OF THE UPPER BASKET If 29 cm to 32,5 cm plates are normally used, load them onto the lower basket after the upper basket has been placed in its upper position and proceed as detailed below: 1. Pull out the upper basket; 2. - Page 39 LOADING DISHES A standard daily load is represented in figs. 1, 2 and 3. Using the upper basket Upper basket (fig. 1) The upper basket is provided with A = soup plates mobile racks hooked to the sides of the B = dinner plates basket, which can be regulated into 4 C = dessert plates...
- Page 40 - POSITION “B”: for dishes which, Upper basket (fig. 3) although standard size, have a particular A = glasses shape (very deep bowls, square dishes B = saucers or ones without borders etc.). C = cups D = small bowl - POSITION “C”: for larger than average E = medium bowl flat plates and/or ones with non-...
-
Page 41: Information For Test Laboratories
A standard daily load is represented in Please load the dishwasher sensibly to figs. 7 and 8. ensure the best wash results. Lower basket (fig. 7) IMPORTANT A = medium-sized saucepan The lower basket has a safety-stop B = large saucepan device, for its safe extraction, also C = frying pan especially useful with a full load. -
Page 42: Loading The Detergent
LOADING THE DETERGENT The detergent IMPORTANT It is essential to use a detergent that is specifically designed for dishwashers either in powder, liquid or tablet form. After pouring the detergent into the container, close the lid, firstly pushing (1) and then “FINISH”... -
Page 43: Types Of Detergent
the effectiveness of detergents containing TYPES OF DETERGENT the built in water softener/salt depends on the hardness of your water supply. Detergent tablets Check that the hardness of your water supply is within the effective range given Detergent tablets of different manufacturers on the detergent packaging. -
Page 44: Loading The Rinse Aid
LOADING THE RINSE AID The rinse aid The rinse aid, which is automatically released during the last rinsing cycle, helps the dishes to dry quickly and prevents spots and stains forming. Filling the rinse aid container The rinse aid container can be found to the left of the detergent container (fig. -
Page 45: Cleaning The Filters
CLEANING THE FILTERS The filter system (fig.A “4”) consists of: a central container that traps the larger particles; a flat gauze that continuously filters the wash water; a micro filter, located beneath the gauze, that traps the tiniest particles ensuring a perfect rinse. - Page 46 PRATICAL HINTS How to make savings How to get really good wash If you want the dishwasher to give a complete wash, place the dishes in the results dishwasher at the end of each meal and if necessary turn on the COLD RINSE Before placing the dishes in the cycle to soften the food remains and dishwasher, remove any remaining...
- Page 47 CLEANING AND MAINTENANCE To clean the dishwasher outside, do not use solvents (degreasing action) neither abrasives, but only a cloth soaked with water. The dishwasher does not require special maintenance, because the tank is self-cleaning. Regularly wipe the door gasket with a damp cloth to remove any food remains or rinse aid.
-
Page 48: Description Of The Control Panel
DESCRIPTION OF THE CONTROL PANEL G H I A B C D E FM DIGITAL DISPLAY "DELAY START" indicator light "PROGRAMME SELECTION" button "OPTION SELECTION" light "DELAY START" button "POWER WASH" / "SOFT PROGR." lights "SUPER ECO" option button "SALT EMPTY" light "POWER WASH"... -
Page 49: Programme Selection And Special Functions
PROGRAMME SELECTION Programme settings AND SPECIAL FUNCTIONS (Use in conjunction with programme guide) Open the door and place the dirty dishes inside the appliance. "POWER WASH" button "SOFT PROGR." button Press the "ON/OFF" button . The These buttons allows you to change the display will show two lines. - Page 50 The running programme will be cancelled. "IMPULSE" programmes The display will show two lines. The “IMPULSE” programmes use an At this point a new programme can be set. impluse washing technology, which reduces consumption, noise increases performances. WARNING! IMPORTANT Before starting a new programme, The “intermittent”...
- Page 51 Alarm mute for the PROGRAMME "DELAY START" button Dishwasher start time can be set with this button, delaying start from 1 to 23 hours. The alarm for the programme end may be muted as follows: Proceed as follows to set a delayed start: IMPORTANT Press the "DELAY START"...
- Page 52 Memorization of the last 4. Press the same button again ("A1" will appear on the display to indicate that the programme used memorization is on). last programme used 5. Turn off the dishwasher by pressing the memorized by following the below: "ON/OFF"...
- Page 53 AQUASTOP-SYSTEM The water-stop device protects against water damages caused by leaks on the fill hose which could develop due to natural ageing of the hose. In the water-stop system the leaking water fills the corrugated hose and activates a stop valve which cuts off the water supply to the machine. This fault is shown by a red sector on the window Would this occur, please refer to your Service Agent.
-
Page 54: Programme Guide
PROGRAMME GUIDE Wash with prewash For wash programmes with prewash, it is advisable to add a second dose of detergent (max. 10 g) directly in the machine. Description Programme An antibacterial cycle, intended for washing and Hygiene+ sterilising dishes (even heavily stained ones) 75°C babies’... - Page 55 Avarage Special function Programme contents Check list duration buttons available in minutes • • • • • 75°C • • • • • 75°C • • • • • 65°C • • • • 70°C • • • • 60°C •...
-
Page 56: Water Softener Unit
WATER SOFTENER UNIT * The softener unit is set in the factory at level 4 (d4) as this satisfies the requirements of the majority of users. Depending on the source of the supply, water contains varying amounts of limestone and minerals which are deposited on the Regulate the setting of your water softener dishes leaving whitish stains and marks. -
Page 57: Identifying Minor Faults
IDENTIFYING MINOR FAULTS Should the dishwasher fail to operate, before contacting the Service Centre, make the following checks: FAULT CAUSE REMEDY Plug is not connected to wall Connect electric plug socket O/I button has not been pressed Press button 1 - Machine completely dead Door is open Close door No electricity... - Page 58 FAULT CAUSE REMEDY See causes for no. 5 Check Bottom of saucepans have not Burnt on food remains must been washed well be soaked before putting pans in dishwasher Edge of saucepans have not Reposition saucepans been washed well Spray arms are partially blocked Remove spray arms by unscrewing ring nuts clockwise and wash under running water...
- Page 59 INDICE pag. 60 Règles générales de sécurité pag. 63 Branchement hydraulique pag. 65 Chargement du sel pag. 66 Réglage du panier supérieur pag. 67 Chargement de la vaisselle pag. 69 Information pour les tests laboratoire pag. 70 Chargement du produit de lavage pag.
- Page 60 handicap physique, moteur ou RÈGLES GÉNÉRALES mental, et manquant de connais- DE SÉCURITÉ sance sur l’utilisation de l’appareil, Cet appareil a pour vocation d’être si elles sont sous la surveillance utilisé au sein du foyer, ou dans d’une personne, donnant des ces différentes situations: instructions pour une utilisation en toute sécurité...
- Page 61 L'utilisation de prises multiples Pour un chargement maximal, et/ou rallonges est déconseillée veuillez vous référer à la section et dégage le constructeur de "DONNÉES TECHNIQUES". toutes responsabilités. Ne pas tirer sur le câble ATTENTION! d'alimentation de l'appareil pour couteaux autres débrancher la prise du courant.
- Page 62 Le produit a été conçu et fabri- Si vous avez besoin de déplacer qué en avec les directives la machine après avoir enlevé Européenne suivantes: l'emballage, n’essayez pas de le soulever par le bas de la porte. Ouvrez la porte et soulevez 2006/95/EC (LVD);...
- Page 63 BRANCHEMENT HYDRAULIQUE IMPORTANT L'appareil doit être relié à l'arrivèe d'eau, exclusivement avec le tuyaux fournis. Ne pas réutiliser les anciens tuyaux. Les tuyaux de vidange et de remplissage peuvent être orientés façon indifférente vers la droite ou vers la gauche. IMPORTANT Le lave-vaisselle peut-être relié...
- Page 64 L'extrémité recourbée du tuyau de Raccordement à la vidange vidange peut être accrochée au bord d'un évier, mais ne doit pas rester immergée, pour éviter le siphonnage de Pour la vidange, introduire le tuyau dans l'appareil pendant le programme de l'installation de vidange, en prenant soin lavage (fig.
- Page 65 CHARGEMENT DU SEL Pour utilisation optimale l’appareil, le réservoir à sel, dont la capacité varie de 1,5 à 1,8 kg, doit être L’apparition de taches blanches sur la rempli de temps en temps en fonction du vaisselle est généralement un signe qui réglage opéré...
- Page 66 RÉGLAGE DU PANIER SUPÉRIEUR Quand on utilise habituellement des assiettes de 29 à 32,5 cm de diamètre, charger celles-ci dans le panier inférieur après avoir mis le panier supérieur à sa position la plus haute en procédant comme suit: 1. Faire glisser le panier supérieur vers l’exterieur;...
- Page 67 CHARGER LA VAISSELLE Un chargement standard journalier est indiqué dans les fig. 1, 2 et 3. Utilisation du panier supérieur Le panier supérieur est pourvu de Panier supérieur (fig. 1) supports mobiles accrochés au bord A = assiettes creuses latéral et pouvant occuper 4 positions. B = assiettes plates C = assiettes à...
- Page 68 - POSITION "B": pour les assiettes de Panier supérieur (fig. 3) formes particulières même si sont de A = verres dimensions standards (assiettes creuses B = soucoupes très profondes, assiettes carrées, assiettes C = tasses sans rebords etc…). D = coupe petite E = coupe moyenne - POSITION "C": pour les assiettes plates, F = coupe grande...
- Page 69 Un chargement standard journalier est Le rangement rationnel et correct de la indiqué dans les fig. 7 et 8. vaisselle est la condition essentielle pour obtenir un excellent lavage. Panier inférieur (fig. 7) IMPORTANT A = casserole moyenne Le panier inférieur possède un dispositif B = casserole grande d’arrêt automatique permettant son extraction en toute sécurité, très utile...
- Page 70 CHARGEMENT DU PRODUIT DE LAVAGE Le produit de lavage IMPORTANT Il est indispensable d'utiliser de la lessive en poudre, liquide ou en pastilles spécialement destiné aux machines à laver la vaisselle. Après le versement du détergent dans le "CALGONIT" donne les meilleurs résultats bac à...
- Page 71 TYPES DE PRODUITS DE Produits de lavage combinés LAVAGE “Tout en un” Si vous envisagez d’utiliser des produits lessiviels combinés "Tout en un" ("3 en 1"/"4 en 1"/"5 en 1", etc…) par exemple ceux Produits de lavage en tablettes composés de sel et/ou d’ agents de rinçage, nous vous conseillons de: Les produits de lavage en tablettes des lire attentivement et de suivre les...
- Page 72 CHARGEMENT DU PRODUIT DE RINÇAGE Le produit de rinçage additif introduit automatiquement à la dernière opération de rinçage, assure le séchage rapide de la vaisselle et évite la formation sur celle-ci de taches blanchâtres. Charger le produit de rinçage A la gauche du bac à lessive se trouve le réservoir du produit de rinçage (fig.
- Page 73 NETTOYAGE DES FILTRES Le système de filtrage (fig. A ’’4’’) est constitué par: un réservoir central qui retient les grosses particules; plaque métallique filtre continuellement l’eau de lavage; un micro filtre autonettoyant, situé sous la plaque métallique, qui piège les micro salissures pour garantir un rinçage parfait.
- Page 74 CONSEILS PRATIQUES Que faire pour economiser Au cas où l'on voudrait laver à pleine Que faire pour avoir charge, ranger la vaisselle dans le lave-vaisselle dès que le repas est d'excellents résultats de lavage terminé et en effectuant éventuellement le programme TREMPAGE (ou RINCAGE A FROID) pour ramollir la saleté...
- Page 75 de laine d'acier. Le lave-vaisselle possède NETTOYAGE EXTERNE ET un adoucisseur et il est conseillé l'usage ENTRETIEN de sel pour éviter la formation de dépôt blanchâtre sur la vaisselle. Pour le nettoyage externe de la machine, ne pas utiliser de détergent ni d’abrasifs présence taches mais uniquement un chiffon avec du...
- Page 76 DESCRIPTION DE LA MACHINE G H I A B C D E FM AFFICHEUR Voyant "DEPART DIFFERE" Touche de "SELECTION Voyant "SELECTION D'OPTION" DE PROGRAMME" Voyants "POWER WASH" / Touche "DEPART DIFFERE" "SOFT PROGR." Touche option "SUPER ECO" Voyant "MANQUE DE SEL" Touches "POWER WASH"...
- Page 77 SELECTION DES PROGRAMMES Choix des programmes ET FONCTIONS SPÉCIALES Ouvrez la porte et rangez la vaisselle à laver. Touche "POWER WASH" Touche "SOFT PROGR." Appuyez sur la touche "MARCHE/ARRÊT" touches permettent varier Sur l’écran deux tirets vont apparaître. l’intensité de lavage, en fonction du degré de salissure de la vaisselle, modifiant ainsi la durée et la température du cycle de lavage.
- Page 78 Le programme en cours sera annulé. Programmes "IMPULSE" Sur l’écran deux tirets vont apparaître. Les programmes "IMPULSE" utilisent Vous pouvez alors configurer une technique de lavage qui réduit les nouveau programme. consommations, le bruit et améliore les performances. IMPORTANT ATTENTION! Le fonctionnement "intermittent"...
- Page 79 Désactivation du signal acoustique Touche "DEPART DIFFERE" de FIN PROGRAMME Cette touche permet de retarder le démarrage du cycle de lavage de 1 à 23 heures. La fonction du signal acoustique à la fin du programme peut être désactivée de la manière suivante: Pour configurer le départ différé, procédez de la mantère suivante:...
- Page 80 Mémorisation du dernier 5. Eteindre le lave-vaisselle en appuyant programme utilisé sur la touche "MARCHE/ARRÊT" pour rendre effective la nouvelle configuration. La mémorisation du dernier programme utilisé, peut être activée comme suit: Pour désactiver la mémorisation, suivre la même procédure. IMPORTANT Commencer TOUJOURS la procédure avec le lave-vaisselle éteint.
- Page 81 AQUASTOP - DISPOSITIF DE BLOCAGE DE L’EAU Le tuyau d’alimentation, doublé d’une gaine, est équipé d’un dispositif de blocage de l’eau. Dans le cas où le tuyau se détériorerait (usure naturelle ou surpression), l’eau s’écoulerait dans la gaine et actionnerait le dispositif de blocage de l’eau directement au robinet.
- Page 82 LISTE DES PROGRAMMES Lavage précédé d'un prélavage Pour les programmes précédés d'un prélavage, nous vous conseillons de mettre une seconde dose de détergent (max. 10 grammes) directement dans le lave-vaisselle. Programme Description Cycle avec action anti-bactérienne, adapté pour Hygiéne+ laver et stériliser la vaisselle (même très 75°C incrustée), les biberons, etc…...
- Page 83 Durée Fonctions moyenne Opérations à accomplir Déroulement du programme facultatives minutes • • • • • 75°C • • • • • 75°C • • • • • 65°C • • • • 70°C • • • • 60°C • • • • 55°C •...
- Page 84 ADOUCISSEUR D’EAU * L'adoucisseur d'eau est pré réglé en usine sur le niveau 4 (d4) car ce niveau répond à la majorité des Selon la source d’approvisionnement, besoins. l’eau contient des quantités variables de calcaire et de minéraux qui se déposent Pour régler la position de l'adoucisseur sur la vaisselle en laissant des taches et d'eau en fonction du degré...
- Page 85 IDENTIFICATION D’ANOMALIES MINEURES Si votre lave-vaisselle ne fonctionne pas, avant d’appeler votre revendeur faire les contrôles suivants: ANOMALIES CAUSES REMEDES Prise de courant mal branchée Brancher la prise Touche M/A non appuyée Appuyer sur la touche 1 - La machine ne fonctionne sur aucun programme Pas de courant Contrôler...
- Page 86 ANOMALIES CAUSES REMEDES Voir causes du N. 5 Contrôler Le fond des casseroles n’est Incrustations trop tenaces pas lavé parfaitement qu’il faut enlever avant le lavage dans la machine Le bord des casseroles n’est Positionner mieux les pas parfaitement lavé casseroles Orifices partiellement bouchés Démonter les bras de lavage en...
- Page 87 INHALTSVERZEICHNIS Seite Generelle Sicherheitshinweise Wasseranschluss Seite Einfüllen des Salzes Seite Oberkorb verstellen Seite Geschirr einordnen Seite Informationen für Normtests Seite Spülmittel einfüllen Seite Die verschiedenen Spülmittel Seite Klarspülmittel einfüllen Seite 100 Filterreinigung Seite 101 Praktische Hinweise Seite 102 Wartung und Pflege Seite 103 Beschreibung der Bedienelemente Seite 104...
-
Page 88: Generelle Sicherheitshinweise
Unerfahrenheit oder Unkenntnis GENERELLE nicht in der Lage sind, die SICHERHEITSHINWEISE Waschmaschine sicher zu bedie- nen, dürfen die Waschmaschine Dieses Gerät ist ausschließlich nicht ohne Aufsicht oder für Haushaltsgebrauch Anweisung durch eine verantwor- konzipiert bzw. für den haushalt- tliche Person benutzen, sich in der snahen Gebrauch, wie z.B: Nähe aufhalten oder das Gerät - Teeküchen für das Personal von... - Page 89 Den Netzstecker niemals am Nach der Installation, sollte das Kabel aus der Steckdose ziehen, Gerät so positioniert sein, dass sondern am Stecker selbst. der Stecker frei zugänglich ist. Für die maximale Beladung des Setzen Gerät keinen Geschirrspülers, beziehen Sie Witterungseinflüssen (Regen, sich bitte auf die Tabelle/den Sonne usw.) aus.
- Page 90 Geräte erfüllen die europäi- Falls Sie die Maschine nach dem schen Richtlinien: Entfernen der Verpackung bewe- gen müssen, versuchen Sie nicht, diese an der Unterseite der Tür 2006/95/EC (LVD); anzuheben. Öffnen Sie die Tür lei- 2004/108/EC (EMC); cht und heben Sie die Maschine, 2009/125/EC (ErP);...
-
Page 91: Wasseranschluss
WASSERANSCHLUSS WICHTIG Gerät muss Wasserversorgung neuen Schläuchen angeschlossen werden. Alte Schläuche dürfen nicht wiederverwendet werden. Die Anordunung der Schläuche für den Zu- und Ablauf des Wassers kann wahlweise nach rechts oder links erfolgen. WICHTIG Der Geschirrspüler kann nach Bedarf sowohl an einem Kalt- als auch einem Warmwasseranschluss angeschlossen werden. - Page 92 Das gebogene Schlauchende kann auch Anschluss an den Wasserablauf am Spülbeckenrand eingehängt werden. Achten Sie darauf, dass der Schlauch Das Schlauchende in dem festen Ablauf nicht im Wasser getaucht wird, um einen befestigen. Rücklauf des Wassers beim Spülen zu Der Schlauch darf nicht geknickt werden, verhindern (Abb.
-
Page 93: Einfüllen Des Salzes
EINFÜLLEN DES SALZES Der Behälter faßt ca. 1,5 – 1,8 kg Salz. Um das Gerät effizient zu nutzen, muss der Salzbehälter regelmäßig, je nach Das Auftreten von weißen Flecken auf Einstellung der Enthärteranlage häufiger Geschirr Regel oder seltener, nachgefüllt werden. Warnsignal, dass der Salzbehälter neu aufgefüllt werden muss. -
Page 94: Oberkorb Verstellen
EINSTELLUNG DER HÖHE DES OBEREN GESCHIRRKORBES Teller zwischen 29 cm und 32,5 cm Durchmesser werden in den unteren Geschirrkorb eingeordnet. Hierzu muss der Geschirrkorb folgendermaßen bis zur höchsten Position verstellt werden: 1. Den oberen Korb herausziehen; 2. Dann den Korb an beiden Seiten halten und hochziehen (Abb. -
Page 95: Geschirr Einordnen
EINORDNEN DES GESCHIRRS Eine Standardbeladung für tägliches Spülen ist in den Abb. 1, 2 und 3 dargestellt. Beladen des oberen Geschirrkorbes Oberer Geschirrkorb (Abb. 1) A = tiefe Teller Die klappbaren Geschirrablagen des B = flache Teller oberen Geschirrkorbes ermöglichen C = Dessertteller eine flexible... - Page 96 Oberer Geschirrkorb (Abb. 3) - POSITION "B": ist für Teller mit besonderen Formen geeignet, auch A = Gläser wenn Maße Standards B = Untertassen entsprechen (z.B. besonders tiefe Teller, C = Tassen eckige oder randlose Teller). D = Kleine Schalen - POSITION "C": ist für Teller gedacht, die E = Mittlere Schalen überdurchschnittlich groß...
-
Page 97: Informationen Für Normtests
Eine Standardbeladung für tägliches Die richtige und rationelle Bestückung der Geschirrkörbe ist die Voraussetzung für ein Spülen ist in den Abb. 7 und 8 dargestellt. optimales Spülergebnis. Unterer Geschirrkorb (Abb. 7) A = mittlere Töpfe B = große Töpfe WICHTIG C = Pfannen Der Unterkorb verfügt über einen D = Suppenschüsseln... -
Page 98: Spülmittel Einfüllen
SPÜLMITTEL EINFÜLLEN Das Spülmittel WICHTIG Spülmittel fürs Spülen mit der Hand eignen sich nicht für Spülmaschine, wichtige Bestandteile fehlen, die für beste Spülergebnisse notwendig sind. Nach Einfüllen des Spülmittels in den Behälter bitte den Deckel schließen, indem Sie ihn zuerst zurück über die Öffnung Außerdem beeinträchtigen schieben (1) und dann bis zum spürbaren... -
Page 99: Die Verschiedenen Spülmittel
überflüssig macht, sind die folgenden DIE VERSCHIEDENEN SPÜLMITTEL Hinweise unbedingt zu beachten: Tabs Lesen Sie die Gebrauchshinweise des Spülmittelherstellers sorgfältig durch Spülmittel Tablettenform und wenden Sie das Geschirrspülmittel unterschiedlichen Herstellern lösen sich genau so, wie dort angegeben ist; unterschiedlich schnell auf. Als Folge davon könnten manche Tabs bei den Die Wirksamkeit von Geschirrspülmitteln, die auch den Einsatz von Maschinensalz... -
Page 100: Klarspülmittel Einfüllen
KLARSPÜLMITTEL EINFÜLLEN Das Klarspülmittel Klarspülmittel erleichtert Trocknung des Geschirrs und vermeidet die Bildung von Flecken und matten Ablagerungen. Die benötigte Menge des Klarspülers wird beim letzten Spülen automatisch zugegeben, ein voller Behälter reicht für mehrere Male. Klarspülmittel einfüllen In der Innentür links vom Spülmittelbehälter befindet sich der Klarspülmittelbehälter (Abb. -
Page 101: Filterreinigung
FILTERREINIGUNG Das Filtersystem (Abb. A “4”) besteht aus: dem zentralen Filterkorb zum Auffangen von groben Teilchen; der Siebplatte zum ständigen Filtern des Spülwassers; dem Mikrofilter unterhalb der Siebplatte, der auch die kleinsten Schmutzpartikelchen auffängt und so eine optimale Spülung garantiert. Um stets beste Spülergebnisse zu erzielen, ist es ratsam, das Filtersystem vor jeder Benutzung zu kontrollieren... -
Page 102: Praktische Hinweise
PRAKTISCHE HINWEISE Hinweise zum Sparen Um zu sparen, sollte die Spülmaschine Hinweise zur Optimierung der immer komplett befüllt werden, bevor gespült wird. Das Geschirr wird jeweils Spülergebnisse nach dem Essen in die Spülmaschine gefüllt, bis diese voll ist. Eventuell kann zwischen Beladungen Um optimale Spülresultate zu erhalten,... -
Page 103: Wartung Und Pflege
ÄUßERE REINIGUNG UND PFLEGE Bitte benutzen Sie zur Reinigung des Gerätes von außen stets nur ein feuchtes Tuch und niemals Reinigungs- und Scheuermittel. Innenbehälter bedarf keiner besonderen Reinigung. Bitte reinigen Sie die Türdichtungen regelmäßig mit einem feuchten Tuch, um evtl. anhaftende Lebensmittelreste und Klarspülerrückstände zu entfernen. -
Page 104: Beschreibung Der Bedienelemente
BESCHREIBUNG DER BEDIENELEMENTE G H I A B C D E FM Digitaldisplay Leuchtanzeige "OPTIONSWAHL" Taste "PROGRAMMWAHL" Leuchtanzeigen "POWER WASH"/ "SOFT PROGR." Taste "STARTVERZÖGERUNG" Leuchtanzeige Optionstaste “SUPER ECO” "SALZ EINFÜLLEN" Tasten "POWER WASH"/ Leuchtanzeige "SOFT PROGR." "KLARSPÜLER EINFÜLLEN" Taste "START"/"RESET" Programmbeschreibung (Programm starten/löschen) Taste "START/STOP"... -
Page 105: Programmwahl Und Sonderfunktionen
PROGRAMMWAHL UND Programm einstellen SONDERFUNKTIONEN Öffnen Sie die Tür und ordnen Sie das Taste "POWER WASH" Geschirr ein. Taste "SOFT PROGR." Mit diesen Tasten können Sie die Spül- Drücken Sie die Taste "START/STOP" Intensität je nach Verschmutzungsgrad Das Display zeigt zwei Striche. ändern. - Page 106 Das laufende Programm wird gelöscht. "IMPULS-" Programme Das Display zeigt zwei Striche. Bei den "IMPULS-" Progammen kommt ein Jetzt können Sie ein neues Programm impulsartiger Spülbetrieb zum Einsatz, wählen. durch Verbrauch Geräuschentwicklung minimiert und die Spülleistung verbessert werden. ACHTUNG! Bevor Sie ein neues Programm WICHTIG starten, versichern Sie sich, dass das Die "intermittierende"...
- Page 107 Taste "STARTVERZÖGERUNG" Akustisches Signal für PROGRAMMENDE ausschalten Startzeit gewählten Reinigungsprogramms kann zwischen akustische Signal 1-23 Stunden verzögert werden. Programmende auszuschalten, gehen Sie wie folgt vor: Hierzu gehen Sie bitte wie folgt vor: WICHTIG Drücken Taste Die Einstellungsprozedur muss IMMER "STARTVERZÖGERUNG" (Im Display bei ausgeschaltetem Gerät eingeleitet erscheint die Anzeige "00").
- Page 108 anzuzeigen, dass die Speicherung Das zuletzt gewählte aktiviert wurde). Programm speichern 5. Schalten Sie den Geschirrspüler durch Um das zuletzt gewählte Programm zu Drücken der Taste "START/STOP" aus, speichern, gehen Sie wie folgt vor: um Ihre Einstellung zu speichern. Um die Speicherung wieder zu deaktivieren, WICHTIG befolgen sie die gleiche Prozedur.
-
Page 109: Aquastop
AQUASTOP-SYSTEM Der Wasserzulaufschlauch ist mit einem Wasserstop-System ausgestattet. Sollte der Innenschlauch durch natürliche Alterung schadhaft werden, so blockiert das System die Wasserzufuhr zum Geråt. Die Störung wird durch das Erscheinen einer roten Markierung im Fensterchen angezeigt. In diesem Fall muss der Wasserhahn geschlossen und der Schlauch ersetzt werden. -
Page 110: Liste Der Programme
LISTE DER PROGRAMME Spülen mit Vorspülgang Für alle Programme mit Vorspülgang wird empfohlen, eine zusätzliche Spülmittelmenge (max. 10 Gramm) direkt in den Geschirrspüler zu geben. Programm Beschreibung Programm mit antibakterieller Wirkung, geeignet Hygiene+ zum hygienischen Spülen von Geschirr (auch 75°C besonders verkrustet), Fläschchen usw. - Page 111 Durchschnit- Zusatzfunktionen Arbeitsgänge Programmabläufe tliche Pro- grammdauer in Minuten • • • • • 75°C • • • • • 75°C • • • • • 65°C • • • • 70°C • • • • 60°C • • • • 55°C •...
-
Page 112: Wasserenthärter
WASSERENTHÄRTER Der Enthärter ist werksseitig auf der Stufe 4 eingestellt (d4) und damit den Das Wasser enthält kalkhaltige Salze und Bedürfnissen der meisten Haushalte entsprechend. Mineralien in je nach Wohngebieten unterschiedlich hoher Menge. Diese Substanzen setzen sich auf dem Geschirr Regulieren Sie den Wasserenthärter je ab und hinterlassen Flecken und weißliche nach Härtestufe Ihres Wassers wie folgt:... -
Page 113: Fehlersuche
FEHLERSUCHE Kleine Störungen selbst beheben! Sollte Ihr Geschirrspüler einmal nicht zu Ihrer Zufriedenheit arbeiten, kontrollieren Sie die folgenden Punkte, bevor Sie den Kundendienst rufen: FEHLER GRUND FEHLER -BESEITIGUNG Stecker nicht richtig in der Stecker in die Steckdose Steckdose Ein/Aus-Taste nicht gedrückt Ein/Aus-Taste betätigen 1 - Die Programme Kein Strom vorhanden... - Page 114 FEHLER GRUND FEHLER -BESEITIGUNG Siehe Gründe 5) Kontrollieren Das Geschirr ist zu dicht Geschirr richtig anordnen angeordnet Das Ende des Ablaufschlauches Der Ablaufschlauch darf nicht im liegt im Wasser Wasser liegen Spülmittel ist nicht richtig dosiert, Dosis erhöhen u. ggf. neues 7 - Das Spülgut wird nur verklumpt oder hart Spülmittel benutzen...
- Page 116 Questo elettrodomestico è marcato conformemente alla Direttiva Europea 2012/19/UE sui Rifiuti da Apparecchiature Elettriche ed Elettroniche (RAEE). I RAEE contengono sia sostanze inquinanti (che possono cioè avere un impatto negativo anche molto pesante sull’ambiente) sia materie prime (che possono essere riutilizzate). E’ perciò necessario sottoporre i RAEE ad apposite operazioni di tratta- mento, per rimuovere e smaltire in modo sicuro le sostanze inquinanti ed estrarre e riciclare le materie prime.
- Page 117 Cet appareil est commercialisé en accord avec la directive européenne 2012/19/EU sur les déchets des équipements électriques et électroniques (DEEE). Les déchets des équipements électriques et électroniques (DEEE) contiennent des substances polluantes (ce qui peut entraîner des conséquences négatives pour l’environnement) et des composants de base (qui peuvent être réutilisés). Il est important de traiter ce type de déchets de manière appropriée afin de pouvoir éliminer correctement tous les polluants et de recycler les matériaux.
- Page 119 La Ditta costruttrice declina ogni responsabilità per eventuali errori di stampa contenuti nel presente libretto. Si riserva inoltre il diritto di apportare le modifiche che si renderanno utili ai propri prodotti senza compromettere le caratteristiche essenziali. Per consultare la scheda tecnica relativa al prodotto, fare riferimento al sito web del pro- duttore.
Need help?
Do you have a question about the HLSI 460PW and is the answer not in the manual?
Questions and answers