Table of Contents
Advertisement
Quick Links
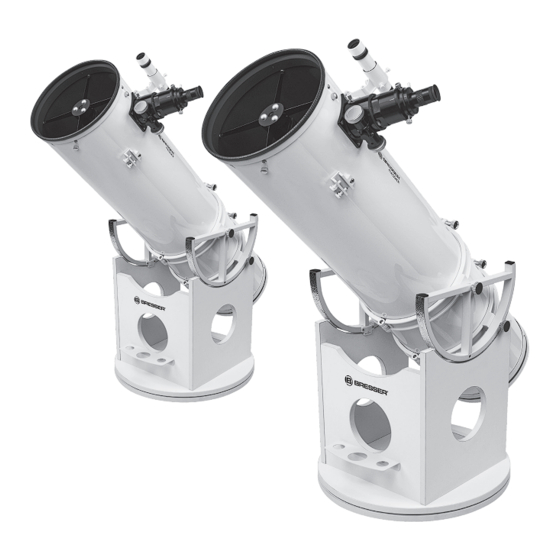
DOB-203 / DOB-254
203/1218 (8") · f/6
254/1270 (10") · f/5
Parabolischer Newton-Reflektor · Parabolic Newtonian Reflector · Réflecteur parabolique newtonien · Parabolische Newton refector
Riflettore parabolico Newton · Reflector parabólico Newton · Refletor parabólico Newton · Paraboliczny reflektor Newtona
Parabolický reflektor Newtonovská · Parabolično Newtonov reflektor · parabolični reflektor Njutnov · Параболическая Ньютона Отражатель
Art. No. 4716420
Art. No. 4716425
InstructIon MAnuAL
GB
Advertisement
Table of Contents

Related Manuals for Bresser DOB-203


Summary of Contents for Bresser DOB-203
- Page 1 DOB-203 / DOB-254 203/1218 (8") · f/6 254/1270 (10") · f/5 Parabolischer Newton-Reflektor · Parabolic Newtonian Reflector · Réflecteur parabolique newtonien · Parabolische Newton refector Riflettore parabolico Newton · Reflector parabólico Newton · Refletor parabólico Newton · Paraboliczny reflektor Newtona Parabolický...
- Page 2 Allgemeine Warnhinweise · General Safety Informations · Avertissements généraux Algemene veiligheid informatie · Avvertenze generali · Advertencias generales de seguridad Informações gerais de segurança · Общие предупреждения Never take the device apart. Please consult GEVAAR Voor brand! your dealer if there are any defects. The Stel het apparaat –...
-
Page 3: Scope Of Delivery
¡PELIGRO de lesiones corporales! Ao vender ou entregar o aparelho a Сохраните руководство по эксплуатации No mire nunca con este aparato directamente outro proprietário/utilizador do produto для последующего использования. hacia el sol o hacia sus inmediaciones. deve entregar juntamente o manual de При... - Page 4 Parts Overview Fig. 2 Inset A C 1% 1& Inset B - 4 -...
-
Page 5: Parts Overview
14a. Fixing screws 15. 1 ¼" and 2" eyepiece holder 16. Viewfinder mounting (2x) 17. Clamp screw OTA's bottom side/mirror frame (Inset B) 18. Mirror backside 19. Mirror frame 20. Collimation screws (3x) 21. Counter screws (3x) www.bresser.de/download/Messier/Dobson - 5 -... -
Page 6: Assembling The Base
Setup Assembling the base NOTE! You additionally need a suitable Phillips screwdriver, an Allen wrench and an open-end wrench or ring wrench for assembling. Use an old carpet or another soft surface to avoid any damages to the component parts. Required IMPORTANT! Note that the studs are height-adjustable. - Page 7 Setup STEP 5 (Fig. 7): Fig. 7 1. Set up the front part (Fig. 1, F) and put it with the drill holes of the quick fasteners (Fig. 1, M) over the threaded bolts (Fig. 1, L) of the left side part (Fig. 1, C). 2.
- Page 8 Setup Fig. 10 Attaching the OTA STEP 8 (Fig. 10): 1. Attach both altitude wheels (Fig. 1, H) with the fixing screws (Fig. 1, T) to the right and left side of the OTA. NOTE! Make sure that the 'noses' on one side (Fig. 10, X) are pointing in the direction of the clamp screws (Fig.
-
Page 9: Installing Accessories
Installing accessories Fig. 12 Inserting the eyepiece (Fig. 12) 1. Insert the 1 ¼" eyepiece (Fig. 1, J) into the eyepiece holder (Fig. 12, 15). 2. Tighten the clamp screw (Fig. 12, 17) slightly. 3. Look through the eyepiece and turn the focusing wheel of the focusing drive (Fig. 12, 13) right or left to focus the image. -
Page 10: Using A Dobsonian Telescope
Usage Using a Dobsonian telescope 1. Never lubricate the Teflon pads on the ground plate. Your Dobsonian has been designed with some inherent friction. You want the telescope to move easily when you position it, but you also want it to stay in the position you place it. Using any kind of oil, silicone spray, wax, or grease will ruin the performance by causing the telescope to move too easily. - Page 11 Usage Calculating the magnification The magnification, or power of a telescope is determined by two factors: the focal length of the eyepiece and the focal length of the telescope. Your telescope is supplied with one eyepiece. The focal length of the eyepiece, 25mm, is printed on its side.
- Page 12 Usage Observation Allow for a temperature adjustment for about 90 minutes before starting an observation. Because when bringing the telecope e.g. from a heated car or house to a place outside so called tube seeing may occur. This means that the primary mirror is warmer than the air and will produce air turbulence.
- Page 13 Usage human observer of this planet in 1610 couldn´t know that the planet had rings – he described that Saturn had „ears“. The rings of Saturn mainly consist of billions of icy particles – from tiniest dust up to the size of a house. The biggest division in the rings, the so called “Cassini division”...
-
Page 14: Useful Tips
Usage Useful tips By the way, you might have noticed something strange when you looked through your eyepiece. The image is upside down, and it is also reversed. That means reading words can be a problem or viewing objects on the ground can be a problem. But it has no affect on astronomical objects. Because of the Earth's rotation all objects seem to drift across the field of view. -
Page 15: Maintenance And Cleaning
Maintenance and Cleaning Maintenance Your telescope is a precision instrument that will provide many years of fun. When you are treating this telescope with the same care as for example a expensive camera, it is very unlikely that you will ever need to return it for service or maintenance. Please notice the following rules: 1. - Page 16 Maintenance and Cleaning direction. Note that these offsets have been performed at the factory prior to shipment of your telescope. It is only necessary for you to confirm that the telescope has not been badly jarred out of collimation, and to perform the final fine-tuning of Step 4, below. To check and, if necessary, set the optical collimation, follow these steps: 1.
-
Page 17: Technical Data
Maintenance and Cleaning Technical data BRESSER 8" Messier Dobson BRESSER 10" Messier Dobson Tubue made of metal with adjustable brackets and altitude wheels made of aluminium Secondary mirror holder four armed, steel Primary mirror 8” (203mm), parabolic / 10” (254mm), parabolic... - Page 18 Disposal · Elimination · Afval · Saltimento · Eliminación · Eliminação VIII Утилизация réglementations applicables, veuillez vous información sobre eliminación adresser aux services communaux en charge reglamentaria en los proveedores de servicios Entsorgen Sie die Verpackungsmateria- de la gestion des déchets. de eliminación municipales o en la agencia lien sortenrein.
- Page 19 Garantiezeit wie auf www.bresser.de/warranty_terms. a la ampliación de la garantía y los dem Geschenkkarton angegeben zu profitieren, servicios pueden encontrarse ist eine Registrierung auf unserer Website www.bresser.de/warranty_terms...
- Page 20 Telefon*: +49 28 72 80 74 310 Téléphone*: 00 800 6343 7000 Teléfono*: +34 91 67972 69 BRESSER GmbH BRESSER France SARL Kundenservice Pôle d'Activités de Nicopolis BRESSER Iberia SLU Gutenbergstr. 2 260, rue des Romarins c/Valdemorillo,1 Nave B...
Need help?
Do you have a question about the DOB-203 and is the answer not in the manual?
Questions and answers