
Related Manuals for Walker Edison Cortez W44CS


Summary of Contents for Walker Edison Cortez W44CS
- Page 1 W44CS W44CS Ítem N.°: Artikel# : W44CS W44CS Revised 27/05/2021 (C) © Copyright by Walker Edison Furniture Co., LLC. All rights reserved.
-
Page 2: General Assembly Guidelines
A Phillips head screwdriver is required for the assembly of this product . VII. Power tools should not be used to assemble this product. VIII. Drill may be needed for securing product to wall. (EN) Copyright by Walker Edison Furniture Co., LLC. All rights reserved. ©... - Page 3 Un tournevis cruciforme est requis pour le montage de ce produit. Des outils électriques ne doivent pas être utilisés pour monter ce produit. VII. Une perceuse peut être nécessaire pour fixer le produit au mur. VIII. (FR) Copyright 2010 by Walker Edison Furniture Co., LLC. All rights reserved. ©...
- Page 4 No se deberán usar herramientas eléctricas en el ensamblaje de este producto. VII. Es probable que se necesite un taladro para asegurar el producto a la pared. VIII. (ESP) Copyright 2010 by Walker Edison Furniture Co., LLC. All rights reserved. ©...
- Page 5 Zur Montage dieses Produkts wird ein Phillips Schlitzschraubenzieher benötigt. Es dürfen keine Elektrowerkzeuge zur Montage dieses Produkts verwendet werden. VII. Möglicherweise wird ein Bohrer benötigt, um das Produkt an der Wand zu befestigen. VIII. (DE) Copyright 2010 by Walker Edison Furniture Co., LLC. All rights reserved. ©...
- Page 6 Lista de piezas Copyright 2010 by Walker Edison Furniture Co., LLC. All rights reserved. ©...
-
Page 7: Hardware List
Ø3x15 Screw Tornillo Schraube 4 pcs Ø6x50 Screw Tornillo Schraube 2 pcs Screw Ø5x8x13 Tornillo Schraube 2 pcs Handle Poignée Mango Griff 2 pcs Ø4x22 Screw Tornillo Schraube Copyright 2010 by Walker Edison Furniture Co., LLC. All rights reserved. ©... - Page 8 Kunststoffkeile 8 pcs Screw Ø3x17 Tornillo Schraube 1 pc Wrench Ø4 Clé hexagonale Llave hexagonal Schraubenschlüssel 3 pcs Glue tube Tube de colle Tubo de pegamento Tube Klebstoff Copyright 2010 by Walker Edison Furniture Co., LLC. All rights reserved. ©...
- Page 9 (no incluido) Für die Montage benötigen Sie einen Kreuzschlitzschraubenzieher (nicht enthalten) The hardware quantities listed above are required for proper assembly.Some extra hardware may also have been included. Copyright 2010 by Walker Edison Furniture Co., LLC. All rights reserved. ©...
- Page 10 Ausklinkbolzen (B) in die obere Platte (1) und das Regalbrett (9) schrauben. Dübel (A) in das Regalbrett (9) einfügen. Türstopper (D) mit kleinen Schrauben (E) an Regalbrett (9) befestigen. P.10 Copyright 2010 by Walker Edison Furniture Co., LLC. All rights reserved. ©...
- Page 11 Insérer les goujons de bois (A) dans les panneaux (3, 4, 10) et la latte (12). (ESP) Inserte las clavijas (A) en los paneles (3,4,10) y el listón (12). (DE) Dübel (A) in Platten (3,4,10) und Leiste (12) stecken. Copyright 2010 by Walker Edison Furniture Co., LLC. All rights reserved. P.11 ©...
- Page 12 Atornille los pernos de leva (B) en los paneles(2). Inserte las clavijas (A) en el panel (2) y el listón (17). (DE) Ausklinkbolzen (B) in die Platte (2) schrauben. Dübel (A) in Platte (2) und Leiste (17) stecken. Copyright 2010 by Walker Edison Furniture Co., LLC. All rights reserved. P.12 ©...
- Page 13 (C) en el listón (17) y apriételos con un destornillador. (DE) Leiste (17) mit Ausklinkbolzen und Dübel als Führungen an Platte (2) befestigen. Ausklinkbolzen (C) in die Leiste (17) stecken und mit einem Schraubenzieher festziehen. © Copyright 2010 by Walker Edison Furniture Co., LLC. All rights reserved. P.13...
- Page 14 Griffe (H) mit mittleren Bolzen (I) an Türen (15,16) befestigen. Kurze Bolzen (G) in Türen (15,16) schrauben. Türscharnier (K) mit kleinen Schrauben (M) an Tür (15) befestigen. Türscharnier (J) mit kleinen Schrauben (M) an Tür (16) befestigen. Copyright 2010 by Walker Edison Furniture Co., LLC. All rights reserved. P.14 ©...
- Page 15 Atornille los pernos de leva (B) en las patas(5,6,7,8). Inserte las clavijas (A) en las patas(5,6,7,8). (DE) Ausklinkbolzen (B) in die Beine (5,6,7,8) schrauben. Dübel (A) in die Beine (5,6,7,8) einfügen. P.15 Copyright 2010 by Walker Edison Furniture Co., LLC. All rights reserved. ©...
- Page 16 (C) en los paneles (3) y apriételos con un destornillador. (DE) Beine (5,6) mit Ausklinkbolzen und Dübeln als Führungen an Platte (3) befestigen. Ausklinkbolzen (C) in die Platte (3) stecken und mit einem Schraubenzieher festziehen. © Copyright 2010 by Walker Edison Furniture Co., LLC. All rights reserved. P.16...
- Page 17 (C) en los paneles (4) y apriételos con un destornillador. (DE) Beine (7,8) mit Ausklinkbolzen und Dübel als Führungen an Platte (4) befestigen. Ausklinkbolzen (C) in die Platte (4) stecken und mit einem Schraubenzieher festziehen. © Copyright 2010 by Walker Edison Furniture Co., LLC. All rights reserved. P.17...
- Page 18 Stützbein (11) mit langen Bolzen (F) an Platte (2) befestigen. Lange Bolzen (F) mit Schraubenschlüssel (R) anziehen. Platte (10) mit Bolzen (F) an Platte (2) befestigen. Lange Bolzen (F) mit Schraubenschlüssel (R) anziehen. P.18 Copyright 2010 by Walker Edison Furniture Co., LLC. All rights reserved. ©...
- Page 19 (C) en los paneles (10) y apriételos con un destornillador. (DE) Regalbrett (9) mit Ausklinkbolzen und Dübel als Führungen an Platte (10) befestigen. Ausklinkbolzen (C) in die Platte (10) stecken und mit einem Schraubenzieher festziehen. P.19 Copyright 2010 by Walker Edison Furniture Co., LLC. All rights reserved. ©...
- Page 20 Führungen befestigen. Ausklinkbolzen (C) in Platte (2) und Regalbrett (9) stecken und mit einem Schraubenzieher festziehen. Zwei Ausklinkbolzen werden in die Platte (2) und das Regalbrett (9) gesteckt. © Copyright 2010 by Walker Edison Furniture Co., LLC. All rights reserved. P.20...
- Page 21 Deslice cuidadosamente el panel trasero (13,14) en su lugar a lo largo de las ranuras en la parte posterior del conjunto del marco. (DE) Rückwand (13,14) vorsichtig entlang der Rillen hinter dem Rahmenbausatz in Position schieben. Copyright 2010 by Walker Edison Furniture Co., LLC. All rights reserved. P.21 ©...
- Page 22 Inserte el cierre de leva(C) en el listón (12) y apriételos con un destornillador. (DE) Leiste (12) mit Ausklinkbolzen und Dübeln als Führungen am Rahmenbausatz befestigen. Ausklinkbolzen (C) in die Leiste (12) stecken und mit einem Schraubenzieher festziehen. Copyright 2010 by Walker Edison Furniture Co., LLC. All rights reserved. P.22 ©...
- Page 23 Zylinderschlösser (C) in Platte (2), Regalbrett (9) und Leiste (12) einsetzen. Den Platten-Bausatz (4) mit Ausklinkbolzen und Dübeln als Führungen an Platten (2), Regalbrett (9) und Leiste (12) befestigen. Zylinderschlösser (C) mit einem Schraubenzieher anziehen. P.23 Copyright 2010 by Walker Edison Furniture Co., LLC. All rights reserved. ©...
- Page 24 Apriete los cierres de leva (C) con un destornillador. (DE) Zylinderschlösser (C) in Rahmenbausatz einsetzen. Obere Platte (1) mit Ausklinkbolzen und Dübeln als Führungen am Rahmenbausatz befestigen. Zylinderschlösser (C) mit einem Schraubenzieher anziehen. Copyright 2010 by Walker Edison Furniture Co., LLC. All rights reserved. P.24 ©...
- Page 25 Couvrir toutes les vis excentriques visibles avec les autocollants (T) si désiré. (ESP) Cubra todos los cierres de leva visibles con pegatinas (T) como desee. (DE) Sämtliche sichtbaren Ausklinkbolzen je nach Bedarf mit Aufklebern (T) bedecken. © Copyright 2010 by Walker Edison Furniture Co., LLC. All rights reserved. P.25...
- Page 26 Insérer les pivots de plastique (N) dans le panneau (2,9). (ESP) Inserte el pivote de plástico (N) en el panel (2,9). (DE) Kunststoffgelenke (Q) in Platte (2,9) einfügen. © Copyright 2010 by Walker Edison Furniture Co., LLC. All rights reserved. P.26...
- Page 27 Schrauben (M) an Tür (15) befestigen. Türscharnier (K) in rechtes unteres Kunststoffgelenk (N) einfügen. Tür (16) in Position schieben. Türscharnier (K) mit kleinen Schrauben (M) an Tür (16) befestigen. © Copyright 2010 by Walker Edison Furniture Co., LLC. All rights reserved. P.27...
- Page 28 Fije los paneles traseros (13,14) con las cuñas de plástico (P) y los tornillos grandes (Q). (DE) Rückwände (13,14) mit Kunststoffkeilen (P) und großen Schrauben (Q) sichern. P.28 Copyright 2010 by Walker Edison Furniture Co., LLC. All rights reserved. ©...
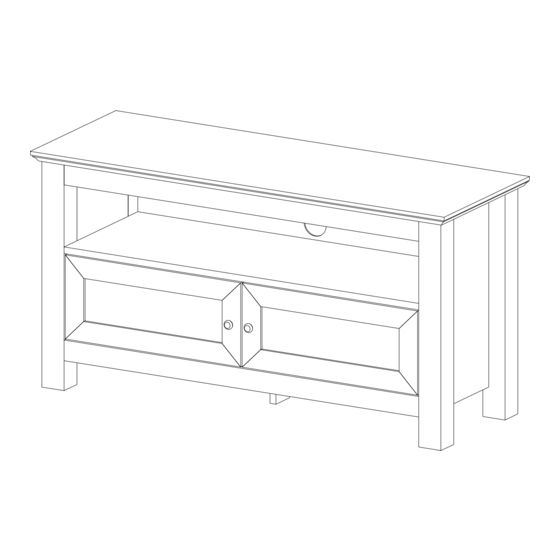
- Page 29 Step 20 Final Assembly P.29 Copyright 2010 by Walker Edison Furniture Co., LLC. All rights reserved. ©...
Need help?
Do you have a question about the Cortez W44CS and is the answer not in the manual?
Questions and answers