Stiga TRE 0702 Workshop Manual
Hide thumbs
Also See for TRE 0702:
- Operator's manual (168 pages) ,
- Operator's manual (14 pages) ,
- Operator's manual (66 pages)
Table of Contents
Advertisement
TRE 0701 - TRE 0702
TRE 0701 - TRE 0702
TRE 0801
TRE 0801
WORKSHOP MANUAL
WORKSHOP MANUAL
2018-->....
Rel. 0.0
PRODUCTION YEAR
The manufacturer reserves the right to make all the necessary technical or commercial improvements to
its products, so there may be some differences between the series of engines and the contents of this
manual. However the basic specifications and different operating procedures will remain the same.
by STIGA - No use of the illustrations or duplication, reproduction or translation, even partial, of the texts
in this document may be made without explicit authorization.
IMPORTANT NOTICE : The information contained herein is intended for Service Operations and professionals
only, able to competently perform the operations described herein, using the appropriate equipment in
order to safeguard se-curity and performance of the machine. The manufacturer is not liable for damages
or injuries arising from operations performed by individuals or inadequate facilities.
Advertisement
Table of Contents

Related Manuals for Stiga TRE 0702


Summary of Contents for Stiga TRE 0702
- Page 1 However the basic specifications and different operating procedures will remain the same. by STIGA - No use of the illustrations or duplication, reproduction or translation, even partial, of the texts in this document may be made without explicit authorization.
-
Page 3: Table Of Contents
<< BACK >> Engine TRE 0701-TRE 0702-TRE 0801 CONTENTS INTRODUCTION ..................... 5 1. RULES AND PROCEDURES FOR SERVICE CENTRES .......... 6 1.1. Guarantee validity ...........................6 1.2. Service repairs after guarantee period ....................6 1.3. Fault notification ............................6 1.4. Spare parts request ..........................6 2. - Page 4 << BACK >> Engine TRE 0701-TRE 0702-TRE 0801 CONTENTS 8. GOVERNOR SYSTEM OF THE CARBURETTOR ..........25 8.1. Adjusting of accelerator cable ......................25 8.2. Verify petrol pump (if present) ......................26 8.3. Pump replacement (if present) ......................26 8.4. Adjusting maximum speed ........................26 8.5.
-
Page 5: Introduction
TRE 0701, TRE 0702 and TRE 0801. Interventions on the engine must be performed in accordance with instructions in the following Warns of operations that should be carried... -
Page 6: Rules And Procedures For Service Centres
<< BACK >> Engine TRE 0701-TRE 0702-TRE 0801 INDEX 1. RULES AND PROCEDURES FOR SERVICE CENTRES 1.1. Guarantee validity The warranty is supplied under the terms, procedu- res and limits stated in the contract. 1.2. Service repairs after guarantee period... -
Page 7: General And Safety Regulations
<< BACK >> Engine TRE 0701-TRE 0702-TRE 0801 INDEX 2. GENERAL AND SAFETY REGULATIONS 2.3. Precautions during servicing IMPORTANT: Before commencing with any As well as following the usual accident prevention intervention, carefully read the information regulations that apply to most repair shops, we... -
Page 8: Etichette Di Sicurezza
<< BACK >> Engine TRE 0701-TRE 0702-TRE 0801 INDEX 2. GENERAL AND SAFETY REGULATIONS 2.4. Etichette di sicurezza 3 - Ventilation of closed areas: In the event that it is necessary to start the engine On the cowl motor, in a immediately identification... -
Page 9: Technical Data And Specifications
Minimum exhaust valve head rim 1.0 mm thickness 3.2. Technical data Valve seat width 1.5 mm Minimum valve spring length 37.5 mm TRE 0701 TRE 0702 TRE 0801 Maximum gap between ends of Displacement 0.8 mm 432 cc 414 cc 452 cc cylinder rings Bore 90 mm... -
Page 10: Tightening Torques
<< BACK >> Engine TRE 0701-TRE 0702-TRE 0801 INDEX 3. TECHNICAL DATA AND SPECIFICATIONS 3.6. Tightening torques 8-12 Nm 110-120 Nm 8-12 Nm 8-12 Nm 18-22 Nm 8-12 Nm 8-10 Nm 50-55 Nm 8-12 Nm 8-12 Nm 22-30 Nm 8-12 Nm... -
Page 11: Table Of Tightening Torques
<< BACK >> Engine TRE 0701-TRE 0702-TRE 0801 INDEX 3. TECHNICAL DATA AND SPECIFICATIONS 3.7. Table of Tightening torques Chapter Ref. Description of screw Tightening torques 6 - 10 Attachment bolt flywheel 110 - 120 Nm 6 - 9 Coil fixing screws... -
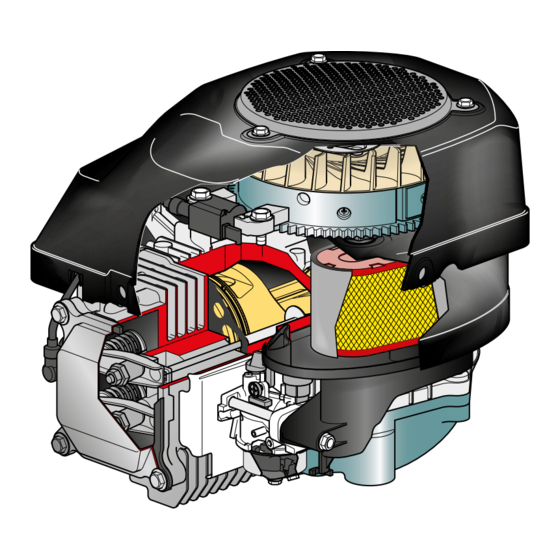
Page 12: Identification Of Engine Units
<< BACK >> Engine TRE 0701-TRE 0702-TRE 0801 INDEX 3. TECHNICAL DATA AND SPECIFICATIONS 3.8. Identification of engine units For ease of reference, this manual has subdivided maintenance operations into different sections, each of which refers to an engine component unit as indicated in the diagrams below. -
Page 13: Engine Tuning And Testing
<< BACK >> Engine TRE 0701-TRE 0702-TRE 0801 INDEX 4. ENGINE TUNING AND TESTING 4.1. Operating guidelines The engine requires a series of interventions (shown in the table below) in order to ensure minimum basic maintenance. Every 25 Every 50... -
Page 14: Functional Test
<< BACK >> Engine TRE 0701-TRE 0702-TRE 0801 INDEX 4. ENGINE TUNING AND TESTING 4.3. Functional test A functional test needs to be carried out at the end of each servicing operation, to check that the operations made are effective. The test must be... -
Page 15: Petrol Supply And Air Intake
<< BACK >> Engine TRE 0701-TRE 0702-TRE 0801 INDEX 5. PETROL SUPPLY AND AIR INTAKE IMPORTANT: Carefully read the information below before commencing any intervention. General information The petrol supply occurs via a tank mounted on the machine and connected to the carburettor by a pipe. -
Page 16: Maintenance Of Filtering Element
<< BACK >> Engine TRE 0701-TRE 0702-TRE 0801 INDEX 5. PETROL SUPPLY AND AIR INTAKE General information The filtering system consists of an air filter directly connected to the carburettor and an internal manifold, located between the carburettor and the cylinder head, which carries the air/petrol mix towards the intake valve. - Page 17 << BACK >> Engine TRE 0701-TRE 0702-TRE 0801 INDEX 5. PETROL SUPPLY AND AIR INTAKE 4 - Touch the cartridge on a solid surface and blow with compressed air from the interior side to remove dust and product residues. IMPORTANT : For the cartridge cleaning don’t use water, petrol, detergtent.
-
Page 18: Starting System
<< BACK >> Engine TRE 0701-TRE 0702-TRE 0801 INDEX 6. STARTING SYSTEM General information The starting system consists of the starting motor mounted on the engine casing which transmits movement to the flywheel and therefore, to the enging shaft. See the relevant section for advice on resolving problems due to the malfunctioning of the star- ting system. - Page 19 << BACK >> Engine TRE 0701-TRE 0702-TRE 0801 INDEX 6. STARTING SYSTEM Using a suitable extracting tool, remove the flywheel (8) as indicated in the diagram. Ensure that the engine shaft key is retained. 5 - Remove the screws (9) and lift out the starting motor (10).
-
Page 20: Replacement Of Starting Motor
<< BACK >> Engine TRE 0701-TRE 0702-TRE 0801 INDEX 6. STARTING SYSTEM Verify the condition of the brushes and, using a gauge, measure (15) the length which should be between 8.5 and 12 mm. If the length is shorter, the brushes must be replaced as indicated below. -
Page 21: Carburation
<< BACK >> Engine TRE 0701-TRE 0702-TRE 0801 INDEX 7. CARBURATION General information The carburettor has a float with a fixed jet and a “CHOKE” control. See the relevant section for advice on resolving problems due to carburation. The carburettor is located on the left-hand side of the engine. For maintenance operations it is necessary to dismantle the air intake filter in the sequence shown below. - Page 22 << BACK >> Engine TRE 0701-TRE 0702-TRE 0801 INDEX 7. CARBURAZIONE 4 - Remove tie engine shaft (7) of the starter throttle lever. 5 - Loosen the central screw (8) fastening the flo- at chamber (9), remove the relative gasket (10) and carefully collect all the petrol left in the float chamber.
-
Page 23: Replacing The Carburettor
<< BACK >> Engine TRE 0701-TRE 0702-TRE 0801 INDEX 7. CARBURATION 8 - Check that no impurities or dirt are deposited in the seat of the needle (16) and of the jet. Verify that the rubber tip of the needle is not mar- ked or worn. -
Page 24: Adjusting Minimum Speed
<< BACK >> Engine TRE 0701-TRE 0702-TRE 0801 INDEX 7. CARBURATION 7.3. Adjusting minimum speed 1 - Check that the throttle cable is adjusted cor- 8.1]. rectly 2 - Let the engine heat up for a few minutes, then set the throttle control to “SLOW”. -
Page 25: Governor System Of The Carburettor
<< BACK >> Engine TRE 0701-TRE 0702-TRE 0801 INDEX 8. GOVERNOR SYSTEM OF THE CARBURETTOR General information The carburettor governor system uses a engine shaft linkage fitted on a support fixed to the left-hand side of the engine, completed by a counterweight device, driven by the camshaft, and thus sensitive to changes in the engine’s revolution pattern depending on load. -
Page 26: Verify Petrol Pump (If Present)
<< BACK >> Engine TRE 0701-TRE 0702-TRE 0801 INDEX 8. GOVERNOR SYSTEM OF THE CARBURETTOR 8.2. Verify petrol pump (if present) By following the operations below, verify that the flow from the petrol pump is continuous and without interruptions: 1 - Disconnect the outlet tube (6) which is connec- ted from the pump (7) to the carburettor. - Page 27 << BACK >> Engine TRE 0701-TRE 0702-TRE 0801 INDEX 8. GOVERNOR SYSTEM OF THE CARBURETTOR Check the rotation speed on the speed indicator (13). 4 - Act on the regulation screw (14) to establish the correct value of the maximum turn system.
-
Page 28: Replacing The Lever Support
<< BACK >> Engine TRE 0701-TRE 0702-TRE 0801 INDEX 8. GOVERNOR SYSTEM OF THE CARBURETTOR 7 - Four holes are present on the lever (19) for inser- ting the spring (17). The number of engine rotations is determined depending on the position of the spring: A ►... - Page 29 << BACK >> Engine TRE 0701-TRE 0702-TRE 0801 INDEX 8. GOVERNOR SYSTEM OF THE CARBURETTOR 5 - Remove the three screws (29) which fasten the levers support (28) of the engine. 6 - Perform the above operations in reverse order when assembling.
-
Page 30: Ignition
<< BACK >> Engine TRE 0701-TRE 0702-TRE 0801 INDEX 9. IGNITION General information The ignition system has a flywheel with an electronic coil which supplies high voltage to the spark plug. See the relevant section for advice on resolving problems related to the ignition. -
Page 31: Adjusting The Air Gap And Checking The Coil
<< BACK >> Engine TRE 0701-TRE 0702-TRE 0801 INDEX 9. IGNITION 9.2. Adjusting the air gap and checking the coil 6.1]. 1 - Remove the cowl and the fan 2 - Make sure that the earth cable faston (6) of the coil (7) is not oxidized;... -
Page 32: Replacing The Coil
<< BACK >> Engine TRE 0701-TRE 0702-TRE 0801 INDEX 9. IGNITION 9.1]. 7 - Perform a spark test as indicated in - If the spark jumps: the coil functions properly and in the event of malfunction, verify that the cut-off cable (12) is not earthed. -
Page 33: Engine Block - External Repairs
<< BACK >> Engine TRE 0701-TRE 0702-TRE 0801 INDEX 10. ENGINE BLOCK - External repairs 10.1. Checking the compression 1 - Remove the cap (1) and take out the spark plug (2). 2 - Manually set the piston to the TDC (Top Dead Centre) of the compression stroke so that both valves are closed. -
Page 34: Adjusting The Valve Clearance
<< BACK >> Engine TRE 0701-TRE 0702-TRE 0801 INDEX 10. ENGINE BLOCK – External repairs If necessary, remove the engine of the machine 11.1]. according to indications in paragraph 10.2. Adjusting the valve clearance WARNING: The adjustment must be made with the engine is cold. -
Page 35: Dismantling And Cleaning The Cylinder Head
<< BACK >> Engine TRE 0701-TRE 0702-TRE 0801 INDEX 10. ENGINE BLOCK – External repairs 10.3. Dismantling and cleaning the cylinder head 1 - Perform the operations indicated in points 1 - 2 10.2] - 3 - 4 in section above. -
Page 36: Overhauling The Cylinder Head And Valves
<< BACK >> Engine TRE 0701-TRE 0702-TRE 0801 INDEX 10. ENGINE BLOCK – External repairs 10.4 Overhauling the cylinder head and valves NOTE - These paragraphs describe all the operations for checking and overhauling the cylinder head; it is left to the operator to... - Page 37 << BACK >> Engine TRE 0701-TRE 0702-TRE 0801 INDEX 10. ENGINE BLOCK – External repairs 6 - Remove the cup-washer (25), the spring (26) and the two half-cones (24). 7 - Use an emery cloth to remove all incrustations from the valve head (27) and check the thickness of the rim (A).
- Page 38 << BACK >> Engine TRE 0701-TRE 0702-TRE 0801 INDEX 10. ENGINE BLOCK – External repairs 11 - Apply abrasive paste for grinding around the rim of the valve head (27) and then insert the valve into its seat. 12 - Use the special manually operated tool (30) to grind the seat and rim of the valve.
-
Page 39: Dismantling And Replacing The Magneto Flywheel
<< BACK >> Engine TRE 0701-TRE 0702-TRE 0801 INDEX 10. ENGINE BLOCK – External repairs - Insert the valve and position the spring (26), the cup-washer (25) and the two half-cones (24) and follow the removal procedure in reverse using the tool (23), to lock the two half-cones into place. -
Page 40: Checking The Oil Breather
<< BACK >> Engine TRE 0701-TRE 0702-TRE 0801 INDEX 10. ENGINE BLOCK – External repairs Using a suitable extraction tool, remove the flywheel (37) as indicated in the diagram. Ensure that the engine shaft key is retained. 5 - Remount the coil (35) and fix the screws (36) to the indicated couple. -
Page 41: Replacing The Upper Compression Ring Of The Engine Shaft (Flywheel Side)
<< BACK >> Engine TRE 0701-TRE 0702-TRE 0801 INDEX 10. ENGINE BLOCK – External repairs 10.7. Replacing the upper compression ring of the engine shaft (flywheel side) 10.5]. 1 - Remove the magneto flywheel 2 - Unscrew the screws (43) and remove the alter- nator (44). -
Page 42: Replacing The Lower Compression Ring Of The Engine Shaft (Sump Side)
<< BACK >> Engine TRE 0701-TRE 0702-TRE 0801 INDEX 10. ENGINE BLOCK – External repairs 10.9. Replacing the lower compression ring of the engine shaft (sump side) NOTE - Before executing this operation di- scharge all the oil from the bowl and rotate 180° the motor. -
Page 43: Engine Block - Overhauling Internal Parts
<< BACK >> Engine TRE 0701-TRE 0702-TRE 0801 INDEX 11. ENGINE BLOCK - Overhauling internal parts All the operations below require that the engine is removed from the machine. 11.1. Remove the engine from the machine 1 - Unthread the accelerator cable (1). -
Page 44: Dismantling And Checking The Camshaft And Counterweight Governor
<< BACK >> Engine TRE 0701-TRE 0702-TRE 0801 INDEX 11. ENGINE BLOCK - Overhauling internal parts 6 - On assembly, follow the steps described in re- verse and: - Replace always the pump trimming (8) oil and close the screws (5) to the indicated couple;... - Page 45 << BACK >> Engine TRE 0701-TRE 0702-TRE 0801 INDEX 11. ENGINE BLOCK - Overhauling internal parts Measure the cams (B), checking for wear and tear. The value must not be lower than 32.15 mm IN (YI) and 32.35 mm EX (YE).
- Page 46 << BACK >> Engine TRE 0701-TRE 0702-TRE 0801 INDEX 11. ENGINE BLOCK - Overhauling internal parts Measure the height of the pump cylinder body (21), which must be lower than 9.95mm. Using a thickness gauge (22), measure the play between the pump cylinder and its mounting seat on the sump.
-
Page 47: Dismantling And Checking The Piston, Piston Rings, Connecting Rod And Engine Shaft
<< BACK >> Engine TRE 0701-TRE 0702-TRE 0801 INDEX 11. ENGINE BLOCK - Overhauling internal parts 11.4. Dismantling and checking the piston, piston rings, connecting rod and engine shaft NOTA - These paragraphs describe all the operations for checking and overhauling the thermal components of the engine;... - Page 48 << BACK >> Engine TRE 0701-TRE 0702-TRE 0801 INDEX 11. ENGINE BLOCK - Overhauling internal parts 12 - To check the wear in the compression rings, insert them one at a time into the cylinder (32) by about 10-15 mm and measure the gap between the two ends with a feeler gauge (34);...
- Page 49 << BACK >> Engine TRE 0701-TRE 0702-TRE 0801 INDEX 11. ENGINE BLOCK - Overhauling internal parts 16 - Check the diameter of the gudgeon pin (38) in several places and replace it if it is less than 19.95 mm, even at a single point.
- Page 50 << BACK >> Engine TRE 0701-TRE 0702-TRE 0801 INDEX 11. ENGINE BLOCK - Overhauling internal parts 19 - Remove the engine shaft (39), checking the diameter of the connecting rod pin with a digital gauge. The value must not be less than 35.93 mm or the engine shaft will have to be replaced.
- Page 51 << BACK >> Engine TRE 0701-TRE 0702-TRE 0801 INDEX 11. ENGINE BLOCK - Overhauling internal parts 23 - Put the piston into the ring compression tool (45). 24 - Oil the inside of the piston liberally and insert the piston, with the marking facing the exhaust.
- Page 52 << BACK >> Engine TRE 0701-TRE 0702-TRE 0801 INDEX 11. ENGINE BLOCK - Overhauling internal parts 27 - Remount the two counterweights, ensuring that the position references (47) and (48) punched on the gears, coincide. Check also that the position references (49) of the...
-
Page 53: Turning Off And Stopping Engine
<< BACK >> Engine TRE 0701-TRE 0702-TRE 0801 INDEX 12. TURNING OFF AND STOPPING ENGINE For maintenance operations relating to this section, refer to the manual specific to the machine on which the engine is mounted. 13. EXHAUST SYSTEM For maintenance operations relating to this section, refer to the manual specific to the machine on which the engine is mounted. -
Page 54: Troubleshooting
<< BACK >> Engine TRE 0701-TRE 0702-TRE 0801 INDEX 14. TROUBLESHOOTING PROBLEM CAUSE SOLUTION No power supply to battery 10.8] Check alternator charge Starting motor short circuit (burnt rotor 6.2] Replace starting motor and stator) Check electrical cabling of earth wire No earth 9.1]... - Page 55 << BACK >> Engine TRE 0701-TRE 0702-TRE 0801 INDEX 14. TROUBLESHOOTING PROBLEM CAUSE SOLUTION Dismount the cylinder head and re- Fouling in the combustion chamber 10.3] move fouling The engine starts but does Check tightness of cylinder head not run screws, replace washer if necessary.
- Page 56 << BACK >> Engine TRE 0701-TRE 0702-TRE 0801 INDEX pag. 56 Service manual Release 00 - 03/2018...
- Page 57 << BACK >> Engine TRE 0701-TRE 0702-TRE 0801 INDEX pag. 57 Release 00 - 03/2018 Service manual...
Need help?
Do you have a question about the TRE 0702 and is the answer not in the manual?
Questions and answers