
Related Manuals for Kärcher K 5 Premium Flex


Summary of Contents for Kärcher K 5 Premium Flex
- Page 1 K 5 Premium Flex OPERATOR MANUAL High-Pressure Washer ..2 MANUEL D’UTILISATION Nettoyeur haute pression ..18 59669680 (2015-12)
-
Page 2: Table Of Contents
HIGH-PRESSURE WASHER OPERATOR MANUAL Model Overview Owner/User Responsibility Important Safety Instructions The owner and/or user must have an un- Assembly Instructions derstanding of the manufacturer’s oper- ating instructions and warnings before Operating Instructions using this pressure washer. Using the Accessories Warning information should be empha- Working with Detergents sized and understood. -
Page 3: Model Overview
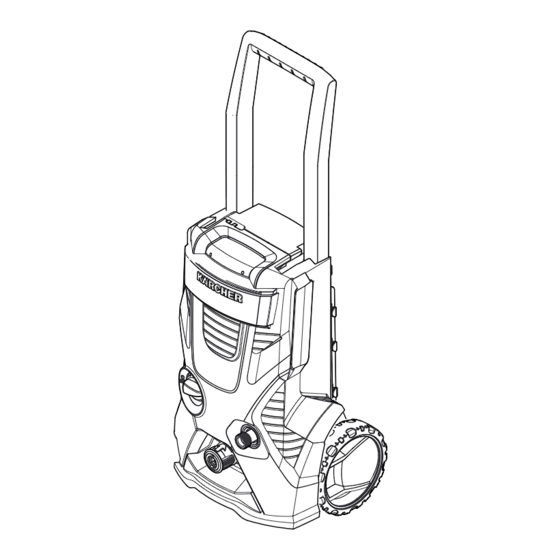
MODEL OVERVIEW 1 Garden hose connector (female) 11 Trigger gun 2 Water inlet connector 12 Trigger gun safety lock 3 Water inlet with integrated filter 13 Key to disconnect the high-pressure 4 Quick connect high-pressure outlet hose from the trigger gun 5 ON/OFF switch 14 High-pressure hose 6 Collapsable transport handle... -
Page 4: Important Safety Instructions
IMPORTANT SAFETY INSTRUCTIONS WARNING physical injuries to the operator and When using this product basic precau- irreversible damage to the machine. tions should always be followed, includ- WARNING – Risk of Electrocu- ing the following: tion Read all the instructions before using Inspect cord before using –... - Page 5 AVOID RUPTURE AND INJURY, DO built into the plug of the power-supply cord. This device provides additional NOT OPERATE THIS PUMP WITH COMPONENTS RATED LESS THAN protection from the risk of electric shock. Should replacement of the plug or cord 2000 PSI (13800 KPA) WORKING PRESSURE (INCLUDING BUT NOT become necessary, use only identical...
-
Page 6: Assembly Instructions
Install the transport handle ASSEMBLY INSTRUCTIONS STEP 3: For more detailed information on Place the transport handle into the how to assemble this high-pressure intake until you feel resistance. Use washer, please visit the heel of your hand or a soft rubber www.karcherresidential.com/assembly mallet to position it. -
Page 7: Operating Instructions
Connect the high-pressure hose to OPERATING the trigger gun INSTRUCTIONS STEP 6: This pressure washer has been tested Push the high-pressure hose into the by Kärcher's quality assurance team. A trigger gun until it locks audibly. small amount of water may be present in Note: Make sure the connection nip- the water inlet or outlet. - Page 8 STEP 3: STEP 6: Install the water inlet connector to the Plug the Ground Fault Circuit Inter- unit’s water inlet. rupter (GFCI) into a working outlet. Note: Never attach the garden hose We recommend that you test the GFCI as part of your startup procedure each time connector to the unit’s water inlet! you use your pressure washer.
-
Page 9: Using The Accessories
USING THE ACCESSORIES Dirtblaster ® WARNING This nozzle features a 0º pencil jet which To avoid serious injury never point rotates 360º for maximum dirt cutting ac- spray nozzle at yourself, other per- tion, effectively increasing cleaning per- sons or animals. formance up to 50%. -
Page 10: Working With Detergents
For best results see Cleaning Tips for WORKING WITH specific information on how to clean DETERGENTS different surfaces. Detergents can only be applied at Always Use Kärcher ® Detergent for low-pressure setting (Mix). Best Results STEP 1: Kärcher ® biodegradable detergents are ... -
Page 11: Taking A Break
STEP 3: TAKING A BREAK ... five Press trigger to release water pres- minutes or more sure. STEP 1: Release trigger and engage gun safety lock. STEP 4: Release trigger and engage gun safety lock. STEP 2: ... -
Page 12: Winterizing And Long-Term Storage
WINTERIZING AND CARE AND MAINTENANCE LONG-TERM STORAGE INSTRUCTIONS 1 Disconnect all water connections. Cleaning the water inlet filter 2 Turn on the machine for a few seconds, until the water which had STEP 1: remained in the pump exits, turn off Pull out water inlet filter with flat-nose immediately. -
Page 13: Cleaning Tips
CLEANING TIPS House Siding CAUTION (with or without detergent). Pre-rinse Before cleaning any surface an in- cleaning surface with fresh water. If us- conspicuous area should be cleaned ing detergent, apply to surface at low to test spray pattern and distance for pressure (for best results, limit your maximum cleaning results. -
Page 14: Optional Cleaning Accessories
gent to dry on surface. If needed, use OPTIONAL CLEANING special wash brush attachment (not in- ACCESSORIES cluded) to remove stubborn dirt. Rinse at high-pressure in a sweeping motion Optional accessories are available to keeping the spray nozzle approximately further enhance your cleaning capabili- 15-20 cm (6-8 in.) from the cleaning sur- ties. - Page 15 Rotating Wash Brush (bayonet) Wet Sandblasting Kit (bayonet) For more effortless cleaning of all Why spend hours stripping old paint and smooth surfaces (painted, glass and rust by hand using harsh chemicals? Let plastic) try the Kärcher ® Rotating Wash the Kärcher ®...
-
Page 16: Troubleshooting
TROUBLESHOOTING WARNING Disconnect the unit from the power source before making any repair. Issue Cause Solution Motor will not start On/Off switch is in the “OFF” Turn switch to the “ON” (I) (0) position. position Power cord is not plugged in. Plug in power cord. Electrical outlet does not Try a different outlet. - Page 17 Issue Cause Solution No detergent. Detergent siphon tube not Check connection. properly connected to the machine. Detergent is too thick. Dilute detergent, for best results use Kärcher detergent. Filter on detergent siphon tube Run warm water through filter is clogged. to remove debris.
Need help?
Do you have a question about the K 5 Premium Flex and is the answer not in the manual?
Questions and answers