Motorola CLS1410 User Manual
Hide thumbs
Also See for CLS1410:
- User manual (66 pages) ,
- User manual (17 pages) ,
- User manual (60 pages)
Table of Contents
Advertisement
Advertisement
Table of Contents

Related Manuals for Motorola CLS1410


Summary of Contents for Motorola CLS1410
- Page 1 CLS SERIES TWO-WAY RADIO MODELS CLS1110 & CLS1410 USER GUIDE...
-
Page 3: Table Of Contents
Locking the Keypad ...... 24 Supplier's Declaration of Conformity 9 Monitoring a Channel ....25 Radio Frequency Exposure Safety Scanning (CLS1410 Only) .... 25 Standards ........11 Customer Programming Mode ..27 Product Safety and RF Exposure Factory Default Settings ....28 Compliance. - Page 4 Contents Bandwidth Range ......40 Audio Accessories ......57 Codes, Interference Eliminator Codes Carry Accessories ......57 (CTCSS/DPL) ......40 Chargers ........58 Keypad Beep (or Keypad Tone) ... 40 Programming Accessories .... 58 Keypad Lock ......... 40 Warranty .......... 59 Low Battery Alert - Shutdown ..
-
Page 5: Documentation Copyrights
The information in this document is carefully examined, and is believed to be entirely reliable. However, no responsibility is assumed for inaccuracies. Furthermore, Motorola Solutions reserves the right to make changes to any products herein to improve readability, function, or design. Motorola Solutions does not assume any liability arising out of the applications or use of any product or circuit described herein;... -
Page 6: Computer Software Copyrights
The information in this document is carefully examined, and is believed to be entirely reliable. However, no responsibility is assumed for inaccuracies. Furthermore, Motorola Solutions reserves the right to make changes to any products herein to improve readability, function, or design. Motorola Solutions does not assume any liability arising out of the applications or use of any product or circuit described herein;... -
Page 7: Accessories Safety Information
Charging the other batteries may cause explosion, personal injury, and damage. 2. Use of accessories not recommended by Motorola Solutions may result in fire, electric shock, or injury. 3. To reduce damage to the electric plug and cord, pull by plug rather than the cord when disconnecting the charger. -
Page 8: Operational Safety Guidelines
fire. 7. To reduce risk of electric shock, unplug the charger from the AC outlet before attempting any maintenance or cleaning. Operational Safety Guidelines • Turn off the radio while charging. • The charger is not suitable for outdoor. Use only in dry locations or conditions. •... -
Page 9: Acoustic Safety
Acoustic Safety Exposure to loud noises from any source for extended periods of time may temporarily or permanently affect your hearing. The louder the radio volume, the less time is required before your hearing can be affected. Hearing damage from loud noises is sometimes undetectable at first and can have a cumulative effect. - Page 10 Notes...
-
Page 11: Fcc Licensing Information
Motorola Solutions Product Services at: 1-800-448-6686. Changes or modifications not expressly approved by Motorola Solutions may void the user authority granted by the FCC to operate this radio and should not be made. - Page 12 To comply with FCC requirements, transmitter adjustments should be made only by or under the supervision of a person certified as technically qualified to perform transmitter maintenance and repairs in the private land mobile and fixed services as certified by an organization representative of the user of those services. Replacement of any transmitter component such as crystal, semiconductor, and others not authorized by the FCC equipment authorization for this radio could violate FCC rules.
-
Page 13: Supplier's Declaration Of Conformity
Supplier's Declaration of Conformity Supplier’s Declaration of Conformity Per FCC CFR 47 Part 2 Section 2.1077(a) Responsible Party Name: Motorola Solutions, Inc. Address: 2000 Progress Pkwy, Schaumburg, Il. 60196, U.S.A. Phone Number: 1-800-927-2744 Hereby declares that the product: Model Name: CLS1110/CLS1410 conforms to the following regulations: FCC Part 15, subpart B, section 15.107(a), 15.107(d), and... - Page 14 Class B Digital Device For a Class B digital device or peripheral, the instructions furnished the user shall include the following or similar statement, placed in a prominent location in the text of the manual: This equipment has been tested and found to comply with the limits for a Class B digital device, pursuant to part 15 of the FCC Rules.
-
Page 15: Radio Frequency Exposure Safety Standards
Product Safety Guide for Portable Two-Way Radios which contains important operating instructions for safe usage and RF energy awareness and control for Compliance with applicable standards and Regulations. For a list of Motorola Solutions-approved antennas, batteries, and other accessories, visit the following website: http://www.motorolasolutions.com... - Page 16 Notes...
-
Page 17: Notice To Users
• This device must accept any interference received, including interference that may cause undesired operation. Changes or modifications made to this device, not expressly approved by Motorola Solutions, could void the authority of the user to operate this equipment. C a u t i o n... -
Page 18: Introduction
Introduction This user guide covers the operation of your radios. Your dealer or system administrator may have customized your radio for your specific needs. Check with your dealer or system administrator for more information. You can consult your dealer or system administrator about the following: •... -
Page 19: Radio Controls
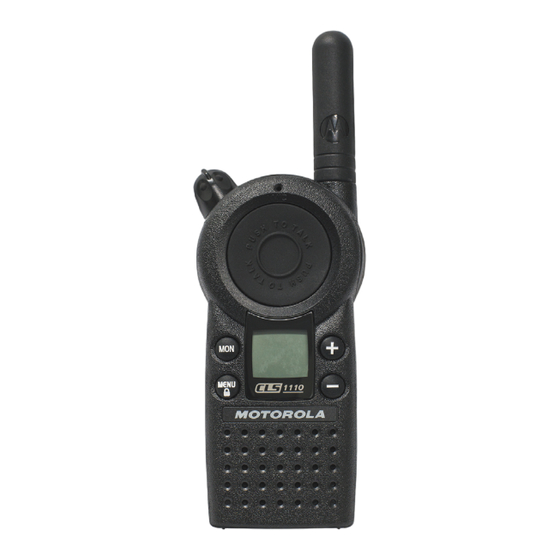
Use Push to Talk to: Talk Use [ and ] to: Exit a menu Change channels Use T to: (CLS1410 only) Monitor the frequency Change menu settings Scan channels (CLS1410 only) Speaker Use S to: Lock the keypad Scroll through menus 020976o... -
Page 20: Getting Started
Getting Started Installing the Batteries Your radio uses a rechargeable Lithium Ion (Li-Ion) battery. Li-Ion Battery 1. If the battery door is already in place, push down on the recess on the door and slide it off the radio. 2. Insert the battery, printed arrows first, into the battery compartment and press down to secure firmly in place. -
Page 21: Installing The Swivel Belt Holster
Installing the Swivel Belt Holster 1. Slide the bottom of the radio into the holster until it snaps into place. 2. To remove, push the tab on the holster and pull the radio away from the holster. Note: In case of loss, please contact your point-of-sale or call 1-800-448-6686 to request replacement part. -
Page 22: Charging The Battery
Charging the Battery Use only the charger supplied with the radio, or other Series power accessories. For optimum battery life, do not charge the battery for prolonged periods after it is fully charged. Charging the battery over the weekend is acceptable. Using the Drop-in Charger 1. - Page 23 Using the Multi-Unit Charger The Multi-Unit Charger (MUC) allows drop-in charging of up to 6 radios or batteries. Batteries can be charged inside the radios or removed and placed in the MUC separately. Each of the 6 charging pockets can hold a radio or battery, but not both. 1.
- Page 24 Charging Status LEDs On the drop-in charger, the radio and battery charging pockets have their own LEDs. On the MUC, each of the 6 charging pockets has an LED. The LEDs are grouped into pairs to show which charging pockets are paired (for cloning, see page 44). The LED is solid red when the battery is charging, and solid green when charging is complete.
-
Page 25: Turning Your Radio On And Off
Turning Your Radio On and Off See page 15 for a basic radio diagram. Turn P clockwise to turn the radio on, and counterclockwise to turn the radio off. When the radio is on, the transmit light on the top of the radio blinks every 3 seconds. When you turn the radio on, the radio chirps and the display briefly shows all features and display segments. -
Page 26: Adjusting The Volume
Reading the Display ® VibraCall Alert Indicator Signal Strength and Channel Busy Indicator Frequency and Interference Eliminator Battery Meter Code Channel Keypad Lock Interference Eliminator Code Indicator Frequency Indicator Programming Mode Microphone Gain and VOX (CLS1410 only) Scan (CLS1410 Only) -
Page 27: Talking And Receiving
Talking and Receiving Basic Radio Operation 1. Press and hold T to check for channel activity. If you hear static, the channel is clear to use. Do not transmit if someone is speaking on the channel. Press T again to stop monitoring. 2. -
Page 28: Talk Range
Talk Range Industrial Multi-Level Inside steel/concrete Inside multi-level industrial buildings buildings Up to 200,000 sq. ft. Up to 15 floors Locking the Keypad You can lock the keypad to avoid accidentally changing your radio settings. 1. Press and hold S for 3 seconds. 2. -
Page 29: Monitoring A Channel
0 will display. 2. Press T again to stop monitoring. Scanning (CLS1410 Only) You can scan up to 4 channels and frequencies. When the radio detects activity, it stops scanning and locks in on the active channel. This allows you to talk and listen to the person transmitting without changing channels. - Page 30 Skipping and Removing Channels While Scanning Scan has two temporary features to make it easier to use. • Scan advance If the radio stops scanning on a channel you do not want to listen to, press ] to resume scanning for the next active channel. •...
-
Page 31: Customer Programming Mode
• Call tones • Microphone gain • Scan list (CLS1410 only) • Available channels (CLS1410 only) Note: • To talk with someone on your two-way radio, the channel (CLS1410 only), frequency, and interference eliminator code must be the same on both radios. -
Page 32: Factory Default Settings
Factory Default Settings Your radio is programmed at the factory to the following settings: Frequency CLS1110 CLS1410 Channel Not available Code Call Tone/ Off (0) ® VibraCall Not available Off (0) Microphone 2 (medium sensitivity) Gain To restore the factory settings, turn the radio on while holding Push to Talk and S... -
Page 33: Entering Advanced Configuration Mode
If you press and release the Push to Talk button when programming CSL1410 models, you will return to the front of the Advanced Configuration Mode. Selecting a Channel (CLS1410 Only) 1. In advanced configuration mode, press S until the channel number blinks and the frequency and code display alternately (this is the first setting after you enter advanced configuration mode). - Page 34 3. Press and hold Push to Talk to exit, or press S to continue programming. Programming the Available Channels (CLS1410 only) If you need fewer channels, you can reduce the number of available channels. 1. In Advanced Configuration mode, press S until = displays and the channel number blinks.
- Page 35 (set to 0), but you can change this setting to choose a distinctive call tone. ® The VibraCall feature is an additional call tone option that makes the CLS1410 radio vibrate briefly when it receives if you have not transmitted or received in the last ®...
- Page 36 = Low sensitivity, for loud environments 3. Press and hold Push to Talk to exit, or press S to continue programming. Editing the Scan List (CLS1410 Only) For faster scanning and to avoid hearing unwanted transmissions, you can edit the scan list to skip channels.
- Page 37 Programming with Customer Programming Software The easiest way to program or change features in your radio is by using the Customer Programming Software (CPS) and the CPS Programming Cable(*). CPS Software is available for free as web based downloadable software at www.motorolasolutions.com/CLS.
- Page 38 To program, connect the CLS Series radio via the Drop-in Charger Tray and CPS Programming Cable to your computer as shown in the picture above. Prior to programming, verify that the switch in the Programming Cable is in the ‘Analog(**)’ position.
- Page 39 CPS Basic Menu Instructions 1. Open the CPS software and click on the “RADIO” top tab. 2. Click on the “READ” tab to read the radio(*), or On the drop down menu “Radio Type”, select “CLS” if you want to open a new profile or an existing one.
- Page 40 4. Once you have changed all the settings, click “Writeto radio” in order to program your radio with the new settings. The CPS will display a window confirming the writing (programming of your radio) is successful. You can also save your profile at any time in order to use the same settings when programming other radios by clicking on “Save to profile”.
-
Page 41: Feature Summary Chart
Feature Summary Chart Features Programmable Programmable Default Programming Tips via Advanced via CPS Configuration Backlight 5 sec Enable or disable backlight by using CPS. Call Tones Advanced Configuration available for CLS Models by going into Advanced Configuration Mode(1). Values available are 0 (OFF),1, 2, 3 and 4 (Vibrator). -
Page 42: Channels
Features Programmable Programmable Default Programming Tips via Advanced via CPS Configuration Channels Model You can select Dependant channels using the + or - button. You can also add or delete channels using the CPS. Note: Enabling/ disabling channels via CPS automatically affects the Maximum Channels you... -
Page 43: Cloning Mode
Features Programmable Programmable Default Programming Tips via Advanced via CPS Configuration Cloning Mode Enabled Enables radio to enter cloning mode in order to clone its profile settings into other radios (using Radio to Radio Cloning Cable or Multi-Unit Charger). Press PTT, MON while turning radio Note: You can clone radios using the... -
Page 44: Bandwidth Range
Features Programmable Programmable Default Programming Tips via Advanced via CPS Configuration Bandwidth Range Model Radios Bandwidth is Dependant fixed and non- programmable. Bandwidth Range for 1W radios: UHF 461-470 Mhz. Codes, Interference Channel and Use Advanced Eliminator Codes Model Configuration Mode (CTCSS/DPL) Dependant for front panel radio... -
Page 45: Low Battery Alert - Shutdown
Features Programmable Programmable Default Programming Tips via Advanced via CPS Configuration Low Battery Alert - Gives a sequence of Shutdown loud and high beep tones to alert battery level is low. This a non-programmable feature. Maximum Channels Model and CPS Use the Advanced programmable Configuration Mode... -
Page 46: Nuisance Ch Delete
Features Programmable Programmable Default Programming Tips via Advanced via CPS Configuration Nuisance Ch Delete "-" Button Press MON Button to start scanning and wait until the radio lands on the channel you want to delete. Long press "-" button to delete the channel. -
Page 47: Reset To Factory Defaults (2)
Features Programmable Programmable Default Programming Tips via Advanced via CPS Configuration Reset to Factory Enabled Allows to restore Defaults (2) radio's factory defaults. Press PTT, Menu simultaneously for 3 seconds while turning ON radio. Reverse Burst Reverse Burst eliminates unwanted noise (squelch tail) during loss of carrier detection. -
Page 48: Cloning Radio Settings
Cloning Radio Settings You can copy Series radio settings from one radio (the source) to a second radio using the Multi-Unit Charger (MUC) optional accessory. See the MUC User's Guide for more information. You can clone only one radio at a time. A multi-channel radio can clone to a single- channel radio, but only the first channel is cloned. -
Page 49: Advanced Features
Advanced Features You can set the following features by pressing and holding additional buttons while turning the radio on. Press This Button Default To Do This While Turning Setting the Radio On Turn Keypad Tones On/Off Turns keypad beeps off for silent keypad operation. Turn End-of-Transmission Tone On/Off If enabled, your two-way radio transmits a tone when you finish transmitting. - Page 50 Press This Button Default To Do This While Turning Setting the Radio On Restore Factory Defaults Push to Talk S Returns radio to its original factory settings.
-
Page 51: Troubleshooting
Troubleshooting Symptom Try This: No Power Recharge or replace Li-Ion battery. Make sure Push to Talk is completely pressed while transmitting. Message not Recharge, replace, and/or reposition batteries. transmitted Verify the transmit light is illuminated while speaking. Verify Channel, Frequency, and Code settings are correct. Hearing other noises or Frequency may be in use. - Page 52 Move to another location. Obstructions and operating indoors or in vehicles may decrease range. Verify radio is not in scan mode (CLS1410 only, see page 25). Radios are too close. They must be at least 5 feet apart. Heavy static or...
- Page 53 Symptom Try This: Low battery meter reading Verify radio is set to the correct battery type (see page 16). although new batteries are installed Cannot enter Unplug audio accessories and retry. kmode A) Ensure that there is no debris in the charging tray or on the radio contacts.
-
Page 54: Use And Care
Use and Care Use a soft damp cloth Do not immerse Do not use alcohol or to clean the exterior. in water. cleaning solutions. If the radio is submerged in water... Turn radio off and Do not use radio until Dry with soft cloth. -
Page 55: Frequencies And Bandwidths
Frequencies and Bandwidths These charts provide frequency information and are useful when using Motorola Solutions Series radios with other business radios. Frequency Display Number is identical to Spirit M, GT, and S-Series frequency position (where applicable), but bandwidth may be different. - Page 56 UHF Frequencies (Continued) Display Frequency Display Frequency Number (MHz) Bandwidth Number (MHz) Bandwidth 461.1875 12.5 462.8375 12.5 461.2125 12.5 462.8625 12.5 461.2375 12.5 462.8875 12.5 461.2625 12.5 462.9125 12.5 461.2875 12.5 464.4875 12.5 461.3125 12.5 464.5125 12.5 461.3375 12.5 464.5375 12.5 461.3625 12.5...
- Page 57 UHF Frequencies (Continued) Display Frequency Display Frequency Number (MHz) Bandwidth Number (MHz) Bandwidth 466.1125 12.5 466.3625 12.5 466.1375 12.5 467.7875 12.5 466.1625 12.5 467.8375 12.5 466.1875 12.5 467.8625 12.5 466.2125 12.5 467.8875 12.5 466.2375 12.5 467.9125 12.5 466.2625 12.5 469.4875 12.5 466.2875 12.5...
- Page 58 Interference Eliminator Codes Display Code Display Code Display Code Number (Hz) Number (Hz) Number (Hz) 67.0 107.2 167.9 71.9 110.9 173.8 74.4 114.8 179.9 77.0 118.8 186.2 79.7 123.0 192.8 82.5 127.3 203.5 85.4 131.8 210.7 88.5 136.5 218.1 91.5 141.3 225.7 94.8...
- Page 59 Digital Interference Eliminator Codes Display Digital Display Digital Display Digital Number Code Number Code Number Code...
- Page 60 Digital Interference Eliminator Codes (Continued) Display Digital Display Digital Display Digital Number Code Number Code Number Code...
-
Page 61: Accessories
Accessories Batteries Part No. Description PMNN4497_ CLS Li-Ion Battery 1800 mAh Audio Accessories Part No. Description HKLN4599_ Earpiece w/PTT, Mic, Slim Plug, PVC Free HKLN4601_ Dual Pin Surveillance w/PTT, Slim Plug, PVC Free HKLN4604_ Swivel Earpiece w/PTT, Slim plug, PVC Free HKLN4606_ Remote Speaker Mic w/PTT, Slim Plug, PVC Free HKLN4608_... -
Page 62: Chargers
(*) HKKN4027_ CPS Cable Kit must be used with the CLS Programming Cradle Note: Certain accessories may be or may not be available at the time of purchase. For latest information on accessories, contact your Motorola Solutions point of purchase or visit: www.motorolasolutions.com/CLS. For product-related questions, contact: 1-800-448-6686... -
Page 63: Warranty
Products (“Software”) to be free from defects in materials and workmanship under normal consumer usage for the period(s) outlined below. This limited warranty is a consumer's exclusive remedy, and applies as follows to new Motorola Solutions Products, Accessories and Software purchased by consumers in the United States, which are accompanied by this written warranty. - Page 64 Limited lifetime warranty for the lifetime of ownership by the first consumer purchaser of the product. • Business Two-way Radio Accessories. One (1) year from the date of purchase by the first consumer purchaser of the product. • Products and Accessories that are Repaired or Replaced. The balance of the original warranty or for ninety (90) days from the date returned to the consumer, whichever is longer.
- Page 65 (c) use of the Products or Accessories for commercial purposes or subjecting the Product or Accessory to abnormal usage or conditions; or (d) other acts which are not the fault of Motorola Solutions, are excluded from coverage.
- Page 66 “as is” and without warranty. VI. Who is Covered? This warranty extends only to the first consumer purchaser, and is not transferable. VII. How to Obtain Warranty Service Or Other Information? Contact your Motorola Solutions point of purchase.
- Page 67 Furthermore, the purchase of the Motorola Solutions products shall not be deemed to grant either directly or by implication, estoppel, or otherwise, any license under the copyrights, patents, or patent...
- Page 68 Patent Notice This product is covered by one or more of the following United States patents. 5896277 5894292 5864752 5699006 5742484 D408396 D399821 D387758 D389158 5894592 5893027 5789098 5734975 5861850 D395882 D383745 D389827 D389139 5929825 5926514 5953640 6071640 D413022 D416252 D416893 D433001 XI.
- Page 69 Press [ or ] to change the Frequency frequency. Set the Press S until ydisplays. Interference Press [ or ] to change the Eliminator code. Code Press S until = displays. Available Press [ or ] to select number Channels* of available channels. * CLS1410 Only...
- Page 70 Series Programming Quick Reference Press S until E displays. Press [ or ] to select 1 , 2 , or 3 Set a Call Tone for audible call tones, 4 for VibraCall, or 0 for off (default). Press S until display.
- Page 72 Chicago, IL 60661 U.S.A. MOTOROLA, MOTO, MOTOROLA SOLUTIONS and the Stylized M logo are trademarks or registered trademarks of Motorola Trademark Holdings, LLC and are used under license. All other trademarks are the property of their respective owners. © 2003 and 2023 Motorola Solutions, Inc. All rights reserved.
Need help?
Do you have a question about the CLS1410 and is the answer not in the manual?
Questions and answers