Table of Contents
Advertisement
Advertisement
Table of Contents

Related Manuals for Plantronics T10H


Summary of Contents for Plantronics T10H
- Page 3 Printed in the U.S.A. 69047-01 (11•04) © 2000 – 2004 Plantronics, Inc. All rights reserved. Plantronics, the logo design, Plantronics and the logo design combined are trademarks or registered trade- marks of Plantronics, Inc. U.S. Patent 5210791, D394,437 and D403,327;...
- Page 4 Headset Telephone Single Line Model T10 User Guide...
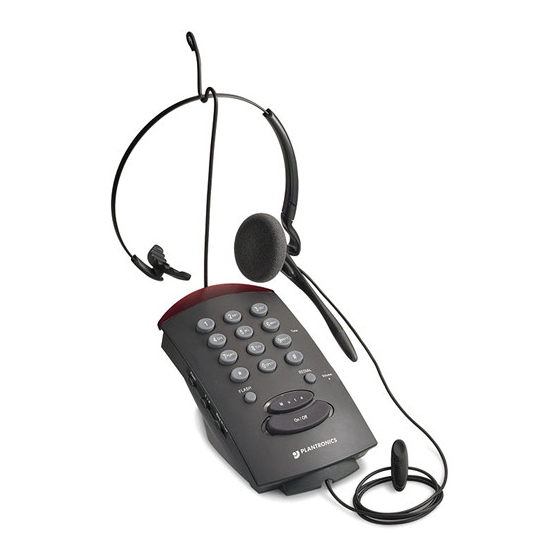
- Page 6 DIAGRAM...
- Page 7 Mute Indicator Light Mute Button Headset Jack On/Off Button In-Use Indicator Light Listen Volume Control Redial Button Tone Control Base Rear Telephone Line Jack Line Cord Headset (Both Configurations Shown) Cord Clothing Clip (P/N 43220-01) Adjustable Headband (P/N 43298-01) Headset Assembly...
- Page 11 STEP 1 WELCOME Thank you for selecting the T10 Headset Telephone from Plantronics. This User Guide will help you install your T10 Headset Telephone and learn its basic operation.
-
Page 12: Important Safety Instructions
This product should not be placed in a built-in installation unless proper venti- lation is provided. 6. This product should be operated only from the low voltage power provided in your telephone line. No separate power supply is required. - Page 13 11. Avoid using telephone equipment during an electrical storm. There may be a remote risk of electric shock from lightning. 12. Do not use the telephone equipment to report a gas leak in the vicinity of the leak.
- Page 14 If the product exhibits a distinct change in performance. 14. Never install telephone wiring during a lightning storm. 15. Never install telephone jacks in wet locations unless the jack is specifically designed for wet locations. 16. Never touch uninsulated telephone wires or terminals unless the telephone line has been disconnected at the network interface.
- Page 15 Turn the T10 base over and insert the Headset Holder. Set the Tone/Pulse Switch to match your phone service (usually tone). If you are not sure, call your local telephone provider. Set the Ringer Volume Control for incoming calls to your preferred level.
-
Page 16: Using The Headset
STEP 2 USING THE HEADSET The Headset included with the T10 Headset Telephone can be used with the Adjustable Headband or with one of the Earloops. HEADBAND USE Snap the Adjustable Headband Assembly . Press the Ear Cushion Assembly Assembly , aligning the notch in the ring with the Voice Boom. -
Page 17: Placing A Call
STEP 3 PLACING A CALL With the Headset in position, place a call by pressing the On/Off Button (In-use Indicator Lights are on). Listen for dial tone. Dial the desired number using the Twelve Button Dial Pad. When your party answers, speak normally. If your party cannot hear you, see Troubleshooting (page 12). -
Page 18: Convenience Features
Press the Flash Button again to return to the first caller. This feature can also be used with most office telephone systems to transfer a call to another extension. Press Flash to hear a dial tone, enter the extension number, after the extension rings, press Flash again or hang up to transfer the call. -
Page 19: Troubleshooting
Adjust Headset so the microphone is closer to your mouth. PLANTRONICS HELP DESK The Plantronics Help Desk is ready to assist you! Dial 1-800-544-4660 Monday through Friday 8:00 a.m. to 5:00 p.m. Pacific Standard Time or visit our website at www.plantronics.com. - Page 20 SUPPLIES AND ACCESSORIES For information on supplies and accessories all Plantronics at 1-800-544-4660 or visit our web site at www.plantronics.com. See also Diagram Key for additional part numbers.
-
Page 21: Fcc Registration Information
The REN is useful to determine the quantity of devices you may connect to your telephone line and still have all of those devices ring when your telephone num- ber is called. In most, but not all areas, the sum of the RENs of all devices con- nected to one line should not exceed five (5.0). -
Page 22: Warranty And Service
We may use functionally equivalent reconditioned/refurbished/ remanufactured/pre-owned or new Products or parts. • To obtain service in the U.S. contact Plantronics at (800) 544-4660 and in Canada call (800) 540-8363. If you need additional information, please contact our service centers at the numbers provided.
Need help?
Do you have a question about the T10H and is the answer not in the manual?
Questions and answers