Table of Contents
Advertisement
Quick Links
Advertisement
Table of Contents

Related Manuals for Flebi SUPRA 3.0


Summary of Contents for Flebi SUPRA 3.0
- Page 1 User manual...
- Page 2 19. Handlebar folding mechanism 7. Nexus 3 / 7 changes 20. Quick fold easy-folding 8. Tyre inflation 21. Drag on the training wheels 9. Chain placement Parts of Flebi Supra 3.0 Electrical operation 22. Discovering your Flebi 10. Battery removal 11. Battery recharge...
-
Page 3: Box Contents
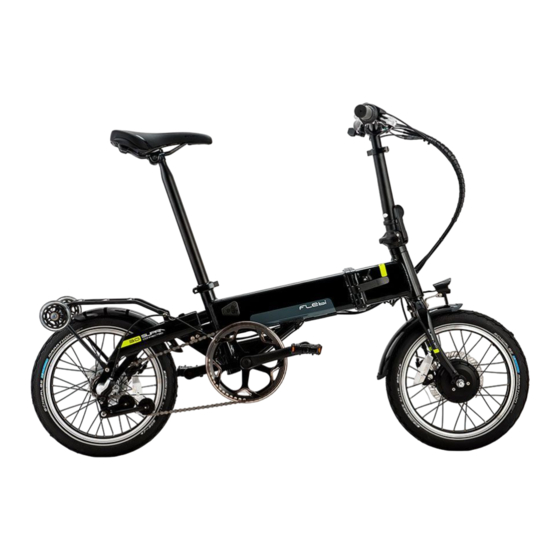
Unpacking & assembly Box contents Assembling your Flebi Supra 3.0 is very easy! Flebi Supra 3.0 is equipped with a 36 V / 250 W motor and reaches a top speed of 25 km/h. Take the bike out of the box... - Page 4 Unpacking & assembly Introduction of the set handlebar To install the assembly made up of the handlebar and the telescopic seatpost that allows you to adjust the height, you simply have to insert it into the stem of the handlebar following the guides that you'll find.
- Page 5 In the event that you have to repackage your bike in its original box to send it to Flebi's technical service, we recommend that you follow the steps below to protect it as best as possible and avoid bumps and...
-
Page 6: Handlebar Adjustment
Start up Handlebar adjustment You can adjust the height of the handlebar to accommodate your height. To do this, open the telescopic closure and place the seatpost in the desired position, taking care not to exceed the safety mark. Then tighten the clasp firmly so it doesn't move. -
Page 7: Saddle Adjustment
Start up Saddle adjustment You can also adjust the height of the saddle to perfectly adapt it to your height. To adjust the hardness you must tighten the thread according to your tastes. Check that it is not too loose or the seatpost will move. - Page 8 Start up Disc brake adjustment Tektro CAUTION: The brakes on the Supra 3.0/3.0+ are fully adjusted at the factory and no adjustment is necessary unless they loosen with use. To adjust the mechanical disc brake, we will first loosen the mounting bolts, to allow some movement for the caliper.
- Page 9 Start up Uso de los cambios Nexus 3 / 7 Supra 3.0 and 3.0+ are equipped with Shimano Nexus 3v and 7v derailleurs respectively (the Supra 3.0 lite is single speed), integrated into the rear wheel hub. This system allows shifting when stationary without the chain slipping or crossing.
-
Page 10: Tyre Inflation
Start up Tyre inflation To check the amount of air in the tires, remember that the Supra ECO has 3.5 bar of pressure, so it is convenient to use an inflator with a pressure gauge. The Supra ECO is very comfortable, since you can inflate the wheels in the semifolded position, without the need to support it on the wall or turn it over. - Page 11 Start up Chain placement To return the chain of your Flebi Supra 3.0 / 3.0+ to its natural position. You have to the chain to the pinion and pay attention to the pulley, carrying the crowns in the exact way that we tell you in the explanatory video.
- Page 12 Electrical operation Removal and insertion of the battery Supra 3.0 battery can be removed to recharge off the bike, or to be replaced with another. To remove it from the box, you just have to open the security lock with one of the keys, and then carefully pull the ring.
-
Page 13: Recharging The Battery
Electrical operation Recharging the battery The Supra 3.0 battery can be recharged both inside the frame (uncovering the triangular cover to access the connector) and outside of it. In both cases you must plug the charger into the mains, and the charger connector to the battery. - Page 14 Electrical operation C300U display operation The C300U LCD display is activated by pressing the power button M located in the center of it. To run the bike, you must turn on the battery. Once turned on, we will have several fields: speed, engine load, battery, assistance levels (6), etc.
- Page 15 Electrical operation Throttle operation (optional) The throttle on the Supra 3.0 has the same operation and installation as on the Supra ECO. Unlike the PAS (Pedal Assist System), the accelerator makes the motor work without the need to pedal. In order for the trigger-type accelerator to work, you must turn on the display and set the assistance level to 0.
-
Page 16: Unfolding The Bike
Folding & Unfolding Unfolding the bike The steps to unfold your Flebi Supra 3.0 are: - Place the seat post inside the frame - Unfold the frame, tighten the front closure and place the safety (see 17) - Raise the stem of the handlebar,... -
Page 17: Folding The Bike
Folding & Unfolding Folding the bike The steps to fold your Flebi Supra 3.0 are: - Release the swingarm by pressing the lever next to the yellow elastometer (see 16) - Remove the safety and release the front folding lever to then open the... -
Page 18: Swingarm Operation
Folding & Unfolding Swingarm operation One of the main advantages of Supra 3.0 is its comfortable and effective folding mechanism, since with a simple movement semi-fold reduce its length by half, very practical for rolling it. To do this, you just have to act on the folding lever located on the back. - Page 19 Folding & Unfolding Opening/Closing the frame To open or close the front of the frame, you just have to remove the safety in case of opening it and put it in case of closing it. And release the lever of the fold out to open it, and press it inward to close it.
- Page 20 Folding & Unfolding Folding/Unfolding the pedals To fold or unfold each Wellgo pedal you must press the control outwards and, at the same time, bend the pedal inwards (folded) or outwards (unfolded) until you feel the clic. Video: https://youtu.be/V55_kJvUzy8...
- Page 21 Folding & Unfolding Handlebar folding mechanism First make sure the cables are not too tight due to the fixed handlebar height. To fold the handlebar stem, you must remove the lever lock and open it by pressing outwards to then lower the power.
- Page 22 Folding & Unfolding Quick easy-folding This folding system is an alternative to the conventional one, which has the advantage of being faster (2 steps instead of 3), and reducing the width of the folded bike as much as possible, sacrificing length. The procedure is the same as the anterior (see 16), without folding the frame at the joint.
- Page 23 Folding & Unfolding Drag on the training wheels Drag int semi-folded Drag in trolley type position position Video: https://youtu.be/4wmW9G9_VrQ...
- Page 24 Parts of Flebi Supra 3.0 Discovering your Flebi Info: https://www.flebi.com/...
Need help?
Do you have a question about the SUPRA 3.0 and is the answer not in the manual?
Questions and answers