Advertisement
Quick Links
Products names are as follows.
(商品名は以下のようになります。 )
For Japanese market(国内向け):
For overseas market(海外向け):
DIGITAL KEYBOARD
PK
001874
SERVICE MANUAL
SERVICE MANUAL
* PSR-I455 is an overseas export model. (PSR-I455 は輸出専用モデルです。 )
CONTENTS (目次)
SPECIFICATIONS(総合仕様) .............................3/4/5
PANEL LAYOUT(パネルレイアウト) ....................6/8
(ユニットレイアウト&結線図) ................................10
DISASSEMBLY PROCEDURE(分解手順) .............12
LSI PIN DESCRIPTION(LSI 端子機能表) ...............21
CIRCUIT BOARDS(シート基板図) .........................24
TEST PROGRAM(テストプログラム) ...............30/34
DATA BACKUP(データのバックアップ) ...........38/39
INITIALIZATION(初期化) ........................................40
START-UP SEQUENCE(起動シーケンス) ........41/42
(DMLCD Circuit Board チェック方法) .................43/44
PARTS LIST
BLOCK DIAGRAM(ブロックダイアグラム)
OVERALL CIRCUIT DIAGRAM(総回路図)
Copyright (c) Yamaha Corporation. All rights reserved. PDF
PSR-E433
PSR-I455
HAMAMATSU, JAPAN
'12.05
&
Advertisement
Chapters

Subscribe to Our Youtube Channel
Related Manuals for Yamaha PSR-EE433


Summary of Contents for Yamaha PSR-EE433
-
Page 1: Table Of Contents
INITIALIZATION(初期化) ........40 START-UP SEQUENCE(起動シーケンス) ..41/42 For Japanese market(国内向け): DMLCD CIRCUIT BOARD CHECK METHOD (DMLCD Circuit Board チェック方法) ....43/44 For overseas market(海外向け): PARTS LIST DIGITAL KEYBOARD BLOCK DIAGRAM(ブロックダイアグラム) OVERALL CIRCUIT DIAGRAM(総回路図) 001874 HAMAMATSU, JAPAN Copyright (c) Yamaha Corporation. All rights reserved. PDF ’12.05 &... - Page 2 IMPORTANT NOTICE This manual has been provided for the use of authorized Yamaha Retailers and their service personnel. It has been assumed that basic service procedures inherent to the industry, and more specifically Yamaha Products, are already known and understood by the users, and have therefore not been restated.
- Page 3 Amplifiers/Speakers × × Adaptor: Users within U.S or Europe: PA-150 or an equivalent recom- Adaptor mended by Yamaha Power Supply Others: PA-5D, PA-150 or an equivalent Power Supply Six “AA” size alkaline (LR6), manganese (R6) or Ni-MH rechargable bat- Batteries teries Owner’s Manual...
- Page 4 PSR-E433/PSR-I455 総合仕様(PSR-E433) 寸法 幅×奥行き×高さ 946 mm × 405 mm × 140 mm サイズ/重量 質 量 k ( 電 池 含 ま ず 鍵 盤 数 鍵盤 タ ッ チ レ ス ポ ン ス ○ ピ ッ チ ベ ン ド ○ その他の操作子 ノ ブ ○...
- Page 5 Data List AC Power Adaptor PA-150 or an equivalent Included Accessories * May not be included depending on your particular area. Please check with your Yamaha dealer. Music Rest Online Member Product Registration Accessories AC Power Adaptor Users within U.S or Europe: PA-150 or an equivalent recom-...
-
Page 6: Panel Layout(パネルレイアウト
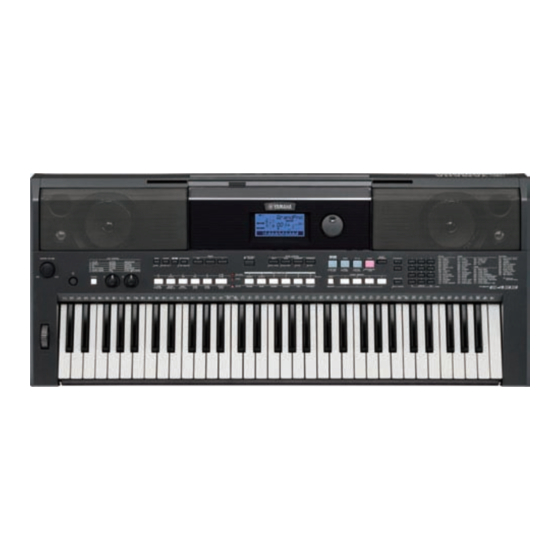
PSR-E433/PSR-I455 PANEL LAYOUT(パネルレイアウト) (PSR-E433) • Front Panel(フロントパネル) Front Panel フロントパネル q [MASTER VOLUME] control q [ 全体音量 ](MASTER VOLUME) コントロール w PITCH BEND wheel w [PITCH BEND]( ピッチベンド ) ホイ ール e [ ] (Standby/On) switch e [ ]( スタンバイ/ オン ) スイ ッチ r LIVE CONTROL section r ... - Page 7 PSR-E433/PSR-I455 • Rear Panel(リアパネル) @0 [REGIST MEMORY] buttons !9 [ カテゴリー ](CATEGORY) ボタン群 @1 [FUNCTION] button @0 レジス トレーションメモリー (REGIST MEMORY) ボタン群 @2 Number buttons [1]–[9], [-/NO], [0/EXECUTE] @1 [ 機能 ](FUNCTION) ボタン @2 数字ボタン [1] 〜 [9]、 [ − /NO]、 [0/ 実行 (EXECUTE)]、 and [+/YES] buttons @3 Drum illustrations for the Drum Kit ...
- Page 8 PSR-E433/PSR-I455 PANEL LAYOUT (PSR-I455) • Front Panel Front Panel q [MASTER VOLUME] control w PITCH BEND wheel e [ ] (Standby/On) switch r LIVE CONTROL section [ASSIGN] button [A] and [B] knobs t [DEMO] button y [LESSON] button u [REC] button i [METRONOME] button o TEMPO section [TAP] button...
- Page 9 PSR-E433/PSR-I455 • Rear Panel @0 [REGIST MEMORY] buttons @1 [FUNCTION] button @2 Number buttons [1]–[9], [-/NO], [0/EXECUTE] and [+/YES] buttons @3 Drum illustrations for the Drum Kit Rear Panel @4 USB terminals USB TO HOST terminal USB TO DEVICE terminal @5 SUSTAIN jack @6 PHONES/OUTPUT jack @7 Power supply jack...
-
Page 10: Circuit Board Layout & Wiring(ユニットレイアウト&結線図
PSR-E433/PSR-I455 CIRCUIT BOARD LAYOUT & WIRING(ユニットレイアウト&結線図) Bottom view (下から見た図) LOWER KEY BED ASSEMBLY DMLCD (下ケース鍵盤 Ass y) SPEAKER (TWEETER) L SPEAKER (TWEETER) R UPPER CASE ASSEMBLY (スピーカ (ツイーター) 左) (スピーカ (ツイーター) 右) (上ケース Ass y) LOUD SPEAKER (WOOFER) L LOWER CASE ASSEMBLY LOUD SPEAKER (WOOFER) R (スピーカ... - Page 11 PSR-E433/PSR-I455 <LOWER KEY BED ASSEMBLY ( 下ケース鍵盤 Ass'y)> Top view (上から見た図) KEYBOARD ASSEMBLY 61L-MK 61H-MK (16N-C61-2M 鍵盤) Connector Unit Name Location Part No. Destination Remarks assembly (WC60540) BACK LIGHT ASSEMBLY *2 AMJK-CN201 2P L=70 (ZC62230) MVR-CN390 AMJK-CN204 (ZC62220) PNL-CN320 VR-CN350 (ZC62190) PNL-CN330 DMLCD-CN301...
-
Page 12: Disassembly Procedure(分解手順
PSR-E433/PSR-I455 DISASSEMBLY PROCEDURE(分解手順) Caution: Be sure to attach the removed filament tape just as it was before removal. 注意 : 分解時に取り外したフィラメントテープは、必ず元通りに取り付けてください。 Lower Case Assembly 1. 下ケース Ass'y (所要時間 : 約 2 分) (Time required: About 2 minutes) 1-1 [80A] のネジ 6 本、[90] のネジ 2 本と [100A] のネ Remove the six (6) screws marked [80A], two (2) ジ... - Page 13 PSR-E433/PSR-I455 AMJK Circuit Board 2. AMJK シート (所要時間 : 約 3 分) 2-1 下ケース Ass'y を外します。 (1 項参照) (Time required: About 3 minutes) Remove the lower case assembly. (See procedure 1.) 2-2 [380A] のネジ 10 本を外して、AMJK シートを外 Remove the ten (10) screws marked [380A]. The AMJK します。...
- Page 14 PSR-E433/PSR-I455 DMLCD Circuit Board, Back Light 3. DMLCD シート、バックライト Ass'y、液 Assembly and LCD Display 晶ディスプレイ (所要時間 : 約 5 分) (Time required: About 5 minutes) 3-1 下ケース Ass'y を外します。 (1 項参照) Remove the lower case assembly. (See procedure 1.) 3-2 AMJK シートを外します。 (2 項参照) Remove the AMJK circuit board.
- Page 15 PSR-E433/PSR-I455 MVR Circuit Board 5. MVR シート (所要時間 : 約 3 分) 5-1 コントロールパネルから、V ツマミを図 7 のよう (Time required: About 3 minutes) Pull out the knob V from the control panel as shown in にして抜いておきます。 (図 1、図 7) Fig.7. (Fig. 1, Fig. 7) 5-2 ...
- Page 16 PSR-E433/PSR-I455 <UPPER CASE ASSEMBLY ( 上ケース Ass'y)> Bottom view (下から見た図) [380H] x 11 [380G] x 17 [380I] [380I] [380J] WHEEL ASSEMBLY (ホイールAss y) Fig. 8 ( 図8) PNL Circuit Board 9. PNL シート (所要時間 : 約 5 分) (Time required: About 5 minutes) 9-1 ...
- Page 17 PSR-E433/PSR-I455 PB Circuit Board and Wheel Assembly 12. PB シート、ホイール Ass'y (Time required: About 4 minutes) (所要時間 : 約 4 分) 12-1 Pull out the two (2) rotary knobs from the control panel. 12-1 コントロールパネルから、ロータリーノブ 2 個を (Fig. 1) 抜いておきます。 (図 1) 12-2 Remove the lower case assembly.
- Page 18 PSR-E433/PSR-I455 Disassembling Keyboard Assembly 14. 鍵盤 Ass'y の分解 (所要時間 : 約 13 分) 14-1 下ケース Ass'y を外します。 (1 項参照) (Time required: About 13 minutes) 14-1 Remove the lower case assembly. (See procedure 1.) 14-2 下ケース鍵盤 Ass'y を外します。 (8 項参照) 14-2 Remove the lower key bed assembly. 14-3 ...
- Page 19 PSR-E433/PSR-I455 < LOWER KEY BED ASSEMBLY ( 下ケース鍵盤 Ass'y)> Top view (上から見た図) RUBBER CONTACT RUBBER CONTACT (接点ゴム) (接点ゴム) [100C] [100D] RUBBER CONTACT RUBBER CONTACT RUBBER CONTACT (接点ゴム) (接点ゴム) (接点ゴム) [100C] [100C] [100C] [100D] [100D] [110A] [110A] [110B] 61H-MK 61L-MK Fig. 12 ( 図12) 61L-MK 61H-MK Fig.
- Page 20 PSR-E433/PSR-I455 How to Remove Spring Terminals 15. 接点バネの外し方 15-1 Spring Terminal A and Spring Terminal B 15-1 接点バネ A、接点バネ B (所要時間 : 各約 4 分) (Time required: About 4 minutes each) 15-1-1 下ケース Ass'y を外します。 (1 項参照) 15-1-1 Remove the lower case assembly. (See procedure 1.) 15-1-2 ...
-
Page 21: Lsi Pin Description(Lsi 端子機能表
PSR-E433/PSRI-455 LSI PIN DESCRIPTION(LSI 端子機能表) AK4385ET (X6040A01) DAC (Digital to Analog Converter) ...............22 ML9040A-B01GAZ03A (XZ987A0R) LCD DRIVER ................21 NT3881DFG-01 (X3148A0R) LCD DRIVER ..................21 R8A66597FP (YD645A00) USB HOST CONTROLLER ..............22 SPLC780D1-001A-HQ1 (YC471A00) LCD DRIVER ................21 SWL01U (YA876A01) CPU .........................23 NT3881DFG-01 (X3148A0R) LCD DRIVER ML9040A-B01GAZ03A (XZ987A0R) LCD DRIVER SPLC780D1-001A-HQ1 (YC471A00) LCD DRIVER DMLCD: IC601... - Page 22 PSR-E433/PSR-I455 AK4385ET (X6040A01) DAC (Digital to Analog Converter) DMLCD: IC201 NAME FUNCTION NAME FUNCTION MCLK Master Clock AOUTR- Rch Analog out(-) BICK Audio Serial Data Clock AOUTR+ Rch Analog out(+) SDTI Audio Serial Date Input AOUTL- Lch Analog out(-) LRCK L/R Clock AOUTL+ Lch Analog out(+)
- Page 23 PSR-E433/PSRI-455 SWL01U (YA876A01) CPU DMLCD: IC001 NAME FUNCTION NAME FUNCTION Connection to the GND Connection to the GND EA3/PD3/KYN24 MD03 MD11 EA2/PD2/KYN23 ON/OFF signal from the keyboard EA1/PD1/KYN22 MD04 EA0/PD0/KYN21 MD12 ED0/PC0/KYN11 MD05 External memory data bus ED1/PC1/KYN12 MD13 MD06 ED2/PC2/KYN13 ED3/PC3/KYN14 MD14...
-
Page 24: Circuit Boards(シート基板図
PSR-E433/PSR-I455 CIRCUIT BOARDS(シート基板図) AMJK Circuit Board (YD798C0) ....................24 DMLCD Circuit Board (YD972C0, YE710A0) ..............25/26 ENC(EN) Circuit Board (YD797C0) ..................25 MVR Circuit Board (YD797C0) ....................25 PB Circuit Board (YD797C0) ....................26 PNL Circuit Board (YD797C0) ....................27 PNR Circuit Board (YD797C0) .................... -
Page 25: Dmlcd Circuit Board (Yd972C0, Ye710A0)
PSR-E433/PSRI-455 DMLCD Circuit Board YE710A0 to PNL-CN310 YD972C0 Component side(部品側) ENC(EN) Circuit Board MVR Circuit Board to AMJK-CN204 Component side(部品側) Component side(部品側) DMLCD: 2NA-WZ26790 ENC, MVR: 2NA-WZ26810... -
Page 26: Pb Circuit Board (Yd797C0)
PSR-E433/PSR-I455 DMLCD Circuit Board Pattern side(パターン側) TW Circuit Board PB Circuit Board to VR-CN352 to AMJK-CN206 (Right side) to AMJK-CN205 (Left side) to TWEETER R to TWEETER L Component side(部品側) Component side(部品側) DMLCD: 2NA-WZ26790 PB, TW: 2NA-WZ26810... -
Page 27: Pnl Circuit Board (Yd797C0)
PSR-E433/PSRI-455 PNL Circuit Board to VR-CN350 A’ to AMJK-CN203 to DMLCD-CN303 A’ to DMLCD-CN302 Component side(部品側) PNL: 2NA-WZ26810... -
Page 28: Pnr Circuit Board (Yd797C0)
PSR-E433/PSR-I455 PNR Circuit Board to DMLCD-CN301 A’ A’ Component side(部品側) VR Circuit Board to PB-CN380 to PNL-CN320 Component side(部品側) VR: 2NA-WZ26850 PNR: 2NA-WZ26810... -
Page 29: Mk Circuit Board (X2335D0)
PSR-E433/PSRI-455 Scale: 70/100 61H-MK Circuit Board to DMLCD-CN501 to 61L-MK-CN4 to DMLCD-CN503 A’ A’ Component side(部品側) 61L-MK Circuit Board B’ B’ to DMLCD-CN502 to 61H-MK-CN3 Component side(部品側) 61H-MK: V869540 61L-MK: V869520... -
Page 30: Test Program(テストプログラム
PSR-E433/PSR-I455 TEST PROGRAM * If the test number 59 “Factory Set” is executed, the data already set will be lost. Preparations 1) Use an AC adaptor PA-5D, PA-150 or PA-150A. 2) Measuring device: Frequency counter, which can detect thousandth value or more, Level meter (with JIS-C fi lter), Oscilloscope Note: Use a stereo plug and connect a load resistor of 33 Ω... - Page 31 PSR-E433/PSR-I455 TEST No LCD display Test descriptions, judging conditions, etc. Pit Chk Checks pitch accuracy. Connect the frequency counter to the [PHONES/OUTPUT] jack. (Either L or R) Make sure that the correct signal is output. (441.0 Hz ± 0.2 Hz) Amount of volume decay Connect the level meter (with JIS-C fi...
- Page 32 PSR-E433/PSR-I455 TEST No LCD display Test descriptions, judging conditions, etc. Rom Chk2 Checks the ROM connected to the CPU bus. Make sure that “Rom OK” is displayed on the LCD. It will take about 25 seconds for the check. Ram Chk2 Checks the RAM connected to the CPU bus.
- Page 33 PSR-E433/PSR-I455 PSR-E433 PSR-I455 Turn Note Number SW Name LCD Display SW Name LCD Display ARPEGGIO Arpeggio ARPEGGIO Arpeggio PATTERN PATTERN TABLA/TANPURA TABLA SONG Song SONG Song STYLE Style STYLE Style VOICE Voice VOICE Voice MUSIC DATA BASE M.D.B. MUSIC DATA BASE M.D.B.
- Page 34 PSR-E433/PSR-I455 テストプログラム ※テストナンバー 59 の Factory Set を実行すると、設定したデータが失われます。 1 準備 1) AC アダプターは PA-5D、PA-150 または PA-150A を使用します。 2) 測定器 : 周波数カウンター(小数点以下 3 桁以上測定可能なもの) 、レベルメーター (JIS-C フィルター使用 )、オシロ スコープ 注) 特に指示のない限りステレオプラグを用い、 [PHONES/OUTPUT] 端子に 33 Ωの負荷抵抗を接続して測定します。 測定器の入力インピーダンスは 1 M Ω以上であること。 3) 治具 : フットスイッチ(FC-4 または FC-5) 、USB ケーブル、USB ストレージデバイス、乾電池 2 ...
- Page 35 PSR-E433/PSR-I455 テスト No LCD 表示 テスト内容及び判定条件など 鍵盤を自動的にスケーリングします。 (発音鍵域は、C2 から G4 までの 32 音です。 ) TG1 Chk 異音、ノイズの無いことを確認します。オートスケーリングが終了すると、 TG1 End と表示されます。 Pit Chk ピッチ精度のチェック。 [PHONES/OUTPUT] 端子に周波数カウンターを接続します。 (L か R のどちらか) 正しい信号が出力されていることを確認します。 (441.0 Hz ± 0.2 Hz) ボリューム減衰値 [PHONES/OUTPUT] 端子の L, R にレベルメーター (JIS-C フィルター使用) を接続します。 (33 Ω負荷)...
- Page 36 PSR-E433/PSR-I455 テスト No LCD 表示 テスト内容及び判定条件など 乾電池または相当の直流電源を接続し、AC アダプタの挿抜検出をチェックします。 Adpt Chk [START/STOP] ボタンでテストに入ると、LCD に Adpt Out が表示されますので、AC アダプタを抜きます。 LCD が Adpt In に切り替わるので、 AC アダプタを挿し込みます。 C4 を発音し、LCD に Adpt OK が表示されることを確認します。 Rom Chk2 CPU のバスに接続されている ROM をチェックします。 LCD に Rom OK が表示されることを確認します。 検査には約 25 秒かかります。 Ram Chk2 CPU のバスに接続されている RAM をチェックします。 LCD に...
- Page 37 PSR-E433/PSR-I455 SW テスト項目リスト(PSR-E433) 順番 SW 名 ディスプレイ表示 ノート番号 順番 SW 名 ディスプレイ表示 ノート番号 30 SONG 2 Song 2 DIAL UP Dial Up DIAL DOWN Dial Dwn 31 SONG 3 Song 3 32 SONG 4 Song 4 DEMO Demo 33 SONG 5 Song 5 LESSON Lesson SONG REC Song REC 34 SONG A Song A METRONOME Metro 35 BANK/MEMORY Memory 36 REGIST 1...
-
Page 38: Data Backup(データのバックアップ
PC (Personal Computer) AB type USB cable of less than about 3 meters MIDI-USB Driver * Musicsoft Downloader (MSD) * *1: Obtain these programs from Yamaha offi cial website. (URL>> http://www.yamahapkclub.com) Install these software in PC beforehand. PSR-E433 USB cable BACKUP PROCEDURE 1. - Page 39 PSR-E433/PSR-I455 データのバックアップ(PSR-E433) ユーザーデータを外部機器へバックアップする際は、 付属ソフト「ミュージックソフトダウンローダー」をご利用ください。 ミュージックソフトダウンローダーを使って、ユーザーソング 10 曲を含むバックアップファイルを、楽器からコンピュー ターへ転送できます。 バックアップ可能なデータ一覧 • ユ ーザーソング • コ ンピューターから転送されスタイル番号 187 〜 191 にロードされたスタイルデータ • レ ジストレーションメモリー • 機 能設定の各設定 : チューニング、スプリットポイント、タッチ感度、スタイル音量、ソング音量、パターン音量、 メトロノーム音量、評価、デモグループ、デモ再生、デモキャンセル、マスター EQ タイプ、 ユアテンポ オン / オフ、オートパワーオフ設定、バッテリーセレクト、言語 準備 PC(パーソナルコンピューター) USB ケーブル(A-B Type、3 メートル以下) USB-MIDI ドライバー(*...
-
Page 40: Initialization(初期化
PSR-E433/PSR-I455 INITIALIZATION(初期化) This function erases all backup data in the instrument’s fl ash この楽器のフラッシュメモリーにあるソングデータや memory and restores the initial default settings. The following バックアップデータを消去し、設定を初期設定(工場出 initialization procedures are provided. 荷時の状態)に戻すことを「初期化」と呼びます。初期 化は以下の方法で行なってください。 Backup Data Clear バックアップデータクリア To clear data backed up to the internal fl ash memory – panel バックアップデータをクリアしたいときは、鍵盤の最... -
Page 41: Start-Up Sequence(起動シーケンス
Serial driver initialization Test Program ? Timer driver initialization ADSP initialization Opening indication Test Program SWL01U (IC001) 165Pin ("YAMAHA") ("TEST") indication PJ5 L → H Cancels MUTE (DAC) Cancels MUTE (AMP) Test program The keyboard is defective if it is... - Page 42 初期化タスク起動 初期化タスク終了 割り込みベクタ設定 Bootは通るがここまで動作しない場合、 ProgramRom (IC101)/SDRAM (IC131)は 問題ない。 SW/LED SWL01U (IC001)/DataFlash (IC121)の 初期化ドライブ信号出力 不具合。 割り込みプライオリティ、 100mSec後にテストモードの判断 エッジ/レベル設定 シリアルドライバ初期化 テストモード? タイマードライバ初期化 ADSP初期化 オープニング画面表示 テストプログラム表示 SWL01U (IC001) 165Pin ("YAMAHA") ("TEST") PJ5 L → H MUTE解除(DAC) MUTE解除(AMP) テストプログラム テストに入れない場合、鍵盤の不良 バックアップ対象変数の バックアップRAMクリア 初期設定 PAD/MIDIで音を鳴らすことが可能 非バックアップ変数の 初期設定 各タスクの初期化 押鍵すれば発音するが、画面 メイン画面表示 が表示しない場合、LCD IC MIDI (Serial) 許可 ("GrandPno") またはLCD周辺結線の不具合。...
-
Page 43: Dmlcd Circuit Board Check Method (Dmlcd Circuit Board チェック方法
PSR-E433/PSR-I455 DMLCD CIRCUIT BOARD CHECK METHOD The DMLCD Circuit Board is provided with test points for service check purposes. Check the test points on the DMLCD Circuit Board if the following symptoms appear. Symptoms and check items No LCD display with Power SW ON --> Check items sequentially ②... - Page 44 PSR-E433/PSR-I455 DMLCD Circuit Board チェック方法 DMLCD Circuit Board にはサービスチェック用の Test Point を設けてあります。 下記の症状により DMLCD Circuit Board の Test Point を確認してください。 症状により確認する 1 電源を入れても LCD が表示しない。⇒ ②〜⑥を順番に確認します。 2 音が出ない、音が歪む。⇒ ①⑦及び⑧を確認します。 Test Point Test Point 回路 判定基準 測定器具 不良が疑われる部品 ① アナログ回路用 5V 電源 5V ± 0.2V テスター IC201 (On AMJK Circuit Board) ② デジタル回路用 5V 電源 5V ± 0.2V テスター...
- Page 45 PARTS LIST CONTENTS(目次) OVERALL ASSEMBLY(総組立) ............. 2 UPPER CASE ASSEMBLY(上ケース Ass'y) ........4 LOWER KEY BED ASSEMBLY(下ケース鍵盤 Ass'y) ....6 LOWER CASE ASSEMBLY(下ケース Ass'y) ......... 7 KEYBOARD ASSEMBLY(16N-C61-2M 鍵盤) ........ 8 ELECTRICAL PARTS(電気部品) ..........9-15 Notes : DESTINATION ABBREVIATIONS A : Australian model M : South African model B : British model O : Chinese model...
- Page 46 PSR-E433/PSR-I455 OVERALL ASSEMBLY (総組立) MUSIC REST (譜面板) UPPER CASE ASSEMBLY: See page 4.(上ケースAss y) 30 LOWER CASE ASSEMBLY: See page 7. (下ケース Ass y) LOWER KEY BED BATTERY COVER ASSEMBLY: See page 6. ASSEMBLY (下ケース鍵盤 Ass y) (電池蓋Ass y)
- Page 47 PSR-E433/PSR-I455 PART NO. DESCRIPTION 部 品 名 REMARKS REF NO. QTY RANK OVERALL ASSEMBLY 総 組 立 PSR-E433/PSR-I455 OVERALL ASSEMBLY 総 組 立 PSR-E433 (WZ37500) OVERALL ASSEMBLY 総 組 立 PSR-I455 (ZC95410) UPPER CASE ASSEMBLY 上 ケ − ス A s s y...
- Page 48 PSR-E433/PSR-I455 UPPER CASE ASSEMBLY (上ケース Ass'y) (ホイールAss'y)
- Page 49 PSR-E433/PSR-I455 PART NO. DESCRIPTION 部 品 名 REMARKS REF NO. QTY RANK UPPER CASE ASSEMBLY 上 ケ ー ス A s s y PSR-E433/PSR-I455 UPPER CASE ASSEMBLY 上 ケ ー ス A s s y PSR-E433 (WZ37460) UPPER CASE ASSEMBLY 上...
- Page 50 PSR-E433/PSR-I455 LOWER KEY BED ASSEMBLY (下ケース鍵盤 Ass'y) KEYBOARD ASSEMBLY: See page 8. (16N-C61-2M鍵盤) (赤) Black (黒) PART NO. DESCRIPTION 部 品 名 REMARKS REF NO. QTY RANK LOWER KEY BED ASSEMBLY 下 ケ ー ス 鍵 盤 A s s y...
- Page 51 PSR-E433/PSR-I455 LOWER CASE ASSEMBLY (下ケース Ass'y) L100 L100 L100 L110 L100 LOWER CASE SUB ASSEMBLY (下ケースサブAss'y) PART NO. DESCRIPTION 部 品 名 REMARKS REF NO. QTY RANK LOWER CASE ASSEMBLY 下 ケ ー ス A s s y PSR-E433/PSR-I455 LOWER CASE ASSEMBLY 下...
- Page 52 PSR-E433/PSR-I455 KEYBOARD ASSEMBLY (16N-C61-2M 鍵盤) LOWER CASE : See page 6. (下ケース) PART NO. DESCRIPTION 部 品 名 REMARKS REF NO. QTY RANK KEYBOARD ASSEMBLY 1 6 N − C 6 1 − 2 M PSR-E433/PSR-I455 WE126700 KEYBOARD ASSEMBLY 16N C61 P2M 1...
- Page 53 PSR-E433/PSR-I455 ELECTRICAL PARTS (電気部品) AMJK and VR PART NO. DESCRIPTION 部 品 名 REMARKS REF NO. QTY RANK ELECTRICAL PARTS 電 気 部 品 PSR-E433/PSR-I455 WZ268600 CIRCUIT BOARD AMJK A M J K シ ー ト (WZ26850)(YD798C0) WZ268800 CIRCUIT BOARD V...
- Page 54 PSR-E433/PSR-I455 AMJK and VR PART NO. DESCRIPTION 部 品 名 REMARKS REF NO. QTY RANK C215 VR168500 MONOLITHIC POLYESTER F. CAP. ECQ-V1H154JL3 積 層 マ イ ラ ー コ ン C215 WW501700 MONOLITHIC POLYESTER F. CAP. 0.1500 63V J TP マ...
- Page 55 PSR-E433/PSR-I455 AMJK/VR and DMLCD PART NO. DESCRIPTION 部 品 名 REMARKS REF NO. QTY RANK R251 HF45510R CARBON RESISTOR 100.0 1/4 J AX TP カ ー ボ ン 抵 抗 R252 HF45510R CARBON RESISTOR 100.0 1/4 J AX TP カ ー...
- Page 56 PSR-E433/PSR-I455 DMLCD PART NO. DESCRIPTION 部 品 名 REMARKS REF NO. QTY RANK C219 WK145900 CERAMIC CAPACITOR (CHIP) 0.47 10V K 1005 チ ッ プ セ ラ C221 US635100 CERAMIC CAPACITOR (CHIP) 0.100 16V Z RECT. チ ッ プ セ ラ( F ) C222 UF03810R ELECTROLYTIC CAPACITOR(CHIP) 100 16V...
- Page 57 PSR-E433/PSR-I455 DMLCD PART NO. DESCRIPTION 部 品 名 REMARKS REF NO. QTY RANK DA402 V 9 4 2 4 9 0 0 DIODE ARRAY 1SS372 TE85L ダ イ オ ー ド ア レ イ DA402 WV973800 DIODE ARRAY DB3J316F0L 0.10A X ダ...
- Page 58 PSR-E433/PSR-I455 DMLCD PART NO. DESCRIPTION 部 品 名 REMARKS REF NO. QTY RANK R201 RD45747R CARBON RESISTOR (CHIP) 47.0K 63M J RECT. チ ッ プ 抵 抗 R202 RD456100 CARBON RESISTOR (CHIP) 1.0K 63M J RECT. チ ッ プ 抵 抗...
- Page 59 PSR-E433/PSR-I455 DMLCD/ENC/MVR/PB/PNL/PNR/TW/61H-MK and 61L-MK PART NO. DESCRIPTION 部 品 名 REMARKS REF NO. QTY RANK TR304 WB12320R TRANSISTOR (ARRAY) IMB10A T110 ト ラ ン ジ ス タ ア レ イ TR306 WB12320R TRANSISTOR (ARRAY) IMB10A T110 ト ラ ン ジ ス タ ア レ イ TR309 VY67760R DIGITAL TRANSISTOR DTC123JKA TP デ...
- Page 60 PSR-E433/PSR-I455 BLOCK DIAGRAM PSR-E433/PSR-I455 TOUCH RESPONSE Keyboard 61KEY (16N) SW200 STANDBY/ON SW MATRIX DISPLAY ( SW: 25PCS ) SW373 SW MATRIX 61L-MK (C1~B3) 61H-MK (C4~C6) ( SW: 24PCS ) PPB[3] SW303,306,307,313,317,323,327, BACK LIGHT ASSIGN 333,337,343–345,347, PPA[7] SW300–302,310–312,320–322,330–332, N11–16, N21–26 N11–16, N21–26 340–342,350–352,360–362,370–372 LED:1PC ( Blue ) 354–357,364–367,374–377...
- Page 61 PSR-E433/PSR-I455 PSR-E433/PSR-I455 OVERALL CIRCUIT DIAGRAM (DMLCD, AMJK, VR, ENC, PB, MVR, PNL, PNR, TW, 61H-MK, 61L-MK) DMLCD +3.3D +3.3D SDRAM 16M 64M SDRAM PPB[3] FLASH ROM 16M 128M Correspondence SW303 SW313 SW323 SW333 SW343 IC131 IC132 IC121 W9816G6IH-7 K4S641632K-UC75000 MX29LV160CBTI-70G +3.3D 0.1u MUSIC...
Need help?
Do you have a question about the PSR-EE433 and is the answer not in the manual?
Questions and answers