Table of Contents
Advertisement
Quick Links
Operator's Manual
Prism
®
Register your machine:
www.lincolnelectric.com/register
Authorized Service and Distributor Locator:
www.lincolnelectric.com/locator
Save for future reference
Date Purchased
Code: (ex: 10859)
Serial: (ex: U1060512345)
IM10634
|
I
s s
u
e
Date
© Lincoln Global, Inc. All Rights Reserved.
Mar - 22
For use with machines having Product Numbers:
13264, 13265, 13266, 13267,
13268, 13269, 13270, 13271,
13272, 13273, 13274, 13275,
13276, 13277, 13278, 13279,
13280, 13281, 13282, 13283,
13284, 13285, 13286, 13287,
13288, 13289, 13290, 13291,
13292, 13293, 13294, 13295,
13296, 13297, 13298, 13299,
13300, 13301, 13303, 13304
Need Help? Call 1.888.935.3877
to talk to a Service Representative
Hours of Operation:
8:00 AM to 6:00 PM (ET) Mon. thru Fri.
After hours?
Use "Ask the Experts" at lincolnelectric.com
A Lincoln Service Representative will contact you
no later than the following business day.
For Service outside the USA:
Email: globalservice@lincolnelectric.com
Advertisement
Table of Contents
Troubleshooting

Related Manuals for Lincoln Electric Prism 13264


Summary of Contents for Lincoln Electric Prism 13264
- Page 1 Operator’s Manual Prism ® For use with machines having Product Numbers: 13264, 13265, 13266, 13267, 13268, 13269, 13270, 13271, 13272, 13273, 13274, 13275, 13276, 13277, 13278, 13279, 13280, 13281, 13282, 13283, 13284, 13285, 13286, 13287, 13288, 13289, 13290, 13291, 13292, 13293, 13294, 13295, 13296, 13297, 13298, 13299, 13300, 13301, 13303, 13304 Need Help? Call 1.888.935.3877...
- Page 2 THANK YOU FOR SELECTING KEEP YOUR HEAD OUT OF THE FUMES. A QUALITY PRODUCT BY DON’T get too close to the arc. LINCOLN ELEC TRIC. Use corrective lenses if necessary to stay a reasonable distance away from the arc. READ and obey the Safety Data PLEASE EXAMINE CARTON AND EQUIPMENT FOR Sheet (SDS) and the warning label DAMAGE IMMEDIATELY...
- Page 3 P.O. Box 351040, Miami, Florida 33135 or CSA Standard W117.2. A Free copy of “Arc Welding Safety” booklet E205 2.a. Electric current flowing through any conductor is available from the Lincoln Electric Company, 22801 causes localized Electric and Magnetic Fields (EMF). St. Clair Avenue, Cleveland, Ohio 44117-1199.
- Page 4 SAFETY ELECTRIC SHOCK ARC RAYS CAN BURN. CAN KILL. 3.a. The electrode and work (or ground) circuits are 4.a. Use a shield with the proper filter and cover plates to protect your electrically “hot” when the welder is on. Do eyes from sparks and the rays of the arc when welding or not touch these “hot”...
- Page 5 SAFETY WELDING AND CUTTING CYLINDER MAY EXPLODE IF SPARKS CAN CAUSE DAMAGED. FIRE OR EXPLOSION. 7.a. Use only compressed gas cylinders containing the correct shielding gas for the process used 6.a. Remove fire hazards from the welding area. If and properly operating regulators designed for this is not possible, cover them to prevent the welding sparks the gas and pressure used.
- Page 6 ® PRISM SAFETY As a rule of thumb, for many mild steel electrode, if the air is (Permissible Exposure Limit), and the recommended guideline, the visibly clear and you are comfortable, then the ventilation is ACGIH TLV (Threshold Limit Value), for many compounds found in generally adequate for your work.
- Page 7 TLV and PEL values are as of October 2013. Always check Safety and 313 of the Emergency Planning and Community Right- Data Sheet (SDS) with product or on the Lincoln Electric website at to-Know Act of 1986 and of 40CFR 370 and 372.
-
Page 8: Table Of Contents
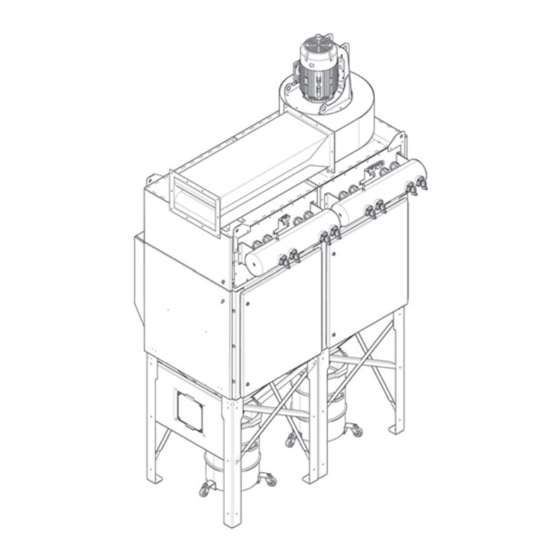
® PRISM TABLE OF CONTENTS INSTALLATION .............................SECTION A TECHNICAL SPECIFICATIONS .............................A-1 L SERIES COMPONENTS ............................A-2 GENERAL DESCRIPTION.............................A-3 THE INTENDED PURPOSE............................A-3 TRANSPORT AND ERECTION ............................A-3 SELECT SUITABLE LOCATION.............................A-3 ENVIRONMENTAL AREA .............................A-3 ® INSTALLATION OF PRISM ............................A-4 OPERATION ..............................SECTION B USERS ................................B-1 INTENDED USE ................................B-1 MODIFICATIONS ................................B-1... -
Page 9: Technical Specifications
MERV 16 NANO OIL RESISTANT Prism "L" series units include cleaning control panels but do not ® include the following components which must be purchased as AMBIENT CONDITIONS separate items. Contact your Lincoln Electric Sales Representative MINIMUM TEMPERATURE -4°F (-20°C) ® -0°F (-17.8°C) *Normal •... -
Page 10: L Series Components
® INSTALLATION PRISM PRISM® “L” SERIES COMPONENTS 115/230V 460V *Mount Indoors ITEMS INCLUDED WITH L SERIES UNIT CUSTOMER SUPPLIED ITEMS (see wire diagrams for details) 1 - Remote cleaning control panel 9 - Cable (Remote Cleaning Panel to VFD Panel) 2 - Remote start/stop smart connect module with bracket 10 - VFD Motor Cable (VFD Panel to Fan Motor) 3 - Smart connect cable (2ft long) -
Page 11: General Description
® INSTALLATION PRISM INSTALLATION WARNING GENERAL DESCRIPTION Excluded Uses! ® • Welding fumes containing oil designed with welding and plasma cutting systems in mind. The • Aluminum dust • Burning or incandescent materials about any automated system with hoods or extraction arms. •... - Page 12 ® INSTALLATION PRISM PRISM® L SERIES ASSEMBLY STEP 2 – PREPARE MAIN BODY FOR INSTALLATION ON TO LEG BASE TOOLS NEEDED FIGURE A.2 • 5/16" Nutdriver Remove packaging in preparation for • 3/8" Nutdriver lifting main module • 1/2" Nutdriver on to leg base.
- Page 13 ® INSTALLATION PRISM Step 3 cont. – Install main module on leg base/hop- FIGURE A.5 Assembled unit – unit ready for top mount fan installation interior rivet nuts (2 in each leg). These need to all be started before setting full weight of module on leg base. FIGURE A.4 Lift main module on top of leg...
- Page 14 ® INSTALLATION PRISM Step 4a - Install fan L17587-1, L17587-2, L17587-4 12B DUAL FAN TOP VIEW L17587-10, L17587-12, L17587-13, L17587-14, L17587-16, L17587-19, L17587-20, L17587-21, L17587-23, L17587-24, L17587-25, L17587-26, L17587-28 ONLY. L17587-34, L17587-35, L17587-36, L17587-37, L17587-39 & L17587-40 REQUIRE TWO FANS FIGURE A.6 Install supplied fan adapter ring appropriate for fan to be installed.
- Page 15 ® INSTALLATION PRISM Step 5 – Install fan silencer L17587-1, L17587-2, L17587-4, L17587-10, L17587-12, L17587-13, L17587-14, L17587-16, L17587-19, L17587-20, L17587-21, L17587-23, L17587-24, L17587-25, L17587-26, L17587-28 ONLY. L17587-34, L17587-35, L17587-36, L17587-37, L17587-39 & L17587-40 REQUIRE TWO SILENCERS. Install silencer support bracket to top of module before installing silencer.
- Page 16 ® INSTALLATION PRISM Step 6 - Drum Installation Step 8 – Install duct pressure sensor and pitot tube (controls airflow when combined with Variable FIGURE A.8 Frequency Drive) a. Carefully position the dust collection drum onto the wheel cart. Pressure sensor and Pitot tube should be installed within 20 ft of b.
- Page 17 ® INSTALLATION PRISM b. Unclamp filter handles FIGURE A.13 Step 9 – Connections to control panel in leg base FIGURE A.11 Connect green wire from control module above compressed air tank to this fitting “Low Side Pressure Tap” connect ¼” black tube from clean air side (upper fitting on side of...
- Page 18 ® INSTALLATION PRISM PRISM® LARGE CONFIGURATION INSTALLATION (L17587-5, L17587-7, L17587-8, L17587-9, L17587-11 L17587-17, L17587-29, L17587-30, L17587-31, L17587-32, L17587-33 ONLY) Typical shipping configuration (L17587-9 shown) FIGURE A.16 STEP 11 – UNPACK THE LEG BASE(S) (W/ HOP- TYPICAL SHIPPING CONFIGURATION PERS) RIGHT FIGURE A.16 LEFT Rear inlet side of unit Door side of unit...
- Page 19 ® INSTALLATION PRISM STEP 12 – ASSEMBLE LEG BASES TOGETHER IN DESIRED LOCATION Foam gasket strips should be in place before assembling together. For assembly flexibility, do not fully tighten adjoining leg base bolts until upper module assemblies are fastened to hoppers. Join leg bases together by first removing bolts from cross braces on facing sides, then use the removed bolts to fasten through both legs and a cross brace to tie them all together.
- Page 20 ® INSTALLATION PRISM STEP 13 – PREPARE TO ASSEMBLE UPPER MOD- ULES TOGETHER Apply strip foam gasket completely around all joining surfaces. Apply gasket on both sides of holes and overlap in corners. A-12...
- Page 21 ® INSTALLATION PRISM STEP 14 – PREPARE TO ASSEMBLE UPPER MOD- ULES TOGETHER Move two module assemblies close together in preparation for joining together STEP 15 – PREPARE TO ASSEMBLE UPPER MOD- ULES TOGETHER A-13...
- Page 22 ® INSTALLATION PRISM STEP 16– JOIN UPPER MODULES TOGETHER Pickup smaller module assembly and slide it against larger modular assembly Join upper (clean air) sections together through top which is made accessible by sliding top panels to side as shown One ¼”...
- Page 23 ® INSTALLATION PRISM STEP 17– JOIN MODULE ASSEMBLIES TOGETHER Drive appropriate screws though clearance holes which are identified by a silver outline. The A (QTY) FASTENERS: ¼” THREAD FORMING thread forming screws will thread into an appro- B (QTY) FASTENERS: 3/8” THREAD FORMING priately sized hole on the adjoining module.
- Page 24 ® INSTALLATION PRISM STEP 17 CONT.– REINSTALL TOP PANELS After modules are completely fastened together, verify top gaskets are in good shape (replace as needed), then apply caulk between double foam strips and fasten top panels in place using ¼” thread forming screws at all locations.
- Page 25 ® INSTALLATION PRISM STEP 18 COMPLETING UNIT CONNECTIONS Connect two modules together with the supplied 1m (40”) long green cable. Repeat on rear side modules. Secure cables in same manner as done on other pre-wired modules. Connect air line between tanks as done on other pre- assembled modules.
- Page 26 ® INSTALLATION PRISM STEP 19 - PREPARE LEG BASES FOR UPPER MODULE ASSEMBLY Place a bead of liquid sealant between all double strip foam gaskets, then quickly proceed to lifting upper modules on to leg bases. Level the leg base assembly before installing upper modules.
- Page 27 ® PRISM INSTALLATION STEP 20– ASSEMBLING UPPER MODULES TO Location for 3/8” LEG BASES flange bolts (2 per each leg) Using appropriate rigging, lift upper modules on to leg bases but keep a small gap between to adjust when fastening together. Thread 3/8”...
- Page 28 ® INSTALLATION PRISM STEP 21– COMPLETING INSTALLATION Connect exhaust air (clean air) ductwork to top duct adapters, then to remote fan. (fan silencer optional) Connect supply air (dirty air) ductwork to rear inlet duct adapters. A-20...
- Page 29 ® INSTALLATION PRISM Drum Installation Install duct pressure sensor and pitot tube (con- trols airflow when combined with Variable FIGURE A.8 Frequency Drive) a. Carefully position the dust collection drum onto the wheel cart. Pressure sensor and Pitot tube should be installed within 20 ft of b.
- Page 30 ® INSTALLATION PRISM Step 22 – Connections to control panel in leg base FIGURE A.13 FIGURE A.11 Connect green wire from control module above compressed air “Low Side Pressure Tap” connect ¼” black tube from clean air side (upper unit) “High Side Pressure Tap”...
- Page 31 ® INSTALLATION PRISM d. Reclasp filter handles FIGURE A.15 A-23...
-
Page 32: Operation
RESTRICTIONS Only use the product for the welding processes described in the General The Lincoln Electric ”BANK” system may only be used for filtration Description. Avoid using the product for of fumes and dust generated by some dry processing industries. -
Page 33: Control
® OPERATION PRISM Control Panel HMI Navigation CONTROL The Eaton 2DD Smartwire I/O pack produces both an input and an Overview output when connected to a robotic welding cell. When the unit is powered on and operating, the remote output will produce a •... - Page 34 System Messages Are Displayed Here Admin Active (a) Touch the Lincoln Electric logo to raise the screen showing the support phone number and software version numbers. FIGURE B.3 01 Jan 2022 2:16 pm Touch the Menu button to raise the System Menu.
- Page 35 ® OPERATION PRISM FIGURE B.4 01 Jan 2022 2:16 pm Displays the Current Logged-in User System Messages Are Displayed Here Admin Active (c) The current logged-in user is displayed in the lower right hand corner. Operator is the default user. Passwords are required for Maintenance, Service and Admin levels of access.
- Page 36 ® OPERATION PRISM FIGURE B.6 01 Jan 2022 2:16 pm (b) When the Run Schedule is enabled but NOT activated, the system will be started and stopped using the buttons on this screen. FIGURE B.7 01 Jan 2022 2:16 pm (c) When the Run Schedule is enabled, the system starts and stops automatically based on the Run Schedule.
- Page 37 ® OPERATION PRISM C) System Setup Screen (1) Viewable by all users. Changes by maintenance, service, and admin users only. FIGURE B.8 01 Jan 2022 01 Jan 2022 01 Jan 20 2:16 pm 2:16 pm 2:16 pm aise the About s e the the support the s...
- Page 38 ® OPERATION PRISM E) Auto Run Schedule Screen (1) Viewable by all users; Changes by maintenance, service and admin users only. FIGURE B.10 01 Jan 2022 2:16 pm (a) Touch each eld to set the Start and Stop times for each shift on each day. Only maintenance users can adjust the schedule. FIGURE B.11 01 Jan 2022 2:16 pm...
- Page 39 ® OPERATION PRISM F) System Status (1) Viewable by all users; Changes by maintenance, service and admin users only. FIGURE B.12 01 Jan 2022 2:16 pm (a) System Status screen displays status information received from the VFD. It also shows total run hours of the fan and kWh used.
-
Page 40: Operation
® OPERATION PRISM G) Smartwire Status (1) Viewable by all users. FIGURE B.14 01 Jan 2022 2:16 pm (a) Smartwire Network Status is shown here. If a module is missing or has been replaced with a NOP module, that status will show on the appropriate module. - Page 41 ® OPERATION PRISM I) Filter Loading History (1) Viewable by all users. FIGURE B.16 01 Jan 2022 2:16 pm (a) The graph tracks Fan Speed, Duct Pressure, and Prism® lter pressure over time. J) Cleaning (1) Accessible by all users. FIGURE B.17 01 Jan 2022 2:16 pm...
- Page 42 ® OPERATION PRISM K) Alarms and Warnings Screen (1) Accessible by all users; Changes by service and admin users only. Only service personnel can clear the history. FIGURE B.18 01 Jan 2022 2:16 pm Errors are shown in RED 01.01.2022 23:59:59 Acknowledged Errors are shown in GREY 01.01.2022 23:59:59 Messages are shown in GREEN...
- Page 43 (20Hz) and maximum (60Hz) speeds. Consult the VFD operation guide, or contact Lincoln Electric service department for guidance with adjustment of the fan motor VFD parameters. cleaning are used. Online cleaning will not stop until the...
-
Page 44: Smartwire Device Learning
The Lincoln Electric L series Prism unit has a separate VFD in an parameter contained within the VFD, start signals for the fan motor to the VFD come from the cable to the main control cabinet. -
Page 45: Accessories
® ACCESSORIES PRISM ACCESSORIES REPLACEMENT FILTER OPTIONS · KP4519-1 MERV 11 spun bond polyester filter cartridge · KP4519-2 MERV 16 high efficiency nano fiber filter cartridge · KP4519-3 MERV 16 high efficiency thermal bonded PTFE membrane filter cartridge · KP4519-4 MERV 11 spun bond polyester filter cartridge with oil resistant technology ·... -
Page 46: System Overview
® ACCESSORIES PRISM PRISM® L SERIES THERMAL SUPPRESSION SYSTEM OVERVIEW L17587-12, L17587-13, L17587-14, L17587-15, L17587-16, L17587-17, L17587-18, L17587-24, L17587-25, L17587-26, The Prism indirect low pressure ® L17587-27, L17587-28, L17587-35, L17587-37 thermal suppression system uses an extinguishing agent commonly known NOTE: If smoke detector is mounted outdoors, it must be mounted horizon- powder that has been treated to be detector up. -
Page 47: Installation
® ACCESSORIES PRISM INSTALLATION NOTE: FOR UNITS WITH TOP MOUNTED FANS, SKIP TO STEP #7. NOTE: STEP 1–3 COMPONENTS MUST BE INSTALLED INDOORS ON THESE UNITS, THE EXHAUST DAMPER IS PRE-INSTALLED EVEN IF DUST COLLECTOR IS INSTALLED OUTSIDE UNDER THE FAN. STEP 1 –... - Page 48 ® ACCESSORIES PRISM STEP 10 – Connect Bypass Control wire to 2nd lower port on STEP 14 (remote fan units only) – Connect Lincoln Smart Connect Lincoln Smart Connect 4DD module (Module #1, Port “X2”) 4DD module above unit’s rear compressed air tank to exhaust damper’s 2DD module on top of unit using a 3m (10 ft) long green STEP 11 –...
-
Page 49: Operation And Diagnostics
Replacement parts it trips a pressure switch and flashes a coded pulse on the lower can be ordered through Lincoln Electric. Detection tubing is the stack light. heart of the system and special attention should be made to replace it with the same lengths/routing/locations. -
Page 50: Alarm Identification And Troubleshooting
C. RECOMMISSION After the system has been repaired, it must be re-commissioned. This must be done by a certified Firetrace distributor. Contact the Lincoln Electric Service Department to aid in identifying a certified Firetrace distributor. D. MAINTENANCE * Monthly inspections of the system should be performed by the user as detailed in the Firetrace instruction manual included with your unit. - Page 51 3. Press reset on main control panel. The unit is now ready for operation. open. Contact a Lincoln Electric technician for possible temporary resolutions. Exhaust Damper(s) 1. After fan is started, exhaust 1. Repair damper. Possible causes include failed actuator, failed actuator...
-
Page 52: Maintenance
If a problem cannot be corrected by following the (PPE) such as gloves, respirators and instructions, contact your local Lincoln Electric repre- protective clothing to protect against sentative for service options or contact Lincoln Electric overexposure to particulate. It is Customer Service. recommended that a vacuum cleaner or wet methods be used to clean up any ELECTRIC SHOCK can kill. -
Page 53: Periodic Maintenance
PERIODIC MAINTENANCE MAINTENANCE SCHEDULE The product has been designed to function without problems for NOTE: * REQUIRES Lincoln Electric factory authorized service many hours with minimal maintenance. In order to ensure this, technician. some simple, regular maintenance and cleaning activities are AS NEEDED required which are described in this section. -
Page 54: Replacing Filter Cartridges Or Emptying Dustbins
® PRISM MAINTENANCE • Check fan motor blades for encrusted particles and clean if necessary. • Inspect and clean control panel with a non-aggressive detergent. • Check inlets and outlets for tears or wear. CONTROL PANEL • Check for functionality of control panel fan. •... -
Page 55: Replacing Filter Cartridges
® PRISM MAINTENANCE REPLACING FILTER CARTRIDGES WARNING Before opening door, unit must be off and the power switch on the side of the control panel turned to the off position. Verify power has been switched off at the control panel, then unlock door handle using the supplied hex tool or any standard 5/16"... - Page 56 PRISM ® MAINTENANCE L17587-2, L17587-6, L17587-9, L17587-11, L17587-14, L17587-18, L17587-21, L17587-26, L17587-29, L17587-30, L17587-31, L17587-32, L17587-33, L17587-34, L17587-35, L17587-38 & L17587-39 units only rear of the unit. of the unit, engage tool hook into fabric loops hanging below the lter ange near the lter media.
-
Page 57: Troubleshooting
TROUBLESHOOTING TROUBLESHOOTING GUIDE Service and Repair should only be performed by Lincoln Electric Factory Trained Personnel. Unauthorized repairs performed on this equipment may result in danger to the technician and machine operator and will invalidate your factory warranty. For your safety and to avoid ELECTRICAL SHOCK, please observe all safety notes and precautions detailed throughout this manual. - Page 58 Cleaning valve fails to open. 1. The pulsation cycle may be faulty. 1. Verify that the pulsation cycle is OK, that it's within the parameters recommended by Lincoln Electric. 2. Possible dirt in the housing of the valve. 2. Clean the housing of the valve.
- Page 59 ® PRISM TROUBLESHOOTING Observe all Safety Guidelines detailed throughout this manual Observe all Safety Guidelines detailed throughout this manual PROBLEMS POSSIBLE RECOMMENDED (SYMPTOMS) CAUSE COURSE OF ACTION FUNCTION PROBLEMS Filter replacement alarm does 1. Wrong DP reading reported by 1. The Differential Pressure sensor PD1 is read after the analog input not function.
- Page 60 ® PRISM TROUBLESHOOTING Observe all Safety Guidelines detailed throughout this manual Observe all Safety Guidelines detailed throughout this manual PROBLEMS POSSIBLE RECOMMENDED (SYMPTOMS) CAUSE COURSE OF ACTION FUNCTION PROBLEMS Poor suction. 1. Outlet(s) are blocked. 1. Replace filter if necessary. 2.
- Page 61 PRISM ® DIAGRAMS...
-
Page 62: Diagrams
® PRISM DIAGRAMS L17587-1, L17587-2, L17587-3, L17587-4, L17587-10, L17587-19, L17587-20, L17587-21, L17587-22, L17587-23, L17587-36 & L17587-40 SCHEMATIC... - Page 63 ® PRISM DIAGRAMS L17587-1, L17587-2, L17587-3, L17587-4, L17587-10, L17587-19, L17587-20, L17587-21, L17587-22, L17587-23, L17587-36 & L17587-40 SCHEMATIC...
- Page 64 ® PRISM DIAGRAMS L17587-1, L17587-2, L17587-3, L17587-4, L17587-10, L17587-19, L17587-20, L17587-21, L17587-22, L17587-23, L17587-36 & L17587-40 SCHEMATIC 10 11 12 13 14 15 - OUT + MC NC NO...
- Page 65 ® PRISM DIAGRAMS L17587-5, L17587-6, L17587-7, L17587-8, L17587-9, L17587-11, L17587-29, L17587-30, L17587-31, L17587-32, L17587-33, L17587-34, L17587-38 & L17587-39 SCHEMATIC...
- Page 66 ® PRISM DIAGRAMS L17587-5, L17587-6, L17587-7, L17587-8, L17587-9, L17587-11, L17587-29, L17587-30, L17587-31, L17587-32, L17587-33, L17587-34, L17587-38 & L17587-39 SCHEMATIC...
- Page 67 ® PRISM DIAGRAMS L17587-5, L17587-6, L17587-7, L17587-8, L17587-9, L17587-11, L17587-29, L17587-30, L17587-31, L17587-32, L17587-33, L17587-34, L17587-38 & L17587-39 SCHEMATIC...
- Page 68 ® PRISM DIAGRAMS L17587-5, L17587-6, L17587-7, L17587-8, L17587-9, L17587-11, L17587-29, L17587-30, L17587-31, L17587-32, L17587-33, L17587-34, L17587-38 & L17587-39 SCHEMATIC 10 11 12 13 14 15 - OUT + MC NC NO...
- Page 69 ® PRISM DIAGRAMS L17587-12 & L17587-24...
- Page 70 ® PRISM DIAGRAMS L17587-12 & L17587-24 F-10...
- Page 71 ® PRISM DIAGRAMS L17587-12 & L17587-24 10 11 12 13 14 15 - OUT + MC NC NO F-11...
- Page 72 ® PRISM DIAGRAMS L17587-13, L17587-14, L17587-25 & L17587-26 F-12...
- Page 73 ® PRISM DIAGRAMS L17587-13, L17587-14, L17587-25 & L17587-26 F-13...
- Page 74 ® PRISM DIAGRAMS L17587-13, L17587-14, L17587-25 & L17587-26 10 11 12 13 14 15 - OUT + MC NC NO F-14...
- Page 75 ® PRISM DIAGRAMS L17587-15, L17587-16, L17587-27, L17587-28 & L17587-37 F-15...
- Page 76 ® PRISM DIAGRAMS L17587-15, L17587-16, L17587-27, L17587-28 & L17587-37 F-16...
- Page 77 ® PRISM DIAGRAMS L17587-15, L17587-16, L17587-27, L17587-28 & L17587-37 F-17...
- Page 78 ® PRISM DIAGRAMS L17587-15, L17587-16, L17587-27, L17587-28 & L17587-37 10 11 12 13 14 15 - OUT + MC NC NO F-18...
- Page 79 ® PRISM DIAGRAMS L17587-17, L17587-18 & L17587-35 F-19...
- Page 80 ® PRISM DIAGRAMS L17587-17, L17587-18 & L17587-35 F-20...
- Page 81 ® PRISM DIAGRAMS L17587-17, L17587-18 & L17587-35 F-21...
- Page 82 ® PRISM DIAGRAMS L17587-17, L17587-18 & L17587-35 10 11 12 13 14 15 - OUT + MC NC NO F-22...
- Page 83 ® PRISM DIAGRAMS F-23...
- Page 84 ® PRISM DIAGRAMS F-24...
- Page 86 Do not touch electrically live parts or Keep flammable materials away. Wear eye, ear and body protection. electrode with skin or wet clothing. Insulate yourself from work and ground. No toque las partes o los electrodos Mantenga el material combustible Protéjase los ojos, los oídos y el bajo carga con la piel o ropa moja- fuera del área de trabajo.
- Page 87 Keep your head out of fumes. Turn power off before servicing. Do not operate with panel open or Use ventilation or exhaust to guards off. remove fumes from breathing zone. Los humos fuera de la zona de res- Desconectar el cable de ali- No operar con panel abierto o piración.
- Page 88 TLV limits. Lincoln Electric is not in a position to warrant or guarantee such advice, and assumes no liability, with respect to such information or advice. We expressly disclaim any warranty of any kind, including any warranty of fitness for any customer’s particular...
Need help?
Do you have a question about the Prism 13264 and is the answer not in the manual?
Questions and answers