Oregon Scientific EW93 - Weather Station with RC Alarm Clock Manual
- User manual (2 pages) ,
- User manual (96 pages)
Advertisement
- 1 INTRODUCTION
- 2 OVERVIEW
- 3 RECEPTION OF SENSOR SIGNAL
- 4 RECEPTION OF RADIO CONTROLLED TIME SIGNAL
- 5 SIGNAL RECEPTION INDICATOR
- 6 TIME AND CALENDAR MANUAL SETTING
- 7 ALARM TIME SETTING
- 8 USING ALARM FUNCTION
- 9 TO SILENCE THE ALARM
- 10 READING INDOOR AND OUTDOOR TEMPERATURE RECORDS
- 11 VIEWING THE MINIMUM AND MAXIMUM TEMPERATURE RECORDS
- 12 WEATHER FORECAST INDICATOR
- 13 USING ICE ALERT FUNCTION
- 14 BATTERY REPLACEMENT
- 15 PLACEMENT OF MAIN UNIT AND SENSOR
- 16 SPECIFICATIONS
- 17 PRECAUTIONS
- 18 Documents / Resources
INTRODUCTION
The receiver unit has a clear and easy-to-read display that shows the indoor temperature, time, the maximum & minimum temperature records in the past 24 hours, the weather forecast icon as well as the outdoor temperature measured and transmitted from the remote sensors. It is able to receive and display readings from up to 3 remote sensors.
The 433 MHz technology means no wire installation is required and you can place the sensors within 30m (100ft) from the main (indoor) unit.
This product is designed to synchronize its date and time automatically once it is within range of the WWVB-60 signal from the atomic clock in Fort Collins, Colorado.
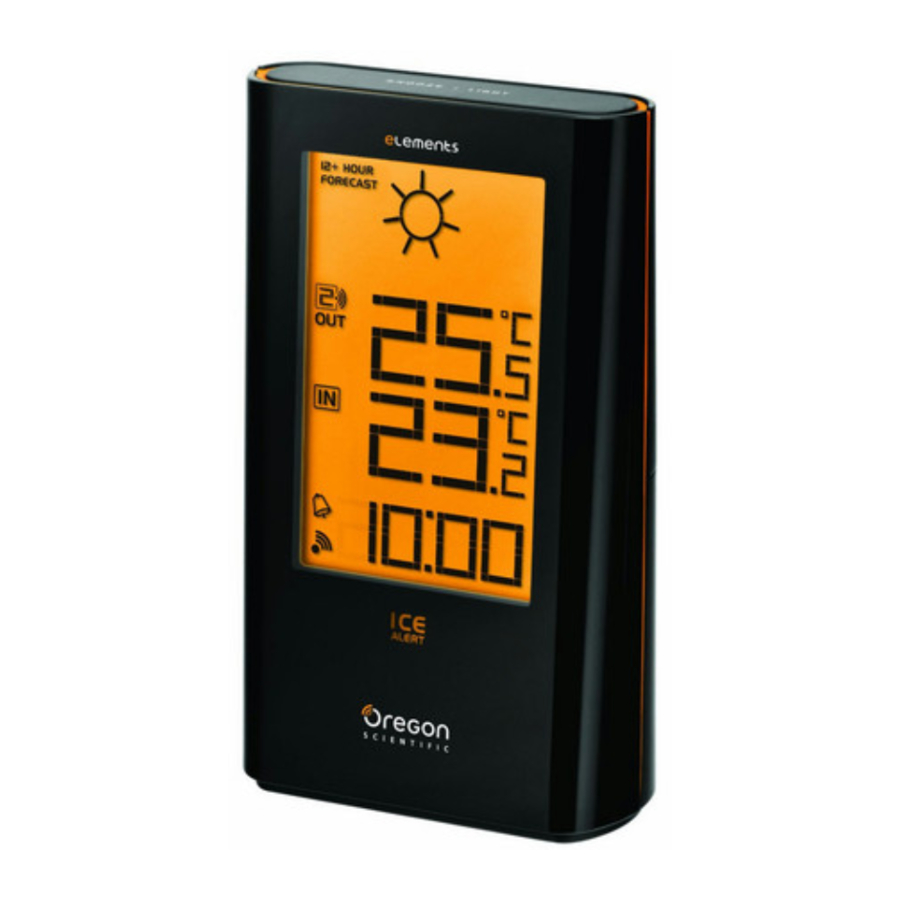
OVERVIEW
RECEIVER

- SNOOZE/LIGHT key:
- In normal time mode, press it once to turn on the backlight for 5 seconds.
- Press it to silence the current alarm when it is going and enter the snooze mode for 8 minutes.
- LCD display:
- Displays weather forecast icon, outdoor & indoor temperature. Automatically switches Time and Date in 5 seconds interval.
- Ice Alert indicator light:
- Flashes when the outdoor temperature is between -2.0°C(28°F) and 3.0°C(37°F).
- +/CHANNEL key:
- Press it once to switch between Channel 1, 2 and 3.
- Press and hold it for 2 seconds to view the channels automatically. Press it again to exit the automatic display mode.
- In time setting mode, press it to increase the setting values.
- SET CLOCK key:
- In normal time mode, press it once to enter the normal time setting mode.
- In normal time setting mode, press it to step the setting items. Press and hold it to exit the setting mode in any step.
- /MIN.MAX. key:
- Press it to show the minimum and maximum temperature records in the past 24 hours.
- Press and hold it for 3 seconds to delete the minimum and maximum temperature records.
- In time setting mode, press it to decrease the setting values.
- SENSOR key:
- Press it once to search a sensor.
- During the reception period, press and hold it for 3 seconds to stop the reception.
- °C/°F slide switch:
- Slide it to switch between Celsius and Fahrenheit.
- ALARM ON/OFF key:
- Press it once to turn on the backlight and display the alarm time for 5 seconds.
- Press it again to turn on/off the alarm.
- SET ALARM key:
- Press it once to turn on the backlight for 5 seconds, and press it again to enter the alarm time setting mode.
- In alarm time setting mode, press it to step the setting items.
- RESET key:
- Press it to return all values to default values.
- In case of malfunction, the unit may be required to reset.
- RCC key:
- In normal time mode, press it once to receive the RC signal for reception testing.
- BATTERY COMPARTMENT:
- Accommodates 2 AA size batteries.
- BATTERY DOOR
LCD DISPLAY

- Weather forecast icon
- Sensor signal
- Channel
- Low battery indicator
- Min and Max temperature
- Time and Calendar
- Signal reception indicator
- °C & °F
- Outdoor temperature
- Indoor temperature
- Time zone indicator
SENSOR

- LED indicator:
- Flashes when the remote unit transmits a reading.
- Wall-mounting holder:
- Supports the sensor on the wall.
- RESET key:
- Press it to restart the sensor and return all values to default values.
- CHANNEL slide switch:
- Assign the sensor to channel 1, 2 or 3.
- BATTERY COMPARTMENT:
- Accommodates 2 AAA size batteries.
- BATTERY DOOR
RECEPTION OF SENSOR SIGNAL
OPERATING THE MAIN UNIT
- Remove the battery door and insert 2 new AA size batteries as per the polarity information marked on the battery compartment.
- Press "RESET" key to restart the clock.
- Slide "°C/°F" switch to select between Celsius and Fahrenheit.
- Slide the battery door back on.
- Press "+/CHANNEL" key to select the desired channel.
 | Main unit is searching for the sensor(s) (the icon will be flashing) |
 | The sensor(s) cannot be found |
 | Sensor 1 has been found (the icon will be displayed, but won't flash) |
 and "--.-" (Outdoor temperature Area) and "--.-" (Outdoor temperature Area) | The sensor(s) cannot be found after operating the main unit for 15 minutes |
Note
When the sensor signal is received, the icon "  " will be displayed on the LCD.
OPERATING THE SENSOR
- Remove the battery door and slide "CHANNEL" switch to CH 1. (When using additional sensors, make sure each sensor is assigned a different CHANNEL number.
- Insert 2 new AAA batteries, matching polarities (+/-).
- Press the "RESET" key.
- Slide the battery door back on.
Note
- Place the sensor in location away from direct sunlight and rain.
- Do not place the sensor more than 30 m (100 ft) from the main (indoor) unit.
- Position the sensor so that it faces the main (indoor) unit, minimizing obstructions such as doors, walls, and furniture.
- Place the sensor in a location with a clear view to the sky, away from metallic or electronic objects.
- Position the sensor closer to the main unit during cold winter months as below-freezing temperatures may affect battery performance and signal transmission.
The transmission range may vary depending on many factors. You may need to experiment with various locations to get the best results.
Standard Alkaline batteries contain significant amounts of water. Because of this they will freeze in low temperatures of approximately -12°C (10°F). Disposable Lithium batteries have a much lower threshold for temperature with an estimated freezing range of below -30°C (-22°F).
Wireless ranges can be impacted by a variety of factors such as extremely cold temperatures. Extreme cold may temporarily reduce the effective range between the sensor and the base station. If the unit's performance fails due to low temperature, the unit will resume proper functioning as the temperature rises to within the normal temperature range (i.e. no permanent damage will occur to the unit due to low temperatures).
RECEPTION OF RADIO CONTROLLED TIME SIGNAL
The time and calendar are radio-controlled. The current time and calendar are automatically synchronized with the atomic clock signal from Fort Collins, Colorado. When used for the first time (after inserting batteries or pressing "RESET" key), the clock will start to search for the atomic clock signal and the signal reception icon will flash for 5 minutes.
SIGNAL RECEPTION INDICATOR
The wave segment flashing means time signals are being received. The signal quality could be classified into 3 types:

Note
- The unit will automatically search for the time signal at 2:00am (3:00am or 4:00am is also available if the signal is not received at 2:00am), 8:00am, 2:00pm, and 20:00 each day.
- Always place the unit away from electrical devices such as televisions, computers, telephones, etc.
- Avoid placing the unit on or next to metal plates.
- If possible, place the unit next to a window. Signal reception is greatly decreased when located in closed areas like basements or metal buildings.
- Do not start reception in moving vehicles or trains.
TIME AND CALENDAR MANUAL SETTING
If you are out of reach of the Radio Controlled sensor or if the reception is not reachable, the time and calendar can be set manually. As soon as the signal of sensor is received again, the clock will automatically synchronize with the exact time and calendar.
- In normal time mode, press "SET CLOCK" key once to enter the time setting mode.
- Press "+/CHANNEL" or "-/MIN.MAX." key to change the settings.
- Press "SET CLOCK" to confirm. The setting order is: 12/24-hr format, time, time zone offset, year, day/month format, date.

- Press "SET CLOCK" key to save and exit the setting mode.

Note
- During the setting period, press and hold "+/ CHANNEL" or "-/MIN.MAX." key to speed up the change of settings.
- The time zone indicators are abbreviated as below: P=Pacific, M=Mountain, C=Central, E=Eastern.
ALARM TIME SETTING
- In normal time mode, press "SET ALARM" key once to enter the alarm time setting mode.
- Press "+/CHANNEL" or "-/MIN.MAX." key to set hour/minute.
- Press "SET ALARM" key to save and exit the setting mode. "
![]() " indicates alarm is ON.
" indicates alarm is ON.
 " indicates alarm is ON.
Note
- The alarm will be automatically turned on when you set the alarm time.
- During the alarm time setting period, press and hold "+/CHANNEL" or "-/MIN.MAX." key to speed up the change of settings.
USING ALARM FUNCTION
- Follow the directions above to set the alarm time.
- In normal time mode, press "ALARM ON/OFF" key once to display the current alarm time.
- Press it again to turn alarm ON/OFF.
TO SILENCE THE ALARM
- Press "SNOOZE/LIGHT" to silence the alarm for 8 minutes. The "
![]() " will be flashing.
" will be flashing. - Press any other key to turn the alarm off and activate it again after 24 hours.
- If no key is pressed within 120 seconds, the alarm will be turned off and be activated again after 24 hours.
 " will be flashing.
READING INDOOR AND OUTDOOR TEMPERATURE RECORDS
Slide "ºC/ºF" switch to select between Celsius and Fahrenheit.
Note
- If no signals are received or the transmission is interfered, "
![]() " will appear on the display.
" will appear on the display. - Replace the batteries if the batteries are low, relocate the sensor or main display unit away from electronic devices, or hit the reset buttons on the main display unit and sensor.
 " will appear on the display.
VIEWING THE MINIMUM AND MAXIMUM TEMPERATURE RECORDS
- In normal mode, press "-/MIN.MAX." key twice to show the minimum indoor & outdoor temperature records in the past 24 hours.

- Press it again to show the maximum temperature records.

- Press it again to exit.


Note
Press and hold it for 3 seconds to delete the minimum and maximum temperature records.
WEATHER FORECAST INDICATOR
This product forecasts the next 12 to 24 hours of weather within a 30-50 km (19-31 mile) radius with a 75% accuracy.

USING ICE ALERT FUNCTION
If the outdoor temperature range is -2.0ºC ~ 3.0ºC (28.4ºF ~ 37.4ºF), the ice alert indicator light will be turned on and flash.
BATTERY REPLACEMENT
If the low battery icon turns on next to the outdoor temperature reading, replace the sensor's battery with 2 AAA batteries.
If the low battery icon turns on next to the indoor temperature reading, replace the sensor's battery with 2 AA batteries.

Note
Attention! Please dispose of the used unit or batteries in an ecologically safe manner.

PLACEMENT OF MAIN UNIT AND SENSOR

For the sensor, place the screw on the desired wall and hang the sensor by the recessed hole in the back of it or simply place it on the desktop.
For the main unit, you can just place it on the table by itself.
SPECIFICATIONS
| TYPE | DESCRIPTION |
| MAIN UNIT | |
| L x W x H | 81 x 38 x 137 mm (3.19 x 1.5 x 5.39 in) |
| Weight | 198g |
| Signal frequency | 433 MHz |
| Temperature range | -5°C to 50°C (23°F to 122°F) |
| Temperature resolution | 0.1°C (0.2°F) |
| Ice alert temperature range | 3°C to -2°C (37°F to 28°F) |
| Power | 2 x AA 1.5V batteries |
| REMOTE UNIT (EW-99) | |
| L x W x H | 58 x 23 x 100 mm (2.28 x 0.9 x 3.94 in) |
| Weight | 52g |
| Signal frequency | 433 MHz |
| Number of channel | 3 |
| Transmission range | 30 m (98 ft) unobstructed |
| Temperature range | -20°C to 60°C (-4°F to 140°F) |
| Power | 2 x AAA 1.5V batteries |
Note
We recommend that you use alkaline batteries with this product for longer usage and lithium batteries in temperatures below freezing.
PRECAUTIONS
- Do not subject the unit to excessive force, shock, dust, temperature or humidity.
- Do not cover the ventilation holes with any items such as newspapers, curtains etc.
- Do not immerse the unit in water. If you spill liquid over it, dry it immediately with a soft, lint-free cloth.
- Do not clean the unit with abrasive or corrosive materials.
- Do not tamper with the unit's internal components. This invalidates the warranty.
- Only use fresh batteries. Do not mix new and old batteries.
- Images shown in this manual may differ from the actual display.
- When disposing of this product, ensure it is collected separately for special treatment and not as normal household waste.
- Placement of this product on certain types of wood may result in damage to its finish for which Oregon Scientific will not be responsible. Consult the furniture manufacturer's care instructions for information.
- The contents of this manual may not be reproduced without the permission of the manufacturer.
- Do not dispose old batteries as unsorted municipal waste. Collection of such waste separately for special treatment is necessary.
- Please note that some units are equipped with a battery safety strip. Remove the strip from the battery compartment before first use.
Note
The technical specifications for this product and the contents of the user manual are subject to change without notice.

Documents / ResourcesDownload manual
Here you can download full pdf version of manual, it may contain additional safety instructions, warranty information, FCC rules, etc.
Download Oregon Scientific EW93 - Weather Station with RC Alarm Clock Manual
Advertisement


Need help?
Do you have a question about the EW93 and is the answer not in the manual?
Questions and answers