Table of Contents
Advertisement
Quick Links
Advertisement
Table of Contents

Related Manuals for VEVOR DM-160C


Summary of Contents for VEVOR DM-160C
- Page 1 M odel:DM -160C M ini G rinder User M anual...
- Page 3 M ini G rinder User M anual This is the original instruction, please read all manual instructions carefully before operating. V EV OR r be subject to the product you received. Please forgive us that we won't inform you again if there is any technology or software updates on our product.
-
Page 4: Technical Specifications
INSTRODUC TION This ro and removing rust in tight spaces or inaccessible places. The tool can be used on most metals, glass, wood and ceramics. F exercising too much pressure. As a guideline, use the tool at low speed for all large accessories, such as polishing for example, and at high speed for smaller accessories such as those used for engraving. -
Page 5: Speed Adjustment
9. USE SAFETY GLASSES. Also use a face and a dust mask to guard against dust 10. DO NOT ABUSE THE CORD. Never car Keep the cord away from heat, oil or sharp objects. 11. SECURE YOUR WORK. Use clamps or a vice to hold y our work in position. It is much safer than using y our hand and it frees both hands to operate the tool. -
Page 6: Know Y Our Rotary Tool
6. Do not leave y our tool unattended while switched on. 7. Do not use or store y our tool in damp or wet conditions. Useful Hints & Tips 1. Your ro cool down. 2. To ensure smooth running, the spindle should be oiled periodically . 3. -
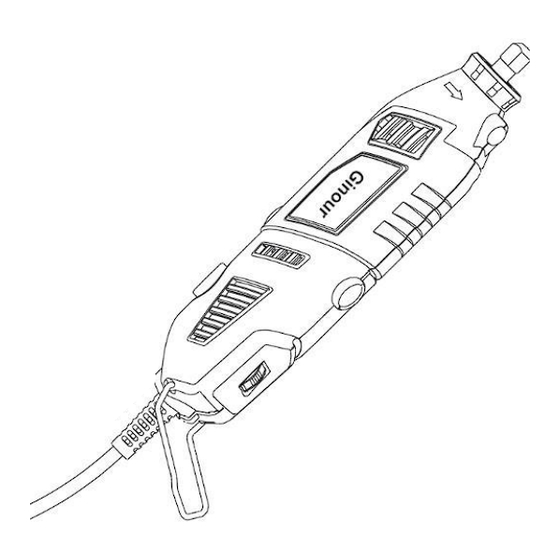
Page 7: Function Description
PA R T DE SC R IPT ION Shaft lock button Case L ock Collet Collet nut Collet wrench Brush cap On/Off Switch Speed control dial Power cord FUNC TION DE SCRIPTION On / Off Switch This product has an easy access power Speed control switch (H) located at the bottom of the tool. -
Page 8: Installing Accessories
Installing Accessories WARNING Do not press the shaft lock button (A) while ro 1. Unplug the ro 2. Press and hold the shaft lock button(A), and rotate the shaft by hand until the shaft lock engages the shaft, prev 3. With the shaft lock button engaged, use the collet wrench (E) to loosen the collet nut (D), if neces it is engaged. -
Page 9: Speed Control
If Using The Standard M andrel: 1. Press and hold the shaft lock button (A). into the slot on top of the mandrel and unscrew. 3. Remove mandrel screw and washer. 4. Place desired acces and align acces the acces NOTE : The mandrel washer should be placed between the mandrel screw and the acces * Tighten using provided wrench. - Page 10 SPE E D SE TTING FOR ROTARY AC C E SSORIE S Soft Hard Aluminum, Shell, Function Picture Plastic Steel Ceramic G lass Description wood wood brass, etc. stone G rinding 15000- 15000- 15000- 15000- 15000- 15000- 15000- wheel 35000 35000 35000 35000...
-
Page 11: Cutting G Uide
RUL E S OF OPE RATING SPE E DS The best way to determine the correct speed for work on any material is to practice for a few minutes on a piece of scrap, even after referring to the Speed Dial Settings tables. You can quickly learn that a slower or faster speed is more effective just b at different speeds. -
Page 12: Installation Instruction
Step.1 Step.2 Step.3 Step.4 Step.5 Shield Ro The ro from the user without int left-hand grip positions and works to deflect debris on a variety of applications, including cutting, sanding, grinding and polishing. The shield can be quickly adjusted into position, provides easy access to the acces Installation Instruction: Step 1. - Page 13 FIG.1 FIG.2 FIG.3 Flexible Driver Attachment Safety Rules for Flexible Driver. Do not operate the flexible shaft with a sharp or multiple bends. Ensure that there are no sharp residual bends or kinks in the Flexible Driver before the operation. Over bending the shaft can generate excessive heat on the jacket or hand piece and may cause the Flexible Driver to disengage from...
-
Page 14: Directions For Use
7. Loosen co acces DIRE C TIONS FOR USE 1. With small milling cutters / grinding pins: Use a high speed. 2. With large milling cutters / grinding pins: Use a low speed. 3. Precision work / engraving: Hold the drive unit like a pen. 4. - Page 15 CL E ANING 1. Keep all safety devices, air vents and the motor housing free o Wipe the equipment with a clean cloth or blow it with compressed air at low pressure. 2. We recommend that y ou clean the device immediately each time y ou have finished using it. 3.
- Page 16 E-mail: CustomerService@vevor.com...
Need help?
Do you have a question about the DM-160C and is the answer not in the manual?
Questions and answers