Table of Contents
Advertisement
Quick Links
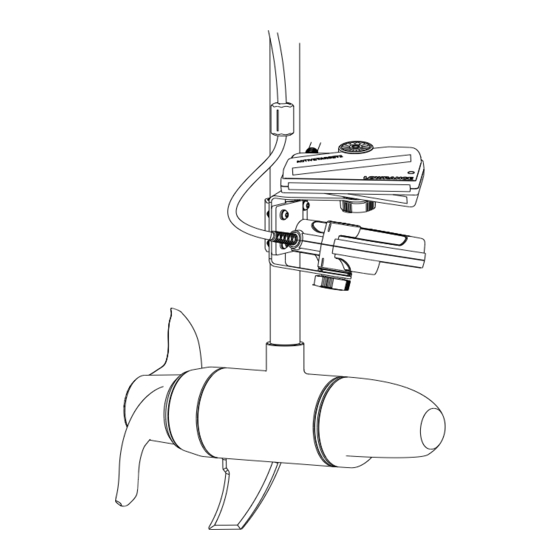
ActiveTarget™ 2 Scout™ Wide Bracket
Installation Guide
Introduction
The ActiveTarget
2 Scout™ wide bracket is a non-adjustable bracket arm that holds two ActiveTarget
®
proper Scout™ angles.
When installed with two ActiveTarget
Lowrance
HDS
Pro multi-function display.
®
®
The Scout™ wide view is a composite image (two images blended at the center) that displays a much wider area of fish and
structure than a single Scout™ view.
Installation
We recommend you install the Scout™ wide bracket while your trolling motor is stowed. This allows you to quickly see if
you've oriented the bracket incorrectly (i.e. the bracket is touching the trolling motor mount or you can't install the bottom
transducer because the trolling motor mount is in the way). If you install the bracket incorrectly while the trolling motor is
deployed, you won't realize until you try to stow your trolling motor.
This guide provides instructions on how to mount the ActiveTarget
install ActiveTarget
2 sonar modules and how to wire an ActiveTarget
®
Manual. To learn how to display the Scout™ wide view on your Lowrance
Lowrance
HDS
Pro Operator Manual.
®
®
¼ Warning: Never install a Scout™ wide bracket to your trolling motor while the trolling motor is operating.
Parts included
•
•
•
•
•
•
•
•
* Transducers not included
Tools needed
•
•
•
2 sonar modules, the bracket allows you to view a Scout™ wide view on your
®
Scout™ wide bracket arm
Clamp collar, 1x large, 1x small
1.5 mm rubber spacer (for shaft diameters 31-33 mm), 2x
3 mm rubber spacer (for shaft diameters 29-31 mm), 2x
M6x20 mm bolt, 2x
M6x30 mm bolt, 2x
M6 flat washer, 8x
M6 lock nut, 4x
10 mm open end wrench
4 mm Allen key
Torque wrench
2 Scout™ wide bracket. For instructions on how to
®
2 system, refer to the ActiveTarget
®
HDS
Pro multi-function display, refer to the
®
®
Scan for more info
2 transducers at
®
2 Installation
®
Advertisement
Table of Contents

Subscribe to Our Youtube Channel
Related Manuals for Lowrance ActiveTarget 2 Scout Wide Bracket


Summary of Contents for Lowrance ActiveTarget 2 Scout Wide Bracket
- Page 1 2 sonar modules and how to wire an ActiveTarget 2 system, refer to the ActiveTarget 2 Installation ® ® ® Manual. To learn how to display the Scout™ wide view on your Lowrance Pro multi-function display, refer to the ® ® Lowrance Pro Operator Manual.
- Page 2 Determine bracket configuration (port or starboard) 1. Determine the stow direction of your trolling motor. If the port side of trolling motor lower unit faces up (away from the mount), use the port configuration: Use port configuration Port configuration If the starboard side of the trolling motor lower unit faces up, use the starboard configuration: Use starboard configuration Starboard configuration Attach collar to bracket arm...
- Page 3 Position clamp on shaft 6. With the bracket in upwards position (arrow pointing towards the top of the trolling motor), place the collar assembly against the trolling motor shaft. ¼ Note: The bracket arms should be facing the same way as the nose of the trolling motor (i.e. the opposite side to the propeller).
- Page 4 This product’s warranty is supplied as a separate document. Safety, disclaimer and compliance This product’s safety, disclaimer and compliance statements are supplied as a separate document. More information Document version: 001 For the latest version of this document in supported languages and other related documentation, visit: www.lowrance.com/downloads/activetarget.
Need help?
Do you have a question about the ActiveTarget 2 Scout Wide Bracket and is the answer not in the manual?
Questions and answers