
Related Manuals for RIB R10-CRX


Summary of Contents for RIB R10-CRX
- Page 1 R10-CRX ABJ0015 ITALIANO pag. 04 / FRANÇAIS page 11 / ENGLISH pag. 18 / ESPAÑOL pag. 25...
-
Page 2: Istruzioni Di Sicurezza Importanti
2° - En ce qui concerne la section et le type des câbles, RIB conseille d’utiliser un câble de 2° - Per la sezione ed il tipo dei cavi la RIB consiglia di utilizzare un cavo di tipo H05RN-F type H05RN-F ayant une section minumum de 1,5 mm et de toute façon, s’en tenir à... - Page 3 2° - For the section and the type of the cables RIB advices to use a cable of H05RN-F type 2° - Para la sección y el tipo de los cables, RIB aconseja utilizar cables de tipo H05RN-F con with 1,5 sqmm minimum section and, however, to keep to the IEC 364 and installation sección mínima de 1,5 mm...
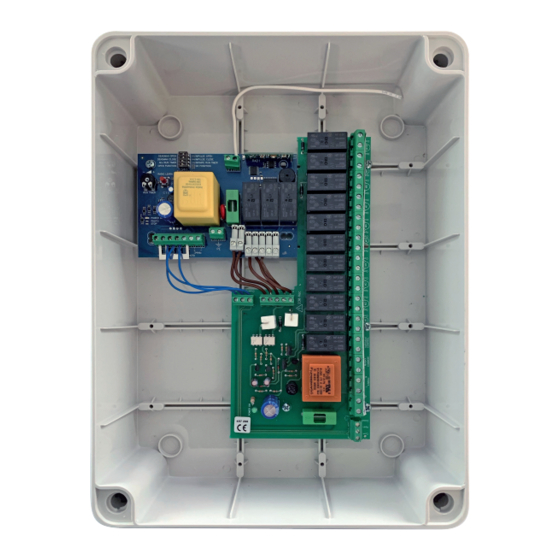
- Page 4 1. Introduzione Il quadro elettrico R10-CRX è un quadro di comando sviluppato per controllare 10 motori in modo semplice e intuitivo. R10-CRX controlla 10 motori a 230 Vac fino a 1000 W. C'è un'uscita per la luce di cortesia e un ingresso per le fotocellule.
-
Page 5: Led Di Segnalazione
3. Collegamenti Elettrici La centralina viene fornita con tutti gli ingressi normalmente chiusi ponticellati al comune. Prima di collegare un dispositivo alla centralina, rimuovere il ponticello corrispondente all’apparato che si vuole cablare lasciando inalterati gli altri. Collegare il cavo d’antenna Al morsetto 18 è... -
Page 6: Controlli Preliminari
I 2 tasti “A” e “B” sono memorizzati e la procedura è terminata. Ripetere la procedura se si desidera apprendere un nuovo telecomando. NOTA: Con un telecomando SUN 4CH è possibile associare i tasti C e D a un’altra centrale R10-CRX ch: C ch: A ch: B ch: D... - Page 7 7. Funzioni selezionabili tramite dip-switch Cambiare la posizione dei dip-switch solo con scheda non alimentata !!! Togliere l’alimentazione durante il cambio di configurazione. IMPOSTAZIONI DI DEFAULT Il quadro di comando viene fornito con i dip-switch impostati come indicato in Fig.1. Nella tabella vengono riassunte le funzione selezionabili tramite questi dip-switch.
- Page 8 7.3 Funzionamento impulsivo Il settaggio di questo dip imposta la modalità di funzionamento, quando il dip 1 e il dip 2 sono impostati su ON (funzionamento a impulso). Viene attivata la “funzione Go”. L’automatismo funziona in modalità “passo-passo” ad un tasto. Il pulsante OPEN/tasto “A”...
-
Page 9: Guida Alla Risoluzione Dei Problemi
7) Non si riesce ad entrare in apprendimento • L’automazione non è ferma. • Inviare un comando di stop e riprovare. CARATTERISTICHE TECNICHE R10-CRX Tensione di alimentazione su scheda di potenza (morsetti 1-2) 230 Vac ±15% 50/60 Hz Assorbimento scheda... - Page 10 Standard connection for synchonized use of the motors MAIN CONTROL UNIT FOR ROLLER SHUTTERS Multi ATTE TECH Freq OPER Sync Indiv corre DISP This dispo produ produ must provi whic wired button for synchronized and h control As in Optional connections for individual control of the motors sanc M2, M3, M4 M7, M8, M9...
-
Page 11: Avertissements Et Conseils
1. Introduction L’armoire de commande R10-CRX est une centrale développée pour commander 10 rideaux d’une façon simple et intuitive. Ce produit contrôle les moteurs 230 Vac jusqu’à 1000 W. Il sont prevus une sortie pour la lumière de courtoisie et une entrée pour les photocellules. - Page 12 3. Connexions électriques L’armoire de commande est fournie avec toutes les entrée normalement fermées shuntées au commun. Avant de brancher le dispositif à l’armoire de commande enlever le shunt correspondant à l’équipement qu’on veut câbler en laissant inaltérés les autres. Relier le câble de l’antenne.
-
Page 13: Contrôles Preliminaires
Répéter la procédure si on désire apprendre un nouveau émetteur. REMARQUE: Avec un émetteur SUN 4CH il est possible d’associer les boutons C et D à une autre centrale R10-CRX ch: C ch: A ch: B ch: D... -
Page 14: Temps De Fonctionnement
7. Fonctions sélectionnables par dip-switch Il est important de changer la configuration des dip-switch seulement avec la carte non alimentée !!! Couper l’alimentation pendant le changement de configuration. Configurations de default L’armoire de commande est fournie avec les dip-switch réglés comme indiqué dans la Fig.1. Dans le tableau ils sont indiqués les fonctions sélectionnables par ces dip-switch. - Page 15 7.3 Fonctionnement impulsif Le réglage de ce type de dip affiche la modalité de fonctionnement, quand le dip 1 et le dip 2 sont réglés sur ON (fonctionnement à impulsion). Est activée la “fonction Go”. L’automatisme fonctionne en modalité “pas à pas” avec une bouton. La bouton OPEN/“A”...
- Page 16 7) On ne réussi pas à entrer dans la phase d’apprentissage. • L’automatisme n’est pas arrêté • Envoyer une commande de stop et réessayer. CARACTERISTIQUES TECNIQUE R10-CRX Tension d'alimentation sur tableau de gestion du moteurs (bornes 1-2) 230 Vac ±15% 50/60 Hz...
- Page 17 Standard connection for synchonized use of the motors MAIN CONTROL UNIT FOR ROLLER SHUTTERS Multi ATTE TECH Freq OPER Sync Indiv corre DISP This dispo produ produ must provi which wired button for synchronized and h control As in Optional connections for individual control of the motors sanc M2, M3, M4 M7, M8, M9...
- Page 18 1. Introduzione R10-CRX is a control unit developed to control up to 10 rolling shutters in an easy and intuitive way. This product controls motors up to 230 Vac up to 1000W. A courtesy light output and an input for the photocells are available.
-
Page 19: Signalling Led
3. Electrical connections The control unit is supplied with all the inputs normally closed and jumpered to the common. Before connecting a device to the control unit remove the jumper corresponding to the device that you want to connect leaving the others unchanged. -
Page 20: Preliminary Checks
Repeat the procedure if you wish to learn a new transmitter. NOTE: With a 4 channel SUN remote control the buttons C and D can be used with another R10-CRX control panel. ch: C ch: A ch: B... -
Page 21: Working Time
7. Selectable functions through dip-switch IT IS IMPORTANT TO CHANGE THE CONFIGURATION OF THE DIP-SWITCH ONLY WHEN THE UNIT IS TURNED OFF!!! TURN OFF THE POWER SUPPLY DURING THE CHANGE OF CONFIGURATION. Default settings The control board is supplied with the dip-switches set as indicated in the Pict. 1. In the table are sum up the functions that can be selected through these dip-switches. - Page 22 7.3 Pulse operation The setting of this dip configures the operating mode, when the dip 1 and the dip 2 are set on ON (pulse operation). The “Go functioning” is activated. The automation works under “step by step” mode with one button. The OPEN/“A”...
-
Page 23: Troubleshooting Guide
7) It is not possible to enter into the learning phase. • The automation is not still. • Give a stop impulse and try again. TECHNICAL DATA R10-CRX Power supply voltage on motors management board (terminals 1-2) 230 Vac ±15% 50/60 Hz... - Page 24 Standard connection for synchonized use of the motors MAIN CONTROL UNIT FOR ROLLER SHUTTERS Multi ATTE TECH Freq OPER Sync Indiv corre DISP This dispo produ produ must provi whic wired button for synchronized and h control As in Optional connections for individual control of the motors sanc M2, M3, M4 M7, M8, M9...
- Page 25 1. Introducción R10-CRX es una centralita desarrollada para accionar 10 motores en modo simple e intuitivo. Este producto manda motores de 230 Vac hasta 1000W. Tiene una salida de luz de cortesía y una entrada para las fotocélulas. El producto es compatible con mandos SUN.
- Page 26 3. Conexiones Eléctricas La centralita es suministrada con todas las entradas normalmente cerradas puenteadas al común. Antes de conectar un dispositivo a la centralita, quitar el puentecillo correspondiente al aparato que se quiere cablear dejando inalterables los otros. Conectar el cable de la antena. Al terminal 18 ya está...
- Page 27 Las 2 tecla “A” y “B” han sido memorizadas y el procedimiento terminado. Repetir el procedimiento si se desea memorizar un nuevo mando. NOTA: Con un emisor SUN 4 canales se pueden utilizar las teclas C y D con otra central R10-CRX ch: C ch: A ch: B ch: D...
- Page 28 7. Funciones seleccionables por medio dip-switch Es importante cambiar la configuración de los dip-switch solo con la tarjeta no alimentada!!! Quitar la alimentación durante el cambio de configuración. Regulación de default El cuadro de mando es suministrado con los dip-switch regulados como indicado en la Fig.1. En la tabla se dispone de un resúmen de las funciones seleccionables por medio de estos dip-switch.
- Page 29 7.3 Funcionamiento impulsivo La regulación de este dip regula la modalidad de funcionamiento, cuando el dip 1 y el dip 2 son regulados en ON (el funcionamiento a impulso). Se activa la “función Go”. El automatismo funciona en modalidad “paso-paso” con una tecla. La tecla OPEN/“A”...
- Page 30 7) No se logra entrar en aprendizaje. • El automatismo no se detiene. • Dar un mando de stop y probar nuevamente. CARACTERÍSTICAS TÉCNICAS R10-CRX Tensión de alimentación en la placa que gestiona los motores (terminales 1-2). 230 Vac ±15% 50/60 Hz Absorción tarjeta...
- Page 31 Standard connection for synchonized use of the motors MAIN CONTROL UNIT FOR ROLLER SHUTTERS Multi ATTE TECH Freq OPER Sync Indiv corre DISP This dispo produ produ must provi which wired button for synchronized and h control As in Optional connections for individual control of the motors sanc M2, M3, M4 M7, M8, M9...
- Page 32 R.I.B. S.r.l. - Via Matteotti, 162 - 25014 Castenedolo - Brescia - Italy Tel. ++39.030.2135811 - www.ribind.it - ribind@ribind.it Apparecchio modello : Oggetto della dichiarazione : Modèle d'appareil : R10-CRX Objet de la déclaration : Apparatus model : Object of the declaration : Modelo de aparato : Objeto de la declaración :...
Need help?
Do you have a question about the R10-CRX and is the answer not in the manual?
Questions and answers