Focusrite OctoPre MkII Dynamic Manual
- User manual (28 pages) ,
- Important safety instructions manual (14 pages)
Advertisement
Important Safety Instructions
- Read these instructions.
- Keep these instructions.
- Heed all warnings.
- Follow all instructions.
- Do not use this apparatus near water.
- Clean only with dry cloth.
- Do not block any ventilation openings. Install in accordance with the manufacturer's instructions.
- Do not install near any heat sources such as radiators, heat registers, stoves, or other apparatus (including amplifiers) that produce heat.
- Do not defeat the safety purpose of the polarized or grounding-type plug. A polarized plug has two blades with one wider than the other. A grounding type plug has two blades and a third grounding prong. The wide blade or the third prong are provided for your safety. If the provided plug does not fit into your outlet, consult an electrician for replacement of the obsolete outlet.
- Protect the power cord from being walked on or pinched particularly at plugs, convenience receptacles, and the point where they exit from the apparatus.
- Only use attachments/accessories specified by the manufacturer.
- Use only with the cart, stand, tripod, bracket, or table specified by the manufacturer, or sold with the apparatus. When a cart is used, use caution when moving the cart/apparatus combination to avoid injury from tip-over.
![]()
- Unplug this apparatus during lightning storms or when unused for long periods of time.
- Refer all servicing to qualified service personnel. Servicing is required when the apparatus has been damaged in any way, such as power-supply cord or plug is damaged, liquid has been spilled or objects have fallen into the apparatus, the apparatus has been exposed to rain or moisture, does not operate normally, or has been dropped.


To reduce the risk of fire or electric shock, do not expose this apparatus to rain or moisture.
It is important that the apparatus shall not be exposed to dripping or splashing and that no objects filled with liquids, such as vases shall be placed on the apparatus.
- Do not expose this apparatus to drips or splashes.
- Do not place any objects filled with liquids, such as vases, on the apparatus.
- Do not install this apparatus in a confined space such as a bookcase or similar unit.
- Slots and openings in the cabinet are provided for ventilation and to ensure reliable operation of the product and to protect it from overheating. Please ensure adequate space around the apparatus for sufficient ventilation. Ventilation should not be impeded by covering the ventilation openings with items such as newspapers, tablecloths curtains etc.
- The apparatus draws nominal non-operating power from the AC outlet with its POWER switch in the off position.
- The apparatus should be located close enough to the AC outlet so that you can easily grasp the power cord plug at any time.
- An apparatus with Class 1 construction shall be connected to an AC outlet with a protective grounding connection.
- The MAINS plug or the appliance coupler is used as the disconnect device. Either device shall remain readily operable when the apparatus is installed for use.
- No naked flames, such as lighted candles, should be placed on the apparatus.

excessive sound pressure levels from earphones and headphones can cause hearing loss.
This equipment must be earthed by the power cord
Important Safety Precautions

RISK OF ELECTRIC SHOCK
DO NOT OPEN
TO REDUCE THE RISK OF ELECTRIC SHOCK, DO NOT REMOVE COVER (OR BACK). NO USER-SERVICEABLE PARTS INSIDE. REFER SERVICING TO QUALIFIED SERVICE PERSONNEL.
 The lightning flash with arrowhead symbol, within equilateral triangle, is intended to alert the user to the presence of uninsulated "dangerous voltage" within the product's enclosure that may be of sufficient magnitude to constitute a risk of electric shock to persons.
 The exclamation point within an equilateral triangle is intended to alert the user to the presence of important operating and maintenance (servicing) instructions in the literature accompanying the appliance.
TO PREVENT FIRE OR SHOCK HAZARD, DO NOT EXPOSE THIS APPLICANCE TO RAIN OR MOISTURE
Environmental Declaration
Compliance Information Statement: Declaration of Compliance procedure
Product Identification: Focusrite OctoPre MkII Dynamic
Responsible party: American Music and Sound
Address: 5304 Derry Avenue #C Agoura Hills, CA 91301
Telephone: 800-994-4984
This device complies with part 15 of the FCC Rules. Operation is subject to the following two conditions:
- This device may not cause harmful interference, and
- this device must accept any interference received, including interference that may cause undesired operation.
RoHS Notice
Focusrite Audio Engineering Limited has conformed and this product conforms, where applicable, to the European Union's Directive 2002/95/EC on Restrictions of Hazardous Substances (RoHS) as well as the following sections of California law which refer to RoHS, namely sections 25214.10, 25214.10.2, and 58012, Health and Safety Code; Section 42475.2, Public Resources Code.
Introduction
Thank you for purchasing the Focusrite OctoPre MkII Dynamic. This unit will provide 8 channels of high quality Focusrite preamplifiers for you to use on microphone, line and instrument signals. You can use the OctoPre MkII Dynamic as part of your studio set-up or live rig. The OctoPre MkII Dynamic offers 8 direct outputs via the balanced line outputs to connect to an analogue device, or via a single or dual ADAT connection to a digital device.
If the main User Guide sections do not provide the information you need, be sure to consult http://www.focusrite.com/answerbase, which contains a comprehensive list of common technical support queries regarding the product to date.
Box Contents
Along with your OctoPre MkII Dynamic you should have:
1 - IEC power cable
4 - Self-adhesive rubber feet - stick to the bottom of the unit for table-top placement
1 - Registration Card
1 - Focusrite / Novation Product Brochure
Hardware
Back Panel

The back panel provides the all of the input and output connections on the OctoPre MkII Dynamic.
- 8 x Combo inputs for Inputs 1 - 8. Mic via XLR or Line via Jack*
- 8 x Line outputs (1 - 8)*
- 2 x Optical input sockets **
- 2 x Optical output sockets **
- 1 x BNC Word Clock input connector
- 1 x BNC Word Clock output connector
- 1 x IEC Power input socket
* Either 1/4 inch TRS (balanced) or TS (unbalanced) Jack connectors can be used.
** @ sample rates of 44.1 / 48 kHz use either output port 1 or port 2 for 8 channels - ADAT (a copy is sent to both ports)
@ sample rates of 88.2 / 96 kHz use output port 1 and 2 for 2 x 4 channels - ADAT SMUX.
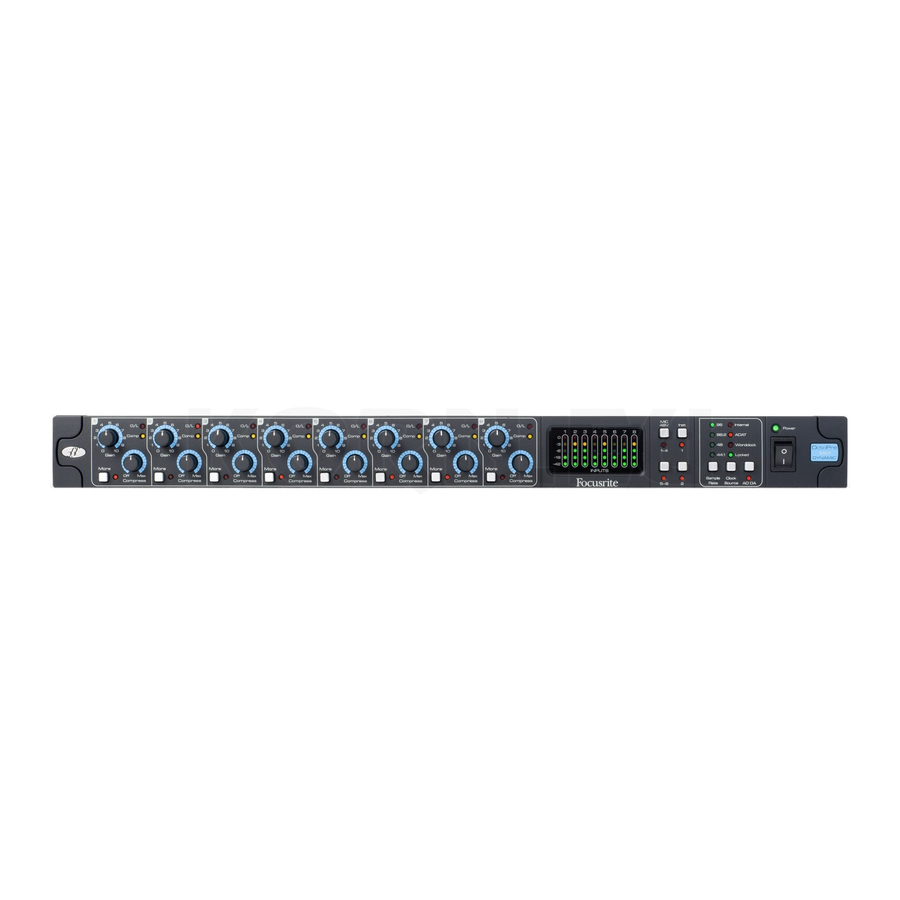
Front Panel

- Preamp Gain and Compression Compress and More controls for Inputs 1 - 8
- Separate 5 LED meter for each input channel -42, -18, -6, -3, 0 dBFS. (NOTE: Metering is post preamp and compression)
- The Mic 48V Phantom Power switches with LEDs for Channels 1-4 and 5-8
- Inst Instrument switch with LEDs for inputs 1 and 2
- Sample Rate switch with separate LEDs for each sample rate
- Clock Source switch with separate LEDs for sync source / status
- AD DA Switch to route ADAT input to line outputs
- Power switch with LED - LED is lit when the unit receives power and is turned on
- Removable rack-ear covers - remove to install unit into a 19 inch rack
Using the Device
Combo Inputs

All eight of the analogue audio inputs use professional combo connectors. These can accept male XLR connectors, TS (un-balanced) and TRS (balanced) jack connectors.
If an XLR cable is used, then the preamp will automatically switch to microphone level.

If a jack cable is connected, then the preamp will automatically switch to line level. For instrument signals connected to inputs 1 and 2 use the Inst button to switch to high impedance instrument level.
Phantom Power (MIC 48V)

The two phantom power switches turn on 48V phantom power to Mic inputs 1-4 and 5-8. Phantom power is required for most condenser (capacitor) microphones. Phantom power is only sent to the XLR connector on the combo inputs, so if a group of 4 preamps is shared between mic and line level signals, +48V is only sent to the microphones.
Dynamic microphones do not require phantom power but most will operate with phantom power supplied.
Ribbon microphones do not require phantom power and may be damaged if supplied with phantom power.
If you are unsure about your microphone DO NOT supply phantom power until you have confirmed the specifications with the manufacturer.
Preamp Gain
The gain of each preamp should be set with reference to the level of the input source. Use the LED metering to monitor the signal level of each preamp.

Start with the preamp gain set to minimum. Ensure that the compression is set to off. Ask the recording artist to play at the loudest level required by the performance.
The O/L LED will light if the signal level is too high. If the signal causes the O/L LED to light, even with the gain set to a minimum then compression will be required.
Compression can also be applied to signals that don't overload the preamp, but require an amount of 'levelling' of the dynamics.
Compressor
The Compress control allows compression to be applied to the signal. With the control fully anti-clockwise, the compressor is set Off: no compression is applied.
To turn on the compressor, rotate the Compress dial clockwise. As soon as the dial is moved from the Off position the yellow Comp LED will briefly light to indicate that the compressor is now active. As the control is turned further clockwise, the compression threshold is progressively reduced, resulting in heavier and heavier compression of the signal. Now the yellow Comp LED will light whenever compression is being applied to the signal.
A compressor acts as an automatic volume control, effectively turning down the volume of a signal if it gets too loud. As the Compress dial is turned clockwise, the make-up gain is progressively increased, bringing up the overall signal level.
The More button will provide a greater ratio, thereby applying heavier compression to the signal.
Compressor - Detailed information
The following graphs show the compression curve for normal and more modes. These graphs include the effect of the make-up gain to the overall signal level. The four lines represent Compress Off (OFF), Compress On - Min (MIN), Mid (MID) and Max (MAX) settings.
In both modes the attack time is 1.2ms. The release time the 28ms
Normal Mode

In Normal mode (More button switched out) the compression ratio is 2:1
More Mode

In More mode (More button switched in) the compression ratio is 4:1
In both modes, as the Compress dial is turned clockwise, the threshold is reduced and the make-up gain increased. As More mode utilises a higher ratio (hence more compression) there is more make-up gain to compensate.
Line Outputs

Use the line outputs to connect the OctoPre MkII Dynamic to the line inputs of any analogue device.
The OctoPre MkII Dynamic will accept either TS (unbalanced) or TRS (balanced) jacks.
TRS jacks will give a maximum signal level of +16dBu whereas TS jacks will give a maximum level of +10dBu.
These analogue output levels correspond to 0dBFS.
NOTE: When the AD DA button is switched in, the line outputs are switched to output the signal received at the ADAT inputs (see below).
5 LED Metering

The 8 x 5 LED meters show the level of the signal just before it reaches the analogue to digital Converters - i.e after both the preamp and compressor.
Each LED represents the following values in dBFS: -42, -18, -6 (Green), -3 (Yellow), 0 (Red).
When connected to a digital device, you should ensure that both the preamp and compressor settings are such that the signal level never reaches 0dBFS (Red).
Digital Outputs
Use the ADAT output(s) to connect the OctoPre MkII Dynamic to the ADAT input(s) of any digital device.

The OctoPre MkII Dynamic will send 8 channels of audio at 44.1 / 48kHz via a single optical cable. The same 8 channels are sent to both optical output ports.
The OctoPre MkII Dynamic will send 4 channels of audio at 88.2 / 96kHz via a single optical cable. Channels 1-4 and 5-8 are sent out of optical ports 1 & 2 respectively.
Use the Sample Rate button to select the desired sample rate. You must ensure that the sample rate selected on the OctoPre MkII Dynamic matches the sample rate set on all connected digital devices.
Digital Inputs
The OctoPre MkII Dynamic will also act as a digital to analogue converter. For example, if you are using the OctoPre MkII Dynamic with a computer audio interface, then you can connect the interface ADAT outputs to the ADAT inputs of the OctoPre MkII Dynamic, thus increasing the number of analogue outputs from your computer.
Press the AD DA button to send the digital ADAT input to the 8 Line outputs.
NOTE: The analogue to digital and digital to analogue converters are synchronised to the same clock source. This means that both must run at the same sample rate.
Digital Synchronisation
There are a number of synchronisation options available:
OctoPre MkII Dynamic as clock source master - ADAT:
Connect the OctoPre MkII Dynamic's ADAT output to the digital device's ADAT input and ensure that the receiving device is set to receive clock from it's ADAT input (also ensuring the sample rates on both devices are matched).
The OctoPre MkII Dynamic's Clock Source should be set to Internal and the Locked LED will light up green.
OctoPre MkII Dynamic as clock source master - word clock:
Connect the OctoPre MkII Dynamics ADAT and word clock outputs to the digital device's ADAT and word clock inputs and ensure that the receiving device is set to receive clock from the word clock input (also ensuring the sample rates on both devices are matched).
The OctoPre MkII Dynamic Clock Source should be set to Internal and the Locked LED will light up green.
NOTE: The ADAT connection will transmit the digital audio; the word clock is only providing the synchronisation.
OctoPre MkII Dynamic as Clock Source Slave - ADAT:
Connect the OctoPre MkII Dynamic ADAT output to the digital device's ADAT input. Connect the digital device's ADAT output to the OctoPre MkII Dynamic's ADAT input (also ensuring the sample rates on both devices are matched).
The OctoPre MkII Dynamic Clock Source should be set to ADAT and the Locked LED will light up Green.
OctoPre MkII Dynamic as Clock Source Slave - word clock:
Connect the OctoPre MkII Dynamic's ADAT output to the digital device's ADAT input and connect a BNC cable from the digital device (or any other device in the digital chain) to the OctoPre MkII Dynamic's word clock input (also ensuring the sample rates on both devices are matched).
The OctoPre MkII Dynamic Clock Source should be set to word clock and the Locked LED will light up Green.
NOTE: The OctoPre MkII Dynamic's word clock input is termintated (75Ω). Therefore the OctoPre MkII Dynamic should be the last device in a chain of word clock connected digital devices.
See the following Example Setups section for digital synchronisation examples:
Example Setups

OctoPre MkII Dynamic with Audio Interface: OctoPre MkII Dynamic as Clock Source Master
Here the OctoPre MkII Dynamic is connected to a Focusrite Saffire Pro 40. Both units are running at 44.1kHz. The setup principle will be the same with any other audio interface with an ADAT input.

OctoPre MkII Dynamic with Audio Interface: Audio Interface as Clock Source Master
Here the OctoPre MkII Dynamic is connected to a Focusrite Liquid Saffire 56. Both units are running at 44.1kHz. The setup principle will be the same with any other audio interface with ADAT input and word clock output.

OctoPre MkII Dynamic with Audio Interface - AD / DA Mode
Here the OctoPre MkII Dynamic is connected to a Focusrite Liquid Saffire 56. Both units are running at 44.1kHz. Two ADAT cables are used to send 8 channels of audio each way. The setup principle will be the same with any other audio interface with ADAT input and output.

OctoPre MkII Dynamic with Audio Interface - SMUX mode
Here the OctoPre MkII Dynamic is connected to a Focusrite Liquid Saffire 56. Both units are running at 96kHz. Two ADAT cables are used to send 4 channels of audio each. The setup principle will be the same with any other audio interface with 2 ADAT inputs and word clock output.

OctoPre MkII Dynamic with Analogue Mixing Desk
Connect the OctoPre MkII Dynamic's 8 analogue outputs to any analogue device's 8 inputs using TS or TRS jacks.

OctoPre MkII Dynamic with Analogue Mixing Desk and Digital Record / Backup (44.1 / 48 kHz)
The OctoPre MkII Dynamic can output to both analogue and digital devices simultaneously. Here the line outputs connect to the mixing desk (live monitor), ADAT output 1 to Saffire PRO 40 (record device), and ADAT output 2 to the second Saffire Pro 40 (record 2 / backup device).
Note that this will work at sample rates of 44.1 and 48kHz.
At 88.2 and 96kHz 2 ADAT cables are required to transmit 8 channels of audio. (4 channels per cable).
Performance Specifications
MIC
- Frequency response: 20Hz - 20kHz +/- 0.1 dB.
- Maximum input level (Gain at Minimum): +16dBu.
- THD+N: 0.001% (measured at 1kHz with a 20Hz/22kHz bandpass filter).
- Noise: EIN > 125dB (128dB analogue to digital): measured at ~60dB of gain with 150 Ohm termination (20Hz/22kHz bandpass filter).
LINE
- Frequency response: 20Hz - 20kHz +/- 0.1dB.
- THD+N: < 0.001% (measured with 0dBFS input and 22Hz/22kHz bandpass filter).
- Noise: -90dBu (22Hz/22kHz bandpass filter).
INSTRUMENT
- Frequency response: 20Hz - 20kHz +/- 0.1dB.
- THD+N: 0.004% (measured with 0dBu input and 20Hz/22kHz bandpass filter).
- Noise: -87dBu (20Hz/22kHz bandpass filter).
DIGITAL PERFORMANCE
- Clock sources:
Internal clock.
Sync to word clock Input.
Sync to ADAT Input (ADAT 1 input only). - A/D dynamic range 110dB 'A-weighted' (all inputs).
- D/A dynamic range 110dB 'A-weighted' (all outputs).
- JetPLLTM PLL technology providing superb jitter reduction for class leading converter performance.
- Clock jitter < 250 pico seconds.
- Sample rates: 44.1kHz to 96kHz.
- Sample rate clock accuracy: +/-20PPM.
ANALOGUE INPUTS
- Mic / line inputs on XLR combo with auto-switching between mic (XLR) and line / instrument (TRS).
- Mic / line / instrument 1 & 2: 2 x XLR Combo on rear panel.
- Mic / line 3-8: 6 x XLR combo.
- Instrument: As above, switched to instrument (inputs 1 & 2 only).
- Mic gain: +10dB to + 55dB.
- Line 1-8 gain: -10dB to +36dB.
- Instrument gain: +10dB to +55dB.
- Phantom power switched in 4 channel groups on mic 1-4 and 5-8.
- Mic and instrument maximum input level +16dBu.
- Line maximum input level +26dBu.
COMPRESSORS
- Threshold range: -44dBFS (Max setting) to -4dBFS (Min setting).
- Compression ratio: Normal - 2:1, More: 4:1.
- Auto make-up gain: 4dB (min setting), 18dB (max setting).
- Attack time: 1.2ms, release time: 28ms (-3.5dB method).
- Compression curve: classic focusrite soft knee.
- THD+N (maximum at any compression threshold, input < +16dBu, gain at minimum): < 0.18%
ANALOGUE OUTPUTS
- Line level 8 x 1/4" TRS Jack.
- Nominal output level 0dBFS = 16dBu, balanced.
- Frequency response: 20Hz – 20kHz +/- 0.2dB.
- THD+N < 0.0010% (-100dB) (measured with 0dBFS input 22Hz/22kHz bandpass filter, un-weighted).
- Switching to enable monitoring of A/D inputs or ADAT inputs with ADDA switch.
DIGITAL I/O
- ADAT Out 1 & 2: 8 channels (44.1 / 48kHz), 4 channels SMUX (88.2 / 96kHz, 8 channels total).
- ADAT In 1 & 2: 8 channels (44.1 / 48kHz, ADAT 1 only), 4 channels SMUX (88.2 / 96kHz, 8 channels total).
POWER
- Internal universal input PSU.
FRONT PANEL INDICATORS
- Metering of analogue inputs (channels 1-8), 5 segment (-42, -18, -6, -3 and 0dBFS).
- 4 sample rate LED's (44.1k, 48k, 88.2k & 96k).
- 3 sync source LED's (Internal, Word Clock and ADAT).
- 'Lock' indicator LED.
- ADDA switch for analogue output source selection (A/D's or ADAT inputs).
WEIGHT and DIMS
- 3kg - 35cm x 4.5cm x 26.5cm.
Troubleshooting
For all troubleshooting queries, please visit the 'Focusrite Answerbase' where there are articles covering numerous troubleshooting examples. www.focusrite.com/answerbase.
Focusrite is a registered trade mark of Focusrite Audio Engineering Limited.
OctoPre is a trade mark of Focusrite Audio Engineering Limited.
2009 – 2010 © Focusrite Audio Engineering Limited. All rights reserved

Documents / ResourcesDownload manual
Here you can download full pdf version of manual, it may contain additional safety instructions, warranty information, FCC rules, etc.
Advertisement


Need help?
Do you have a question about the OctoPre MkII Dynamic and is the answer not in the manual?
Questions and answers