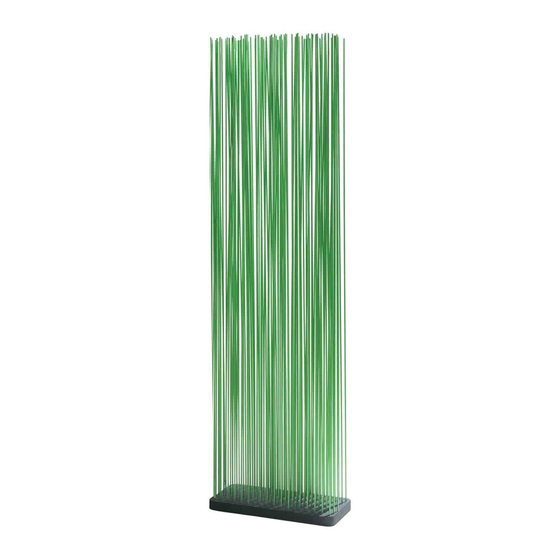
Extremis Sticks Manual
Hide thumbs
Also See for Sticks:
- Manual (40 pages) ,
- Quick start manual (40 pages) ,
- Assembly instructions manual (52 pages)
Advertisement
Quick Links
Advertisement

Related Manuals for Extremis Sticks


Summary of Contents for Extremis Sticks
- Page 1 Sticks...
- Page 2 IMPORTANT! RETAIN FOR FUTURE REFERENCE: READ CAREFULLY.
- Page 3 Table of contents Mounting kit Assembly Sticks Assembly Sticks with Led Assembly extra weight This is an interactive PDF You can easily navigate through this manual, allowing you to smoothly jump from one page to the other.
- Page 4 Table of contents Assembly connection piece Assembly floor fastening Warnings - Text instructions - Maintenance This is an interactive PDF You can easily navigate through this manual, allowing you to smoothly jump from one page to the other.
-
Page 5: Mounting Kit
Mounting kit 6 x Foot 6 x screw 4x20 Mounting kit to fix feet to the rubber bases 4 x screw 3,9 x 38 STI150 Mounting kit to fix extra weight to the base... - Page 6 S ticks 1. Go to page 13 if you want to assemble the extra weight 5’ Outer holes Inner holes outdoor use, more indoor use, less stability visibility 6 x Foot 6 x screw 4x20...
- Page 7 Always use gloves to assemble the rods...
- Page 8 Sticks with Led 1. Go to page 14 if you want to assemble the extra weight 10’ Outer holes Inner holes outdoor use, more indoor use, less stability visibility 6 x Foot 6 x screw 4x20...
- Page 9 Connect all bases...
- Page 11 Screw the sealing cap onto the male connector for the last base Attach the power supply to the first base...
- Page 12 Always use gloves to assemble the rods 1 x power supply = max. 9 bases 1 x power supply + connection cable 1m = max. 8 bases 1 x power supply + connection cable 4m = max. 6 bases 1 x power supply + connection cable 9m = max. 4 bases...
- Page 13 Extra weight 5’ Remove all feet In case of Led, push all the cables deep into the recesses...
- Page 14 STI150 4 x screw 3,9 x 38...
-
Page 15: Connection Piece
Connection piece... -
Page 16: Floor Fastening
Floor fastening ø 6 mm Drill a ø6 mm hole through the center of the base... - Page 17 ø 6 mm, L 80 mm...
- Page 18 Always use gloves to assemble the rods...
- Page 19 Warnings Text instructions Maintenance Warnings Assembly text instructions Maintenance ...
- Page 20 This is the case for both standard colors as for colors upon request. • Rubberwood bases are not suitable for outdoor use. • When using the Sticks high up or in windy places, we advise you to...
- Page 21 attach the bases to the ground. In places where this is not possible, we offer a weighted base. • Due to their more limited wind resistance, we advise you most strongly not to use the 50 x 25 cm bases outdoors. •...
- Page 22 • 100-240V ~ 50/60Hz • IP65 • The supplied plug is a Europlug (Type E) or plug (Type B). In countries where this plug is not used, pleaes provide a suitable plug yourself.
- Page 23 Use the inner holes if you would prefer the feet not to show too much. 2. Now insert the rods in the base. Do not touch the fiberglass rods with your bare hands. Always use gloves to assemble Sticks. Sticks with Led (p9) 1.
- Page 24 Insert the other rods directly in the bases. Floor fastening (p17) 1. Begin by marking the center of the base and drill a ø6 mm hole through the base. 2. Position the base where you want to install your Sticks. Insert a pen in...
- Page 25 5. Insert the rods in the base. Tip: If possible, cover the screw with a black cap. When all the rods are in place, the cap is not visible. Do not touch the fiberglass rods with your bare hands. Always use gloves to assemble Sticks.
-
Page 26: Maintenance
USEFULL ADVICE When you disassemble the Sticks space divider, bundle the rods with the same side up or down, as the base sometimes leaves marks on the rods. When re-inserting the rods in the base, make sure they are facing the same way as they did before the disassembly. - Page 27 All rights reserved. Unless otherwise specified, all designs and photographs contained in this publication are copyright protected and are the property of Extremis. No part of this publication may be copied or distributed without Extremis’ prior written consent. The names of the authors of photographs to which we do not hold rights are mentioned here. We have done our utmost to provide a...
Need help?
Do you have a question about the Sticks and is the answer not in the manual?
Questions and answers