Table of Contents
Advertisement
Available languages
Available languages
Quick Links
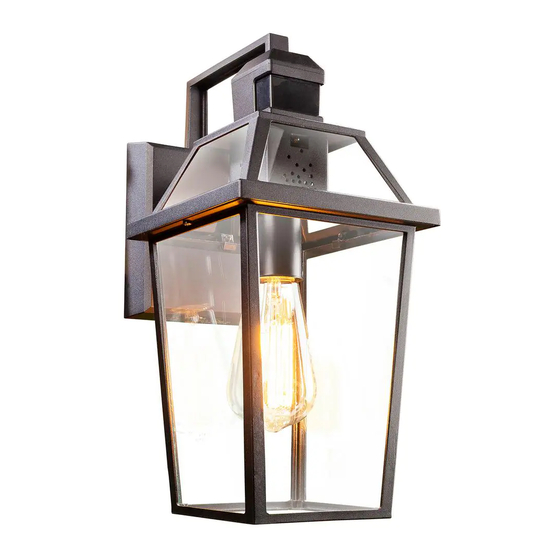
Motion Decorative Light
For a description of the DualBrite® technology, see page 6 .
© 2019 HeathCo LLC
Decorative Motion Light
INSTALLATION AND OPERATING
INSTRUCTIONS
SAFETY INFORMATION . . . . . . . . . . . . . . . . . . . . . . . . . . . . . . . . . . . . . .2
PREPARATION . . . . . . . . . . . . . . . . . . . . . . . . . . . . . . . . . . . . . . . . . . . . . . .2
HARDWARE CONTENTS . . . . . . . . . . . . . . . . . . . . . . . . . . . . . . . . . . . . . .2
LIGHT FIXTURE INSTALLATION . . . . . . . . . . . . . . . . . . . . . . . . . . . . . . .3
WIRING THE LIGHT FIXTURE . . . . . . . . . . . . . . . . . . . . . . . . . . . . . . . . .3
MOUNTING THE LIGHT FIXTURE . . . . . . . . . . . . . . . . . . . . . . . . . . . . .4
TESTING AND ADJUSTMENTS . . . . . . . . . . . . . . . . . . . . . . . . . . . . . . . .5
SECUR360 APP INSTALLATION . . . . . . . . . . . . . . . . . . . . . . . . . . . . . . .5
SPECIFICATIONS . . . . . . . . . . . . . . . . . . . . . . . . . . . . . . . . . . . . . . . . . . . . .6
CARE AND MAINTENANCE . . . . . . . . . . . . . . . . . . . . . . . . . . . . . . . . . . .6
RESET BUTTON . . . . . . . . . . . . . . . . . . . . . . . . . . . . . . . . . . . . . . . . . . . . . .6
TROUBLESHOOTING GUIDE . . . . . . . . . . . . . . . . . . . . . . . . . . . . . . . . . .7
TECHNICAL SERVICE . . . . . . . . . . . . . . . . . . . . . . . . . . . . . . . . . . . . . . . . .8
ONE YEAR LIMITED WARRANTY . . . . . . . . . . . . . . . . . . . . . . . . . . . . . .8
Questions?
Please refer to the troubleshooting guide in this manual
or call our technical service department (English speak-
ing only) at 1-800-858-8501, 8:00 a . m . - 5:00 p . m . , CST,
Monday - Friday before returning to your retailer .
Keep this manual for future reference.
ATTACH YOUR RECEIPT HERE
Receipt is required for all warranty requests .
Purchase Date
Connected Wired
Model 9000
210167-01A
Advertisement
Chapters
Table of Contents

Subscribe to Our Youtube Channel
Related Manuals for Heath Zenith SECUR360 9000


Summary of Contents for Heath Zenith SECUR360 9000
-
Page 1: Table Of Contents
Connected Wired Decorative Motion Light Model 9000 INSTALLATION AND OPERATING INSTRUCTIONS SAFETY INFORMATION . . . . . . . . . . . . . . . . . . . . . . . . . . . . . . . . . . . . . .2 PREPARATION . -
Page 2: Safety Information
PREPARATION SAFETY INFORMATION Before beginning installation of product, make sure all parts Please read and understand this entire manual before at- are present. Compare parts with hardware contents list. If tempting to assemble, operate, or install the product. any part is missing or damaged, do not attempt to assemble, This light fixture requires 120-volts AC. -
Page 3: Light Fixture Installation
LIGHT FIXTURE INSTALLATION WIRING THE LIGHT FIXTURE For best performance, mount the fixture about 6 feet (1.8 m) above the ground. WARNING: Turn power off at circuit breaker 1. Remove two decorative nuts. or fuse. 2. Remove mounting bracket. 3. Tighten mounting screws finger tight. Note: All wiring must be run in accordance with the Na- 4. -
Page 4: Mounting The Light Fixture
Connect the fixture wires to the wires in the junction box. MOUNTING THE LIGHT FIXTURE Twist the wires together and secure with wire connectors. 1. Make sure wire connectors and wires are inside the junction box. 2. Slide the fixture assembly onto the mounting screws. Tighten decorative nuts removed in step 1 of Light Fixture Installation section securely against fixture base. -
Page 5: Testing And Adjustments
TESTING AND ADJUSTMENTS Final Setup IMPORTANT: All of the settings on the motion sensor are Initial Setup also controlled through the Secur360 app. However, if the The TEST mode overrides the photocell (daylight shutoff light loses wi-fi connection (the LED indicator will blink feature) and allows the light fixture to be tested day or night blue), the motion sensor settings will control the light until when the ON-TIME switch is in the TEST position. -
Page 6: Specifications
Offline Operating Modes RESET BUTTON This light can be reset to the original factory settings either Mode: On-Time Works: Day Night by using the reset button on the bottom of the sensor or Test 5 Seconds through the SECUR360 app. Note: After resetting the light, Auto 1, 5, or 10 Minutes it may take up to 5 minutes for the light to be removed from... -
Page 7: Troubleshooting Guide
TROUBLESHOOTING GUIDE SYMPTOM POSSIBLE CAUSE SOLUTION Lights will not Light switch is turned off. Turn light switch on. come on. Light bulb is loose or burned out. Check bulb and replace if burned out. Fuse is blown or circuit breaker is turned off. Replace fuse or turn circuit breaker on. -
Page 8: Technical Service
TECHNICAL SERVICE Please call 1-800-858-8501 (English speaking only) for assistance before returning product to store. If you experience a problem, follow this guide. You may also want to visit our Web site at: www.hzsupport.com. If the problem persists, call* for assistance at 1-800-858-8501 (English speaking only), 8:00 AM to 5:00 PM CST (M-F). You may also write* to: HeathCo LLC P.O. - Page 9 Luz detectora de movimiento decorativa alámbrica conectada Modelo 9000 INSTRUCCIONES PARA SU INSTALACIÓN Y FUNCIONAMIENTO INFORMACIÓN SOBRE LA SEGURIDAD . . . . . . . . . . . . . . . . . . . . . 10 PREPARACIÓN .
-
Page 10: Información Sobre La Seguridad
PREPARACIÓN INFORMACIÓN SOBRE LA Antes de comenzar la instalación, asegúrese de que tiene SEGURIDAD todas las piezas. Compare las piezas con la lista de ferretería Por favor lea y comprenda todo el manual antes de intentar ofrecida. Si alguna pieza falta o está dañada, no intente ensamblar, operar o instalar el producto. -
Page 11: Instalación Del Aparato De Luz
INSTALACIÓN DEL APARATO DE LUZ CABLEADO DEL APARATO DE LUZ Para un mejor funcionamiento, instale el aparato a casi 1.8 m del suelo. ADVERTENCIA: Desconecte la alimentación en 1. Quite dos tuercas decorativas. el disyuntor o en el fusible. 2. Retire el soporte de montaje. 3. -
Page 12: Montaje Del Aparato De Luz
Conecte los alambres del aparato a los alambres de la caja MONTAJE DEL APARATO DE LUZ de empalme. Tuerza juntos los alambres y asegúrelos con 1. Asegúrese que los conectores de alambre y los alambres conectores de alambre. estén dentro de la caja de empalme. 2. -
Page 13: Pruebas Y Ajustes
PRUEBAS Y AJUSTES Configuración Final IMPORTANTE: Todos los ajustes en el detector de movimiento Configuración inicial también se controlan a través de la aplicación SECUR360. La modalidad TEST anula la fotocélula (función de apagado Sin embargo, si la luz pierde la conexión wi-fi (el indicador durante el día) y permite que el aparato de luz sea probado LED parpadeará... -
Page 14: Especificaciones
Modalidades de operación sin conexión BOTÓN DE REINICIO Esta luz se puede restablecer a la configuración original de Trabaja: Día Noche Modalidad: A tiempo: fábrica usando el botón de reinicio en la parte inferior del 5 segundos Prueba detector o usando la aplicación SECUR360. Nota: Después Automático 1, 5 o 10 min. -
Page 15: Guía De Investigación De Averías
GUÍA DE INVESTIGACIÓN DE AVERÍAS SÍNTOMA POSIBLE CAUSA SOLUCIÓN Las luces no se El interruptor de luz está apagado. Encienda el interruptor de luz. prenden. La bombilla está floja o quemada. Revise la lámpara y cámbiela si está quemada. El fusible está quemado o el cortacircuitos está apagado. Cambie el fusible encienda el disyuntor. -
Page 16: Servicio Técnico
SERVICIO TÉCNICO Favor de llamar al 1-800-858-8501 (sólo para hablar en inglés) para pedir ayuda antes de devolver el producto a la tienda. Si tiene algún problema, siga esta guía. Usted puede también visitar nuestro sitio Web: www.hzsupport.com. Si el problema continúa, llame al 1-800-858-8501 (sólo para hablar en inglés), de 8:00 AM a 5:00 PM CST (L-V). - Page 17 Lumière décorative filaire et connectée avec détecteur de mouvement Modèle 9000 INSTRUCTIONS D’INSTALLATION ET MODE D’EMPLOI RENSEIGNEMENTS DE SÉCURITÉ . . . . . . . . . . . . . . . . . . . . . . . . . . . 18 PRÉPARATION .
-
Page 18: Renseignements De Sécurité
PRÉPARATION RENSEIGNEMENTS DE SÉCURITÉ Avant de commencer l’installation du produit, assurez-vous Veuillez lire et bien comprendre le guide avant de tenter de bien avoir toutes les pièces. Comparez les pièces avec la d’assembler, d’utiliser ou d’installer le produit. liste de la quincaillerie fournie. S’il manque une pièce ou Ce luminaire exige une alimentation de 120 volts c.a. -
Page 19: Installation Du Luminaire
INSTALLATION DU LUMINAIRE BRANCHEMENT DU LUMINAIRE Pour un rendement optimal, montez le luminaire à environ 1,8 m au-dessus du sol. MISE EN GARDE : Coupez l’alimentation au 1. Retirez les deux écrous décoratifs. disjoncteur ou au fusible. 2. Retirez le support de montage. 3. -
Page 20: Montage Du Luminaire
Branchez les fils du luminaire aux fils dans la boîte de MONTAGE DU LUMINAIRE raccordement. Torsadez ces fils ensemble, puis ajoutez-y 1. Assurez-vous que les capuchons de connexion et les fils un connecteur de fils. sont bien insérés dans la boîte de jonction. 2. -
Page 21: Essais Et Réglages
ESSAIS ET RÉGLAGES Réglage Final IMPORTANT : tous les paramètres du détecteur de mouvement Réglage initial sont également contrôlés via l’application SECUR360. Le mode TEST contourne la photocellule (fonction d’arrêt Cependant, si la lumière perd sa connexion Wi-Fi (le voyant pendant la journée) et permet de faire l’essai du luminaire DEL clignotera en bleu), la lumière peut être contrôlée via pendant la journée ou la nuit lorsque le commutateur « ON-... -
Page 22: Fiche Technique
Modes de fonctionnement hors ligne BOUTON DE RÉINITIALISATION Cette lumière peut être réinitialisée aux paramètres d’usine En fonction: par défaut à l’aide du bouton de réinitialisation situé en bas Mode: Temps en circuit: jour nuit du détecteur, ou via l’application SECUR360. Remarque : Essai 5 secondes après avoir réinitialisé... -
Page 23: Guide De Dépannage
GUIDE DE DÉPANNAGE SYMPTÔME CAUSE POSSIBLE SOLUTION L’éclairage ne L’interrupteur d’ é clairage est hors tension. Mettre l’interrupteur sous tension. s’allume pas. L’ampoule est lâche ou grillée. Vérifier l’ampoule et la remplacer si elle est grillée. Le fusible a sauté ou le disjoncteur a été déclenché. Remplacer le fusible ou ré-enclencher le disjoncteur. -
Page 24: Service Technique
SERVICE TECHNIQUE Veuillez faire le 1 800 858-8501 (service en anglais seulement) pour obtenir de l’aide avant de retourner l’article au magasin. En cas de problème, suivez ce guide. Vous pouvez aussi visiter notre site Web à www.hzsupport.com. Si le problème persiste, composez* le 1 800 858-8501 (service en anglais seulement), entre 8 h 00 et 17 h 00, HNC, du lundi au vendredi.
Need help?
Do you have a question about the SECUR360 9000 and is the answer not in the manual?
Questions and answers