
Subscribe to Our Youtube Channel
Related Manuals for Costway ES10127US


Summary of Contents for Costway ES10127US
- Page 1 ICE MAKER Machine à Glaçons ES10127US THIS INSTRUCTION BOOKLET CONTAINS IMPORTANT SAFETY INFORMATION. PLEASE READ AND KEEP FOR FUTURE REFERENCE.
- Page 2 Before You Start Please read all instructions carefully. Retain instructions for future reference. Separate and count all parts and hardware. Read through each step carefully and follow the proper order. We recommend that, where possible, all items are assembled near to the area in which they will be placed in use, to avoid moving the product unnecessarily once assembled.
-
Page 3: Safety Instructions
Safety Instructions Your safety and the safety of others are very important. We have provided many important safety messages manual for this appliance. Always read and obey all safety messages. This is the safety alert symbol: All safety messages will follow the safety alert symbol and the word “DANGER” or “WARNING”. - Page 4 Do not run the power cord over carpeting or other heat insulators. Do not cover the cord. Keep cord away from traffic areas, and do not submerge in water. We do not recommend the use of an extension cord, as it may overheat and become a risk of fire.
-
Page 5: Package Contents
Risk of fire/flammable materials used. Please according to local regulations regarding disposal of the appliance for its flammable blowing gas. Keep ventilation openings, in the appliance enclosure or in the built-in structure, clear of obstruction. Do not damage the refrigerant circuit. Do not use mechanical devices or other means to accelerate the defrosting process or ice harvesting process. -
Page 6: Specifications
Specifications Model ES10127US Voltage/Frequency 110-120V/ 60Hz Cold Water Temperature 46.4℉ Cold Water Tank Capacity 2.5L Hot Water Temperature 194℉ Hot Water Tank Capacity 0.8L Product Dimensions W16.85 x D10.94 x H18.86 inches Net Weight 33 LBS * Improper use of the grounded plug can result in the risk of electrical shock. -
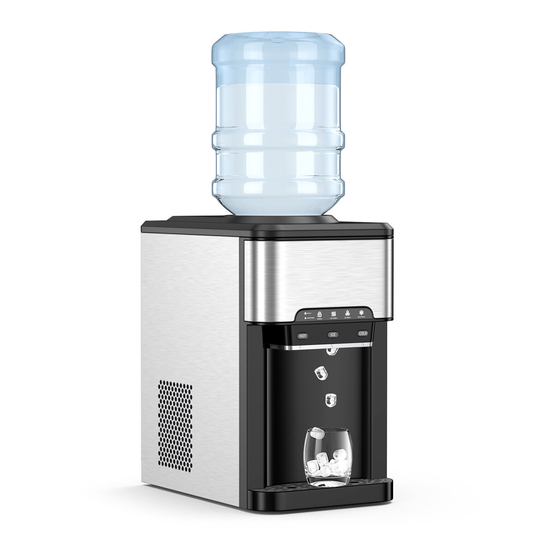
Page 7: Product Features
Product Features Part Description Part Description Removable drip tray Cold water drain outlet Drip tray Cover Hot water drain outlet Hot/Cold/Ice Button Cold water spout Touch panel display Ice cube spout Water reservoir Hot water spout Bottle support collar Night light Cover Back cover... -
Page 8: Installation
Hot water button–Press to dispense hot water Ice dispense button–Press to dispense ice cubes Cold water button–Press to dispense cold water Power indicator light Add-water indicator light Lock button–Press to lock or unlock the hot water button Heating indicator light–Light on means hot water ready –Light flash means water is heating Ice making indicator light–Light on means ice tank is full –Light flash means making ice cubes... - Page 9 3. Install a Water Bottle(#1) To prevent dry heating, do not turn on the heating and cooling until you complete the steps in this procedure. This dispenser is compatible with 3-or 5-gallon water bottles.It is recommended that you purchase water bottles equipped with a push-cap hole diameter bigger than 20mm (3/4 in) and the bottle neck cap Make sure that the bottom water drain plug is in place and secure.
-
Page 10: Operation
Operation This unit has been tested and sanitized prior to packing and shipping. During transit, dust and odors can accumulate in the tank and lines. Dispense and dispose at least one quart of water prior to drinking any water. After unpacking your Ice Maker, it must rest in an upright position for at least two hours before you plug it in or the compressor may be damaged, shortening the life span of the unit. - Page 11 Dispense Ice Cubes(#4) It will take approximately 6-13 minutes to make ice after plugging in and turning on. The ice tank can hold 1.8Kgs (4 pounds) ice cubes. To dispense ice cubes, place a drinking glass or container under the ice spout and press the “Ice”...
-
Page 12: Cleaning And Maintenance
This ice maker is equipped with a child safety lock in order to prevent inadvertent dispensing. To disable the child safety lock feature, press the “Unlock” touch button. To dispense hot water, place a drinking glass or container under the hot water tap and press the “Hot”... - Page 13 Clean the top water reservoir(#6) Twist or lift off the bottle supporter. Clean the water reservoir and make sure to remove the hot water drain plug on the unit bottom to drain the water completely. Dry the water reservoir with soft cloth. Make sure to put back the hot water drain plug after cleaning and before using the unit.
- Page 14 Care and Maintenance To prolong the lifetime of the machine, it is recommended that the unit be cleaned and sanitized manually every months. •Clean the outside of the ice maker with a mild detergent solution and warm water. Use a soft cloth to wipe to avoid scratching or damaging the surface of the unit.
-
Page 15: Troubleshooting
Troubleshooting Problem Solution “Add Water”indicator light on Replace with a new water bottle Pour drinking water into the top reservoir to MAX level Clean the water tank and check the water level switch if it works well. “Add Water”indicator light flash Clean the cold water tank and check the water quickly level switch if it works well. - Page 16 Correct Disposal of this product. This marking indicates that this product should not be disposed with other household wastes throughout the EU. To prevent possible harm to the environment or human health from uncontrolled waste disposal, recycle it responsibly to promote the sustainable reuse of material resources.
-
Page 17: Consignes De Sécurité
Consignes de Sécurité Votre sécurité et celle des autres sont très importantes. Nous avons fourni de nombreux manuels de messages de sécurité importants C'est le symbole d'alerte de sécurité: Tous les messages de sécurité suivront le symbole d'alerte de sécurité et le mot «... - Page 18 Ne faites pas passer le cordon d'alimentation sur de la moquette ou d'autres isolants thermiques. Ne couvrez pas le cordon. Éloignez le cordon des zones de circulation et ne le plongez pas dans l'eau. Nous déconseillons l'utilisation d'une rallonge électrique, car elle peut surchauffer et devenir un risque d'incendie.
- Page 19 - les cuisines du personnel dans les magasins, bureaux et autres environnements de travail ; - les fermes et par les clients des hôtels, motels et autres environnements de type résidentiel ; - des environnements de type chambres d'hôtes ; - la restauration et les applications similaires non commerciales.
-
Page 20: Contenu Du Colis
Contenu du colis Machine à glaçons de comptoir avec distributeur d'eau Bac d'égouttage amovible Manuel d'instructions Spécifications Modèle ES10127US Tension/Fréquence 110-120V/ 60 Température de l'Eau Froide 46.4℉ Capacité du Réservoir d'Eau Froide 2.5L Température de l'Eau Chaude 194℉ Capacité du Réservoir d'Eau Chaude 0.8L... -
Page 21: Caractéristiques Du Produit
Caractéristiques du produit Partie Description Partie Description Bac d'égouttage amovible Sortie de vidange d'eau froide Bac d'égouttage couvercle Sortie d'évacuation d'eau chaude Bouton Chaud/Froid/Glace Bec d'eau froide Écran tactile Bec verseur à glaçons Réservoir d'eau Bec d'eau chaude Collier de support de bouteille Veilleuse Couverture Couverture arrière... - Page 22 Bouton d'eau chaude – Appuyez pour distribuer de l'eau chaude Bouton de distribution de glaçons – Appuyez pour distribuer des glaçons Bouton d'eau froide – Appuyez pour distribuer de l'eau froide Voyant d'alimentation Bouton de verrouillage – Appuyez pour verrouiller ou déverrouiller le bouton d'eau chaude Voyant de chauffage –...
- Page 23 3. Installez une bouteille d'eau (#1) Pour éviter le chauffage à sec, n'allumez pas le chauffage et le refroidissement avant d'avoir terminé les étapes de cette procédure. Ce distributeur est compatible avec les bouteilles d'eau de 5 gallons. Il est recommandé d'acheter des bouteilles d'eau équipées d'un trou de bouchon à...
-
Page 24: Opération
Opération Cet appareil a été testé et désinfecté avant d'être emballé et expédié. Pendant le transport, de la poussière et des odeurs peuvent litre d'eau avant de boire de l'eau. Après avoir déballé votre machine à glaçons avec distributeur d'eau, elle doit reposer en position verticale pendant au moins deux heures avant de la brancher, sinon le compresseur pourrait être endommagé, ce qui raccourcirait la durée de vie de l'unité. - Page 25 Il faudra environ 6 à 13 minutes pour faire de la glace après avoir branché et allumé. Le réservoir de glace peut contenir 1,8 kg de glaçons. 1 Pour distribuer des glaçons, placez un verre ou un récipient sous le bec verseur à...
-
Page 26: Nettoyage Et Entretien
1 Cette machine à glaçons avec distributeur d'eau est équipée d'une sécurité enfant afin d'éviter une distribution accidentelle. Pour désactiver la fonction de verrouillage de sécurité pour enfants, appuyez sur le bouton tactile « Unlock (Déverrouiller) ». 2 Pour distribuer de l'eau chaude, placez un verre ou un récipient sous le robinet d'eau chaude et appuyez sur le bouton «... - Page 27 Séchez le réservoir d'eau avec un chiffon doux. Assurez-vous de remettre le bouchon de vidange d'eau chaude après le nettoyage et avant d'utiliser l'appareil. Nettoyer le Composant Interne (#7) 1. Appuyez sur les deux clips sur la partie supérieure de la plaque arrière pour ouvrir la plaque arrière.
- Page 28 Soins et Entretien Pour prolonger la durée de vie de la machine, il est recommandé que l'unité soit nettoyée et désinfectée manuellement tous les mois. • Nettoyez l'extérieur de la machine à glaçons avec une solution détergente douce et de l'eau tiède. Utilisez un chiffon doux pour essuyer afin d'éviter de rayer ou d'endommager la surface de l'appareil.
-
Page 29: Dépannage
Dépannage Problème Solution Remplacer par une nouvelle bouteille d'eau. l'eau) » allumé Versez de l'eau potable dans le réservoir Nettoyez le réservoir d'eau et vérifiez que le commutateur de niveau d'eau fonctionne bien. Voyant « Add Water » clignote Nettoyez le réservoir d'eau froide et vérifiez le rapidement commutateur de niveau d'eau s'il fonctionne bien. - Page 30 Il y a des fuites d'eau Assurez-vous que la bouteille est correctement installée. Les bouchons de vidange sont en place et bien Vérifiez que les tuyaux sont correctement connectés. La conduite d'eau peut avoir besoin d'être remplacée. Élimination correcte de ce produit. avec les autres déchets ménagers dans toute l'UE.
- Page 31 Return / Damage Claim Instructions DO NOT discard the box / original packaging. In case a return is required, the item must be returned in original box. Without this your return will not be accepted. Take a photo of the box markings. A photo of the markings (text) on the side of the box is required in case a part is needed for replacement.
- Page 32 USA office: Fontana AUS office: Truganina GBR office: Ipswich FRA office: Saint Vigor d'Ymonville USA:cs.us@costway.com If you're having difficulty, our friendly AUS:cs.au@costway.com customer team is always here to help. GBR:cs.uk@costway.com FRA:cs.f r @costway.com...
Need help?
Do you have a question about the ES10127US and is the answer not in the manual?
Questions and answers