Advertisement
Quick Links
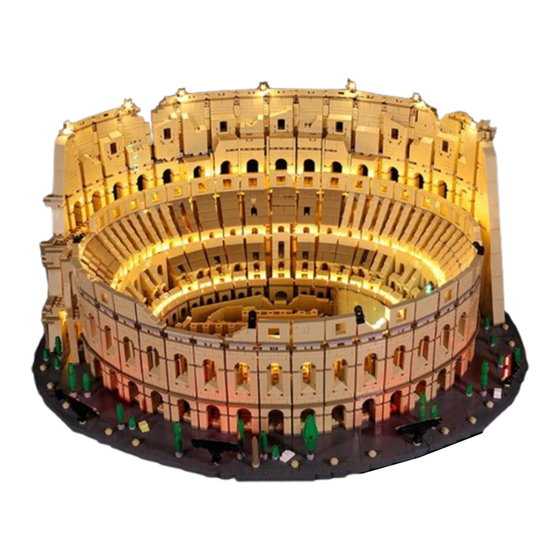
Lighting Kit LEGO 10276 RGB Remote Controller version
Thank you for choosing our lighting products. We are committed to LEGO product study and lighting development, we're
always trying our best to provide LEGO fans with the best products and the best installation ideas.
Must be careful observation, imagination can be infinite.
We provide basic parts to support your imagination.
DO IT YOURSELF .that's what LEGO is .
As always, Lego has been adhering to the DIY philosophy from product selection, research and development to sales.
Consumers buy the parts, you will assemble them by yourself, and you can experience every step from picking up the first
piece to installing the last one. Besides, LEGO has different answers for the installation form and method of each part.
Vonado lighting also does not want to kill your unlimited creativity, we will try our best to make products with high
variability, high playability and unlimited play. If you have any dissatisfaction or your own ideas on the parts such as the
color of the lights, the length of the cables, the installation position of the product, and the final effects of each module,
you can make your own arrangement, and we will cooperate with you to replace or repurchase.
LETS MOVE!
Package contents:
11 x 30cm Warm White Head Lights
4 x RGB Multi Colour Background Lights
1 x Multi Colour Background Light
18 x 15cm Warm White Strip Lights(with 28 lights)
5 x 30cm RGB Connecting Cables
1 x 15cm Connecting Cable
6 x 30cm Connecting Cables
7 x 50cm Connecting Cables
9 x 4-port Expansion Boards
4 x 6-port Expansion Boards
1 x 6-port RGB Expansion Board
1 x RGB Remote Control Switch Board
1 x USB Cable
Extra pieces
Advertisement

Related Manuals for LIGHT MY BRICKS Lighting Kit LEGO 10276 RGB Remote Controller version


Summary of Contents for LIGHT MY BRICKS Lighting Kit LEGO 10276 RGB Remote Controller version
- Page 1 Lighting Kit LEGO 10276 RGB Remote Controller version Thank you for choosing our lighting products. We are committed to LEGO product study and lighting development, we're always trying our best to provide LEGO fans with the best products and the best installation ideas.
- Page 2 Note: Place wires on the surface or under the building blocks. The wire can be place between the building blocks or under the block, but they should be placed between the studs correctly. Insert the connectors to the ports. Be careful when you are operating, there’s only one correct way to insert, make sure the expansion board is upward, find the soldered “=”...
- Page 3 At this point, use the tweezers to straighten the bent pins. When installing dot lights, make sure they are correctly placed (Yellow LED package is exposed). You can put they either on the top of the studs or between studs. Connecting cable connectors to Strip Lights Take extra care when inserting connectors to ports on the Strip Lights.
- Page 4 Finally, please pay attention to the positive and negative terminals of the battery when installing the battery case.
- Page 5 Instructions for installing this kit: The Roman Colosseum, RGB Remote Control Version, Lighting Kit, 14 bags in total. Power supply: USB cable (self-contained power bank or mobile phone charger). Firstly, take the power source (power bank or mobile phone charger), connect it to the USB cable, connect the other end of the USB cable to the expansion board to verify all the lights one by one.
- Page 6 Instructions for installing this kit: Start to install. Take 11 black round hinge plate with handle, 11 black ladder vertical clamp plates. Assemble them respectively as per below. Take 11 head lights, 11 adhesive squares.
- Page 7 Take adhesive square to the back of the hinge plate. With lighting part facing up, stick the head light to it. Thread the cable through the gap on the hinge plate.
- Page 8 Install the other 10 lights in the same way. With lighting part facing the front, connect the 7 of them to the top of the Colosseum. Connect the other 4 lights to the following places.
- Page 9 Take two 30cm connecting cables, two 4-port expansion boards assemble them as per below. Connect the 3 cables from the left to the following expansion board. Take 2 adhesive squares.
- Page 10 Stick them to the back of the expansion board, and stick the expansion board to the following place. Take 3 adhesive squares. Tuck the cables as per below.
- Page 11 Connect the 3 cables from the right to anther 4-port expansion board. Take 2 adhesive squares. Stick them to the back of the expansion board, and stick the expansion board to the following place.
- Page 12 Take a 50cm connecting cable, a 4-port expansion board, assemble the as per below. Connect the cables from the middle and both sides to the expansion board, group the cables together. Tuck the expansion board at the following place, place the 50cm connecting cable underneath.
- Page 13 Take 3 adhesive squares. Tuck the cables at the right as per below. Take 3 warm white 15cm strip lights.
- Page 14 With lighting part facing outside, stick them to the following places, place the cables as per below. Take a 50cm connecting cable, a 4-port expansion board, assemble the as per below. Connect the 3 cables of the strip lights to the expansion board.
- Page 15 Take 2 adhesive squares. Stick them to the back of the expansion board, and stick the expansion board to the following place. Pull the 50cm connecting cable to the left.
- Page 16 Secure it at the following place as per below. Take a 50cm connecting cable, a 4-port expansion board, assemble the as per below. Connect the cable we pulled and the cable of the following light to the expansion board.
- Page 17 Tuck the expansion board as per below. Take a 15cm connecting cable, a 6-port expansion board, assemble the as per below. Connect the following cable from the left and the 3 cables to the following expansion board.
- Page 18 Place the expansion board at the following place, tuck the cables in between the spaces. Take 5 warm white strip lights. With lighting part facing outside, stick them to the following places, place the cables as per below.
- Page 19 Turn the Colosseum to the back. Turn to the left. Take 6 warm white strip lights.
- Page 20 Take 4 strip lights, thread the cables through and stick the lights to the wall inside, you can use the tweezer to help. After secured the strip lights, thread the cables to the inside. Pull the 4 cables to the inside.
- Page 21 Turn to the right of the Colosseum. Thread the other 2 cables of the strip lights through the following spaces, and stick the strip lights to the wall inside. After secured the strip lights, thread the cables to the inside.
- Page 22 Pull the cables out. Turn to the front. Take a 50cm connecting cable, a 6-port expansion board, assemble the as per below.
- Page 23 Connect the following 4 cables from the strip lights to the expansion board. Tuck the expansion board inside as per below. Take a 30cm connecting cable, a 4-port expansion board, assemble the as per below.
- Page 24 Connect the following 50cm connecting cable and the 2 cables of the strip lights to the expansion board. Tuck the expansion board inside as per below. Take a 30cm connecting cable, a 4-port expansion board, assemble the as per below.
- Page 25 Connect the following 3 cables to the expansion board. Tuck the expansion board inside as per below. Remove the following piece.
- Page 26 Take 4 warm white strip lights. With lighting part facing outside, stick them to the following places, place the cables as per below. Take a 50cm connecting cable, a 4-port expansion board, assemble the as per below.
- Page 27 Connect the following 3 cables of the strip lights from the left to the expansion board. Tuck the expansion board at the following space. Take a 30cm connecting cable, a 6-port expansion board, assemble the as per below.
- Page 28 Connect the following 4 cables of the strip lights to the expansion board. Connect the 50cm connecting cable from the left to the 6-port expansion board at the right. Remove the following piece.
- Page 29 Take a 2x6 black plate, 3 black plates, a black ladder vertical clamp plate, a black hinge plate with handle. Assemble them as per below. Turn the piece to the back.
- Page 30 Take a Multi Colour Background Light, a 30cm connecting cable, assemble them as per below. Stick it to the 2x6 plate. Connect it to the following place.
- Page 31 Take a 50cm connecting cable, a 6-port expansion board, assemble the as per below. Connect the following 5 cables to the 6-port expansion board. Thread the 50cm connecting cable from the expansion board through to the outside.
- Page 32 Reconnect the following piece, press the cables underneath. Take four 2x6 black plates, 8 black plates, 4 black hinge plates with handle, 4 black ladder vertical clamp plates. Assemble them as per below.
- Page 33 The 4 pieces assembled are as per below. Take 4 RGB Multi Colour Background Lights, 16 adhesive squares.
- Page 34 Stick the adhesive squares to the backs of the Multi Colour Background Lights. Turn the following piece to the back. Stick the background lights to them.
- Page 35 Take five 30cm RGB connecting cables, a 6-port RGB expansion board. Connect the cables to the following ports. Connect the 3 cables of the background lights to the 6-port expansion board.
- Page 36 Take a RGB Remote Control Switch Board, a 50cm connecting cable, connect the connecting cable to the input port. Instruction of the RGB remote control. Connect the cable from the 6-port expansion board and the cable from the following background light to the RGB Remote Control Switch Board.
- Page 37 Continue to install lights for the outer ring. Turn to the left, install the 2 multi colour background lights to the following places. Turn to the right, install the other 2 multi colour background lights to the following places.
- Page 38 Turn to the middle. Take 2 adhesive squares. Stick them to the back of the expansion board, and stick the expansion board to the following place.
- Page 39 Take 4 adhesive squares, stick them to the back of the Remote Control Switch Board. Stick it to the following place. Take a USB cable, a 4-port expansion board, assemble the as per below.
- Page 40 Connect the cable from the Remote Control Switch Board and the following cables from the Colosseum to the 4-port expansion board. Take 2 adhesive squares. Stick them to the back of the expansion board, and stick the expansion board to the following place.
- Page 41 This completes installation of this LED Lighting Kit. ENJOY! The above are ideas and instructions provided by our designers. Please move on: 1: Do you have any suggestions about the material and quality of our products? 2: Do you have any suggestions on the installation instructions and the degree of difficulty of the installation? 3: If you have better installation method and ideas, please contact us in time.
Need help?
Do you have a question about the Lighting Kit LEGO 10276 RGB Remote Controller version and is the answer not in the manual?
Questions and answers