Table of Contents
Advertisement
Quick Links
Advertisement
Table of Contents

Related Manuals for BMPRO JAYCOMMAND TravelLINK


Summary of Contents for BMPRO JAYCOMMAND TravelLINK
- Page 1 OWNER’S MANUAL TEAMBMPRO.COM...
- Page 3 To learn more about the BMPRO range of products, please visit our website teambmpro.com TEAM BMPRO...
-
Page 4: Safety Precautions
SAFETY PRECAUTIONS Please read the Safety Precautions before installing or using the system. Be sure to observe all precautions without fail. Failure to observe these instructions properly may result in personal damage, or personal injury which depending on the circumstances may be serious and cause loss of life. WARNING Correct installation is the most critical factor in ensuring the safe use of the system. -
Page 5: Information For The User
This device must accept any interference received, including what may have cause undesired operation. WARNING Any changes or modification are not approved by BMPRO and will void compliance of the product and the user’s authority to operate this equipment. Le présent appareil est conforme aux CNR d’Innovation, Sciences et Développement économique Canada applicables aux appareils radio exempts de... -
Page 6: Table Of Contents
BMPRO CLOUD (MODEL DEPENDENT) ....19 CONNECTING TO THE BMPRO CLOUD ....19 CLOUD CONTROL . - Page 7 ENERGY CENTER ......34 BATTERY AND FUEL ......34 GENERATOR (MODEL DEPENDENT) .
-
Page 8: About The System
ABOUT THE SYSTEM The system brings smart home technology to your RV, taking control and management of your RV to new horizons! -
Page 9: Node
SmartConnect sensors are available through your local RV dealership. For more details, refer to teambmpro.com/products/smartconnect BLEXTENDER Your system is compatible with BMPRO’s BLExtender. The BLExtender is a Bluetooth range extender, designed to allow you to use your SmartConnect Bluetooth sensors from every corner of your RV without worrying about losing Bluetooth signal. -
Page 10: Description Of Parts
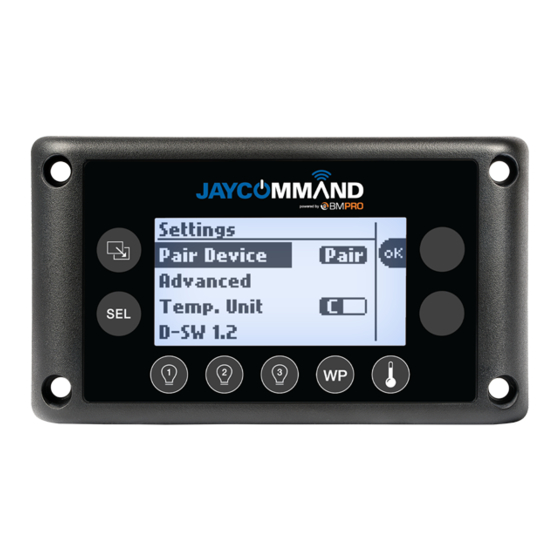
DESCRIPTION OF PARTS DISPLAY (MODEL DEPENDENT) Page Navigation Button Move between function screens, eg. From Tanks to Water screen. Menu Navigation Button Navigate between items within a page, e.g. in the Water page move from Pump to Elec Heater. 3-4. Action Buttons The function for each of the action buttons changes depending on the selected menu item. -
Page 11: Display Navigation (Model Dependent)
DISPLAY NAVIGATION (MODEL DEPENDENT) Use the Page Navigation Button to move from page to page. Use the Menu Navigation Button to move between menu items within a page. Tanks The Tanks display shows the levels of fresh, gray and black water tanks. Levels are displayed as: FULL 2/3 FULL 1/3 FULL... - Page 12 If Furnace Mode is selected, the AC-Fan option displays. AC-Fan: Settings: OFF / LOW Energy ON: Press and hold the ON action button, until the generator turns on. OFF: Press and hold the OFF action button, until the generator turns off. NOTE: A generator warning will appear if the generator fault LED is actively blinking.
-
Page 13: Controller (Model Dependent)
CONTROLLER (MODEL DEPENDENT) 1. Controller Home Screen Button 2. Connection Bar When connected to Bluetooth, the icon will appear on screen. When connected to the cloud, the icon will appear on screen. Both icons will appear when both services are available. 3. - Page 14 9. Lights (Model Dependent) Turn lights and water pumps on/off: All Interior Lights All Exterior Lights All Lights Water Pump Control Adjusting the Lights QUICK press toggles between off and the previous stored brightness. LONG press sets the light brightness to 100%. 10.
-
Page 15: Control Panel Menu Functions (Model Dependent)
CONTROL PANEL MENU FUNCTIONS (MODEL DEPENDENT) The menu functions on the Controller’s Control Panel allow you to operate various motors, quickly switch off loads and pair or clear the Node. The following functions apply depending on what is available in your RV. Awnings Jacks Navigate to the desired awning:... -
Page 16: Pairing To The Node
PAIRING TO THE NODE PAIRING TO THE NODE WITH A DISPLAY (MODEL DEPENDENT) Pairing your smartphone to the Node is simple. The App will guide you through the process. The Node can be paired to a total of four devices. Launch the App on your phone and choose the device installed in your RV Press the Page Navigation Button to navigate to the Settings page. -
Page 17: Pairing To The Node With A Controller (Model Dependent)
PAIRING TO THE NODE WITH A CONTROLLER (MODEL DEPENDENT) Pairing your Controller, smartphone or tablet to the Node is done in three easy steps. The App will guide you through the pairing process. NOTE: The Controller will have been paired to your Node at the factory. You should only need to pair your own device or smartphone to the Node. - Page 18 When pairing is successful, you will be taken to the App home screen and the Bluetooth icon will be visible. CONGRATULATIONS, YOU’RE CONNECTED! For additional support, refer to the FAQs and Troubleshooting section. Cannot Pair to the Node If you are pairing a mobile device to the Node and pairing fails, or "--" appears on screen, it is mostly likely that four devices are connected to the Node simultaneously.
-
Page 19: Bmpro Cloud (Model Dependent)
BMPRO CLOUD (MODEL DEPENDENT) WARNING You can only connect to the BMPRO Cloud if your RV is equipped with a Controller. Systems with a Controller have cloud control, which allows you to remotely connect, monitor and control your RV from your smart device. - Page 20 An email will be sent to your account to verify your email address. Click on the link provided in the email to complete verification. Now connect your smart device using your BMPRO account details to get started. Account Not Verified If the email address was not verified, the following message will appear: Press RESEND VERIFICATION EMAIL to complete the email verification process.
-
Page 21: Cloud Control
Press Delete Account. In the pop-up, enter your password. Press Delete Account. Your BMPRO cloud account will be deleted. If you want to control your RV from the cloud again, you will need to create a new BMPRO cloud account. -
Page 22: Winegard
WINEGARD WARNING You can only set up Winegard if your RV is equipped with a Controller. To set up Winegard: From the App home screen, press the Settings icon. Press Winegard Settings. Logging into the Winegard network Press the search button to search for the available networks. Select the desired network and enter the password or enter the network name and password. - Page 23 Internet Preferences You can select from the following options: 9 4G: Connect to a 4G network. SIM card required. 9 WiFi: Connect to an external WiFi network. 9 Internet OFF: No internet source selected. Winegard Status The current status of the Winegard is displayed on the Winegard tile in the General Settings area.
- Page 24 WiFi Properties To log in to a WiFi network: Press the Search button for a list of available networks and select your desired network. If your network is not seen, make sure the Winegard is turned on and scan again. After the network name and password are entered correctly, press Join.
-
Page 25: The App
THE APP Download the JAYCOMMAND/TravelLINK powered by BMPRO app to your smartphone or tablet and enjoy the freedom to monitor and control the onboard features of your RV remotely. If your system has a Display, the App allows you to access more features of your connected RV that otherwise may not be available. -
Page 26: App Home Screen
APP HOME SCREEN The App home screen provides a general overview of the key features of your RV. It also provides a quick, direct way to control specific RV lights, the RV’s climate system, and if your RV supports it, access to the Quick Start feature for help organising your adventures. - Page 27 Set Up Camp Press Set Up Camp from the Quick Start screen if you have arrived at your destination. You will be taken through a checklist, providing you with information on how to best set up camp. Use the buttons on each page to navigate through each step. The checklist will allow you to ctivate or deactivate your lights, climate control, leveling, slides, awnings, inverter and pumps directly, without needing to go to other pages within the App.
- Page 28 Prepare For Travel Press Prepare For Travel when you are getting ready to continue travelling. You will be taken through a checklist, providing you with information on how to best pack up and get ready for travelling. Use the buttons on each page to navigate through each step. The checklist will allow you to activate or deactivate your lights, climate control, leveling, slides, awnings, inverter and pumps directly, without needing to go to other pages within the App.
-
Page 29: Tanks Screen
TANKS SCREEN You can control the water pump, electric heaters, gas heaters and tank heaters from the Tanks screen, if applicable. The Tanks screen displays the levels of your fresh, gray and black water tanks. The water levels displayed are: Empty, 1/3, 2/3 and Full. MOTORS SCREEN The Motors screen allows you to control the Slide-outs, Awnings, Landing Legs and Jacks. - Page 30 Individual jack controls and zero point calibration are also available on some models. Leveling Faults If a fault occurs with the leveling system, a pop-up will appear. To clear the fault, follow the instructions in the pop-up and press OK.
- Page 31 Motor Control Only one motor may be operated at a time. Once a motor is in operation, motor control will be disabled in any other device running the App. This does not include the leveling system. To operate motors on your own device, swipe to unlock the Motors screen. Motor Lockout Feature WARNING The motor lockout feature is only available if your RV is equipped with a Controller.
-
Page 32: Climate Screen
CLIMATE SCREEN The Climate screen allows you to control the temperature inside your RV. The zones that appear depend on the vehicle configuration. Additional ACs can be configured by scrolling down from the Main AC. Choose from Cool, Cool Auto or Heat to adjust the temperature between 33°F – 90°F (1°C –... -
Page 33: Lights Screen
Heat If available, the RV may be heated from the furnace, heat pump or a combination of both. The furnace can only be controlled from the Main Climate Zone. To set the temperature: Turn climate on. Select your mode of operation. Adjust the temperature to your desired setting (if available in the selected mode). -
Page 34: Energy Center
ENERGY CENTER The Energy Center screen allows you to monitor energy usage within your system. BATTERY AND FUEL The Battery and Fuel section allows you to monitor RV voltages, chassis voltages and fuel levels. If no RV and chassis batteries are connected, the App will monitor the system voltage of the Node. -
Page 35: Automatic Generator Start
Generator Fault If the Generator Status section in the App indicates a fault: Press the Stop Generator button. Fix the fault with the generator. Press the Start Generator button. If the fault has been fixed, when you next turn the generator on from the App, the Generator Status section will display “No fault”. -
Page 36: Solar Controller
SOLAR CONTROLLER When solar is connected to a compatible RV-C controller, the Energy Center screen will display the Solar Controller section, allowing you to view the status of any connected solar panels. Solar Controller This section displays the input voltage and current from the solar panel and the output voltage and current of the battery. -
Page 37: Inverter (Model Dependent)
INVERTER (MODEL DEPENDENT) When an RV-C-enabled inverter is connected to the system, the Energy Center screen will display the inverter section, allowing you to view the status of the inverter. The Inverter section will display the current inverter status, output power, battery current draw and the DC voltage at the inverter. -
Page 38: General Settings
GENERAL SETTINGS General Settings may be accessed by pressing the Settings icon in the App home screen. - Page 39 From General Settings, you can: 9 Check the Bluetooth Connection between the Node and your smartphone. 9 Establish a Remote Connection to the BMPRO Cloud. For more information, refer to the section Cloud Control. 9 Enter the Winegard network name and password to connect to the internet ...
-
Page 40: Sensor Settings
SENSOR SETTINGS The Sensors Settings screen allows you to configure push notification warning limits for any connected tire and temperature SmartConnect sensors, and allows you to toggle the sensor displays on or off. For more information about SmartConnect sensors, refer to the SmartConnect user manual. -
Page 41: Energy Center Settings
ENERGY CENTER SETTINGS Energy Center Settings can be used to adjust Automatic Generator Start usage. Use AGS to Support This setting is used to determine if AGS will support battery levels, climate or both. 9 Battery Levels: the generator will turn on and run until ... - Page 42 Run Time Limits Used to set the minimum time the generator will continue to run for after the target battery voltage and/or temperature is reached. The maximum time is the total run time that the generator will operate to reach the target battery voltage and/or temperature.
-
Page 43: Motor Settings
MOTOR SETTINGS If your model supports zero point leveling, you can use the Motor Settings screen to perform zero point calibration. To access Motor Settings: From the App home screen, press the Settings icon Press Motor Settings. For more information on zero point calibration, refer to the Zero Point Calibration Sequence help guide. -
Page 44: Inverter Settings
INVERTER SETTINGS The Inverter Settings screen is used to configure a connected inverter. To access Inverter Settings: From the App home screen, press the Settings icon Press Inverter Settings. Battery Voltage Shutdown Threshold Allows you to set the voltage threshold for when the inverter will enter “warning” mode, indicating low or high battery voltage. -
Page 45: Solar Controller Settings
SOLAR CONTROLLER SETTINGS The Solar Controller Settings screen is used to configure the Solar Controller to your liking. To access Solar Controller Settings: From the App home screen, press the Settings icon Press Solar Controller Settings. - Page 46 Display Solar Controller Allows you to toggle Solar Controller information to be hidden if you do not want it to be displayed in the App. If Solar Controller information is hidden, you can toggle it to be displayed. Operating Status Displays the current operating status of the Solar Controller.
-
Page 47: Unit Preferences
UNIT PREFERENCES To change temperature or pressure units, go to the settings menu on the App home screen and press Preferences. From there, temperature units can be toggled between Fahrenheit and Celsius, and pressure units can be toggled between kPa and psi. DIAGNOSTICS The Diagnostics screen displays any detected faults in the system, and allows you to force reset the Node. - Page 48 Solar Controller Faults The Diagnostics screen will display any faults detected on the Solar Controller. The following types of faults will be displayed in the Diagnostics screen if detected: 9 Battery Over Voltage 9 Battery Under Voltage 9 Battery Over Temperature ...
- Page 49 Climate Faults The Diagnostics screen will display any faults detected in the climate system. The fault message will disappear from the Diagnostics screen once the fault has been externally cleared. Inverter Faults The Diagnostics screen will display any faults detected in the inverter. The fault message will disappear from the Inverter screen once the fault has been externally cleared.
- Page 50 Resetting the Node If the Node is not behaving correctly, you can force reset it. To reset the Node: From the App home screen, press the Settings icon Press Diagnostics. Press Reset NODE. In the pop-up, press Confirm. The Node will now reset.
-
Page 51: Voice Control (Model Dependent)
VOICE CONTROL (MODEL DEPENDENT) Selected sysems are compatible with Jayco’s voice control system. Once the voice control system has been installed in a central place in your RV, give it a command by saying “Jayco”. Below are a few examples of what you can do: Jayco, all lights on! All lights in your RV turn on. -
Page 52: Updating Firmware (Model Dependent)
UPDATING FIRMWARE (MODEL DEPENDENT) The Node can be updated over-the-air, meaning you get the latest feature updates without the need to bring your RV to your local RV dealer. The App on your smartphone or Controller (depending on your model) will need to be updated regularly to receive the latest firmware. -
Page 53: Switch (Model Dependent)
SWITCH (MODEL DEPENDENT) The Switch communicates via Bluetooth to the Node, giving you additional control of RV features. NOTE: Any Switch you install in your RV has been paired to the Node at the factory and is ready for immediate use. If a Switch isn’t responding, it may need to be re- paired. -
Page 54: Faqs And Troubleshooting
FAQS AND TROUBLESHOOTING PAIRING WITH THE NODE I tried pairing my phone to the Node, but it didn’t connect? If pairing fails, before you attempt to pair your smartphone again: Toggle the smartphone’s Bluetooth off and on. Toggle the smartphone’s Airplane mode on and off. Restart the App. -
Page 55: App
Verify the mobile network or WiFi connection on your smartphone. Launch your App store app. (Google Play Store or Apple App Store) Search for the JAYCOMMAND/TravelLINK powered by BMPRO app. Verify there is no option to update. If the option to update is available, press Update and allow the App to download and install on your device. -
Page 56: Switch (Model Dependent)
The Controller is displaying the code 88 and is unusable, what do I do? The Controller will display 88 on its menu display if there is a system error which prevents the use of the system. If you encounter an 88 error, please contact your RV dealership for further assistance. -
Page 58: Appendices
APPENDICES SPECIFICATIONS NODE Input Voltage 8V to15V DC Range Ambient -4°F to 140°F (-20°C to 60°C) Temperature IP Rating IP20 FCC 47 CR15, CAN ICES-3 (B) / NMB-3 (B), IEC 61000-4-2 Level III, Approvals IEC60068-2-27 Table A.1, IEC 60068-2-64 Spectrum A.3 Category 1 CONTROLLER Input Voltage 8V to15V DC... -
Page 59: Limited Warranty Terms And Conditions
• BMPRO may seek reimbursement of any costs incurred when a product is found to be in proper working order or damaged as a result of any of the warranty exclusions listed above. - Page 60 BMPRO TEAM service@teambmpro.com BMPRO Unit 1, 821 E Windsor Ave, Elkhart IN 46514 USA .COM teambmpro.com...
Need help?
Do you have a question about the JAYCOMMAND TravelLINK and is the answer not in the manual?
Questions and answers