Table of Contents
Advertisement
Quick Links
Advertisement
Table of Contents

Related Manuals for Medion AKOYA E42019


Summary of Contents for Medion AKOYA E42019
- Page 1 User Manual MULTIMEDIA PC MEDION® AKOYA® E42019...
-
Page 2: Table Of Contents
Contents Overview ..................3 Device parts ..................6 Information about these operating instructions ......9 Safety information .................12 Setting up the PC ................17 Connection ..................19 First use ..................25 Mouse ..................... 27 Keyboard ..................28 Hard drives ..................29 Optical drive* ................. 32 Card reader .................. -
Page 3: Overview
Overviews... - Page 4 Overview...
-
Page 6: Device Parts
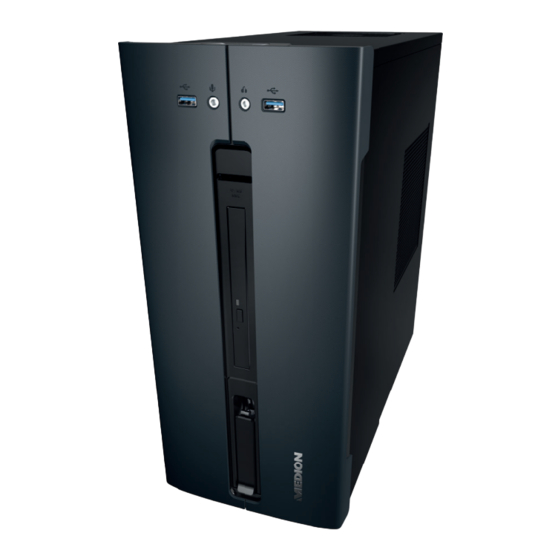
Device parts Device parts On/off switch/operating mode Optical drive Optical drive eject button Power supply (mains cable socket & mains switch) Hot-swap mobile rack Card reader USB 2.0 ports Headphones socket Microphone socket Audio input / Speaker RS (rear out)* Headphones socket / Speaker FS (front out)* Microphone socket / Speaker CC/SS (center/subwoofer out)* DisplayPort... - Page 7 Table of Contents Overview ......................... 3 Device parts ......................6 Information about these operating instructions ........9 1.1. Key to symbols ....................... 9 1.2. Proper use ......................11 1.3. Trademark information ..................11 Safety information ..................12 2.1. Dangers for children and people with reduced ability to operate devices ........................12 2.2.
- Page 8 Keyboard ....................28 7.1. The Alt, Alt Gr and Ctrl buttons ..............28 7.2. The F1 to F12 and Fn keys ................28 Hard drives ....................29 8.1. Important directories ..................30 8.2. Hot-swap mobile rack*..................31 Optical drive* ..................... 32 9.1. Load disc.........................32 9.2.
-
Page 9: Information About These Operating Instructions
1. Information about these operating instructions Thank you for choosing our product. We hope you enjoy using this device. Read the operating instructions and safety instructions carefully before using the device for the first time. Note the warnings on the device and in the operating instructions. - Page 10 Due to the 5 GHz frequency range of the wireless LAN solution used, the device may only be used inside buildings in the EU. NOTICE! Follow these instructions to prevent damage to the device! Additional information on using the device! Comply with the notes in the operating instructions.
-
Page 11: Proper Use
High Definition Multimedia Interface are registered trademarks of HDMI Licensing LLC. • The Bluetooth® word mark and logos are registered trademarks of Bluetooth SIG, Inc. and are used by Lenovo/Medion under license. • USB is a registered trademark of USB Implementers Forum Inc. •... -
Page 12: Safety Information
2. Safety information 2.1. Dangers for children and people with reduced ability to operate devices This device may be used by children over the age of 8 and by persons with limited physical, sensory or mental abilities or by those without experience and knowledge, if they are supervised or have been instructed in the safe use of the device and have understood the dangers that result from it. - Page 13 Liquids penetrating the device may impair the electrical safety of the product. Avoid exposing the device to water droplets or spray and do not place any liquid-filled containers (vases or similar) on or next to the device or the power pack. The slots and openings on the PC are for ventilation purposes.
-
Page 14: Never Carry Out Repairs Yourself
Turn off the PC immediately/do not turn on the PC in the first place and contact customer services if... • the mains adapter or PC produces unusual noises or smoke. • the mains cable or the attached plug is scorched or damaged. ... -
Page 15: Mouse
the device from the mains quickly if necessary. • When unplugging, always hold the plug itself and never pull on the cable. • Never touch the mains plug with wet hands. • Pull out the mains plug during thunder storms and remove the network cable and aerial cable (if present) in particular. -
Page 16: Audio Connections
2.7. Audio connections WARNING! Damage to hearing! Listening to a device at high volumes when using headphones or earphones and changing the basic settings of the equaliser, the driver, the software or the operating system creates excessive sound pressure and can result in damage to and/or loss of hearing. -
Page 17: Setting Up The Pc
3. Setting up the PC Setting up your PC correctly goes a long way towards ensuring comfortable operation. 3.1. Installation location • Place all devices onto a stable, flat and vibration-free surface and only operate them on this type of surface in order to prevent the PC malfunctioning. •... - Page 18 Take regular breaks when working at your monitor and perform relevant stretching exercises to avoid tension and fatigue. Sitting for prolonged periods without changing position can be uncomfortable. Correct posture is very important for minimising the risks of physical injuries or damage.
-
Page 19: Connection
4. Connection The connections and equipment features shown are not necessarily part of the package contents or PC equipment. All connections and technical equipment marked with an asterisk* may vary depending on the model; the available connection and equipment features are detailed in the supplied data sheet. -
Page 20: Connecting The Monitor
• Pull out the mains plug during thunder storms and remove the network cable and aerial cable (if present) in particular. For additional safety, we recommend using a surge protection device to protect the PC against damage due to voltage spikes or lightening strike from the power supply. -
Page 21: Connecting Audio Output/Headphones/Speakers
NOTICE! Risk of damage! Due to the arrangement of the contacts, the plug will only fit into the socket in one position (with the exception of USB type C). Take care to ensure that the plugs and sockets fit together precisely in order to avoid any damage to the contacts. -
Page 22: Connecting A Microphone
4.5.1. Connecting the headphones Plug the cable into the marked socket on the front of the PC using the 3.5 mm stereo jack plug. WARNING! Damage to hearing! Listening to a device at high volumes when using headphones or earphones and changing the basic settings of the equaliser, the driver, the software or the operating system creates excessive sound pressure and can result in damage to and/or loss of hearing. -
Page 23: Connecting Audio Input/Recording Source
4.7. Connecting audio input/ recording source* This socket is used to connect external analogue audio sources (e.g. stereo system, synthesizer). Plug the connection cable with the 3.5 mm stereo jack plug into the light blue socket on the rear or the PC. 4.8. - Page 24 Please note the following safety instructions: DANGER! Risk of electric shock! Even when the PC is switched off, some components are live. Remove the mains plug from the socket to disconnect your PC from the power supply or to completely isolate the device from voltage sources.
-
Page 25: First Use
5. First use The operating system and all hardware drivers are already pre-installed. Once all connections have been established you can start up your PC: 5.1. Operating LED responses Operating LED state Meaning LED permanently on System in operation LED is flashing System in power saving mode LED off System is shut down... - Page 26 Follow the instructions on the screen. Step-by-step instructions will guide you through the process to be followed. The welcome procedure takes you through several screens and dialogues. Select your desired language and then the desired country. Connect to the Internet, if you have access to a respectively configured internet connection.
-
Page 27: Mouse
5.3. Activating antivirus software* Antivirus software is installed on your PC. When the PC is connected to the Internet, the software is registered automatically. The free registration enables you to receive free updates for 30 days. Do not install additional antivirus software, as this can limit the performance of the PC. -
Page 28: Keyboard
7. Keyboard 7.1. The Alt, Alt Gr and Ctrl buttons In addition to the usual letters and characters, the keyboard can also be used to input some special characters and execute certain commands, depending on the program. This special configuration is controlled with the Alt; Alt Gr and Ctrl buttons. -
Page 29: Hard Drives
Description Fn + F9 Previous track Jumps to the previous track during media playback Fn + F10 Next track Jumps to the next track during media playback Fn + F11 Play/Pause Starts playback of a track, pauses playback and resumes playback Fn + F12 Stop... -
Page 30: Important Directories
8.1. Important directories NOTICE! Loss of data! Do not delete or modify these directories or their contents, otherwise data may be lost or system functionality may be impaired. The first partition (C:\) contains the operating system, the applications and the “Documents”... -
Page 31: Hot-Swap Mobile Rack
8.2. Hot-swap mobile rack* An additional external hard drive can be connected using a hot-swap SATA mobile rack for 2.5” or 3.5” hard drives. Please bear in mind that only the mobile rack supplied can be used. 8.2.1. Installing a 3.5” hard drive in a 2.5”/3.5” mobile rack The mobile rack is made of plastic and enables the hard drive to be installed without the need for tools. -
Page 32: Optical Drive
8.2.2. Installing a 2.5” SSD drive in a 2.5”/3.5” mobile rack When installing an SSD drive, follow the first four steps in the previous instructions and then proceed as follows: The upper side of the hard drive is face up and the contacts are to the bottom right. -
Page 33: Removing The Disc
9.1.1. In horizontal drive Press the eject button on the optical drive to open the tray. Insert the disc into the tray, label up, so that it lies flat. Press carefully against the drawer until the resistance is overcome and the drawer automatically returns into the optical drive. -
Page 34: Playing/Reading Discs
9.4. Playing/reading discs Many discs run automatically when they are inserted. This depends on the operating system and the relevant settings. Your PC is capable of playing audio CDs, DVD films or data discs from the optical drive. Once a disc has been loaded, a dialogue box opens containing various playback options. -
Page 35: Card Reader
10. Card reader Your PC features a card reader, you can use the following card types. When inserting the memory cards, ensure that the contacts are pointing in the right direction, as specified in the list below. Inserting a card incorrectly may damage the card reader and/or the card. -
Page 36: Sound System
11. Sound system The external audio connections can be configured so that you can connect a surround sound system. If you wish to change the default volume, click the loudspeaker icon in the task bar. WARNING! Damage to hearing! Listening to a device at high volumes when using headphones or earphones and changing the basic settings of the equaliser, the driver, the software or the operating system creates excessive sound pressure and... - Page 37 WARNING! Danger from radio signals and electromagnetic radiation! Radio signals and electromagnetic radiation can affect the functionality of sensitive electronic devices, such as pacemakers or implanted cardioverter defibrillators. Keep the product at least 20 cm away from these devices, as radio signals and electromagnetic radiation may affect their functionality.
-
Page 38: System Recovery/Settings
The use of encryption is crucial for wireless data transfer, as there is always the risk that data could be intercepted by an unauthorised third party. 12.3. Bluetooth®* Bluetooth technology is designed to bridge short distances wirelessly. Bluetooth devices transfer data wirelessly, enabling computers, mobile phones, printers, keyboards, mice and other devices to communicate with one another without the need for cables. -
Page 39: System Recovery With Windows Recovery Options
− Keep my files Removes all apps and settings containing personal data. − Remove everything Removes all data, apps and settings. • Restore Restarts the PC and restores factory settings. − Restore to HDD - no backup of user data Irretrievably deletes all data on the PC. -
Page 40: Uefi Firmware Configuration
13.2.1. To refresh your computer Open the start menu. Select the Settings app from the list. Click Update and Security. Click on Recovery. Click on Get started. In the selection window that opens, select the recovery option Keep my files to refresh the PC. -
Page 41: Faq - Frequently Asked Questions
13.3.1. Executing the UEFI firmware configuration You can only run the configuration program upon system startup. If the PC has already been started, shut down Windows® and restart it. Before the PC reboots, press the Del key and hold it down until the message Entering Setup appears. -
Page 42: Customer Services
15. Customer services 15.1. Initial help in the event of hardware problems Malfunctions can sometimes have various causes, we have included a brief troubleshooting guide which may help to solve any problems. If these measures don’t solve the problem, we’ll be more than pleased to help you further. -
Page 43: Transport
Apps (e.g. the weather app) cannot be displayed as live tiles. Check the date, time zone and time. 15.4. Do you need more help? If you are still having problems after checking through the suggestions in the previous section, check the online help guide for the operating system or call the hotline in the country where you purchased your PC. -
Page 44: Storage
• Dust can clog up the vents which can lead to overheating and malfunctions. Check that the vents are providing a sufficient level of air circulation at regular intervals (approx. every 3 months). Use a vacuum cleaner to remove the dust from the vents. -
Page 45: Recycling And Disposal
WARNING! Risk of explosion! A lithium battery is located on the motherboard. Batteries are hazardous waste and must be disposed of properly. Never try to recharge the battery. Never expose the battery to high temperatures or fire. Observe the polarity when replacing the battery. ... - Page 46 DEVICE Do not dispose of old devices in normal household waste. In accordance with Directive 2012/19/EU, all devices marked with the symbol illustrated must be properly disposed of at the end of their service life. This involves separating the materials in the devices for the purpose of recycling and minimising the environmental impact.
-
Page 47: Service Information
In our Service Community, you can meet other users, as well as our staff, and you can exchange your experiences and pass on your knowledge there. You will find our Service Community at http://community.medion.com. • Alternatively, use our contact form at www.medion.com/contact. -
Page 48: Legal Notice
23. Privacy statement Dear customer, We wish to inform you that we, MEDION AG, Am Zehnthof 77, 45307 Essen, Germa- ny process your personal data as a data controller. For matters regarding data protection, we are supported by our company data pro- tection officer who can be contacted at MEDION AG, Datenschutz, Am Zehnthof 77, D –... -
Page 49: Index
Wrists ............18 24. Index Factory setting ..........38 Ambient conditions ........17 System recovery ........38 FAQ ..............41 Bluetooth ............38 Getting started ..........25 Cable connections ........19 Card reader ........... 35 Hard drive ............29 Memory stick .......... 35 Hardware problems ........ - Page 50 Safety Cable connections ........ 19 Connection ..........19 Service technician ........44 Setting up the PC ........17 Setup/conversion ........44 Sound system ..........36 System recovery .......... 38 Burning drivers and tools to an optical disc ..........38 PowerRecovery ........38 Restore to HDD –...
- Page 51 PRODUCED IN CHINA FOR: MEDION AG AM ZEHNTHOF 77 45307 ESSEN GERMANY...
Need help?
Do you have a question about the AKOYA E42019 and is the answer not in the manual?
Questions and answers