Advertisement
Quick Links
Advertisement

Related Manuals for Young Electric Sole


Summary of Contents for Young Electric Sole
-
Page 2: Parts List
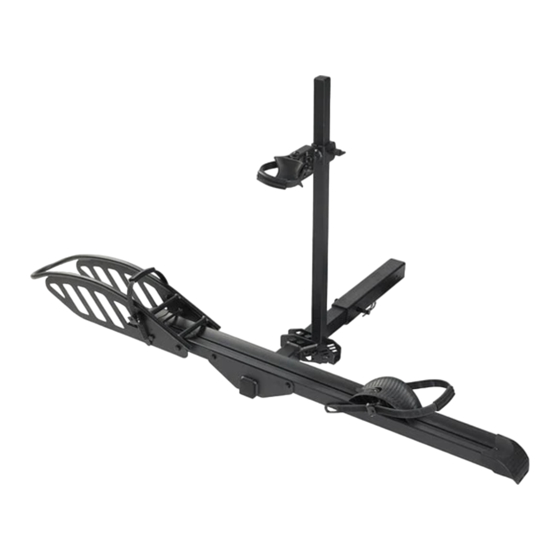
Parts Parts List Part# Description Beam Assembly M10 Outer Hexagon Bolt Front Wheel Mount M10 Long Outer Hexagon Bolt M10 Lock Nut Bottom Fixing Bracket Support Rod M10 Low Square Neck Bolt Adjustable Support Assembly M16 Shockproof Bolt φ16 Spring Washer φ16 Flat Washer φ3.8 Cotter Pin/Lock Requied Tools(Not included)... - Page 3 STEP1 STEP2 Put the holes of Front Wheel Mount (3) and Beam Assembly (1) Place the components assembled in steps 1 above into the aligned, install 4pcs-M10 Outer Hexagon Bolt (2) and tighten bottom fixing bracket assembly (6), align the holes, install 2pc them.
- Page 4 STEP3 STEP4 50Nm Insert the Support Rod (7) into the Bottom Fixing Bracket (6), Insert Adjustable Support Assembly (9) into the Support Rod (7), align the holes, install M10 Low Square Neck Bolt (8) and M10 and properly tighten the knob so that it does not slide down. Lock Nut (5), and tighten them until the support rod does not move.
- Page 5 STEP5 The diameter of lock beam should be less than 7mm. The lock is not included. 2" Align the holes of the folding tube with the holes on the vehicle's 2" hitch receiver, then connect the two parts as shown below. Place an M16 shockproof bolt (10), through the φ16 Spring Washer (11), φ16 Flat Washer (12) and the aligned holes.
- Page 6 Bike Installation Instructions Before placing the bicycle, stand up the support rod in the middle, snap the front tire of the ebike into the fixed frame, place the rear tire in the beam, and then use the ratchet wheel straps to fix the front wheel, rear wheel, and seat tube of the bicycle as shown in the figure below.
- Page 7 How to Adjust the Wheel Cradle 1.Pull the cam gear 2.Turn in counterclockwise 3.Slide it 4.Until it against the tire 5.Turn it tighten by clockwise 6.Press it down...
- Page 8 YOU ARE ALMOST THERE!
-
Page 9: Technical Specifications
Not intended for use with mopeds, motorcycles or 3 wheels bikes Universal sized up to 5'' wide tire Model Name YOUNG ELECTRIC Sole Description 2'' Hitch 1-Bike Rack Material Aluminum & Steel Maximum Weight Capacity 100lbs Applicable Vehicles... - Page 10 ⚠ WARNINGS ⚠ Do not overload beyond the bike rack’s weight capacity of 100lbs. Do not carry more than 1 bike on the carrier. The bike rack is not intended for transporting humans or animals. If you are planning to load only one bike, it is recommended to place it in the position closest to the vehicle. ...
- Page 11 Young Electric) is a purchaser’s exclusive remedy under this Young Electric Warranty Policy warranty. Young Electric is committed to providing our customers with a quality shopping experience, for the products we sell, we provide Young Electric shall not be liable for any direct, indirect,...
- Page 12 This manual contains warnings, cautions, and notes, therefore YOUNG ELECTRIC works hard to guarantee you a bike rack that please carefully read all of this information for your safety.Give is properly assembled and correctly adjusted when it leaves our special attention to any information that has a warning or factory.
-
Page 13: Get Support
Get Support https://youngelectricbikes.com support@youngelectricbikes.com Toll Free Number: 888-933-8899...
Need help?
Do you have a question about the Sole and is the answer not in the manual?
Questions and answers