Advertisement
Quick Links
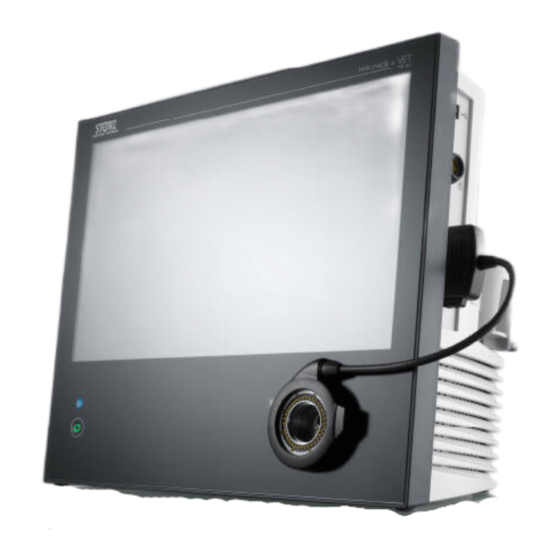
Quick Start Guide for TELE PACK+ VET
Touch Screen Display
• Navigate device control functions and menus
• On-screen keyboard for entering patient information
LED Light Source and Insufflation Pump
• Allows for both manual and automatic
light intensity modes via the on-screen
Light Source button
• 2 level airpump controlled via on-screen
airpump button
• Configured for direct connection to GI videoscopes,
adaptable to standard light guide cables for use
with rigid and semi-rigid telescopes, and flexible
fiberscopes using adaptor 495KS or 20030030
Power Button
• Glows white when device is plugged in
•
Turn On:
Press and hold for
2 seconds
button illuminates green
•
Turn Off:
Press and hold until device powers off
X-Line Camera Connection Input
Compatible with –
• HD videoscopes
• HX Camera heads (enabling use with rigid,
semi-rigid, and flexible fiberscopes)
• CCD GI videoscopes (with adaptor TC013)
Device Overview
until the
For More Detailed Information, Consult the Instruction Manual
Holder for water bottle or camera head
available separately (TP002)
USB Ports
USB 2.0 ports for connectivity/exporting to –
• External storage devices (FAT32-formatted)
• Keyboard
• Printer
• Footswitch
• KARL STORZ-approved accessories
Audio Jacks
• (rear) 3.5 mm jacks for audio in/out
C-Line
Camera Connection Input
Compatible with –
• Single-use flexible videoscopes
• H1 camera head (enabling use with rigid and semi-rigid
telescopes, and flexible fiberscopes)
Note:
Be sure to line up the arrows to ensure that the pins
are in the correct orientation, gently push the connector
into the socket until you hear a click.
HD Videoendoscope Adaptor
• Integrated adaptor for direct connection to select
KARL STORZ HD GI videoscopes
• CCD GI videoscopes require video connecting cable
TC013 (available separately)
Advertisement

Related Manuals for Karl Storz TELE PACK+ VET


Summary of Contents for Karl Storz TELE PACK+ VET
- Page 1 Quick Start Guide for TELE PACK+ VET Device Overview USB Ports Touch Screen Display USB 2.0 ports for connectivity/exporting to – • Navigate device control functions and menus • External storage devices (FAT32-formatted) • On-screen keyboard for entering patient information •...
-
Page 2: Main Screen
Quick Start Guide for TELE PACK+ VET Main Screen Please Note: The Patient Area will only become active after a service password has been Patient Area Information Area set up for the device by the user. This is done via the menu button > Setup Data can be entered here to >... - Page 3 Quick Start Guide for TELE PACK+ VET Starting a Case via Patient Area Patient Info Entry (#1) • Select the Patient Area at the top left corner of During the Case (#2) the screen • Ensure the appropriate Patient’s name and •...
- Page 4 • Selecting “Finish Procedure” indicates you are done • When done, select the “X” to go back reviewing captured content on the TELE PACK+ VET • To review previously captured procedures please export data via USB, or network...
- Page 5 Note: Light Guide Cable Adaptors To configure the TELE PACK+ VET for use with standard light guide cables, plug light guide cable adaptor 495KS or 20030030 into the LED light source port • Adaptor 495KS adapts the unit for access to the LED light source •...
- Page 6 The steps for programming the camera buttons is similar to other flexible videoscopes to the videoendoscope lightsource Note: connector and the adaptor into the and camera heads. X-line port. For More Detailed Information, Consult the Instruction Manual KARL STORZ SE & Co. KG, Dr.-Karl-Storz-Straße 34, 78532 Tuttlingen/Deutschland, www.karlstorz.com...
Need help?
Do you have a question about the TELE PACK+ VET and is the answer not in the manual?
Questions and answers