Table of Contents
Advertisement
Quick Links
SCC-1 SMARTCRAFT CONNECT GATEWAY
INSTALLATION MANUAL
IMPORTANT: This document guides our dealers, boatbuilders, and company service personnel in the proper installation
or service of our products. If you have not been trained in the recommended servicing or installation procedures for
these or similar Mercury Marine products, have the work performed by an authorized Mercury Marine dealer technician.
Improper installation or servicing of the Mercury product could result in damage to the product or personal injury to
those installing or operating the product. Always refer to the appropriate Mercury Marine service manual for component
removal and installation instructions.
NOTE: After completing installation, place these instructions with the product for the owner's future use.
Components in Kit
NOTE: The termination band on the 10‑pin connector cable only applies to engine‑mounted modules.
d
a -
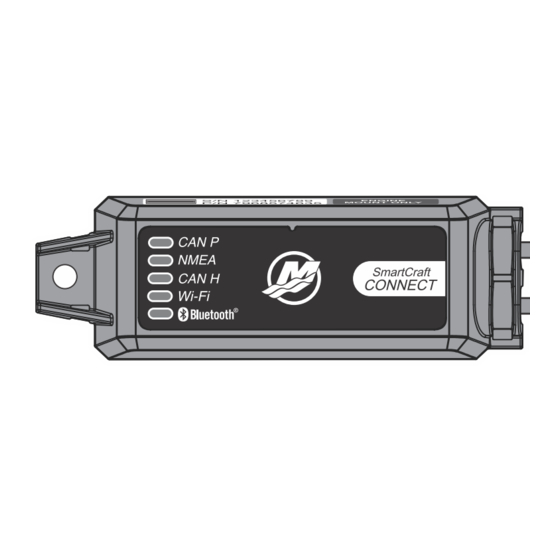
SmartCraft CONNECT module
b -
SmartCraft CONNECT module ‑ side view
c -
Cable ties ‑ 4
d -
#10 x .88" stainless steel wood screw
Features
The CAN P, CAN H, and NMEA lights will turn on when data is being transmitted through the gateway.
NOTE: This manual covers the installation of CAN P only ‑ engine‑mounted module (single). The helm‑mounted module
will default out of the box with CAN P and CAN H. CAN H is applicable to dual, triple, and quad DTS engine applications.
CAN H must be turned off if issues with the analog tachometers are encountered on mechanical/non‑DTS products.
90-8M0219240 eng MAY 2023
a
c
b
© 2023 Mercury Marine
71911
Page 1 / 23
Advertisement
Table of Contents

Related Manuals for Mercury SCC-1


Summary of Contents for Mercury SCC-1
- Page 1 Mercury Marine products, have the work performed by an authorized Mercury Marine dealer technician. Improper installation or servicing of the Mercury product could result in damage to the product or personal injury to those installing or operating the product. Always refer to the appropriate Mercury Marine service manual for component removal and installation instructions.
- Page 2 SCC-1 SMARTCRAFT CONNECT GATEWAY INSTALLATION MANUAL NOTE: At the time of this publication, VesselView Link and SmartCraft CONNECT cannot be used together on the same network. SmartCraft CONNECT Module—Single through Quad‑Engine NOTE: The SmartCraft CONNECT module does not provide power for any device on the NMEA 2000 network. The NMEA 2000 network will require its own power source.
-
Page 3: Mounting Requirements
SCC-1 SMARTCRAFT CONNECT GATEWAY INSTALLATION MANUAL Connect the module NMEA 2000 harness connector to the NMEA 2000 network. A NMEA 2000 extension may be required to reach the NMEA 2000 backbone. 120‑ohm termination resistor Chartplotter SmartCraft CONNECT module NMEA 2000 fused power source... - Page 4 Record the serial number from the body of the SmartCraft CONNECT in the SN: space in the SmartCraft CONNECT Serial Number table. SmartCraft CONNECT Serial Number Remove the battery from the outboard. Refer to the Mercury Avator 7.5e Operation and Installation Manual Battery Removal. Page 4 / 23 ©...
- Page 5 • Handle the Mercury Avator battery with care. Do not crush the Mercury Avator battery or subject it to mechanical shock. • Keep the Mercury Avator battery away from sources of heat and fire.
-
Page 6: Module Configuration
10. Install the starboard cowl panel on the outboard. Refer to the Mercury Avator 7.5e Operation and Installation Manual Starboard Cowl Panel Installation. 11. Install the front lower cowl panel on the outboard. Refer to the Mercury Avator 7.5e Operation and Installation Manual Front Lower Cowl Panel Installation. - Page 7 SCC-1 SMARTCRAFT CONNECT GATEWAY INSTALLATION MANUAL Select the consumer user option. 75308 Select Continue to begin data sharing. 75309 Enter the email address and password. As a first time user, select the Sign up now option. 75310 90-8M0219240 eng MAY 2023 ©...
- Page 8 SCC-1 SMARTCRAFT CONNECT GATEWAY INSTALLATION MANUAL Complete all of the required data fields. When finished, select the Create button. 75312 Power up the SmartCraft CONNECT and all other vessel components, select Find My Device. Select the SmartCraft CONNECT device. 75314 75377 Enter the SmartCraft CONNECT serial number.
- Page 9 11. Enter the password needed for establishing a connection to a Wi‑Fi network. Select Connect. 72608 12. After this data is entered, go to the Mercury Dealer or OEM Configuration Process: Step 11, to continue the configuration process instructions. 90-8M0219240 eng MAY 2023 ©...
- Page 10 SmartCraft CONNECT, an account must be created. Save the new account credentials for future use. NOTE: Brunswick Corporation is moving all accounts to a single login. If you already have an account for 1st Mate, Mercury University, MDA, Harris® boats, Boston Whaler®, Sea Ray®, etc., your username and password will work here. Page 10 / 23 ©...
- Page 11 SCC-1 SMARTCRAFT CONNECT GATEWAY INSTALLATION MANUAL IMPORTANT: Android™ users need to grant the app permission to use location services when requested. This is a requirement to allow a full Bluetooth® connection to the module. 72605 Continue entering additional data on the next screen.
- Page 12 SCC-1 SMARTCRAFT CONNECT GATEWAY INSTALLATION MANUAL 75314 75377 NOTE: Networks that do not require a password are acceptable to use. Captive portal Wi‑Fi networks, which require a user to interact with a web page, cannot be used to configure this module.
- Page 13 72609 12. The menu screen will appear. The module will automatically query the Mercury site for any updates to the firmware. If any updates are needed, there will be an exclamation point in the upper right corner of the Update Firmware tile. In this event, click on that tile and any updates will begin.
- Page 14 SCC-1 SMARTCRAFT CONNECT GATEWAY INSTALLATION MANUAL 13. Select the Configuration tile on the screen. 75338 14. Select Configure Engines. 75341 15. Enter the correct information for the Engine Type, and Engine Model. Review your selections, and if everything is correct, select Save.
- Page 15 Raymarine MFD to SmartCraft for the use of features such as Active Trim, speed‑based cruise, and Smart Tow. A Mercury GPS must be installed to use these features. 18. Verify that the Wi‑Fi LED is solid, indicating that the device has completed a cloud sync. If this is not verified, there is no certainty that the configuration was delivered to the module.
- Page 16 SCC-1 SMARTCRAFT CONNECT GATEWAY INSTALLATION MANUAL 20. Select the Pencil Icon within each tank field to edit and enter tank information. 74580 21. Enter tank data and descriptions by selecting each option on the screen. Select SAVE after all information has been entered for each tank.
- Page 17 SCC-1 SMARTCRAFT CONNECT GATEWAY INSTALLATION MANUAL 23. For steering angle source selection, return to the CONFIGURATION screen, and select the Steering Angle Source option and select START. 75348 24. Select the desired steering angle source from the drop‑down menu and select SAVE.
-
Page 18: Troubleshooting
SCC-1 SMARTCRAFT CONNECT GATEWAY INSTALLATION MANUAL 25. To enable or disable Stationkeeping features, return to the CONFIGURATION screen, and select the Stationkeeping Features option and select START. 75349 26. Using the radial slider buttons, enable or disable the desired features, and select SAVE. -
Page 19: Led Lighting
Solid: Once the bus communication is established, the LED will remain on. Wi‑Fi • Off: No connection. • Flashing: Connected to a Wi‑Fi access point. Attempting to sync with the Mercury cloud server. • On: Connected to a Wi‑Fi access point and synced with the Mercury cloud server. Bluetooth •... - Page 20 InactiveDealer: This account number is no longer active with Mercury Marine. • InvalidDealer: The account number entered was not found in Mercury Marine's records. • InvalidLicenseKey: The license key that was entered is not a valid key—typed it in wrong.
- Page 21 SCC-1 SMARTCRAFT CONNECT GATEWAY INSTALLATION MANUAL Transmitted NMEA 2000 PGNs 128259/0x1F503 – Speed, Water Reference 128267/0x1F50B – Water Depth 129025/0x1F801 – Position, Rapid Update 129026/0x1F802 – COG & SOG, Rapid Update 129029/0x1F805 – GNSS Control Status 129538/0x1FA02 – GNSS Control Status 129540/0x1FA04 –...
- Page 22 SCC-1 SMARTCRAFT CONNECT GATEWAY INSTALLATION MANUAL Received NMEA 2000 PGNs Pop‑up Button Command, (Mercury 130820/0x1FF04 – Marine Proprietary) Mercury Engine Data to NMEA 2000 Capable Products Signal Special Information NMEA 2000 PGN Mode Rated RPM – 127498/0x1F20A Coolant pressure –...
-
Page 23: Rf Exposure Considerations
MotorGuide, OptiMax, Pro XS, Quicksilver, SeaCore, Skyhook, SmartCraft, Sport-Jet, Verado, VesselView, Zero Effort, Zeus, #1 On Fond du Lac, WI 54936-1939 the Water and We're Driven to Win are registered trademarks of Brunswick Corporation. Mercury Product Protection is a registered service mark of Brunswick Corporation. All other marks are the property of their respective owners.
Need help?
Do you have a question about the SCC-1 and is the answer not in the manual?
Questions and answers