Table of Contents
Advertisement
Quick Links
Advertisement
Table of Contents

Related Manuals for CHOWIS dpi harris


Summary of Contents for CHOWIS dpi harris
- Page 1 USER MANUAL For more information visit us at www.chowis.com...
-
Page 2: Table Of Contents
CONTENTS Device Overview ..............Package Inclusions ............. How to Use: Attaching Device to Phone ........Installing the DermoPico Hair App......Connecting Device to Phone ........Registering New Customer ........Quick Diagnosis ............Measurements: Analyzing Scalp Hydration ........Analyzing Scalp Sebum ..`........Analyzing Hair Density .......... -
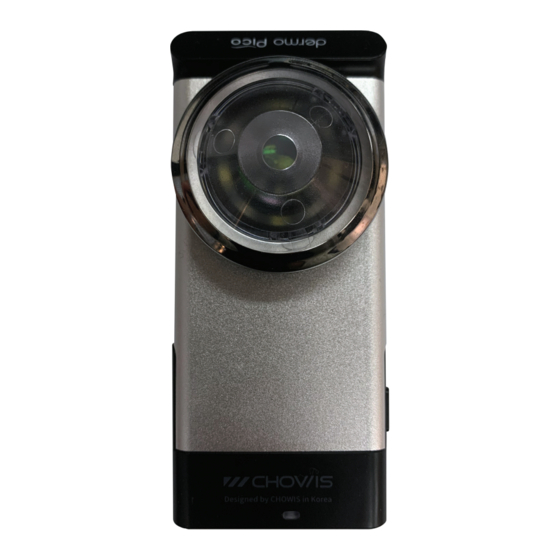
Page 3: Device Overview
DEVICE OVERVIEW 1. Moisture sensor 5. Micro-USB B port 2. Magnetic attachment 6. Non-removable lens 3. Serial Number 7. Switch On/O 4. Light Indicator PACKAGE INCLUSIONS dpi Viso Device (1) Charger Adaptor (1) 5-pin UBS Cable (1) Silver Black Air Blower (1) Cleaning Cloth (1) Magnet (2) Sebum Paper... -
Page 4: How To Use
HOW TO USE ATTACHING DEVICE TO PHONE 1. Press switch button of the dpi Harris device for 3 seconds until LED light blinks. 2. Put paper film guide on your phone and attach the guide. 3. Attach the dpi Harris device on the metal guide of the... -
Page 5: Installing The Dermopico Hair App
HOW TO USE INSTALLING THE DPI HAIR PICO APP 1. Open App Store/Play Store and search “Chowis.” 2. Select DermoPico Hair app and tap “get” to install. -
Page 6: Connecting Device To Phone
HOW TO USE CONNECTING DEVICE TO PHONE 1. Turn on Bluetooth on your phone. 2. Open DermoPico Hair App. 3. Choose Product ID of device to connect via Bluetooth. 4. After connecting device, press start. 5. Select Quick Diagnosis for quick usage. NOTE: If connection was successful, Bluetooth indicator will change to BLUE if not it is GRAY... -
Page 7: Registering New Customer
HOW TO USE REGISTERING NEW CUSTOMER 1. Tap Start button, choose Customer then tap Add Customer at the button part, pop up will appear to either to scan the WeChat QR Code or Input manually customer details. 1.3829 in 2. Tap on WeChat QR Scan button to Scan Customer’s WeChat QR code, this will provide customer’s personal information then the Save button will be enabled then tap save. -
Page 8: Quick Diagnosis
HOW TO USE REGISTERING NEW CUSTOMER Manual Input information, customer must read the agreement and put checkmark on textbox to proceed, then the Save button will be enabled then tap save. QUICK DIAGNOSIS 1. Quick Diagnosis only needs gender, birthyear, and ethnicity to make a quick analysis of the hair;... -
Page 9: Measurements
MEASUREMENTS ANALYZING SCALP HYDRATION 1. Select the Scalp Hydration icon Device’s Sensor 2. Place the Hydration Sensor on the scalp 3. Press button on device or Tap Scalp location on App. 4. App will display done analysis and result of measurement. -
Page 10: Analyzing Scalp Sebum
MEASUREMENTS ANALYZING SCALP SEBUM 1. Choose Sebum function on the App, the Active icon of the measurement will light up. Change focus mode of camera. Take Image/Capture Icon 2. Dab the pink area of on the Sebum Paper on the hair scalp for 3 seconds. -
Page 11: Analyzing Hair Density
MEASUREMENTS ANALYZING HAIR DENSITY 1. Choose Hair Density on the App, this will make icon Active. Change focus mode of camera. Take Image/Capture Icon 2. Take image of the Hair, Position it at the crown area of the head, focus on the scalp. Tap Analyze to show result. 3. -
Page 12: Analyzing Dead Skin Cells
MEASUREMENTS ANALYZING DEAD SKIN CELLS 1. Choose Hair Density on the App, this will make icon Active. Change focus mode of camera. Take Image/Capture Icon 2. Take image of the Scalp, Position it at the crown area of the head, focus on the scalp. Tap Analyze to show result. 3. -
Page 13: Analyzing Hair Impurities
MEASUREMENTS ANALYZING SCALP IMPURITIES 1. Choose Hair Density on the App, this will make icon Active. Change focus mode of camera. Take Image/Capture Icon 2. Take image of the Scalp, Position it at the crown area of the head, focus on the scalp. Tap Analyze to show result. 3. -
Page 14: Results
RESULTS VIEW ANALYSIS RESULT 1. Open main screen page 2. Press start, customer and choose customer name from list 3. Search Customer and Tap on the Customer Row to view results History. Delete Customer Edit Customer 4. Tap directly on the date with row data to show results. Slide on Results page to view Bar Graph/Pie Graph and images taken from analysis. -
Page 15: Compare Results
RESULTS COMPARE COMPARE RESULTS 1. Open main screen page 2. Press start, customer and choose customer name from the list. 3. Search Customer and Tap on the Customer Row to view results History. Delete Customer Edit Customer 4. Tap on Checkbox beside the date to select it, user may choose 2 or more results to compare, then tap on the Compare Button. -
Page 16: Compare Images
RESULTS COMPARE COMPARE IMAGES 1. Open main screen page 2. Press start, customer and choose customer name from the list. 3. Search Customer and Tap on the Customer Row to view results History. Delete Customer Edit Customer 4. Tap on Checkbox beside the date to select it, user may choose 2 or more results to compare images then tap on the Compare Button to show all images under it. -
Page 17: Share Results
RESULTS SHARE RESULTS 1. After performing analysis, you can send results to your customer via the share function button. Tap Share icon below Analysis, Pop-up will show: - Share via E-mail or Social media platform. Share Icon found below. - Share via WeChat QR Code Scanning ADD COMMENTS... -
Page 18: Settings
SETTINGS GENERAL OPTIONS 1. On Main page, tap Settings and go tap Product & Treatments. 2. Page will show input for every measurement, add image and URL for the specific product. Add another product CHANGE LANGUAGE 1. On Main page, tap Settings and go tap Change Language. 2. -
Page 19: General Options
3. User Guidline Setup - On/O switch SEND IMAGES 1. Last button in Settings, this allows user to sync images of the customer to be saved at Chowis Server. 2. Tap Send to transfer images, wait for transfer to be done. -
Page 20: Faq
However, there is an option provided where images can be sent to Chowis server for analysis improvement purposes. Does Dermo Pico work on Android and iOS? Yes, dermopico works with most IOS phones and Android. -
Page 21: Specifications
HAIR DENSITY SCALP SEBUM SCALP IMPURITIES SCALP HYDRATION DEAD SCALP CELL CONTACT Email: chowis@chowis.com Skype ID: Hello Chowis Skype Chowis Co., Ltd. Homepage: www.chowis.com Tel: +82 31 706 7950 / Fax: +82 31 272 7950 Address: A1301-2, 184, Jungbu-daero, Giheung-gu,...
Need help?
Do you have a question about the dpi harris and is the answer not in the manual?
Questions and answers