
Related Manuals for PARAMOUNT BED PM-30 Series


Summary of Contents for PARAMOUNT BED PM-30 Series
- Page 1 Universal Operating Table PM-30series Instruction Manual PM-3030・PM-3130 PT. PARAMOUNT BED INDONESIA lease use after-sales service and inspection. Keep this manual.
- Page 2 Introduction We would like to thank you for adopting our operating table. To maintain this operating table in good condition for a long time, please read and understand the operation procedures and precautions in this Instruction Manual before use. After reading this instruction manual, store it where it can be easily accessed for later reference.
-
Page 3: Table Of Contents
Table of Contents 1.Unpacking and Installation ================== 5 2.Precautions for Use 6 - 7 ================== 3.Part Names ================ = = 8 - 9 = ================ == 10 4.Features =================== 11 5.Specifications 6.Operation Methods and Procedures 1)AC-Driven Type Power Supply Operation ======= 12 (1)Setting the Single-Wire Grounding (2)Setting the Remote Controller (3)Setting the Power Supply Cable... - Page 4 Table of Contents 5)Head section base Operation ================== 16 (1)To Elevate (2)To Lower (3)Attaching/Removing the Head section base ======= 17 6)Leg section base Operation ================== 18 (1)Attaching/Removing the Leg section bases (2)Opening the Leg section bases (3)To Lower ================= = = = = 19 (4)To Elevate (5)To Remove (6)Adjustment of the Leg section base Clamp...
-
Page 5: 1.Unpacking And Installation
1.Unpacking and Installation The operating table is packed inside a wooden frame, and should be unpacked and installed by the following procedure. 1) Open the package in an open environment, such as outdoors. 2) Check for any damage to the operating table when unpacking is complete. 3)... -
Page 6: 2.Precautions For Use
10) Packaging (1) The system is shipped with wood frame packaging, or delivered directly without packaging. 11) Manufacture Name, Address, etc. Name PT. PARAMOUNT BED INDONESIA Address MM2100 Industrial Town, Block M-1-1, Gandamekar, Cikarang Barat, Bekasi17530, Jawa Barat, Indonesia + 62-21-898-0715... - Page 7 2. Precautions for Use 2. The operator of the operating table is required to understand the procedures and features of the system well. 1) Please follow the precautions below when deciding on a location for installation. (1) Select a dry location where the equipment will not be splashed with water. (2)...
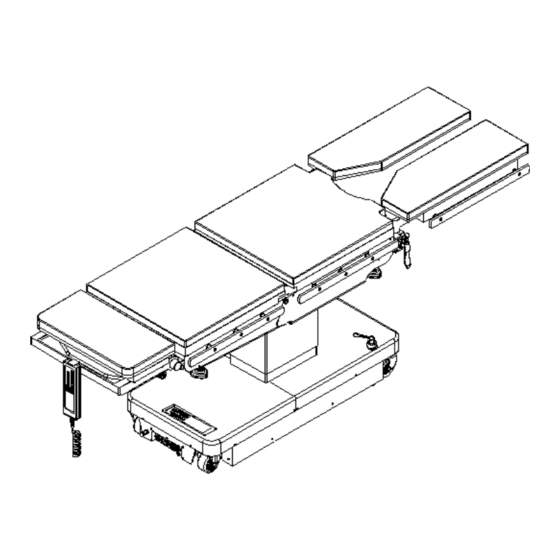
- Page 8 3. Part Names Name Name Name Head section base Lever handle screw Hi-lo system cover Back section base Brake rubber base Caster Hip section base Leg section base Base Mount opening handle Leg section base Leg section base Remote Controller elevation trigger Knob screw for leg Head section base angle...
- Page 9 4. Features PM-3030,3130 1. This operating table can be used for general surgical procedures. 2. The electric motor drive makes the operation easy. 3. The automatic 10-second power-OFF function of the remote controller prevents operation in error. 4. The level of operation noise is low, minimizing discomfort for the patient. 5.
-
Page 10: 5.Specifications
5.Specification Model : PM-3030・PM-3130 Table Top : 50 cm (width) × 200 cm (full length) Height Range : 68 cm (lowest) – 102 cm (highest) Trendelenburg : 25° for up and down Lateral Tilt : 25° for both left and right : 60°up, 40°down Back section base Head section base... -
Page 11: 6.Operation Methods And Procedures
6.Operation Methods and Procedures. 1) Turning the Power supply ON/OFF ③ <Before beginning operation> ・Note 1: Check for damage to the power supply cable. ・Note 2: Do not operate with wet hands *This may lead to electroshock. ② Fig―1(Single-Wire Grounding) (1)Setting the Single-Wire grounding Connect the terminal with a hole (Fig-1) ⑫... -
Page 12: 2)Turning The Power Supply Off
6.Operation Methods and Procedures 2)Turning the Power Supply OFF (See Fig.5 as an enlargement of the power supply window) Turn the power supply switch ⑪ OFF. Then, if the green pilot lamp ⑫ goes out, remove the power supply plug ⑩ (Fig. 4) from the power supply outlet for medical purposes in the operating room. -
Page 13: 3)Operation For Main Unit Fixation
6.Operation Methods and Procedures 3)Operation for Main Unit fixation (1)Main Unit fixation To fix operation table, turn the lever handle screw① clockwise. The break rubber base ② descends. Ensure both of the break rubber bases make equal contact with floor. ①... -
Page 14: 4)Remote Controller Operation = = = = ===========15
6.Operation Methods and Procedures Remote Controller Operation 4) Before beginning operation < > ・Note 1: Check the control box for damage. ・Note 2: Check to ensure the surrounding area is safe. ・Note 3: Use caution while operating with the remote controller to ensure the patient does not fall. -
Page 15: 5)Head Section Base Operation
6.Operation Methods and Procedures 6)Head section base Operation <Before beginning operation> Note 1: Check for anomalies in the head section base. Note 2: Do not load the whole weight solely on the head section base. Note 3: Do not move the operating table by holding the head section base. Note 4: Operate the head section base carefully with both hands. -
Page 16: 3)Attaching/Removing The Head Section Base
6.Operation Methods and Procedures (3)Attaching/Removing the head section base 1.To attach, loosen the fixing screw③shown in the figure below to insert the head section base shaft①into the opening in the back section base②until it fits into the groove ④,and then tighten with the fixing screw③. 2.To remove, loosen the fixing screw③... - Page 17 6.Operation Methods and Procedures 7)Leg section base Operation <Before beginning operation> ・ Note 1: Check for anomalies in the leg section base. ・ Note 2: Do not load the whole weight solely on the leg section base. ・ Note 3: Operate the leg section base carefully with both hands. Note 4: When the leg section base is lowered at an angle of 90°...
-
Page 18: 6)Leg Section Base Operation
6.Operation Methods and Procedures Lowering the leg section base (3) Pull the trigger ④, holding the edge ⑧ of the leg section base with one hand, and the leg section base can be lowered freely at any angle. After determining the position, release the trigger, and the leg section base can be fixed with the clutch engaged. - Page 19 6.Operation Methods and Procedures Head section base and leg section bases interchange operation 8) As explained in the sections describing head section base Operation and leg section base operation, the head section base and the leg section bases of this operating table can be reversed and attached as shown in Fig.-19.
-
Page 20: 7.How To Take Care Of The Product
7. How to Take Care of the Product 1) As the operating table must be kept clean, caution should be taken with regard to the following points in daily maintenance. 2) Be sure to turn the power supply OFF and remove the remote controller plug before cleaning. -
Page 21: 8.Fuse Replacement
8.Fuse Replacement 1)Fuse Type Two 10A fuses are placed separately in each of two fuse holders located in the power supply input of the leg mount. Before replacing the fuses, turn off the power supply or disconnect the power supply cable and check that the pilot lamp goes out. -
Page 22: 3)Fuse Replacement
8.Fuse Replacement 3)Fuse Replacement Fuses Used AC Specification Two 10A fuses (AC primary side) One 5A fuses (DC secondary side) Two 10A fuses Fig-21 Note: Please replace with the correct fuses as marked on the holders. 5A fuses 5A fuse Fig-22... -
Page 23: 9.Service
9.Service Before requesting customer service, please try the following once. power 1、 Is the pilot lamp ON? (If yes, go to 4.) supply dose not 2 、 Is the power supply cable and connector connected turn ON securely? 3、 Is the fuse blown? Nothing 4、... - Page 24 2022.08...
Need help?
Do you have a question about the PM-30 Series and is the answer not in the manual?
Questions and answers