
Related Manuals for Boss SDE-3000EVH


Summary of Contents for Boss SDE-3000EVH
- Page 1 Reference Manual © 2023 Roland Corporation EVH, the EVH logo, and the Stripe Design © used under license from EVH Brands, LLC...
-
Page 2: Getting Ready
* Do this in reverse order when turning off the power. There are many other ways to connect the SDE-3000EVH. * Unsaved data is lost when the power turns off. You must save any data in advance that you want to keep. -
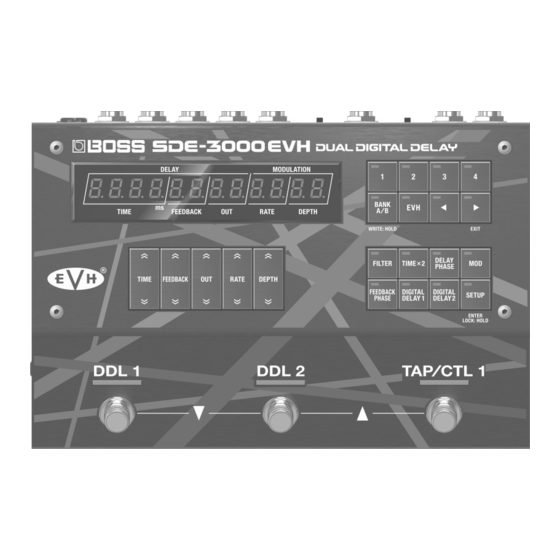
Page 3: Panel Descriptions
Panel Descriptions Top Panel Area Explanation Area Explanation Press the top part of each button to increase the value, and [FILTER] button press the bottom part of each button to decrease the value. A delay filter. This gives you a natural-sounding effect Long-press a button to make its value change rapidly. - Page 4 Getting Ready Switching Between Play Screen Displays The screen that appears after you turn on the power is called the “play screen”. Press the [ã] [â] buttons to switch between displays. Input level display Õ parameter display Õ BPM display Õ bank/memory display Parameter display Bank/memory display Bank...
-
Page 5: Rear Panel
Connect the AC adaptor here. This should normally be set to “OFF”. The SDE-3000EVH powers up when the AC adaptor is connected to Noise may occur due to a ground loop when you connect an amp to the DC IN jack. - Page 6 Select the parameter Edit the value Selecting Memories via Foot Control The SDE-3000EVH has 100 memories, and you can select the memories via foot control. Memories: EVH 1–EVH 8, A.01–A.04, B.01–B.04, C.01–C.84 Memory mode (factory setting) In this mode, the 100 memories are selected in sequential order, two at a time.
- Page 7 Panel Descriptions Wait This displays two memories at a time for you to select. Switch the memory display. Select the memories using the [DDL 1] and [DDL 2] switches. [DDL 1] switch + [DDL 2] switch: previous memory If you press the same switch twice in a row, you can turn the delay [DDL 2] switch + [TAP/CTL 1] switch: next memory off or restore the memory to its stored state.
-
Page 8: Level Meter
Configuring the Input and Output Settings Configuring the Input/Output to Match the Adjusting the Input Level While Checking the Connected Device Level Meter Press the [SETUP] button. On the play screen (the screen that appears right after you start up the unit), press the [ã] button to show the input level meter. - Page 9 VOLUME INPUT Guitar DDL 2 (L/R) SDE-3000EVH MEMO You may hear a humming noise when more than one amp is connected to this unit. For more on how to deal with hum noise, see “Dealing with Hum Noise” (p. 11).
- Page 10 EVH Sound Settings Using Three Amps (1-in, 3-out) When connecting this unit to three amps, use the OUTPUT DIRECT jack, the OUTPUT EFX L and the OUTPUT EFX R jacks. When you connect a plug to the OUTPUT EFX R jack, the signal is separated into dry (direct sound), wet L (left delay sound) and wet R (right delay sound). IN OUT settings DIRECT INPUT...
- Page 11 Dealing with Hum Noise You may hear a humming noise when more than one amp is connected to this unit. This explains how to suppress hum noise. Connecting UsIng the Four-cable Method Using the Included Ground Lift Cable The ground wire is disconnected from the female jack of the cable INPUT that’s included.
- Page 12 Connecting an Amp and Configuring the Input/Output Settings The SDE-3000EVH has two built-in digital delays (Roland SDE-3000) that have been expanded to work in stereo. You can switch the configuration of these two delays between serial to parallel. The connection method is called a “structure”.
- Page 13 NOTE The SDE-3000EVH fully recreates the bypass characteristics of the original Roland SDE-3000. Since the original sound is faithfully recreated by varying the delay times and so on, you may notice a unique modulated sound that occurs with certain settings when you mix two delays that are...
- Page 14 Connecting an Amp and Configuring the Input/Output Settings Using Two Amps (1-in, 2-out) Use the OUTPUT L/MONO and OUTPUT R jacks when connecting to two amps. This lets you mix the dry (direct) and wet (delay) sounds for output, or output the dry and wet sounds separately. When mixing the dry and wet sounds for output IN OUT settings L/MONO...
- Page 15 Connecting an Amp and Configuring the Input/Output Settings When outputting the dry and wet sounds separately IN OUT settings L/MONO INPUT [SETUP] Ó “ ” in;ovt Parameter Value Explanation [TIME] buttons [DEPTH] buttons Inputs from the INPUT L/MONO Nono Nono jack.
- Page 16 Connecting an Amp and Configuring the Input/Output Settings Stereo Input/Output (2-in, 2-out) For stereo input, the dry (direct) and wet (delay) sounds are mixed when output. IN OUT settings Effect, keyboard, [SETUP] Ó “ ” in;ovt audio device Parameter Value INPUT L Explanation [TIME] buttons...
-
Page 17: Using Send And Return
Using SEND and RETURN You can connect an external effects processor between the SEND jack and RETURN jack, and use it as one of the SDE-3000EVH’s effects processors. This lets you control the memories, in which the external pedal is included. -
Page 18: Using The Noise Suppressor
Using the Noise Suppressor Configuring the Noise Suppressor The noise suppressor is a function that suppresses noise during periods of silence. Press the [SETUP] button. The parameter to set is shown in the display. Use the [TIME] buttons to select “ ”. - Page 19 Using the Foot Volume Configuring the Foot Volume This is a volume control effect. Operate this with an expression pedal that’s connected to the CTL 2, 3/EXP1 jack or the CTL 4, 5/EXP2/GA-FC jack. Press the [SETUP] button. Use the [TIME] buttons to select “ ”.
-
Page 20: Selecting A Memory
Playing Selecting a Memory Press the [BANK A/B] button or the [EVH] button to select a bank. ¹ The bank switches between BANK A and BANK B each time you press the [BANK A/B] button. ¹ The unit switches between EVH (1–4) and EVH (5–8) each time you press the [EVH] button. - Page 21 Editing Configuring the Delay Sound Other Delay Parameters (DDL 1, DDL 2) (From the Top Panel) Press the [SETUP] button. Use the buttons to edit the parameters shown in the display. The parameter to set is shown in the display. Switch to the play screen parameter display (p.
- Page 22 Editing Setting the Left and Right Channels to the Same Parameter Value/Explanation Cuts the frequency region below the specified frequency Delay Time (Time Link: ON) (low-cut filter). d±Fb. . L C. F (DDL 1 Feedback EQ Lo Freq) FLAt FLAt When you set the offset to “0”...
- Page 23 Editing Use the [TIME] buttons to select “ ” or d±oFFSt d±oFFSt Switching Between Left and Right Time Display for “ ”, and then use the [DEPTH] buttons to d²oFFSt d²oFFSt DDL 1/DDL 2 change the value. Press the [DIGITAL DELAY 1] or [DIGITAL DELAY 2] ¸...
- Page 24 Editing Carrying Over Reverberations when Switching Setting the Other Parameters (MASTER) the Delays On/Off or When Switching Between Press the [SETUP] button. Memories (Carryover) Use the [TIME] buttons to select “ ”. NASTER NASTER When the carryover function is on, you can make the reverberations of the previous delay continue to sound even when you switch the delays on/off or switch between memories.
-
Page 25: Useful Functions
Editing Make Large Changes to the Delay Time Useful Functions When the delay time on the play screen is displayed as Switching Between Note Length and Time Display time, hold down the [ã] button and press the [TIME] for the Delay Time button up or down. -
Page 26: Saving To Memory
Saving, Exchanging and Other Memory Operations Saving to Memory Swapping Memories (WRITE) (EXCHANGE) Here’s how to save the currently selected memory. Here’s how to swap (exchange) the memory number of the saved memory with a different one. Long-press the [BANK A/B] (WRITE) button. Long-press the [BANK A/B] (WRITE) button. - Page 27 Saving, Exchanging and Other Memory Operations Initializing a Memory (INITIALIZE) Here’s how to initialize the selected memory. NOTE The EVH 1–8 memories can’t be initialized. By executing a factory reset and selecting EVH 1–EVH 8 as the target, you can restore the memories to their factory settings. Ø...
- Page 28 Preventing Accidental Operation (Panel Lock) You can enable (Lock OFF) or disable (Lock ON) the button operations. MEMO The panel lock setting is disabled when the power is turned off. Long-press the [SETUP] button to return to the play screen. The setting toggles between on and off each time you press the button.
- Page 29 The polarity switch is set as shown in the illustration. Supported expression pedals Sold separately: BOSS EV-30, FV-500L, FV-500H, Roland EV-5 Footswitch CTL 2, 3/EXP 1 jack CTL4, 5/EXP2/GA-FC jack CTL 3...
- Page 30 Configuring the External Controllers Configuring the CTL Function Parameter Value (CTL) Explanation [TIME] buttons [DEPTH] buttons C²nvN When you set (MEMORY NEŷnvN – EVH1 EVH1 Press the [SETUP] button. (CTL 2 Number) NUMBER) for (CTL C2. F nC – Ʒ01 Ʒ01 2 Function)–...
- Page 31 Configuring the External Controllers Assign parameters Assign Settings (ASSIGN) You can assign the functions you prefer to the [CTL 1] switch and to Parameter Value Explanation [TIME] buttons [DEPTH] buttons the footswitches you’ve connected. A±Sľ Up to eight assign settings can be saved for each memory. (Assign 1 Switch) Turns Assign 1–8 on/off.
- Page 32 Configuring the External Controllers Parameter Value Parameter Value Explanation Explanation [TIME] buttons [DEPTH] buttons [TIME] buttons [DEPTH] buttons This selects the function assigned to the controller. A±ACL Set the minimum/maximum values for each selected (Assign 1 ACT Low) function as a Min/Max value. Toggle between the “ ”...
- Page 33 Configuring the External Controllers Turning GAFC SW on GA-FC switch CH± CH± CH² CH² CH³ CH³ CH´ CH´ PnŸ PnŸ Etƭ Etƭ Press the [SETUP] button. (Ch1) (Ch2) (Ch3) (Ch4) (Panel) (Effects) GA-FC The parameter to set is shown in the display. Use the [TIME] buttons to select “...
- Page 34 Configuring the External Controllers GA-FC pedal jack Parameter Value Explanation [TIME] buttons [DEPTH] buttons GA-FC CH±d±HLd (CH1 DDL 1 Hold) When – CH±Fn EtµFn d±²HLd d±HoLd d²HoLd CH´d±HLd GA-FC EX (CH4 DDL 1 Hold) PnŸd±HLd (Panel DDL 1 Hold) Etƭd±HLd (Effects DDL 1 Hold) –...
- Page 35 Configuring the External Controllers Parameter Value Parameter Value Explanation Explanation [TIME] buttons [DEPTH] buttons [TIME] buttons [DEPTH] buttons When , or E±SƾF E²SƾF d±²HLd d±HoLd E±Sƾd1HL The GA-FC is not used. , you can set the Hold Level. (off ) d²HoLd (E1 Switch DDL 1 Hold Level) bPŷtAP...
-
Page 36: Connecting External Devices
Connecting with an External MIDI Device Connecting External Devices MIDI Settings (MIDI) Connect an external device to this unit via MIDI when you want to exchange MIDI messages or synchronize to a clock signal. Press the [SETUP] button. The parameter to set is shown in the display. MIDI (OUT/IN) jacks Use the [TIME] buttons to select “... - Page 37 Connecting with an External MIDI Device Parameter Value Parameter Value Explanation Explanation [TIME] buttons [DEPTH] buttons [TIME] buttons [DEPTH] buttons Specifies the input to which the tempo clock is d±NƞdPt synchronized. (DDL 1 Modulation Depth) Guaranteed operating range: 40–250 BPM d²NƞdPt Synchronizes with the internal (DDL 2 Modulation Depth)
- Page 38 Configuring the Program Change Map for the Memories You can use the program change map to customize which memories on the SDE-3000EVH correspond to which program change messages sent from an external MIDI device. Press the [SETUP] button. The parameter to set is shown in the display.
-
Page 39: Connecting To A Computer
You must install the USB driver before connecting this unit to a USB MIDI computer. interface Download the USB driver from the BOSS website. Computer Install this special driver before making a USB connection. For details, refer to Readme.htm in the downloaded file. -
Page 40: System Settings
System Settings Configuring the Range of Memories Selectable Inheriting EXP Pedal Setting when Switching with the Foot Pedal Memory (Memory Extent) (EXP Hold) Press the [SETUP] button. Press the [SETUP] button. The parameter to set is shown in the display. The parameter to set is shown in the display. - Page 41 Restoring the Unit to the Factory Settings Here’s how to restore the SDE-3000EVH to its factory settings. Press the [SETUP] button. The parameter to set is shown in the display. ¸ ¸ ¸ ¸ ¸ ¸ ¸ ¸ ¸ ¸ ¸ ¸...
-
Page 42: Main Specifications
* AF method (Adaptive Focus method) This is a proprietary INPUT L/MONO jack: 1/4-inch phone type AD Conversion method from Roland & BOSS that vastly improves the signal- OUTPUT (DIRECT, EFX L, EFX R) jacks: 1/4-inch to-noise (SN) ratio of the AD and DA converters. -
Page 43: Preset List
Preset List Four Eddie Van Halen settings are saved as EVH memories (the detailed parameters are unreleased). Further, there are two types of each of these four settings: a type for output to three amps, and a type for output to a pair of amps in stereo. The OUT LEVEL parameters are optimized for each type. - Page 44 Preset List Presets A01 through B04 were created to demonstrate the range of the SDE-3000EVH capabilities. A01-A04 are basic delays that only use DDL1: A.01 DDL 1 is set to sixteenth note. STRUCTURE: SERI BPM: DRY+WET L DDL 1 (L/R)
- Page 45 Preset List A.03 DDL 1 is set to 450 msec. STRUCTURE: SERI BPM: DRY+WET L DDL 1 (L/R) DRY+WET R Guitar DDL 1 parameter DDL 1 SW: DDL 1 TYPE: STEREO DDL 1 TIME LINK: ¸ ¸ ¸ ¸ ¸ ¸ ¸ ¸ ¸ ¸ ¸ ¸ $ 4 5 0 4 4 2 5 $ 0 $ 0 L channel ¸...
- Page 46 Preset List B.01 DDL 1 is set as follows: 15 msec for Lch, 10 msec for Rch. DDL 2 is set to 370 msec. STRUCTURE: SERI BPM: DRY+WET L DDL 1 (L/R) DDL 2 (L/R) DRY+WET R Guitar DDL 1 parameter DDL 2 parameter DDL 1 SW: DDL 2 SW:...
- Page 47 Preset List B.03 DDL 1 is set as follows: 502 msec for Lch, 498 msec for Rch. DDL 2 is set as follows: 373 msec for Lch, 375 msec for Rch. The two delays are connected in series for a spacious delay sound. STRUCTURE: SERI BPM:...
Need help?
Do you have a question about the SDE-3000EVH and is the answer not in the manual?
Questions and answers