Table of Contents
Advertisement
Quick Links
Advertisement
Table of Contents

Related Manuals for Boss Dr. Sample SP-303


Summary of Contents for Boss Dr. Sample SP-303
- Page 2 101b • In households with small children, an adult • The unit and the AC adaptor should be located so should provide supervision until the child is their location or position does not interfere with capable of following all the rules essential for the their proper ventilation.
-
Page 3: Table Of Contents
Contents USING THE UNIT SAFELY... 2 Chapter 3. Sampling ....27 Before Sampling............. 27 Selecting Higher Quality Sampling, Extended Sampling, Main Features......6 or Lo-Fi Sampling (Sampling Grade)........27 Selecting Between Stereo and Mono Sampling ....27 About Sampling Time ............27 Panel Descriptions .... - Page 4 Contents Chapter 5. Chapter 7. Using the SP-303 Recording Sample Performances With Other MIDI Devices ..53 (Pattern Sequencer) ....43 Using the SP-303 With a MIDI Keyboard ....53 Composition of Patterns ........43 How to Change the MIDI Channel ......53 Changing the Tempo of a Pattern......43 Note On Operating With MIDI ........
-
Page 5: Main Features
Main Features High-Capacity Memory Cards (SmartMedia) Resampling? No Problem for Extended Sampling Times Resampling the playback of sampled sounds with internal The SP-303 itself provides up to three minutes and twelve effects added lets you create even more new sounds. And since the process is entirely digital, there is no degradation in seconds of sampling. -
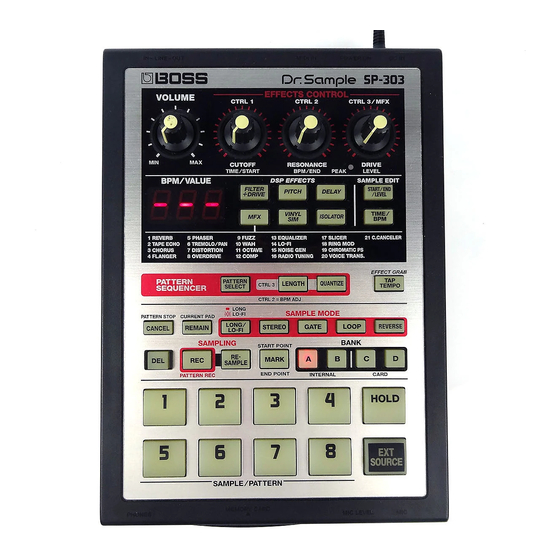
Page 6: Panel Descriptions
Panel Descriptions fig.P01 15 16 17 18 19 20 21 1 VOLUME Knob 4 Display Adjusts the volume level of the LINE OUT and Displays sample and pattern BPM (tempo), settings headphones jacks. values, error messages, and other information. You can also have the remaining time available for sampling 2 EFFECTS CONTROL Knobs displayed. - Page 7 Panel Descriptions 9 LENGTH (Pattern Length) Button 18 REVERSE Button Specifies the length of the pattern. This switches the SP-303 to “Reverse Playback,” where samples are played backwards. 10 QUANTIZE Button Reverse Playback is in effect when the button is lit; when Corrects (quantizes) the timing of the pattern recordings not lit, normal Playback is in effect.
-
Page 8: Power Switch
Panel Descriptions fig.P02 fig.P03 27 AC Adaptor Jack 32 PHONES (Headphones) Jack Connect the AC adapter to this connector. A set of headphones can be connected here to hear the same sound as the line outputs. The jack accepts stereo * Be sure to use only the specified AC adaptor. -
Page 9: Important Notes
IMPORTANT NOTES 291a In addition to the items listed under “USING THE UNIT SAFELY” on page 2–3, please read and observe the following: Power Supply • Never strike or apply strong pressure to the display. • When connecting / disconnecting all cables, grasp the •... -
Page 10: Quick Start
QUICK START Making Connections The SP-303 does not contain an amp or speaker. To hear * Audio cables, MIDI cables, stereo headphones, and sound, either connect an amplifier and speakers or use microphones are not included. These may be purchased headphones. -
Page 11: Turning On The Power
QUICK START Turning On the Power Turning Off the Power 1. Before you turn off the power, make sure that the Once the connections have been completed (p. 11), turn on power to your various devices in the order specified. By volumes of the SP-303 and the connected amp/mixer turning on devices in the wrong order, you risk causing are set to their minimum position. -
Page 12: Listen To The Samples
QUICK START Listen to the Samples * The SP-303 is able to sound up to eight pads simultaneously. If you press additional pads in an attempt to play more, the sound of the first-pressed pad will be turned off (pad dark) to When the SP-303 is shipped from the factory, 1–8 of bank A make way for the newly-pressed pad (last-note priority). -
Page 13: Adding Effects To Samples
QUICK START Adding Effects to Samples 4. Turn the CTRL 1–3 knobs to adjust the amount of Filter + Overdrive to be applied. The SP-303 has 26 effects which can add special characters to CTRL 1 (CUTOFF): the sound. Adjusts the filter cutoff frequency. The more the knob is Here’s how to try out these effects and hear what they can do. -
Page 14: Try Playing A Pattern
QUICK START Try Playing a Pattern 2. Press pad 1. Pad 1 momentarily lights, then goes off, and the With the SP-303, you can press a number of pads in sequence [PATTERN SELECT] light goes out. to play a series of samples, and record that sequence as The performance of the demo pattern begins. -
Page 15: Sampling Your Own Sounds
QUICK START Sampling Your Own Sounds 1. Refer to p. 11 for instructions on connecting CD and MD players, microphones, and other devices. Here, let’s try sampling to Pad 1 in Sample Bank B, which has 2. Press BANK [B], and confirm that the button has lit. had no samples assigned to it at the factory. -
Page 16: If You Don't Like The Sampled Sound
QUICK START If undesired sound or silence was recorded at the beginning or end of the sample, you can make settings so that only the desired portion is played back. For more detailed information, refer to “Preventing Unneeded Portions from Being Played (Markers/Start Point/End Point)”... -
Page 17: Chapter 1. Playing Samples
Chapter 1. Playing Samples On the SP-303, you can play samples by pressing pads 1–8 and the BANK buttons. When you insert an unused (i.e., unformatted on the SP- The pad will remain lit while the sample is playing. 303) memory card, and press BANK [C] or [D], then BANK The pad most recently pressed to play a sample is called the [C] and [D] blink, and “FMt”... -
Page 18: Having A Sample Continue To Play Even When The Pad Is Released (Hold)
Chapter 1. Playing Samples Having a Sample Continue to Play Playing Sounds Input From External Even When the Pad is Released (Hold) Devices (EXT SOURCE Pad) You can use the Hold function to cause the sample to Just as with samples, you can use the SP-303 to control the continue sounding even after you release the pad. -
Page 19: Adjusting The Volume Of The External Input Sounds
Chapter 1. Playing Samples Adjusting the Volume of the External Input Sounds If excessive input volume levels causes the sound to be distorted, or if noise becomes noticeable because levels are too low, use the following procedure to adjust the volume. fig.r01-04 1. -
Page 20: Chapter 2. Using The Effects
Chapter 2. Using the Effects Adding Effects to Samples The SP-303 features twenty-six internal effects, so you can add effects to samples to alter the sounds, just with this one unit. fig.r02-01a ● Of the twenty-six effects, you can select five of them– Filter + Overdrive, Pitch Shifter, Delay, Vinyl Simulator, and Isolator–by directly pressing their buttons. -
Page 21: Turning Effects On And Off Rapidly (Effect Grab)
Chapter 2. Using the Effects Applying Effects to Multiple Turning Effects On and Off Rapidly (Effect Grab) Samples When using the regular effects buttons, since the effects are Normally, when an effect is turned on, the effect is applied turned on or off each time these buttons are pressed, it means only to the sample assigned to the current pad, with no other that if you want to have an effect repeatedly turned on and samples using the effect. -
Page 22: Applying Effects To All Samples Simultaneously
Chapter 2. Using the Effects Applying Effects to All Samples Simultaneously If you want an effect to be applied to all of the pads at once, it would be time consuming if you needed to press all the pads. Thankfully, though, a simple procedure you can use when applying an effect to all of the pads has been provided. -
Page 23: Effects List
Chapter 2. Using the Effects Effects List Effects That Can Be Selected Directly With the Effects Buttons DSP EFFECTS CTRL 1 (display) CTRL 2 (display) CTRL 3 (display) FILTER + DRIVE CUTOFF (CoF) RESONANCE (rES) DRIVE (drV) Low-pass filter with overdrive. Adjusts the cutoff frequency. - Page 24 Chapter 2. Using the Effects DSP EFFECTS CTRL 1 (display) CTRL 2 (display) CTRL 3 (display) 1. REVERB REVERB TIME (tiM) TONE (ton) E.LEVEL (LEV) Adds reverberation to the sound Adjusts the time of reverb. Adjusts the quality of the reverb. Adjusts the volume of the reverb.
- Page 25 Chapter 2. Using the Effects DSP EFFECTS CTRL 1 (display) CTRL 2 (display) CTRL 3 (display) 15. NOISE GEN COLOR (CoL) QUALITY (qLt) LEVEL (LEV) Generates noise. Adjusts the tone of the hissing Sets how often the scratch noise is Adjust the volume level of the noise.
-
Page 26: Chapter 3. Sampling
Chapter 3. Sampling About Sampling Time Available sampling time for the SP-303 (the internal Unauthorized sampling from a CD, record, tape, video memory) and memory cards are shown below. production, or broadcast whose copyright is owned by a third party is forbidden by law, with the exception of * The times shown here are for mono sampling. -
Page 27: Sampling From A Microphone
Chapter 3. Sampling Sampling from a Microphone * You can select stereo sampling with mono input. In this case, the number of voices is doubled, which also uses twice the memory. Sample the microphone input (mono). Here is an example describing the procedure for sampling in 8. -
Page 28: Sampling From A Cd Or Md
Chapter 3. Sampling Sampling from a CD or MD * You can also stop sampling without pressing [REC] by pressing the lit (sampling) pad. In this case, after sampling stops, the sound just sampled is played back automatically. Sounds input from a CD or MD are sampled in stereo. The BPM is automatically calculated to correspond to the Here is an example describing the procedure for sampling in time of the sample (if BPM is set, the time from the start... -
Page 29: Sampling With The Tempo Specified Beforehand
Chapter 3. Sampling * If you select mono sampling with stereo input, the same sound The BPM is automatically calculated according to the is recorded to the left and right channels. In this case, the time of the sample (if BPM is set, the time from the Start stereophonic dimension is lost, but since the number of voices to the End Point), and that value appears in the display. -
Page 30: Starting Sampling Automatically (Auto Sampling)
Chapter 3. Sampling Starting Sampling Automatically (Auto Sampling) At this point, you can set the BPM using [TAP TEMPO] instead of the CTRL 2 (BPM) knob. When you strike The SP-303 provides an Auto Sampling feature which [TAP TEMPO] four times with a fixed interval, the BPM automatically begins sampling when the input sound (signal) is set with quarter notes lasting the set interval, and that exceeds a specified level. -
Page 31: To Stop Auto Sampling
Chapter 3. Sampling Making Samples with Effects 6. Press [REC]. [REC] will light, and the SP-303 will wait for an input Added (Resampling) signal. “rdY” (ready) appears in the display. When the input from the LINE IN or MIC rises above the With the SP-303, you can play back a sample that has effects sampling start level, sampling will start. -
Page 32: Deleting An Individual Sample
Chapter 3. Sampling Deleting an Individual Sample 5. Turn the CTRL 3/MFX (LEVEL) knob to adjust the sampling level so that the PEAK indicator lights only from time to time. To delete only a single sample, use the following procedure. fig.r03-06 6. -
Page 33: Deleting All Samples Together
Chapter 3. Sampling Deleting All Samples Together Changing the Assignment of Samples to the Pads You can delete all samples from the SP-303’s internal memory or memory card in one operation. You can change the assignment of samples to the pads by * When this procedure is carried out on a memory card, the exchanging the samples of two pads. -
Page 34: Checking The Remaining Sampling Time
Chapter 3. Sampling * When displaying the remaining sampling time of a memory card, the indication of minutes and seconds changes according Never turn off the power while the dots on the display to the amount of time left. If there are ten minutes or more are blinking. -
Page 35: Changing The Sampling Settings
Chapter 4. Changing the Sampling Settings Having Samples Play Only While the Pad Is Pressed (Gate Playback) When changing the sampling settings for a memory card, the changes may take some time to complete, and it Having Samples Play Even If the Pad may appear that operation has stopped momentarily. -
Page 36: Playing Samples In The Reverse Direction (Reverse Playback)
Chapter 4. Changing the Sampling Settings Playing Samples in the Reverse fig.r04-04 Direction (Reverse Playback) Reverse Playback plays samples backwards from the end of the sample, providing an effect like that of a tape being rewound. fig.r04-05 Normal 1. Confirm that [PATTERN SELECT] is not lit. If [PATTERN SELECT] is lit, press it so that the button’s Reverse playback light goes out. -
Page 37: Setting The Sample Volume
Chapter 4. Changing the Sampling Settings Setting the Sample Volume Preventing Unneeded Portions from Being Played With the SP-303, you can set the volume level for each (Markers/Start Point/End Point) sample individually. This is convenient for balancing the volume levels of samples On the SP-303, the area of the waveform data which will on different pads. -
Page 38: Adjusting Only The End Point
Chapter 4. Changing the Sampling Settings 2. Press the pad to which the sample you want to change 2. Hold down [MARK] and press the pad to which the is assigned. sample you wish to change is assigned. The pad will light, and the sample will sound. This pad The pad will light, and the sample will sound. -
Page 39: Finely Adjusting The Start Point And End Point
Chapter 4. Changing the Sampling Settings 4. Press the pad again (or in the case of Gate playback, * If you want to cancel the move, return the CTRL 1 (START) release the pad). knob to the center position, setting it so that “0” is displayed. When [MARK] lights, the setting is complete. -
Page 40: Deleting Unwanted Portions (Truncate)
Chapter 4. Changing the Sampling Settings Deleting Unwanted Portions 6. Press [DEL]. (Truncate) [DEL] will light, and the dots in the display blink. During the truncation process, all Pads from [1] through [8] will at first light up, then go out one by one (starting When you specify the Start/End Points, unused portions of with [1]), indicating the progress of the truncation. -
Page 41: Changing The Length Of A Sample Without Changing The Pitch (Time Modify)
Chapter 4. Changing the Sampling Settings 4. Turn the CTRL 2 (BPM) knob to change the BPM value. 4. Turn the CTRL 1 (TIME) knob. If you want to halve the displayed value, turn the knob The BPM value appearing in the display changes as the to the left;... -
Page 42: Recording Sample Performances (Pattern Sequencer)
Chapter 5. Recording Sample Performances (Pattern Sequencer) Changing the Tempo of a Pattern By recording the processes of playing samples as patterns, you can then play back those samples in the same way later The pattern tempo setting is applied to all patterns. This is convenient for creating songs by combining a number * You cannot save different tempo settings for individual patterns. -
Page 43: Stopping Patterns
Chapter 5. Recording Sample Performances (Pattern Sequencer) When you strike [TAP TEMPO] four times using a fixed, * No action results if you press a pad to which no pattern is steady timing, the BPM is set with quarter notes of that assigned (no pattern is recorded). - Page 44 Chapter 5. Recording Sample Performances (Pattern Sequencer) 7. Press [TIME/BPM], and confirm that the button has lit. 13. Press [QUANTIZE], and confirm that the button has turned off. The tempo (BPM) of a pattern appears in the display. 14. Press [REC]. 8.
-
Page 45: Erasing The Data For Mistakes In Performances
Chapter 5. Recording Sample Performances (Pattern Sequencer) Erasing the Data for Mistakes in The dots blink in the display; when the blinking stops, deletion is finished. Performances You can erase performances of samples recorded by mistake by specifying the sample pads and erasing the data. Never turn off the power while the dots are blinking. -
Page 46: Deleting All Patterns Together
Chapter 5. Recording Sample Performances (Pattern Sequencer) Deleting All Patterns Together Changing the Assignment of Patterns to the Pads You can delete all patterns from the SP-303’s internal memory or memory card in one operation. You can change the assignment of patterns to the pads by * When this procedure is carried out on a memory card, the exchanging the patterns on two different pads. -
Page 47: Chapter 6. Using Memory Cards
Chapter 6. Using Memory Cards You can use commercially available SmartMedia cards as memory cards for the SP-303; The 3.3 V type with the The procedures below cannot be carried out when there capacities of 8 MB to 64 MB can be used. is no memory card inserted in the SP-303 or if the card is not formatted. -
Page 48: Initializing Memory Cards (Format)
Chapter 6. Using Memory Cards Initializing Memory Cards Saving Samples to Memory (Format) Cards (Sample Save) Before the SP-303 can use a newly purchased SmartMedia You can save sixteen samples from the SP-303’s internal card or a card which was used by another device, the card memory (Banks A and B) as one set to the backup area of a must be formatted (initialized) by the SP-303. -
Page 49: Loading Sample From A Memory Card (Sample Load)
Chapter 6. Using Memory Cards During the loading process, all Pads from [1] through [8] will at first light up, then go out one by one (starting Never turn off the power while the dots are blinking. with [1]), indicating the progress of the load. This may result in damage to the memory card and The loading is completed when the dots stop blinking corruption of data in the internal memory. -
Page 50: Loading Pattern From A Memory Card (Pattern Load)
Chapter 6. Using Memory Cards 3. Press a pad to specify the card area that you wish to * If you decide to cancel the Save operation, press [CANCEL]. load into internal memory. 4. Press [REC]. Pressed pads remain lit, and [REC] blinks. [REC] lights up, and the save is executed. -
Page 51: Importing Wave Data To The
Chapter 6. Using Memory Cards Importing Wave Data to the * No files with file names other than the those can be loaded. SP-303 From a Computer * Only WAVE or AIFF files with a sampling frequency of 44.1 kHz can be loaded. You can use SmartMedia cards to import WAVE and AIFF files * You cannot load waves that are shorter than approximately from a personal computer and transfer them to the SP-303. -
Page 52: Chapter 7. Using The Sp-303 With Other Midi Devices
Chapter 7. Using the SP-303 With Other MIDI Devices “MIDI” is short for “Musical Instrument Digital Interface,” a The SP-303’s pads correspond to the MIDI keyboard note global standard for the exchange of performance data and numbers as shown below. tone data between devices and instruments. -
Page 53: Note On Operating With Midi
Chapter 7. Using the SP-303 With Other MIDI Devices Note On Operating With MIDI * When continuously playing a sample of a looped phrase along with a MIDI sequencer performance, the rhythm between them may diverge as time passes. In such instances, rather than If you are using a MIDI device to play samples from the SP- using Loop Playback, use One Shot Playback and send a Note 303, you must change the way the external MIDI device’s... -
Page 54: Synchronizing Only The Pattern Tempo With A Midi Sequencer
Chapter 7. Using the SP-303 With Other MIDI Devices 5. Start the MIDI sequencer. 3. Turn the CTRL 1 (TIME) knob to set the MIDI Sync mode to “tMp.” The specified pattern begins playing in sync with the MIDI sequencer. * With the factory settings, this is set to “Aut.”... -
Page 55: Using The Sp-303 As A Rhythm Sound Module
Chapter 7. Using the SP-303 With Other MIDI Devices 4. Press [TIME/BPM]. The [TIME/BPM] light goes out, and the settings value is EXT SOURCE A1 A2 A3 A4 A5 A6 A7 A8 recorded. Note B6 C7 C#7 D7 D#7 E7 F7 F#7 G7 Note Number 95 96 97 98 99 100 101 102 103 * The value set here remains in memory even after the power is... -
Page 56: Using The Note Messages From The Rhythm Machine To Play The Sp-303'S Samples
Chapter 7. Using the SP-303 With Other MIDI Devices 5. Start the rhythm machine. * This setting is retained even while the SP-303 is turned off. The specified pattern begins playing in sync with the * If the rhythm machine’s MIDI channel is set to something rhythm machine. -
Page 57: Restoring The Midi Settings To The Factory Settings
Chapter 7. Using the SP-303 With Other MIDI Devices Bank C Pad 1 Chinese Cymbal Pad 2 Ride Cymbal (Bell) Pad 3 Tambourine Pad 4 Splash Cymbal Pad 5 Cowbell Pad 6 Crash Cymbal 2 Pad 7 Vibra-slap Pad 8 Ride Cymbal 2 Bank D Pad 1... -
Page 58: Examples Of Using The Sp-303
Chapter 8. Examples of Using the SP-303 Using Pattern Sequencer to Create a Rhythm Pattern Now let’s create a four-measure backing pattern including rhythm as Pattern 1. Set up the following samples. Kick Trigger, One Shot Pad 1: Pad 2: Snare Trigger, One Shot Pad 3:... - Page 59 Chapter 8. Examples of Using the SP-303 fig.r08-04 fig.r08-07 QUANTIZE = 4 ERASE Bass Phrase Pad 3 pressed during this passage Chord Phrase SNARE SNARE Bass Phrase KICK KICK KICK KICK Hi-hat throughout this passage deleted SNARE SNARE 15. Starting at the beginning of the next pass, input Pad 5 KICK KICK KICK...
-
Page 60: Using The Sp-303 With Midi Devices
Chapter 8. Examples of Using the SP-303 Using the SP-303 with MIDI Devices When using a MIDI sound module to play multiple parts, you can select any one of the parts and substitute it with the SP-303’s performance. For example, here is how to have the SP-303 play instead of a MIDI sound module’s Part 1. Connections fig.r08-08 Power Amplifier... -
Page 61: Using The Sp-303 With A Turntable
Chapter 8. Examples of Using the SP-303 The performance from the MIDI keyboard is * To return the SP-303 to its regular operating status, hold simultaneously recorded to the MIDI sequencer. down [EXT SOURCE] while switching ON the POWER switch. * For more on the correspondence between notes and samples, refer to (p. -
Page 62: Playing A Sample Along With The Sound From A Turntable
Chapter 8. Examples of Using the SP-303 Playing a Sample Along With the Sound From a Turntable Here is how to have a sample from the SP-303 play while the sound from a turntable plays simultaneously. Connections fig.r08-10 Power Amplifier PHONO A LINE B Turntable... -
Page 63: Appendices
Appendices Chart of Operations Operation Play a sample Pad [1]–[8] Play sounds input from an external source [EXT SOURCE] [EXT SOURCE] ➔ [STEREO] Select mono/stereo for the external input [REC] ➔ Pad [1]–[8] ➔ [REC] Sampling [CANCEL] + [REC] ➔ CTRL 3/MFX (LEVEL) knob ➔ [REC] Set Auto Sampling [CANCEL] + [REC] ➔... - Page 64 Appendices [PATTERN SELECT] ➔ [CANCEL] + [DEL] ➔ BANK [A]–[D] ➔ [DEL] Delete all patterns [PATTERN SELECT] ➔ [CANCEL] + BANK [C] or [D] ➔ Pattern Save Press a pad ([1]–[7]) to specify the number of the area ➔ [REC] [PATTERN SELECT] ➔...
-
Page 65: Troubleshooting
Appendices Troubleshooting If the SP-303 does not function as you expect, please check the following points before assuming that a malfunction has occurred. If this does not resolve the problem, contact a nearby Roland service center or your dealer. ■ No Sound/Low Volume From Problems With the Sound External Input ■... - Page 66 Appendices ■ Cannot Sample Problems With the SP-303’s Memory ❍ Could insufficient memory be the problem? ■ Data Cannot Be Saved Correctly to ➔ “FuL” is displayed if you try to sample when there is not the SP-303’s Memory enough available memory. Delete unneeded samples to free up more memory (p.
-
Page 67: Initializing The Sp-303'S Memory
Appendices Problems With MIDI/Synchronization Initializing the SP-303’s Memory ■ Cannot Play Samples Using Initialize the SP-303’s internal memory. External MIDI Device ❍ Is the power to the external MIDI device turned on? All sample and pattern data in internal memory will be ❍... -
Page 68: Message List
Appendices Message List Data Empty Data Error ❍ When deleting a sample, all pads with no sample ❍ The sample data is corrupted. assigned to it was specified. After pressing [CANCEL] to clear the message from the ❍ When deleting a pattern, all pads with no pattern display, delete all the samples together (p. - Page 69 Appendices Protected Edit ❍ Internal memory protection is on; samples and patterns ❍ In the process of making settings for a sample’s start/ cannot be recorded or deleted. Turn the Protect switch end points, volume, tempo, or playback time (p. 38–42). off.
-
Page 70: Midi Implementation Chart
Appendices MIDI Implementation Chart fig.r09-01_MIDI Dr. Sample Date :Jan. 10, 2001 MIDI Implementation Chart Model SP-303 Version : 1.00 Transmitted Recognized Remarks Function... Basic Default 1–16 Memorized Channel Changed 1–16 Default Mode 3 Mode Messages Altered ************** Note 35–67 Can be changed 95–127 True Voice Number : **************... -
Page 71: Specifications
Appendices Specifications SP-303: Dr. Sample ● Maximum Polyphony ● Input Impedance 23 k Ω (line) 8 voices 2 k Ω (mic) ● Internal Memory ● Nominal Output Level Samples: 16 (8 samples x 2 banks) Patterns: 16 (8 patterns x 2 banks) Output (line): -10 dBu ●... -
Page 72: Index
Index Lo-Fi Sampling ............... 27 LONG ................27 AiF ................52, 70 Loop Playback ..............36 AIFF File ................. 52 Loop Recording ............. 44 Auto Sampling ............... 31 Memory Card ............. 27, 29, 48 Backup Area ..............48 MFX ............... 14, 21–22, 25 BPM .............. - Page 73 Index STANDARD ..............27 Start Point ..............38–40 Stereo Sampling ............. 27 Synchronize .............. 54–56 TAP TEMPO ..............43 Tempo ..............15, 30, 41 Tempo Sync ..............54 Time Modify ..............42 trC ................41, 70 Trigger Playback ............. 36, 54 Truncating ..............
- Page 74 For the U.K. IMPORTANT: THE WIRES IN THIS MAINS LEAD ARE COLOURED IN ACCORDANCE WITH THE FOLLOWING CODE. BLUE: NEUTRAL BROWN: LIVE As the colours of the wires in the mains lead of this apparatus may not correspond with the coloured markings identifying the terminals in your plug, proceed as follows: The wire which is coloured BLUE must be connected to the terminal which is marked with the letter N or coloured BLACK.
- Page 75 02560256 ’05-5-4N...
Need help?
Do you have a question about the Dr. Sample SP-303 and is the answer not in the manual?
Questions and answers