
Subscribe to Our Youtube Channel
Related Manuals for BeaverLAB DDL-M2

Summary of Contents for BeaverLAB DDL-M2
- Page 1 Intelligent Microscope M2 DDL-M2A/B Instruction Manual Please read this instruction manual in detail! Please keep this instruction manual in a safe place!
-
Page 3: Table Of Contents
CATALOG 1. Product overview 2. Notice in application 3. Microscope installation and use instructions 4. Microscope open and use 5. Microscope pedestal use step by step instructions 6. Accessories and tools 7. Interface instructions 8. Microscope troubleshooting 9. Trademark and legal notices Microscope overall parameters... -
Page 4: Product Overview
1 Product Overview Thank you for purchasing the Intelligent microscope M2, hereinafter referred to as the microscope. Please read this manual carefully before use and keep it in a safe place. Please do not use the microscope without understanding how to use it. -
Page 5: Notice In Application
2 Notice In Application Please read this manual carefully and use it correctly. Pay attention to the protection of the lens , be sure to close the lens cap after use to avoid dust or foreign objects into. This microscope can be used handheld or inserted into the base as a desktop use, pay attention to the strength when inserted to avoid damage to the components. -
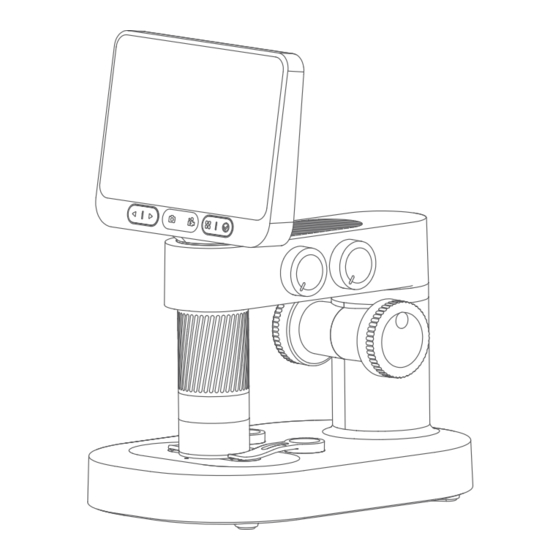
Page 6: Microscope Installation And Use Instructions
3 Microscope Installation And Use Instructions Microscope Composition Microscope monomer Microscope base... - Page 7 Microscope Pedestal Mounting Instructions 1. Take off the microscope monoblock lens cover. 2. Holding the base with one hand, insert the microscope monoblock vertically downward into the mounting hole, paying attention to the rear slot aligned with the mounting hole. 3.
- Page 8 Usage Environment Please use in -10℃~45℃ Please avoid getting the Please avoid placing the Please avoid dust Please avoid the environment microscope wet with microscope near heat, entering the microscope microscope to be water, drinking water, open flames, flammable lens and interior hit and violent vibration corrosive liquid, etc.
- Page 9 The microscope can be charged with Do not charge for more than 12 hours a daily cell phone charger, computer, to avoid affecting the battery life. or rechargeable battery. Charging process, microscope shell and battery such as a slight heating for the normal phenomenon please do not worry to use.
-
Page 10: Microscope Open And Use
4 Microscope Open And Use Micromonomer Operation Instructions Before using the microscope, please make sure to hold it firmly in your hand or place it on a tabletop for use. Microscope Monomer Microscopic observation of core components Focus Rotary Cylinder Multiple adjustment Microscope optical focus adjustment Lens Cap... - Page 11 Video Button Go to the video screen Photo Button Enter the photo interface Function Leys Open menu bar Left And Right Movement Keys Control cursor movement OK Button left and right Click to confirm Microscope Monomer Interface Power/WiFi Connection Indicator Type-C port for charging or connecting to computer Indicator light...
- Page 12 Digital Reduction Key Microscope Monoblock Digital Zoom Button Power Button Short press to Short press to digitally enlarge. digitally reduce. Press and hold for 3 seconds to turn on the phone. Press and hold for 3 seconds to turn off the phone. Microscope Monomer Brightness Dimming Key Brightness Dimmer Key...
- Page 13 Microscope Magnification Adjustment Counterclockwise rotation: Magnification Clockwise rotation: Zoom out (Note: At the same distance, there are two magnifications by rotating the focusing rotary drum. The lifting knob and digital zoom in and zoom out keys can also be used to adjust the multiple. The focusing rotary drum, lifting knob and digital zoom in function are used together.) Step-by-step Instructions For Use:...
- Page 14 3. Remove the lens cover. 4. Aim the microscope at the object to be observed. 5. The other hand rotate the focus rotating cylinder, observe the screen display, and adjust to the best observation effect.
-
Page 15: Microscope Pedestal Use Step By Step Instructions
5 Microscope Pedestal Use Step By Step Instructions Microscope Base Microscope fixtures Color Adjustment Knob Adjust the viewing window color clockwise Base Switch / Light Brightness Knob Adjust the viewing window color counterclockwise and close it Turn on and brighten the viewing window clockwise Dim the viewing window counterclockwise and close it... - Page 16 Lift Knob Chassis Charging Port Adjust the microscope up and down to Type-C port for dock charging achieve different magnifications Microscope Base Opening And Closing Turn the upper brightness adjustment button clockwise, and hear the "Ta" sound, the observation window lights up, that means the microscope base has been opened. Turn the upper brightness adjustment button counterclockwise, and when you hear the "Ta"...
- Page 17 3. Adjust the microscope lift knob, so that the lens barrel 4. Place the object to be observed on the bottom is at a relatively suitable height, easy to place the object viewing panel, in the the center of the crosshairs of observation.
- Page 18 Use Of Specimen Fixation Clips Specimen Fixation Clips Fixation of specimens or observation targets Caution: The retaining clip is magnetically attached, so it can be attached in place as long as it is close to the base mounting section. Specimen fixation clip bottom and base adsorption position regularly cleaned to avoid adsorption of other metal substances.
-
Page 19: Accessories And Tools
Observation Window Light Adjustment Function Description The intensity of the observation window light will affect the specimen outline and some details, please pay attention to the adjustment during use. Choose the appropriate rendering lighting to optimize the observation of the specimen. 6 Accessories And Tools Tool Storage Box Petri Dish x2... -
Page 20: Interface Instructions
7 Interface Usage Instructions Turn On The Device Press and hold the power on button 3S to turn on the phone Photo And Video Touch the photo icon to take a picture and touch the record icon to start/end recording. - Page 21 Album Press the menu button to bring up the three buttons of video album/photo album/settings, select left and right and press the confirmation button to enter the corresponding interface. Video Album Photo Album Settings (microscope-related settings)
- Page 22 APP User Guide: APP download and installation: Scan the QR code below to download the APP (search "Beaver Point" in App store or Google Play to download the APP) Scan here to download APP Android Install the software according to the operating instructions; Turn On The Device Press and hold the microscope rear power on button for 3 seconds, the lower small light of the button lights up or the bottom illumination lights up, that means the microscope has been turned on.
- Page 23 After the device is turned on, open the mobile APP. Click to connect to WIFI and find the hotspot of "DDL-M2-XXXXXX"; Tap and connect to the hotspot. If a connection confirmation prompt pops up, please click "Stay connected" (Android version)/click "OK";...
- Page 24 After clicking Live View, you can enter the real-time observation interface. (Note: After the APP is closed, you need to manually disconnect the WIFI to continue the observation.) Return Click to take photo Click to record Click to watch live Real-time observation For Computer Use Log on to www.beaverlabtech.com or www.dangdangli.com to download and install the software installation...
- Page 25 Use the usb cable that comes with the microscope to connect the microscope monoblock to the computer host; Opening the software to select microscope equipment. Follow the software operating instructions to use it.(Tips: Click on the name bar in the upper right corner to open the connected device and select the resolution)...
-
Page 26: Microscope Troubleshooting
8 Microscope Troubleshooting Problem Phenomenon Reason Processing Method High current during charging, high battery Heat during charging Normal state heat, which is normal ①Repeat connection in close proximity ②Use ①Distance too far ②Equipment without after charging the device ③App and device are The app can't connect power ③Equipment failure closed and restarted before use... -
Page 27: Trademark And Legal Notices
9 Trademark And Legal Notices ”BeaverLAB” is a trademark applied for or registered in mainland China by Beaver Technology (Shenzhen) Co., Ltd. and is used on this merchandise. Without the permission of the trademark owner, no person or organization may use the above trademark mark on goods that are not approved. - Page 28 Any changes or modifications not expressly approved by the party responsible for compliance could void the user's authority to operate the equipment. NOTE: This equipment has been tested and found to comply with the limits for a Class B digital device, pursuant to Part 15 of the FCC Rules.
-
Page 29: Microscope Overall Parameters
Microscope Overall Parameters Product Brand BeaverLAB Product Name Intelligent Microscope M2 Product Model DDL-M2 Product Color White/Gray Chassis Battery Capacity 1800mAh Li-ion battery Single Cell Capacity 2500mAh Li-ion battery Material ABS、PC、Aluminum alloy、LCD、 Electronic component... - Page 32 Intelligent Microscope M2 Product Name: Intelligent Microscope M2 Product Net Weight: About 0.65kg Operating Temperature: -10℃ ~45℃ Product Model: DDL-M2 Input Voltage: DC5V Certification Information: FCC CE Product Size: 182x122x216mm Wireless Connectivity: Wi-FiIEEE802.11b/g/n2.4Ghz FCC ID: 2A6VMDDL-M2 Address: Room101.102, Building 6, F518 Idea Land, No.1065, Baoyuan Road, Laodong, Website Address: www.beaverlabtech.com...
Need help?
Do you have a question about the DDL-M2 and is the answer not in the manual?
Questions and answers
How can I view my photos individually?