Advertisement
Quick Links
INTELLA-SCAN
GRAPHIC ANNUNCIATOR
W A T E R F LO W
T A M PE
LO W A IR
R R
R R
C O . LO C A T IO N
10
R R
R R
Y Y
ST O R A G E
R R
108
G G
R R
R A M P
G G
G G
M IC R O C O M PU T E R
Y Y
G G
C O M M U N IC A T IO N S
C
G A
Y O U
H E
C O N F E R E N C E
10
LE G E N D
D E T E C T O
G A
C
Installation and
Operating Instructions
A A
A A
A A
PR E - A C T IO N
R ISE R
LO BBY
LE A SE SPA C E
E LE C T R IC
R R
R O O M
E LE V A T O R S
A
A
R R
R R
PO W E R
18"
10
R R
R R
Y Y
G G
R R
G G
R R
R E C E PT IO N
E Q U IPM E N T
10
G G
10
LO BB
C O P
O F F IC
O F F IC
R O O
11
10
10
SILE N C
T E ST
R E V IE
ST E
R
P rotection
Manual P/N 06-131
Date: 2/1/98
Advertisement

Related Manuals for Fike 10-11 Series


Summary of Contents for Fike 10-11 Series
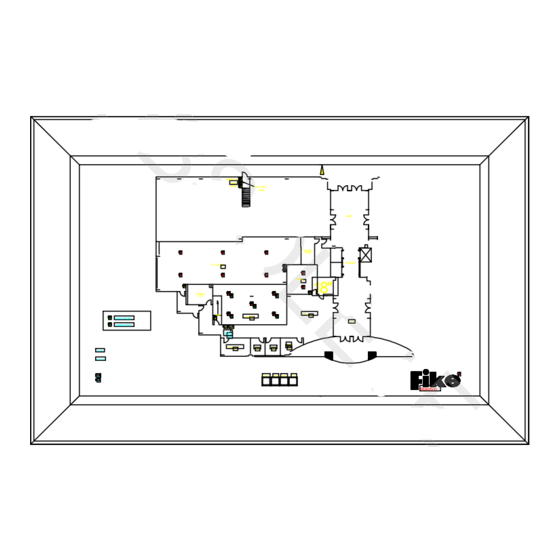
- Page 1 INTELLA-SCAN GRAPHIC ANNUNCIATOR W A T E R F LO W T A M PE LO W A IR PR E - A C T IO N R ISE R LO BBY LE A SE SPA C E E LE C T R IC R O O M E LE V A T O R S C O .
-
Page 2: Table Of Contents
Graphic Annunciator Manual P/N 06-131 2/98 Table of Contents Overview Possible Systems / Wiring Diagram Module Part Numbers & Definition Graphics Micro Board Graphic Switch Card LED Driver Boards Ordering Information Spare Parts / Door Connection to Back Box 9 Programming Checkout Troubleshooting... -
Page 3: Overview
Graphic Annunciator Manual P/N 06-131 2/98 Overview The Fike 10-11XX Graphic Annunciator is an ancillary system designed for use with the Fike Intella- Scan Fire Alarm Control Panel. It is designed to provide remote status of an individual device, zone, and system by illumination of a color LED(s). -
Page 4: Led Driver Boards
Graphic Annunciator Manual P/N 06-131 2/98 Wiring Diagrams/Installation 18-31VDC @ 120MA NON-SUPERVISED LED DRIVER 34 PIN RIBBON CABLE LED DRIVER CATHODE ANODE 34 PIN RIBBON CABLE LED DRIVER #1 34 PIN RIBBON CABLE 6 PIN RIBBON CABLE 6 PIN RIBBON CABLE FIBER OPTIC CABLE, 200 FT. - Page 5 The Graphics MicroController board is programmed using a Personal Computer and software program EGRAPHIC. The software program communicates to the Graphics Micro using Fike Communications cable, P/N 10-1874. When programming the LED, the LED’s are illuminated in the order that they are hard-wired to the LED Driver board.
- Page 6 Graphic Annunciator Manual P/N 06-131 2/98 10-2086 Intella-Scan Graphics Switch Card 4.00" 1.45 " N O N C S W 2 S W 1S IL E N C E S W 4 R E V IE W S W 3 S T E P L A M P T E S T FR O N T B A C K...
- Page 7 Graphic Annunciator Manual P/N 06-131 2/98 10-1858 LED Driver Board #1 8.0938" - 32 - 32 - 64 - 64 - 64 - 64 - 32 - 32 - 64 - 64 - 64 - 64 PO SIT IV E L E A D S NE G A T IV E L E A D S 3.3125 "...
-
Page 8: Ordering Information
Graphic Annunciator Manual P/N 06-131 2/98 Ordering Information To order a complete Graphic Annunciator assembly a minimum of two parts are required, a door assembly and a back box. The door assemblies are typically shipped with all electronics necessary to support up to 128 LED’s. -
Page 9: Spare Parts / Door Connection To Back Box
Graphic Annunciator Manual P/N 06-131 2/98 Spare Parts 02-2999 Tool for Annunciator LED Disconnect (not required on new 10-1858/9’s) 02-3038 LED Orange 02-3013 LED, Green 02-3009 LED, Red 02-3247 LED, Yellow 02-3002 PCB Mount Support, Plastic (For mounting LED Driver Board) 02-3001 PCB Mount, Plastic (For mounting LED Driver Board) 02-2957 Connector, Fiber Optic Transmitting, Red 02-2958 Connector, Fiber Optic Receiving, Black... -
Page 10: Programming
Personal Computer using the Fike DOS compatible PGRAPHIC or EGRAPHIC program. The program communicates to the Micro board RS232 connector via COM1 or COM2 Serial Port using Fike communication cable, P/N 10-1874 (DB25 to RJ11) or 10-1874A (DB9 to RJ11). Basic Requirements IBM-PC compatible computer DOS 3.0 or greater... - Page 11 Graphic Annunciator Manual P/N 06-131 2/98 Remember: 1) An LED can be assigned to multiple Sensors. A Sensor cannot be assigned to multiple LED’s. The only EXCEPTION is: If four or fewer ACM’s are used then JP7 may be installed to allow a maximum of 2 LEDs to be assigned to a Sensor. Assign the second LED by adding 4 to the ACM number.
- Page 12 Graphic Annunciator Manual P/N 06-131 2/98 Once <Enter> is pressed, the computer will ‘beep’ and the third configure screen will appear. It is for selecting the Intella-Scan ACM number in which the device is connected and the LED purpose: LED Address = 1 Enter ACM Number: 1 For individual address response enter ACM number or for Zone Response enter ‘T’...
- Page 13 Graphic Annunciator Manual P/N 06-131 2/98 If several LED’s are programmmed incorrectly or it is necessary to change several LED assignments, the “Clear All” selection is useful. The “CLEAR ALL” selection is located in the second configuration screen (F5 - CLEAR ALL). If F5 is selected, the screen will display a verification: F1-SUMMARY F5-CLEAR ALL F9-CLEAR CURRENT LED ADDRESS ESC-QUIT You have selected CLEAR ANNUNCIATOR!Do you wish to do this?(YorN);...
-
Page 14: Checkout
Graphic Annunciator Manual P/N 06-131 2/98 Jumper JP2 and JP4 should be IN. Jumper JP6 must be IN for Annunciators with ONE computer board. Jumper JP6 must be OUT for Annunciators with MORE THAN ONE computer board. Remember: 1) An LED can be assigned to multiple Sensors. A Sensor cannot be assigned to multiple LED’s. -
Page 15: Troubleshooting
Graphic Annunciator Manual P/N 06-131 2/98 1. Verify wiring is correct and free from opens and shorts. 2. Apply power to the Graphic system. 3. Verify “Micro Computer OK” LED is ON. 4. Verify “Communication OK” LED illuminates within one minute of power up. 5. - Page 16 3) Make sure P6 is not facing direct sunlight or florescent lighting. 4) Position the Annunciator JUMPERS : JP1-IN, JP2-OUT, JP3-OUT, JP4-IN. 5) Connect the COM1 SERIAL PORT to Graphic Annunciator using Fike Cable 10-1874. 6) Turn the Graphic Annunciator ON to establish communication.
- Page 17 Graphic Annunciator Manual P/N 06-131 2/98 (1) ECHO Test (2) SWITCH Test (3) RAM Test (4) LED Test (5) SERIAL LOOPBACK test (6) Quit Diagnostics The ECHO Test will test the connections from the computer to the graphic micro serial port. The software program sends a “HELLO”...
- Page 18 Graphic Annunciator Manual P/N 06-131 2/98 The RAM test will verify that the RAM on the Graphic Micro Board is capable of being written to and read from. This test will write over any configuration currently located in RAM and the configuration will be lost.
- Page 19 Graphic Annunciator Manual P/N 06-131 2/98 Set the Jumpers to: JP1-OUT JP2-IN JP3-IN JP4-OUT Install the test fiber optic cable between P6 AND P8 (For 10-2085 install between P6 and P7) Press SPACE BAR when ready or ESC to abort test..SERIAL LOOPBACK TEST ! IN PROGRESS..SERIAL LOOPBACK OKAY Press SPACE BAR to continue..
- Page 20 Graphic Annunciator Manual P/N 06-131 2/98 Jumpers JP2 and JP4 should be IN. Jumpers JP1, JP3, JP5, JP7, JP8 and JP9 should be OUT. Jumper JP6 must be IN for Annunciators with only ONE computer board. Jumper JP6 must be OUT for Annunciators with MORE THAN ONE computer board. Remember: 1) An LED can be assigned to multiple Sensors.
- Page 21 Graphic Annunciator Manual P/N 06-131 2/98 Intella-Scan Graphics Power Calculations The Graphic Annunciator will turn ON only 1 LED at a time. The flash rate between each ON/OFF time is so short, it appears to be constantly ON to the eye. If using a 24 volt source, or 10-2117: From above, each Micro Board draws 30mAmps and an LED draws 0.6mAmps Total Total Number of Micro Boards ________ x 30mAmps =...
- Page 22 Graphic Annunciator Manual P/N 06-131 2/98 CHEETAH CONTROL SYSTEM This document describes using the Intella-Scan Graphic Annunciator with the Cheetah Control System, and should also be considered as an addendum to the Cheetah Installation, Operation and Maintenance Manual 06-148. The 10-2260 485/232 Converter Module is the interface between the 10-2200 Cheetah Control System and the 10-11XX Intella-scan Graphic Annunciator.
- Page 23 Graphic Annunciator Manual P/N 06-131 2/98 HARDWARE CONFIGURATION The hardware is configured by inserting/removing two jumpers on the board. The two jumpers, labeled ‘J1’ and ‘J2’ have the following function: J1 IN – The board is placed in RS-485 Receive mode. The RS-485 connector P1 will receive data, and the RS-232 connector P3 will transmit data.
- Page 24 Graphic Annunciator Manual P/N 06-131 2/98 INSTALLATION DIAGRAM – SINGLE MICRO BOARD SCENARIOS TO CHEETAH P4 RS-485 24VDC RS-485 J1 IN TERM J2 IN RS-232 10-2260 02-4477 RS-232 RS-232 +24VDC 24VIN 5VIN 24VOUT 5VOUT 10-2085 Graphic Micro Board NOTE: See Technical Specifications for addition details Page 24...
- Page 25 Graphic Annunciator Manual P/N 06-131 2/98 INSTALLATION DIAGRAM – MULTIPLE MICRO BOARD SCENARIOS TO CHEETAH P4 RS-485 24VDC RS-485 24VDC RS-485 J1 IN J1 IN TERM TERM J2 IN J2 OUT RS-232 RS-232 10-2260 10-2260 02-4477 RS-232 02-4477 RS-232 RS-232 RS-232 +24VDC 24VIN...
- Page 26 Graphic Annunciator Manual P/N 06-131 2/98 ISCAN GRAPHIC MICRO-BOARD HARDWARE CONFIGURATION ( 10-2085 ) Jumper settings for normal operation: Jumpers JP1, JP4 and JP6 should be IN. Jumpers JP2, JP3, JP5, JP7, JP8 and JP9 should be OUT. See Manual P/N 06-131 for additional details ISCAN GRAPHIC MICRO-BOARD PROGRAMMING The Graphic Annunciator is programmed exactly the same way when using it with the Cheetah or the Intella-scan.
Need help?
Do you have a question about the 10-11 Series and is the answer not in the manual?
Questions and answers