Fluke TiR105 User Manual
Ccf thermal camera
Hide thumbs
Also See for TiR105:
- User manual (68 pages) ,
- Quick reference manual (2 pages) ,
- User manual (68 pages)
Table of Contents
Advertisement
Quick Links
TiR105
–
CCF Thermal Camera
User Manual
Extracted from: Ti100, Ti105, Ti110, Ti125, TiR105, TiR110, TiR125 Users Manual Oct 2014
PN 3889825
February 2012, Rev.1, 2/13
© 2012-2013 Fluke Corporation. All rights reserved.
Specifications are subject to change without notice.
All product names are trademarks of their respective companies.
Advertisement
Table of Contents

Related Manuals for Fluke TiR105


Summary of Contents for Fluke TiR105
- Page 1 TiR105 – CCF Thermal Camera User Manual Extracted from: Ti100, Ti105, Ti110, Ti125, TiR105, TiR110, TiR125 Users Manual Oct 2014 PN 3889825 February 2012, Rev.1, 2/13 © 2012-2013 Fluke Corporation. All rights reserved. Specifications are subject to change without notice.
-
Page 2: Safety Information
A rugged, rechargeable lithium-ion smart battery provides power to the Imager. Direct AC power is accessible with the included AC power adapter. The TiR105 uses a focus-free system with a large depth of field that keeps the image in good focus at distances more than four feet. -
Page 3: How To Charge The Battery
How to Charge the Battery Connect the ac power adapter into an ac wall outlet and connect the dc output to the Imager’s ac power socket. flashes in the upper left- hand corner of the display while the battery charges with the ac power adapter. Charge until the charge indicator on the display does not flash. -
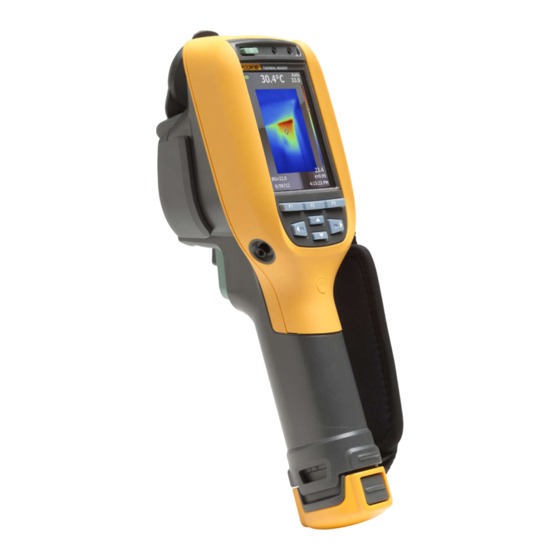
Page 4: Features And Controls
Features and Controls TiR105 Focus The TiR105 uses a large depth of field focus-free system. The focus-free system can focus at a minimum distance of 122 cm (48 in) Images closer than that will be blurred. Beyond that to infinity, hold the camera still and images should be sharp, with no adjustment. -
Page 5: How To Use The Control Buttons
How to Use the Control Buttons The function of the primary trigger is to capture a thermal image for possible storage to memory by the user. How to Use the Menus Image Capture Point the imager at the object or area of interest. Make sure that the object is in focus. -
Page 6: Sd Memory Card
SD Memory Card To eject an SD memory card, push in on the exposed edge of the card and then release. The card should pop partially out after you release it. Carefully pull the card out of the slot. To use the SD memory card, make sure that the write-protect lock is open. - Page 7 Menus...
-
Page 10: Image Menu
Image Menu The Image menu has controls for different features used in the presentation of the infrared image on the Imager's LCD and some saved image files. Data saved as .is2 format can easily be modified within SmartView software. .bmp or .jpg format will retain image settings at the time of capture and save. Palette The Palette menu lets you change the false-color presentation of the infrared images on display or capture. -
Page 11: Settings Menu
Settings Menu The Settings menu has adjustments for user preferences such as units of temperature measurement, file format of stored data, auto off settings, date, time, and language. This menu also has a section that displays information about the Imager such as model number, serial number, and firmware versions. Units To change the temperature units: File Format... - Page 12 The .is2 file format can be emailed and then opened with SmartView Software. This format has the maximum versatility. Visit the Fluke website to download SmartView software at no charge. Auto Off Auto Off is set as off or on. When set to on, the Imager goes into the Sleep mode after 5 minutes of inactivity.
-
Page 13: Memory Menu
Memory Menu The Memory Menu allows the user to review captured images as thumbnails. Review Data Files To view stored images on the SD memory card:... -
Page 14: Temperature Measurement
Software ® SmartView software is supplied with the Imager. This software is intended for Fluke Imagers and contains features to analyze images, organize data and ® information, and make professional reports. SmartView is used to export IR and visible images as .jpeg, .jpg, .jpe, .jfif, .bmp, .gif, .dip, .png, .tif, or .tiff formatted files. -
Page 15: Emissivity Adjustment
Emissivity Adjustment The correct emissivity values are important for you to make the most accurate temperature measurements. Emissivity of a surface can have a large effect on the apparent temperatures that the Imager observes. Understanding the emissivity of the surface being inspected can, but may not always, allow you to obtain more accurate temperature measurements. -
Page 16: Reflected Background Temperature Compensation
Reflected Background Temperature Compensation Compensation for reflected background temperature is set in the Background tab. Very hot objects or very cold objects can affect the apparent temperature and measurement accuracy of the target or object of interest, especially when surface emissivity is low. -
Page 17: Laser Pointer
Laser Pointer The laser pointer is a sighting aid and is offset from the infrared camera. As a result, it may not always represent the exact center of the infrared or visible image. no Laser on TiR The laser dot does not appear on an infrared-only image, but does on visible- only or AutoBlend images. - Page 18 Torch The torch illuminates darker work areas. When set, pull the secondary trigger to operate. Note When the torch is on and an image is captured, the torch momentarily shines brighter and functions as a visible camera flash. To set: Backlight The backlight level control is set to low, medium, and high.
-
Page 19: Maintenance
Connect the battery charger to the mains power outlet before the charger. • Use only Fluke approved power adapters to charge the battery. • Keep cells and battery packs clean and dry. Clean dirty connectors with a dry, clean cloth. -
Page 20: Specifications
Specifications Temperature Operating ............-10 °C to 50 °C (14 °F to 122 °F) Charging............. .0 °C to 40 °C (32 °F to 104 °F) Relative Humidity ..........10 to 95 % non-condensing Power Battery ..............Lithium-ion rechargeable smart battery Battery Life............4+ hours (50 % LCD brightness) Battery Charge Time...........
Need help?
Do you have a question about the TiR105 and is the answer not in the manual?
Questions and answers