Advertisement
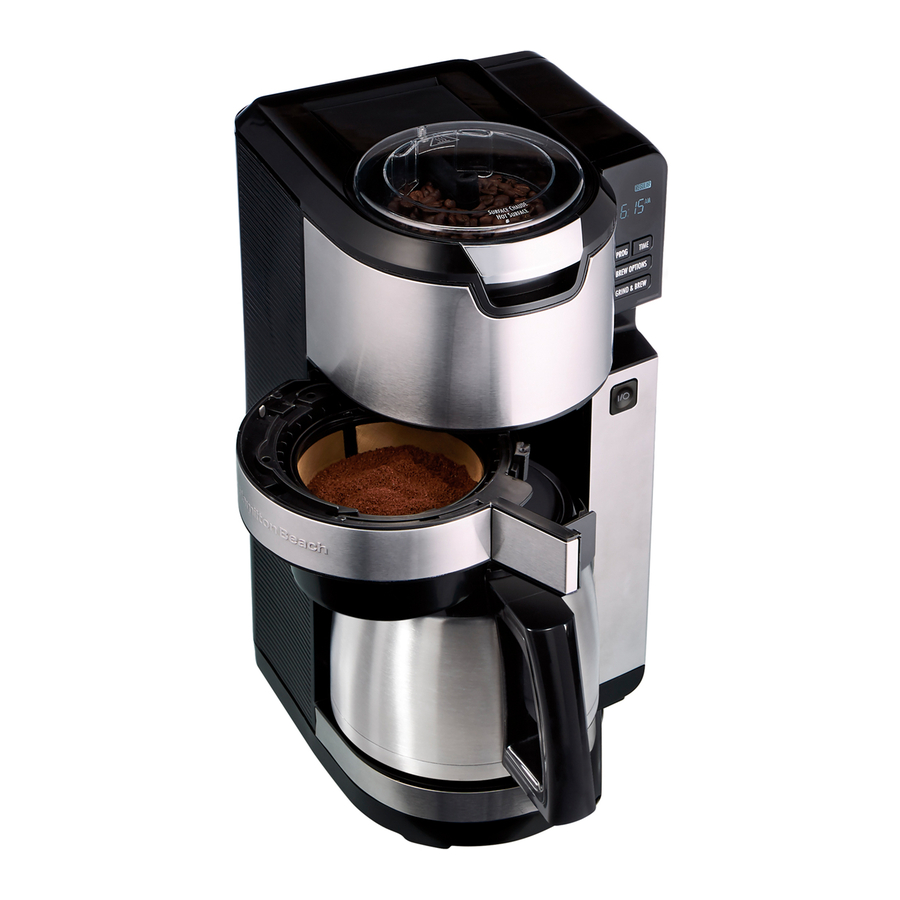
Parts and Features
To order parts: US: 1.800.851.8900
www.hamiltonbeach.com
Canada: 1.800.267.2826
Mexico: 01 800 71 16 100

- Lid with Window
- Shower Tube
- Coffee Bean Grinding Chamber
- Swivel Basket Holder
- 10-cup Thermal Carafe
- Water Reservoir Lid
- Water Reservoir
- Control Panel/Display with Clock
- Water Reservoir Window
- ON/OFF (
![]() ) Button
) Button - Power Light
- Coffee Bean Feeder
- Grinding Blade
- Sieve Holder
- Sieve

- Ensure swivel swivel basket holder is completely closed.
How to Grind and Brew Coffee
Before first use: Wash all removable parts in hot, soapy water. Rinse and dry. Brew one cycle with water and discard water.

If filter basket overflow occurs, unplug coffee maker and allow coffee in filter basket to cool before removing filter basket. To avoid hot coffee overflowing from the filter basket:
- Ensure swivel swivel basket holder is completely closed.
- Plug into outlet.
- To set time, press TIME until hours flash in Display. Pulse TIME to set current hour in AM or PM. Release TIME and minutes will flash in Display.
- Press TIME within 3 seconds to set current minutes. Set time will display constant within 3 seconds.
- Add water to Water Reservoir.
- Place Filter Basket into Basket Holder. Add Filter and Basket Cover. Close Basket Holder.
- Add coffee beans to Grinding Chamber. Close Lid. Use minimum 4 to maximum 14 level tablespoons. 1 tablespoon = 5 g.
- Make sure GRIND & BREW light is on; if not on, press GRIND & BREW to turn light on. Press ON/OFF (
![]() ) Button. Power Light comes on and grinding starts.
) Button. Power Light comes on and grinding starts. - Press ON/OFF (
![]() ) Button to turn off. If not pressed, Coffee Maker will automatically turn off after 2 hours. Unplug.
) Button to turn off. If not pressed, Coffee Maker will automatically turn off after 2 hours. Unplug.
NOTE: The Grinder will cycle on again during brewing to flush grounds from the Grinding Chamber. To stop brewing mid-cycle, press ON/ OFF (![]() ) Button and the unit will turn off.
) Button and the unit will turn off.

- Wipe inside of Grinding Chamber and outside of Shower Tube if they are wet. Beans may adhere if wet inside. Do not use wet beans.
- Do not open the Lid or Filter Basket after beginning to brew.
- If you cancel the brew cycle and start over, replace any wet beans with new, dry ones. Make sure your Coffee Maker is clean. See "Care and Cleaning."
- Clean Sieve Holder and Sieve weekly. See "Cleaning the Sieve."
How to Brew Ground Coffee
Before first use: Wash all removable parts in hot, soapy water. Rinse and dry. Brew one cycle with water and discard water.

Burn Hazard. If filter basket overflow occurs, unplug coffee maker and allow coffee in filter basket to cool before removing filter basket. To avoid hot coffee overflowing from the filter basket:
- Ensure swivel swivel basket holder is completely closed.
- Plug into outlet.
- Add water to Water Reservoir.
- Place Filter Basket into Basket Holder. Add Filter, then add coffee grounds.
- Top Basket Holder with Basket Cover. Close Basket Holder. Make sure GRIND & BREW light is off; if not off, press GRIND & BREW to turn light off. Press ON/OFF (
![]() ) Button. Power Light will come on and brewing will start.
) Button. Power Light will come on and brewing will start.
- Press ON/OFF (
![]() ) Button to turn off. If not pressed, Coffee Maker will automatically turn off after 2 hours. Unplug.
) Button to turn off. If not pressed, Coffee Maker will automatically turn off after 2 hours. Unplug.
Brew Options:
- REGULAR – Press BREW OPTIONS until "REGULAR" is displayed.
- BOLD – For enhanced, full/strong-flavored coffee, press BREW OPTIONS until "BOLD" is displayed. Bold mode will require additional time to complete a brewing cycle.
- 1–4 CUPS – When brewing 1–4 cups of coffee, press BREW OPTIONS until "1–4 CUPS" is displayed.
How to Program Automatic Brew
NOTE: White LED comes on to indicate PROGRAM is activated. White LED light goes off when unit begins to brew at preprogrammed time.
- Choose a brew option.
- Press and hold PROG until HOUR light flashes.
- While pressing PROG, press TIME to select the desired brew time. Release PROG and time will be set.
- Programmed time will be stored and the current time will be displayed.
- Press and release PROG again to activate automatic brew. PROG light will come on.
Tips for Best-Tasting Coffee
- All coffees are made from either arabica beans or robusta beans, or some combination of both. Arabica beans are slightly more expensive, but tend to produce better-tasting coffee. Ground coffee will become stale much faster than whole beans. If buying preground coffee, choose a package with the latest expiration date or a smaller quantity. Try to use freshly ground coffee within about a week of grinding.
- Using filtered water or bottled water will yield better-tasting coffee than tap water.
- Make sure your Coffee Maker is clean. See "Care and Cleaning." If overflow occurs, use slightly less grounds or less beans.
Care and Cleaning

Electrical Shock Hazard. Do not immerse cord, plug, or coffee maker in any liquid. To remove mineral deposits and buildup: All coffee makers should be cleaned at least once a month (once a week for areas with hard water). Press BREW OPTIONS to select "CLEAN".
- Unplug. (This resets brew counter for cleaning mode notification.)
- Wipe Coffee Maker with a damp cloth or sponge. Dry.
- Remove Water Filter and pod (see "How to Replace the Water Filter").
- Pour a minimum of 1 pint (2 cups/473 ml) white vinegar into Water Reservoir.
- Plug into outlet.
- Press BREW OPTIONS to slelect "CLEAN".
- Press the ON/OFF (
![]() ) button once. "CLEAN" will flash in the Display and white LED will come on. When "CLEAN" cycle is finished, wait for unit to cool. Clean cycle takes about 35 minutes to complete.
) button once. "CLEAN" will flash in the Display and white LED will come on. When "CLEAN" cycle is finished, wait for unit to cool. Clean cycle takes about 35 minutes to complete.
- Empty Thermal Carafe and rinse. Press BREW OPTIONS to select "REGULAR". Run 2–3 more brew cycles with clean water only. Allow to cool between cycles.
- The Thermal Carafe, Filter Basket, Filter, Basket Cover, and Sieve are dishwasher-safe to wash and dry in the top rack only. DO NOT use the "SANI" setting on dishwasher. "SANI" cycle temperatures could damage your product.
Clean Notification
If unit is always plugged in, "CLEAN" will show in the Display after 30 cycles. Follow the directions for "Care and Cleaning."
NOTES:
- Performing the cleaning procedure will clear the Display.
- The brew cycle counter resets every time the Coffee Maker is unplugged or when power is lost.
- If you do not want to perform the cleaning procedure, press ON/OFF (
![]() ) four times to clear the Display.
) four times to clear the Display.
How to Replace the Water Filter (optional)
NOTE: For better-tasting coffee, use a water filter.
- Soak filter pod for 15 minutes in water.
- Add pod to bottom of Water Filter and snap on filter handle.
- Place assembly into right side of Water Reservoir.
Cleaning the Sieve
- Unplug and turn Coffee Maker on its side..
- Press latch on Sieve Holder (bottom of Coffee Bean Grinding Chamber) in to unlock and pull down and out. Hand-wash in warm, soapy water and rinse. Hand dry with soft cloth. If coffee beans are in Grinding Chamber, use a small rubber scraper to push any beans down through the opening.
- To replace clean and dry Sieve: Hold latch end of Sieve and insert tab into Sieve Holder. Push up to lock into place.
Troubleshooting
Filter Basket overflows or coffee brews slowly
- The BOLD or 1–4 CUPS brew option is recommended for brewing decaffeinated coffee.
- Excessive amounts of coffee.
- Store-bought coffee ground too finely (not automatic drip grind).
- Swivel Basket Holder not closed completely.
- Carafe removed during brewing for more than 20 seconds and not placed securely back on base.
- Coffee Maker needs cleaning.
- Coffee grounds underneath Filter.
- Too many beans were placed in Grinding Chamber. Use maximum 14 level tablespoons (74 g).
Coffee not brewing/unit will not turn on
- Water Reservoir is empty.
- Unit is unplugged.
- Power outage.
- Power surge. Unplug; then plug the unit back in.
- Clock requires reset after power outage.
- Lid for Grinding Chamber is not fully closed.
- Basket Holder is not fully closed.
- Basket Cover not in place.
For questions and other information: USA–hamiltonbeach.com
1.800.851.8900

Documents / Resources
References
Download manual
Here you can download full pdf version of manual, it may contain additional safety instructions, warranty information, FCC rules, etc.
Download Hamilton Beach 45501 - Grind & Brew 10-Cup Coffee Maker Manual
Advertisement


Need help?
Do you have a question about the 45501 and is the answer not in the manual?
Questions and answers