Advertisement
Quick Links
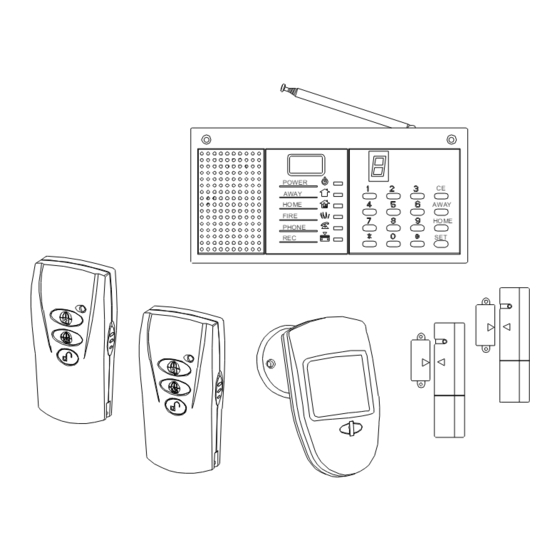
Quick operation instruction of the LX-HS08 system basic configure
Open the main, connect the standby power in the main and switch on power by AC power adapter. Here the
main's POWER,AWAY LED light and the numeric LED display counting down time 9,8,7...1, and after 1 DI sound
you can operate the main.
1.Outer device accession operation
1.1 remote controller's original accession
The system can access 4 remote controllers for operation. Press* key and then input operation password (when
out factory, the password is 0000), press SET to enter the setting mode. Press the function channel key"4", and then
input the first remote controller channel---- "1" and then press # key, within 60sec press the remote controller's key,
the main will give "DI" sound, which indicate the main have accept it. Repeat pressing CE key until "DIDI" sound is
heard to exit the setting mode. So the accession of the first remote controller has finished. By the means same as
above, you only need input remote controller channel "2"/"3"/"4" , the second/third/ fourth remote controller can be
accessed. At last you can repeat pressing CE key until "DIDI" sound is heard to exit the setting mode. And then the
remote controller can control the main.
1.2 other outer wireless device's accession
1.2.1 wireless PIR device's accession
Press* key and then input operation password 0000, press SET to enter the setting mode. Press the function
channel key"4", select the numeral key that you didn't select forestall, and then select position key. For
example: for the indoor detector select HOME key, the outdoor detector select AWAY key. and then switch on
the internal power of the wireless PIR detector, here the wireless PIR detector will emit a signal to the main.
After it receives this signal, the main give"DI" sound, which indicate the main accept it. And then repeat
pressing CE key until "DIDI" sound is heard to exit the setting mode. Then test the PIR detector, the main
should alarm. Attention: after you access any detector, you should test it to ensure every detector has
been accepted by the main.
1.3.2 the magnetism's accession
The magnetism's accession is same as the section 1.3.1, only the numeral you select is different.
2.the function channel code of the outer device on the main.
4-key remote controller
Function channel code is "4"
3. Telephone dial-up function setting
3.1 press * key, input operation password 0000, and then press SET key to enter the setting mode. Press function
channel key"1", and then select "1" (the 1
dial), input the phone number, for example:8726398, and then press # key to confirm. Then repeat pressing CE key
until "DIDI" sound is heard to exit the setting mode. And then you can test its dial-up function by pressing the key of
the medical for help remote controller or sense the PIR detector. The 2
above, you need only select the "2"(the 2
needed number, press #key to confirm and then repeat pressing CE key until "DIDI" sound is heard to exit the
setting mode. We suggest you should test its dial-up function after setting every time.
★★★Please attention: Due to the different installation position and distance (because the wireless
transmission signal is obstructed), you should test them after installation to ensure all detectors and
remote controllers can work normally. Only that can show installation is successful.
If you need use other functions of the system, please read carefully
Wireless PIR detector
Door magnetism
function channel code is "2"
st
group, that mean you will save the first group phone number you want
nd
group) / "3"(the 3
following instructions!
nd
rd
th
/3
/4
group number saving is same as
rd
th
group)/ "4"(the 4
group) and then input the
Advertisement

Related Manuals for Lexing LX-HS08


Summary of Contents for Lexing LX-HS08
- Page 1 Quick operation instruction of the LX-HS08 system basic configure Open the main, connect the standby power in the main and switch on power by AC power adapter. Here the main’s POWER,AWAY LED light and the numeric LED display counting down time 9,8,7…1, and after 1 DI sound you can operate the main.
- Page 2 Basic configure LX-HS08 main (chargeable battery include) 1pcs Power adapter(AC220V DC9V 1A) 1pcs Wireless PIR detector LX-AL8(battery include) 1pcs Wireless door magnetism LX-DM1(battery include) 2pcs 4-key remote controller LX-FS4-V3(battery include) 2pcs Phone line 1pcs Configure instruction: To strengthen security, besides the standard configure we provide, you can add other fittings.
- Page 3 5. Wired zone has 1-4 zones, every zone can be set to indoor/outdoor/24Hr zone type. The numeric LED display wired zone “1./2./3./4”. The No.1 zone is main’s sensor. 6. Arm mode a. All the day (24HR) panic for help (fire or medical alarm zone) b.
-
Page 4: Function Setting Menu
Function setting menu (you can operate following only in setting mode) Press input TEL No. to save,press to delete Press input TEL No. to save,press to delete Press Press input TEL No. to save,press to delete (set telephone number) Press input TEL No. -
Page 5: Function Setting Mode
press AWAY(away arm, indoor and outdoor zone armed) press0(quick arm) press1(delay arm) press HOME(home arm, only outdoor zone armed, and indoor zone not armed) Press zone(the main’s sensor) (inaudible alarm) press Press zone ( set whether the main give press alarm sound after being triggered (audible alarm)... - Page 6 (4)set wireless zone: The wireless zone can control the main only after setting. Operation program Voice prompt /LED state 2 0-9(zone) HOME :set to indoor zone And then trigger the wireless detector emit AWAY :set to outdoor zone signal to the main. 1 DI sound will be heard and * :set to fire or 24HR zone setting successfully.
- Page 7 (14)Tel path trouble alarm setting Operation program remarks 5 2 0(OFF) set whether the main will alarm or not when the 1(ON) phone path has trouble. When set this alarm ON, 2 DI sounds will be heard every 20sec when path trouble occurred. (15)dial-u mode setting Operation program remarks...
- Page 8 3 1-4 0 dial OFF set whether the main dial or not when wired zone 1 dial ON be triggered (25)set whether the main dial or not when wireless zone be triggered Operation program remarks 0-9 0 dial OFF set whether the main dial or not when wireless 1 dial ON zone be triggered (26)re-memorize wired zone’s state...
- Page 9 134MM 83MM 77MM Fig.3 Fig.1 Fig.2 ★★★warning: during you open the unit to install, do not touch the adjustable inductance on PCB(see the 6 of the interior PCB configure), otherwise that will effect the main’s receiving frequency and lead its receiving distance become short.
- Page 10 ◇set its coding by DIP switch; ◇wireless setting: Enter “set wireless zone” in setting mode, sway your hand in front of the detecting window to make it emit signal, and the main will give 1 DI sound, setting successfully. ◇we suggest it should be installed in dypass, living room, reside room etc area, and install it on high place. Its detecting window should face the detection range.
Need help?
Do you have a question about the LX-HS08 and is the answer not in the manual?
Questions and answers