Insulet Omnipod 5 User Manual
Automated insulin delivery system
Hide thumbs
Also See for Omnipod 5:
- User manual (391 pages) ,
- Quick start manual (92 pages) ,
- Resource manual (31 pages)
Table of Contents
Advertisement
Advertisement
Table of Contents

Related Manuals for Insulet Omnipod 5


Summary of Contents for Insulet Omnipod 5
- Page 1 Omnipod 5 Automated Insulin Delivery System ® User Guide...
- Page 2 • Do NOT have adequate hearing diabetes in achieving glycaemic and/or vision to allow recognition targets set by their healthcare of all functions of the Omnipod 5 providers. It is intended to System, including alerts, alarms modulate (increase, decrease and reminders...
- Page 3 WELCOME TO OMNIPOD® 5 New Omnipod 5 User Receiving training and understanding the Instructions for Use are needed BEFORE using your new Omnipod 5 System. Follow these steps to get started: 1. Receive Training Learning how to use your Omnipod 5 System the correct way is important for safe and effective use.
-
Page 5: Table Of Contents
Section 1: Omnipod 5 System Overview ......6 Section 2: Set Up Your Omnipod 5 App ......8 Section 3: Set Up a New Pod . -
Page 6: Section 1: Omnipod 5 System Overview
• cannot communicate with a Dexcom G6 receiver while paired with a Pod For Sensor-specific information, refer to your Dexcom G6 CGM System Instructions for Use. Omnipod 5 App screens are for educational purposes only. Consult your healthcare professional before using these features and for personalised recommendations. -
Page 8: Section 2: Set Up Your Omnipod 5 App
The Omnipod 5 App comes installed on the Controller provided. Connectivity to mobile data or Wi-Fi is important when using the Omnipod 5 System. Make sure to connect to your home or work Wi-Fi network. Initial pump therapy settings, provided by your healthcare provider, are needed to set up your Omnipod 5 App. - Page 9 Omnipod 5 App Security on Your Controller After you set up your provided Controller, the Lock and PIN screens appear whenever you wake up your Controller. The Lock screen displays: • Your selected background image • Today’s date and time •...
-
Page 10: Section 3: Set Up A New Pod
• From the POD setup, tap SET INFO tab on the UP NEW POD Home screen, tap SET UP NEW POD Omnipod 5 App screens are for educational purposes only. Consult your healthcare professional before using these features and for personalised recommendations. -
Page 11: Fill The Pod
Pod. • The Pod will beep twice to indicate the Omnipod 5 Pod is ready to proceed. Omnipod 5 App screens are for educational purposes only. Consult your healthcare professional before using these features and for personalised recommendations. - Page 12 “see” one another without your body blocking their communication. Omnipod 5 App screens are for educational purposes only. Consult your healthcare professional before using these features and for personalised recommendations.
-
Page 13: Apply The Pod
Your Pod” in your Omnipod 5 System Technical User Guide. • Check the infusion site after insertion to ensure that the cannula was properly inserted. Omnipod 5 App screens are for educational purposes only. Consult your healthcare professional before using these features and for personalised recommendations. -
Page 14: Section 4: Connect The Pod And Sensor
• Tap ENTER NEW • Tap the first • Tap SAVE box to enter the Transmitter serial number (SN) Omnipod 5 App screens are for educational purposes only. Consult your healthcare professional before using these features and for personalised recommendations. -
Page 15: Section 5: Omnipod 5 System Modes
Omnipod 5 System Modes System Modes The Omnipod 5 System has two operating modes: Automated Mode and Manual Mode Automated Mode Manual Mode • Adjusts every 5 minutes • Uses your Basal Programme • Adapts by updating your total daily... - Page 16 Manual Mode Automated Mode How it works Basal Insulin Insulin is delivered Insulin is delivered and adjusted according to the active automatically based on sensor Delivery Basal Programme glucose values and 60-minute prediction. When sensor glucose values are not available for adjustments, in Automated: Limited, the System constantly compares Automated Adaptive Basal Rate and Manual...
- Page 17 History Details to save in History Details How you will Refer to Sections 2 & 5 of the Omnipod 5 System Technical User Guide for a detailed list of alarms and notifications be notified Note: In Automated Mode, your Adaptive Basal Rate will be updated with every Pod change.
-
Page 19: Switch To Automated Mode
• An active Pod Home screen and a saved Transmitter serial number (SN) within the Omnipod 5 App are required Note: Before switching to Automated Mode, an active temp basal, extended bolus or insulin pause must first be cancelled. • Confirm that the mode switched. -
Page 20: Section 6: Get To Know The App
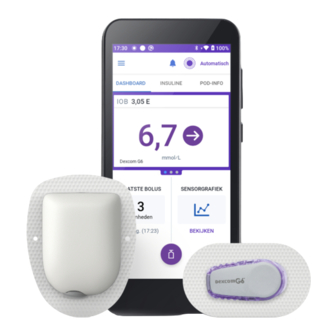
• DASHBOARD • INSULIN • POD INFO Sensor Glucose Value and Trend Arrow Last Bolus Sensor Graph Bolus Button Omnipod 5 App screens are for educational purposes only. Consult your healthcare professional before using these features and for personalised recommendations. -
Page 21: Glucose Trends And Indicators, View Sensor Graph
• Tap VIEW on the Sensor Graph • Sensor Graph Legend Note: The Sensor Graph differs slightly in appearance depending on the Mode Omnipod 5 App screens are for educational purposes only. Consult your healthcare professional before using these features and for personalised recommendations. -
Page 22: Alarms And Notifications
Alarms repeat every 15 minutes until acknowledged. Alarms that sound on the Pod must be acknowledged in the Omnipod 5 App. See Chapters 13 and 24 in the full Omnipod 5 System Technical User Guide for more details on these alarms and notifications. -
Page 23: Advisory Alarms
Advisory Alarms Advisory alarms are lower-priority alarms that indicate that a situation exists that needs your attention. Advisory alarms may escalate to a Hazard alarm. Advisory alarms related to the Pod Low Pod Insulin The amount of insulin in your Pod is below the value you specified in Settings. -
Page 24: Notifications
Advisory alarms related to Automated Mode Missing Sensor In Automated Mode, the Pod has not received sensor Values glucose values for an hour. The System will operate in Automated: Limited until new values are received. Automated Delivery In Automated Mode, the System has been working to Restriction bring your glucose into range but has not seen your glucose change the way it expected. -
Page 25: Section 7: Key Insulin Delivery Actions
• The Home Screen are correct will display the bolus delivery progress • Tap START to begin bolus insulin delivery Omnipod 5 App screens are for educational purposes only. Consult your healthcare professional before using these features and for personalised recommendations. - Page 26 Note: Always bolus for meals as directed by your healthcare provider. In Automated Mode, bolus doses still require your programming and delivery. Failure to deliver a bolus for meals could lead to hyperglycaemia.
-
Page 27: Start The Activity Feature
Note: The Activity feature is available only in Automated Mode The Activity feature of the Omnipod 5 System can be enabled for times when there may be a decrease in insulin needs, like exercise. It will set the Automated Mode Target Glucose to 8.3 mmol/L and reduce insulin delivery. -
Page 28: Cancel The Activity Feature
You can cancel the Activity feature at any time. Upon cancellation or expiry of the defined time period, full automated basal delivery starts on its own and the Omnipod 5 System returns to using the user-defined Target Glucose. • Tap CANCEL on •... -
Page 30: Pause Insulin Delivery
Insulin delivery does not automatically start at the end of the paused period. You must tap START INSULIN to start insulin delivery. Omnipod 5 App screens are for educational purposes only. Consult your healthcare professional before using these features and for personalised recommendations. -
Page 31: Editing A Basal Programme
NEXT to edit basal time segments and rates Omnipod 5 App screens are for educational purposes only. Consult your healthcare professional before using these features and for personalised recommendations. Omnipod 5 App screens are for educational purposes only. Consult your healthcare... -
Page 32: Additional Basal Programmes
Basal Programme • Tap NEXT and define the basal segments one at a time Omnipod 5 App screens are for educational purposes only. Consult your healthcare professional before using these features and for personalised recommendations. -
Page 33: Set A Temporary Basal Rate
KEY INSULIN DELIVERY ACTIONS (continued) Set a Temporary Basal Rate Note: Temp Basal is available only in Manual Mode • Tap the Basal Rate • Tap Set • Tap the Menu button entry box and Temp Basal on the Home screen select % change Note: The up arrow indicates an increase. -
Page 34: Temp Basal Preset
Temp Basal Preset Temp Basal Presets can be created if there is a temp basal that you use often. • Navigate to the Temp Basal Presets screen by tapping Menu>Temp Basal Presets. From here, you can create a new Temp Basal Preset or edit existing Temp Basal Presets. -
Page 35: Section 8: Clinical Evidence For Omnipod 5
Omnipod 5 Pivotal Study in Children, Adolescents and Adults (6-70 years) The goal of the pivotal study of the Omnipod 5 System was to assess the safety and efficacy of the system. This single-arm, multicentre, prospective study enrolled 112 children (6 to 13.9 years) and 128 adolescents and adults (14 to 70 years). - Page 36 (Q1,Q3). The median is the middle number in an ascending list of numbers and the interquartile range represents the middle 50% of values. *Change between the standard-therapy phase and the Omnipod 5 System phase was statistically significant...
- Page 37 ≥13.9 mmol/L, ≥250 mg/dL (15.0%) (5.1%) (12.7%) (7.0%) (std dev) Avg % 6.7% -4.8%* 4.2% 1.5% -2.7%* ≥16.7 mmol/L, ≥300 mg/dL (9.1%) (2.5%) (8.0%) (3.1%) (std dev) *Change between the standard-therapy phase and the Omnipod 5 System phase was statistically significant...
- Page 38 (0.44%) (0.63%) (0.54%) ‡ *Change between the standard-therapy phase and the Omnipod 5 System phase was statistically significant Average A1C values are reported with standard deviation values in brackets. ‡ Adverse Events The table below provides a full list of the adverse events that occurred during the 3-month Omnipod 5 System treatment phase.
- Page 39 A study was conducted on 25 participants with type 1 diabetes aged 6-70 years to assess the Omnipod 5 CGM-informed SmartBolus Calculator. During Phase 1, participants used the Omnipod 5 system in Manual Mode for the first 7 days without a connected CGM (standard SmartBolus Calculator).
- Page 40 Omnipod 5 Clinical Study in Very Young Children The goal of this study was to assess the safety and effectiveness of the Omnipod 5 System in children with type 1 diabetes aged 2 to 5.9 years. This single-arm, multicentre, prospective study enrolled 80 children.
- Page 41 (Q1, Q3). The median is the middle number in an ascending list of numbers and the interquartile range represents the middle 50% of values. *Change between the standard-therapy phase and the Omnipod 5 System phase was statistically significant...
- Page 42 Avg % 13.0% 3.9% -9.1%* ≥13.9 mmol/L, ≥250 mg/dL (13.2%) (3.9%) (std dev) Avg % 4.3% 1.2% -3.1%* ≥16.7 mmol/L, ≥300 mg/dL (6.7%) (1.6%) (std dev) *Change between the standard-therapy phase and the Omnipod 5 System phase was statistically significant...
- Page 43 (0.6%) (0.5%) (0.4%) ‡ *Change between the standard-therapy phase and the Omnipod 5 System phase was statistically significant Average A1C values are reported with standard deviation values in brackets. ‡ Adverse Events The table below provides a full list of the adverse events that occurred during the 3-month Omnipod 5 System treatment phase.
- Page 44 During Phase 1, participants used the Omnipod 5 system in Manual Mode for the first 7 days without a connected CGM (standard SmartBolus Calculator). In Phase 2, participants used the Omnipod 5 system in Manual Mode with a connected CGM (CGM-informed SmartBolus Calculator) for 7 days.
-
Page 45: Section 9: Settings And Technical Specifications
Controller Service Life: Approximately 2 years (based on 300-500 charge cycles) with typical use Shelf Life (Starter Kit): 18 months Battery charger operating line voltage: 100 to 240 VAC, 50/60 Hz Only use the Noetic-approved power adapter (Insulet PN PT-000428) with the Controller. - Page 46 Dexcom Specifications For information about the Dexcom operating specifications, see the Dexcom G6 CGM System Instructions for Use. Pod Specifications Size: 3.9 cm wide x 5.2 cm long x 1.45 cm high (1.53" x 2.05" x 0.57") Weight (without insulin): 26 grams (0.92 oz) Operating temperature range: Pod operating environment of 5°C to 40°C (41°F to 104°F).
- Page 47 Dexcom G6 Continuous Glucose Monitoring System, to continuously adapt and automatically deliver insulin according to your personal needs. The Omnipod 5 System consists of a tubeless insulin Pod and the Omnipod 5 App on an Insulet-provided Controller.
- Page 48 Quality of Service The Omnipod 5 System includes two wireless transmission pathways. Insulet defines the quality of service of the Omnipod 5 System for each of the two pathways: Omnipod 5 App to Pod wireless communication definition Successful transfer of commands, data and alarms between the Controller and Pod when in the communication range (within 1.5 metres (5 ft) during...
- Page 49 (0.1 mmol/L increments) blood glucose meter) Decreasing the BG Reading decreases the amount of the suggested bolus dose. Maximum Bolus Enter in Omnipod 5 App Limits amount of single- 0.05 – 30 U Settings or during First- bolus dose. (0.05 U increments)
- Page 50 • The SmartBolus Calculator refreshes values every 5 minutes. If you do not start your bolus within 5 minutes of entering the SmartBolus Calculator, the Omnipod 5 System will need to clear the screen so that it has the latest IOB and Sensor information. When changing time zones, always check your IC Ratio and Correction Factor settings for the new time to ensure it still meets your body’s true insulin needs.
- Page 51 The SmartBolus Calculator relies on accurate, updated insulin delivery history and data logging from your Omnipod 5 System. If a time zone change is detected by the Controller, the system will notify you. Update time zones on your Omnipod 5 App according to your healthcare...
- Page 52 The SSCP is also available in the European Database on Medical Devices (EUDAMED) website (https://ec.europa.eu/tools/eudamed), where it is linked to the Basic UDI-DI. The Basic UDI-DI for Omnipod 5 is 0385083000145W. Bolus Delivery Performance Specifications Bolus size: 0.05-30 U in 0.05 U increments...
- Page 53 The tables that follow show, for each requested bolus size, the range of amount of insulin that was observed to have been delivered compared with the requested amount. Each table provides the number and percentage of delivered bolus sizes observed within the specified range. Amount of Insulin Delivery for a Minimum (0.05 U) Bolus Request Amount (Units) <0.0125...
- Page 54 Amount of Insulin Delivery for a Minimum (30.0 U) Bolus Request Amount (Units) <7.5 7.5-22.5 22.5-27.0 27.0-28.5 28.5-31.5 (% of settings) (<25%) (25-75%) (75-90%) (90-95%) (95-105%) Number and 0/72 0/72 0/72 0/72 72/72 percentage of (0%) (0%) (0%) (0%) (100%) boluses within range Amount (Units)
- Page 55 [min, max] [28.85, 31.39] [177.49, 181.15] Note: A measurement at the 12-hour period with a 30.0 U/hr basal rate is not applicable to the Omnipod 5 System as the reservoir will empty at approximately 6 ²/ ³ hours at this rate.
- Page 56 A blockage (occlusion) is an interruption in insulin delivery from the Pod. If the Omnipod 5 System detects a blockage, it sounds a hazard alarm and prompts you to deactivate and change your Pod. A blockage hazard alarm sounds when an average of 3 units to 5 units of missed insulin occurs.
- Page 58 Omnipod 5 System Label Symbols The following symbols appear on the Omnipod 5 System or its packaging: Symbol Meaning Symbol Meaning Single-use only MR unsafe Consult the Do not use if the package accompanying is damaged documents Sterilised using Type BF applied part...
- Page 59 Symbol Meaning Symbol Meaning Non-pyrogenic Medical Device fluid path Do not dispose of with household RoHS-compliant waste Marking of Representative in the conformity European Community Product is intended for Switzerland recycling and should Authorised not be placed in the Representative normal bin...
-
Page 61: Section 10: Staying Safe While Using The Omnipod 5 System
All such decisions and treatment should be discussed with a qualified healthcare provider who is familiar with your individual needs. Omnipod 5 App screens are for educational purposes only. Consult your healthcare professional before using these features and for personalised recommendations. - Page 62 Warning: DO NOT use the Omnipod 5 Warning: DO NOT expose any System in oxygen-rich environments Omnipod 5 System products or supplies (greater than 25% oxygen), which include to extreme temperatures, as this results home or surgical areas that use in them not functioning properly. Store supplementary oxygen and hyperbaric all Omnipod 5 System products and chambers.
- Page 63 Glucose Warnings Warning: ALWAYS treat “LOW” or “HIGH” sensor glucose values and “LOW” or Warning: ALWAYS follow your healthcare “HIGH” blood glucose readings according provider’s guidance on appropriate to your healthcare provider’s glucose monitoring to avoid recommendations. These values can hyperglycaemia and hypoglycaemia.
- Page 64 Pod Warnings Warning: ALWAYS check the infusion site often to make sure the cannula is Warning: ALWAYS dispose of the Pod properly inserted and secured to the Pod. according to local waste disposal Verify that there is no wetness or scent of guidelines.
- Page 65 Controller Warnings Alarm Warnings Warning: ALWAYS identify the Omnipod 5 Warning: ALWAYS respond to App as yours before using it. Using Hazard Alarms as soon as they occur. someone else’s Omnipod 5 App can Pod Hazard Alarms indicate that insulin result in incorrect insulin delivery for delivery has stopped.
- Page 66 Sensor Warnings SmartBolus Calculator Warnings Warning: ALWAYS make sure you are using the Sensor per manufacturer’s Warning: AVOID changing your instructions. Do not extend the sensor SmartBolus Calculator settings before wear beyond the recommended duration consulting your healthcare provider. and do not start a Sensor past its Use-By Incorrect changes could result in over- date.
-
Page 67: Precautions
SmartAdjust Technology General Precautions Warnings Caution: Federal (US) law restricts this device to sale by or on the order of a Warning: DO NOT use SmartAdjust doctor. technology in pregnant women, critically ill patients and those on dialysis. The Caution: DO NOT use any component of safety of SmartAdjust technology has not the Omnipod 5 System (Controller, Pod) - Page 68 Omnipod 5 System that have not been change during flight, which may affect authorised by Insulet Corporation. the Pod’s insulin delivery. Rapid changes Unauthorised tampering with the System in altitude and gravity, such as those can revoke your right to operate it.
- Page 69 Controller Precautions Controller-specific Precautions Caution: Connect ONLY to trusted Wi-Fi Caution: AVOID turning Automatic Time networks with your Controller. AVOID Zone OFF on the Controller. If you turn connecting to public Wi-Fi networks, such Automatic Time Zone OFF, your as those found in airports, coffee shops, Controller will not be able to detect when etc, as these networks are not secure and your device time zone and insulin...
- Page 70 Pod Precautions Caution: DO NOT place the Controller in or near water because the Controller is Caution: ALWAYS activate a new not waterproof. Failure to do so could Pod in a timely manner. Waiting too result in damage to the Controller. long between Pod changes could result Caution: DO NOT use solvents to clean...
- Page 71 Alarm Precautions Caution: ALWAYS rotate insulin infusion sites to help prevent infusion-site Caution: ALWAYS respond to Pod complications like scar tissue and Expired, Low Pod Insulin and Pod Shut- infection. Rotating insulin infusion sites Off Advisory Alarms when they occur. reduces the risk of scarring.
-
Page 72: Taking Care Of Your Controller And Pod
Taking Care of Your Controller and Pod Pod and Insulin Storage Extreme heat or cold can damage Pods and cause them to malfunction. It is especially important to store your insulin in a well-controlled environment. Inspect insulin before using it; never use insulin that looks cloudy or discoloured. - Page 73 The battery may explode if overheated. • Do not drop the Controller. • Only use an Insulet-approved charger to charge your Controller. Using unapproved chargers can cause the battery to explode or damage the Controller, and may void the warranty.
-
Page 74: Device Complaints
Device Complaints If, during the use of this device or as a result of its use, a serious incident has occurred, please report it to the manufacturer and/or its authorised representative and to your national authority. Contact details for the manufacturer can be found in the inside front cover of this document (see “Contacts and Important Information”... -
Page 75: Emergency Kit
Always follow the Omnipod 5 System instructions. Failure to do so could result in under-delivery or over-delivery of insulin, which can lead to hypoglycaemia and hyperglycaemia. Please refer to the Omnipod 5 System Technical User Guide for all instructions for use. - Page 76 Corporation. All rights reserved. The Bluetooth word mark and logos are registered trademarks owned by Bluetooth SIG, Inc., and any use of such marks by Insulet Corporation is under licence. Dexcom and Dexcom G6 are registered trademarks of Dexcom, Inc. and used with permission.
Need help?
Do you have a question about the Omnipod 5 and is the answer not in the manual?
Questions and answers