Table of Contents
Advertisement
Quick Links
Instructions for Assembly, Testing, Operation, Servicing, and Storage
Soft wash system with bleach pump: For connecting to external tank for outdoor
READ and UNDERSTAND this Owner's Manual completely before using this sprayer.
Assemble, test, and use only in accordance with this Owner's Manual instructions.
EXERCISE CAUTION when mixing chemicals as incorrect ratios or mixtures could release
harmful gases.
READ and FOLLOW chemical label instructions.
KNOW emergency procedures BEFORE handling chemicals. Sprayer leaks, bodily chemical
contact, poisoning, and spills require immediate response.
AVOID inhaling, ingesting, or coming into contact with any chemicals.
WEAR personal protective gear when filling, using, cleaning, and servicing the sprayer.
KEEP sprayer and spray materials away from children and pets. Some chemicals are especially
toxic to them.
DO NOT TURN ON POWER to sprayer until ready to spray in order to avoid unintentional
spray release.
SOAK vegetation in the area surrounding the work zone well prior to and after spraying bleach.
Bleach can kill vegetation if not rinsed thoroughly.
ALWAYS keep a fire extinguisher rated "ABC" nearby.
Improper use of the sprayer or handling of chemicals could result in serious injury or illness
to the operator or nearby persons/animals or could cause damage to the environment.
**This sprayer is recommended for use in spraying bleach concentrations of 3% or less. The sprayer will be damaged, and
warranty voided if used to apply any petroleum-based product (gasoline, diesel, kerosene, or oil). The sprayer should not be used
to transfer any product intended for human consumption. WE RECOMMEND THAT THE SPRAYER NOT BE USED FOR
OTHER PURPOSES ONCE IT HAS BEEN USED FOR SPRAYING BLEACH. Any chemical will leave some residual in the tank
liner or sprayer components, even after the sprayer has been properly cleaned. These residual chemicals can have unexpected
effects on future uses. This sprayer should not be used by people with reduced physical, sensory or mental capabilities or lack of
experience and knowledge.
Any Questions, Comments, Problems, or Parts Orders
Call NorthStar Product Support at 1-800-270-0810
Owner's Manual
use with bleach soft wash solutions**
WARNING
M1572214A
ITEM NUMBER: 1572214
SERIAL NUMBER: _____________
Advertisement
Table of Contents

Related Manuals for North Star 1572214


Summary of Contents for North Star 1572214
- Page 1 M1572214A ITEM NUMBER: 1572214 SERIAL NUMBER: _____________ Owner's Manual Instructions for Assembly, Testing, Operation, Servicing, and Storage Soft wash system with bleach pump: For connecting to external tank for outdoor use with bleach soft wash solutions** WARNING READ and UNDERSTAND this Owner's Manual completely before using this sprayer.
- Page 2 Hazard Signal Word Definitions...
-
Page 3: Table Of Contents
Table of Contents Intended Use .............................. 4 Summary of Important Safety Information ..................5-6 During Assembly During Operation • General Chemical Safety • Chemical Application Safety • Chemical Accident Procedures Warning Label Locations ........................... 7 Component Inventory Unpacking ..............................8 Unpacking the Manual Bag ........................ -
Page 4: Intended Use
Intended Use This soft wash system is intended for use in spraying bleach concentrations of 3% or less. SPRAYING CHEMICALS: Hazardous chemicals must be handled with caution as directed throughout this manual and on the chemical label. The sprayer is intended for use in spraying chemicals in liquid form only. The sprayer is NOT intended for use in spraying chemicals in dry or aerosolized form, or for use with fumigants. -
Page 5: Summary Of Important Safety Information
Summary of Important Safety Information WARNING Read and understand this owner's manual completely before using the sprayer. Read each chemical label's instructions before handling the chemical. Improper use of the sprayer or handling of chemicals could result in serious injury or illness for the operator or nearby persons/animals, or cause damage to the environment. -
Page 6: Chemical Accident Procedures
Summary of Important Safety Information (continued) • CLEAN up spills immediately per instructions on chemical labels. • TURN OFF power to sprayer and RELIEVE system pressure before leaving sprayer unattended. • SEE Troubleshooting section of this manual before attempting any repairs. Wear personal protective equipment and follow safety instructions. -
Page 7: Warning Label Locations
Warning Label Location Part# Description 799870 Chemical Warning Label 782397 Battery Warning Label 800763 Vegetation Caution Label 793288 Pump Warning Label Always make sure safety labels are in place and in good condition. If a safety label is missing or not legible, order new labels or unsafe operation could result. To order replacement safety labels, call NorthStar Product Support at: 1-800-270-0810. -
Page 8: Unpacking
Unpacking Closely inspect all contents in the shipping carton. If you have missing or damaged components, please contact NorthStar Product Support at: 1-800-270-0810. Sprayer assembly Spray gun (Qty 1) 801769 (Qty 1) Gun hose, 5/8” x 200’ Inlet hose, 5/8” x 8’ 801238 801237 (Qty 1) -
Page 9: Unpacking The Manual Bag
Unpacking the Manual Bag The following items are found in the manual bag. Hose clamp Nozzle holder – 801240 793231 25° Fan tip nozzle – 801858 (Qty 3) 40° Fan tip nozzle – 801241 60° Fan tip nozzle – 801242 Straight stream nozzle –... -
Page 10: Assembly
Assembly Step 1 – Install gun clips to frame. Tools Needed • • Install (2) gun clips to the frame tubes using (2) self-tapping screws. Screwdriver Components Needed from Owner’s Manual Bag: Gun clip Screw, M5 x 15mm self-tapping 801686 98404 (Qty 2) (Qty 2) - Page 11 Assembly Step 2 – Install fittings. Tools Needed • • Remove shipping plugs from pump inlet and outlet ports. None • Insert inlet strainer to the inlet quick connect port of the pump. NOTE: To insert quick connect fittings, lubricate O-ring with water and twist fitting while inserting into pump port.
- Page 12 Assembly Step 3 – Install inlet and outlet hoses. Tools Needed • • Attach inlet hose (8ft. hose) to the hose barb on the inlet side. Install Screwdriver with hose clamp. The other end of the inlet hose should be routed to a nearby clean water supply (i.e.
- Page 13 Assembly Step Four: Connect to battery (battery sold separately). WARNING Batteries are hazardous because they contain caustic acid, can emit explosive gases, and can cause electric shock. Caution must be exercised when making connections to a battery to avoid shock and contact with the acid, and to prevent any sparking that could lead to an explosion.
- Page 14 Assembly 4. Verify connection Verify a complete connection has been made by checking with a DC voltmeter, or by briefly turning the ON/OFF switch on the pump and on the control panel to the ON position and listening for pump activation. 5.
-
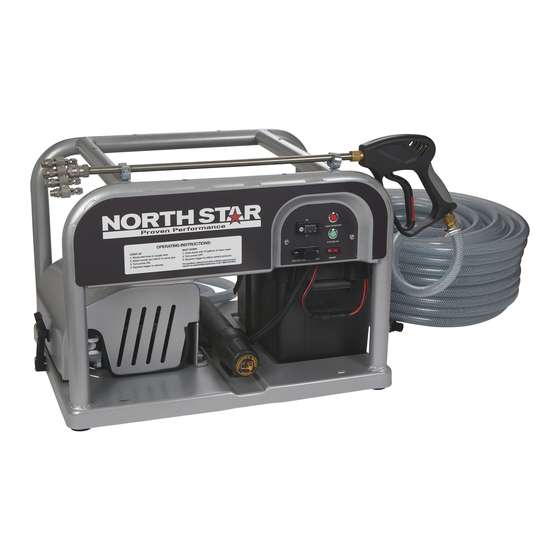
Page 15: Machine Features
Machine Features 1. Motor Armor System. This system will shut the pump off in the event of a leak inside the pump cartridge to prevent damage to the motor. 2. ON/OFF Switches. Allows the operator to turn the pump on and off. 3. -
Page 16: Important Safety Information - Operation
Operation – Important Safety Information Now that you have completed and tested your assembly, there is some important safety and health information you need to know with regard to handling and spraying chemicals. WARNING Carefully read and make sure you understand the following safety information before using the sprayer. -
Page 17: Chemical Application Safety
Operation – Important Safety Information (continued) Chemical Application Safety: WARNING • Caution must be used when spraying chemicals to avoid unsafe exposure to humans and the environment • Heed the warnings below and follow all instructions carefully. Before Spraying • Soak. -
Page 18: Chemical Accident Procedures
Operation – Important Safety Information (continued) Chemical accident procedures: WARNING Before you fill the tank, review the following information with regard to handling accidents. Chemical spills, sprayer leaks, personal contamination, and poisoning are accident situations which you may encounter. All require an immediate response –... - Page 19 Operation – Important Safety Information (continued) Chemical spills Chemical spills must be quickly contained and properly cleaned up. Refer to the chemical label for any specific clean-up instructions with regard to the chemical spilled. General procedures include: 1. Control the spill by stopping the source of the spill. If the source of the spill is a container leak, place the leaking container in a larger, watertight container.
-
Page 20: Preparing The Sprayer For Each Use
Operation – Preparing the Sprayer for Each Use If the sprayer has been used previously, it must be prepared BEFORE EACH SUBSEQUENT USE. WARNING • • Read instructions below carefully for inspecting and preparing the sprayer. • Damaged or clogged equipment could result in leaks or uncontrolled spray. •... -
Page 21: Step One: Assess Wind Conditions And Clear Work Area
Operation – Using the Sprayer Step 1: Assess wind conditions and clear work area. Before you decide to spray, you must determine whether wind conditions are suitable. You must also restrict access to the work area to ensure the safety of bystanders. WARNING Do not spray if wind speeds are greater than 5 MPH or if there are bystanders in the intended spray area. -
Page 22: Step Two: Mixing Chemicals
Operation - Using the Sprayer (continued) Step 2: Mixing chemicals. WARNING • ALWAYS wear personal protective equipment as directed on the chemical labels when handling chemicals. • Long pants and sleeves, chemical resistant gloves, and eye protection are strongly recommended. Additional protective gear may be required depending on the particular chemical. -
Page 23: Step Three: Operate The Sprayer
Operation - Using the Sprayer (continued) Step 3: Operate the sprayer. WARNING • ALWAYS wear personal protective equipment as directed on the chemical label when spraying. • Long pants and sleeves, chemical-resistant gloves, and eye protection are strongly recommended. Additional protective gear may be required depending on the particular chemical. - Page 24 Operation - Using the Sprayer (continued) 7. Understanding the control panel 1. Battery Monitor: Check battery voltage by pressing the ON button on battery monitor. 2. Charging Port: Connect 2-pin connector from battery tender to the charging port to charge the battery (battery tender and battery not included). 3.
- Page 25 Operation - Using the Sprayer (continued) 8c. Spraying fences Follow the steps below for spraying fences or decking: and decking with 1. Using a 2% mix (see table), spray fences from bottom to top; spray flat soft wash mix surfaces (decking floor) starting on the far side and working back towards the sprayer.
-
Page 26: Step Four: Clean Sprayer And Decontaminate After Use
Operation - Using the Sprayer (continued) Step 4: Clean sprayer and decontaminate after use. When finished using the sprayer, it is important to clean the sprayer and decontaminate yourself. Do not store the sprayer with chemicals in the tank, as it is unsafe and could also result in damage to the equipment. -
Page 27: Step Five: Connect To Battery Charger
Operation - Using the Sprayer (continued) Step 5: Connect to battery charger. When finished using the sprayer, the battery can be recharged using the 2-pin connector port shown below. Simply connect the 2-pin connector from the battery charger to the charging port. NOTE: If the battery charger is not equipped with a 2-pin connector, disconnect both 2-pin connectors on the system before attaching charger to the battery. -
Page 28: Storage
Storage When not in use, store indoors. For long term or winter storage, prepare by running RV antifreeze (DO NOT USE automotive antifreeze) through the system. This will keep internal parts lubricated, protect against corrosion, and keep the unit from freezing. CAUTION •... -
Page 29: Troubleshooting
Troubleshooting WARNING Before troubleshooting or attempting to service, read the following safety rules to avoid accidental exposure to chemical and also risk of electric shock. Note: A reserve, clean container should be kept for use when the sprayer tank needs to be emptied temporarily for repairs. -
Page 30: Maintenance
Maintenance In the event of an internal pump cartridge leak, the pump will shut off to protect the motor and the LED light will turn on to indicate the problem. To repair the pump, use 5.5 GPM replacement pump cartridge A157153. To remove the old pump cartridge from the motor: 1. -
Page 31: Specifications
Specifications Electrical System Requirements Electrical connection 12 VDC Amp draw from pump 17.0 Amps Sprayer Specifications Maximum GPM 5.5 GPM (20.8 Liters/min.) Maximum Pressure 60 PSI (4.1 Bar) Overall Frame Dimensions 25.0" x 18.5" x 17.5" (63.5cm x 47.0cm x 44.5cm) Frame Material Aluminum Weight (does not include battery) -
Page 32: Exploded View And Parts Breakdown
Exploded View and Parts Breakdown – Rev A... - Page 33 Exploded View and Parts Breakdown – Rev A Ref # Part # Description 2215 Rubber foot 82717 Bolt, M8 x 20mm SS HHF 82719 Nut, M8 SS serrated flange 98404 Screw, M5 x 15mm SS self-tapping 790471 Manual tube, mini 791168 Zip ties 793231...
-
Page 34: Pump Exploded View
Pump Exploded View Ref # Part # Description 802273 Motor Assembly A157153 Pump Cartridge 800428 Base Plate Assembly 784449 Quick Connect Clip, Black 800092 Decal, Pump Branding 791416 Replacement Fuse, 20A... -
Page 35: Limited Warranty
Limited Warranty Dear Valued Customer: The NorthStar product you just purchased is built with the finest material and craftsmanship. Use this product properly and enjoy the benefits from its high performance. By purchasing a NorthStar product, you show a desire for quality and durability. - Page 36 Manufactured by Northern Tool & Equipment Company, Inc. Burnsville, Minnesota 55306 www.northerntool.com Made in China...
Need help?
Do you have a question about the 1572214 and is the answer not in the manual?
Questions and answers