
Related Manuals for Kees van der Westen Speedster 110-120VAC


Summary of Contents for Kees van der Westen Speedster 110-120VAC
- Page 1 CONTENTS 110-120VAC version 220-240VAC version Installation and user manual Speedster Document ID: Sup-Sium-Eng Date of issue: August 21, 2013 Revision date: June 28, 2017 Speedster page 1...
-
Page 2: Table Of Contents
CONTENTS Parts identification ........................... 3 Unpack..............................4 Parts included in standard shipment ....................... 4 Installation..............................5 Water quality ............................5 Connect water supply .......................... 7 Connect water discharge ........................8 Connect to mains power and switch on ....................9 Adjust pump pressure .......................... 9 Using the machine .......................... -
Page 3: Parts Identification
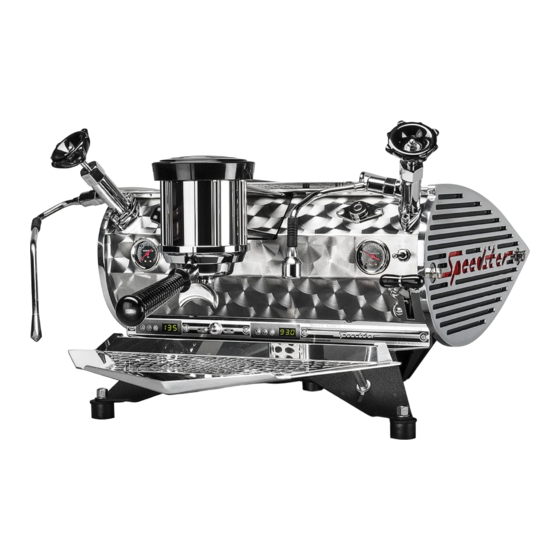
WELCOME Parts identification identity Figure W 1. Showing the main operational parts of the Speedster 1. Mains switch 2. Coffee boiler PID with temperature display 3. Hot water spout 4. 3-way brewing lever 5. 3-way hot water toggle switch 6. Coffee boiler pressure gauge 7. -
Page 4: Unpack
INSTALLATION Unpack Tools needed • Phillips screw driver no. 2 Procedure 1. Remove the lid of the crate. 2. Remove the side panels. 3. Lift the machine by its legs. Warnings! The valves at both sides of the group are not designed to lift the machine. Lifting the machine by these may cause the frame to bend which results in unrepairable damage. -
Page 5: Installation
INSTALLATION Installation Caution! Installation of and maintenance on the Speedster should be done by a qualified technician. Parts of the machine can reach a temperature of close to 140 °C (284 °F). The steam/hot water boiler contains water and pressurised steam of 135 °C at 1.45 bar overpressure (275 °F at 21 PSI), temperature and pressure in the coffee system reaches up to 96 °C at 12 bar overpressure (205 °F at 175 PSI). - Page 6 INSTALLATION Chlorine should not be present in your water since it has a highly corrosive effect on all metal parts (copper, brass and even stainless steel) inside your machine and makes your espresso smell and taste awful. Chlorine treated water should therefore not be used in your machine unless chlorine is removed from the water after the chlorine treatment (e.g.
-
Page 7: Connect Water Supply
INSTALLATION Connect water supply water treatment pump with system motor Figure I 1. Water treatment system (not included) on left is connected to the pump on the right. Water flow is according to arrows. Tap and Speedster will be to left of figure. 1. -
Page 8: Connect Water Discharge
INSTALLATION 6. Hold the loose end of the high pressure hose in a bucket and open the tap slowly. Flush the water treatment system according to manufacturer's instruction. Then flush the pump for a minute (the pump-motor does not have to run). Check if the water does not show a strange colour or smell. -
Page 9: Connect To Mains Power And Switch On
INSTALLATION Connect to mains power and switch on Warning! The Speedster is made for either 110-120VAC or 220-240VAC power supply. Make sure that the power demands (see identity tag on front of machine) matches the local power supply before connecting the Speedster to the mains power. We cannot be held responsible for damages resulting from connecting the machine to incompatible mains power. -
Page 10: Filter Holder
INSTALLATION While brewing espresso, with the group valve “open” and the pump activated, the pressure is supposed to increase up to 9 bar when back pressure is present (coffee puck). The pressure generated by the pump is partly dependent on the line pressure of the building. The pump pressure can be adjusted by turning the set screw on the right hand side of the brass pump housing (see Figure I 4).
Need help?
Do you have a question about the Speedster 110-120VAC and is the answer not in the manual?
Questions and answers