Grasslin QEG-2, QEG-2S - Programmer Manual
- Operating manual (20 pages) ,
- Operating manual (2 pages) ,
- Operating manual (20 pages)
Advertisement
- 1 Safety Instructions
- 2 Information about the device
- 3 Installation and mounting
- 4 Quick-start guide – 3 clicks to total control
-
5
Operation and configuration
- 5.1 Display / Function keys
- 5.2 Commissioning
- 5.3 Set date and time
- 5.4 Change AM/PM time display to 24 hour clock
- 5.5 Running a built-in programme (default programmes)
- 5.6 Domestic hot water systems
- 5.7 Review/Edit central heating (CH) program
- 5.8 Review/Edit domestic hot water (DHW) program
- 5.9 Operating modes
- 5.10 Installers menu
- 5.11 Service menu
- 5.12 PIN code
- 6 Disposal / Recycling
- 7 Videos
- 8 Documents / Resources
Safety Instructions

- Installation must be carried out by a professional electrician!
- To avoid injuries, the device must be installed by a skilled electrician only!
- Before changing the battery, the device must be disconnected from the power supply!
- Please observe the national regulations and safety instructions.
- Interferences and changes to the device will invalidate the warranty and guarantee rights.
- Maximum diameter of the conductors lines for the terminals: 2 x 2,5 mm2
Read and observe these instructions to guarantee a perfect function of the device and a safe operation.
Information about the device
What is a programmer?
...an Explanation for Householders (as recommended by the Energy Savings Trust)
Programmers allow you to set 'ON' and 'OFF' time periods. Some models switch the central heating and domestic hot water on and off at the same time, while others allow the domestic hot water and heating to come on and go off at different times.
Set the 'ON' and 'OFF' time periods to suit your own lifestyle. On some programmers you must also set whether you want the heating and hot water to run continuously, run under the chosen 'ON' and 'OFF' heating periods, or be permanently off.
The time on the programmer must be correct. Some types have to be adjusted in spring and autumn at the changes between greenwich Mean Time and British Summer Time.
You may be able to temporarily adjust the heating programme, for example, 'Override', 'Advance', or 'Boost'. These are explained in the manufacturer's instructions.
The heating will not work if the room thermostat has switched the heating off. And, if you have a hot-water cylinder, the water heating will not work if the cylinder thermostat detects that the hot water has reached the correct temperature.
Description of the device
Your two channel programmer provides timing control for your central heating and domestic hot water, letting you set ON and OFF periods to suit your own lifestyle.
- Backlit lCD Display
- Real Time Clock
- Up to 3 ON/OFF per day
- Automatic summertime / wintertime changeover
- Daily, weekly 1) and week-weekend 1) programming possibility
- Different running modes: OFF, AUTO, ONCE, CONTINUOUS and HOlIDAYS 1)
- Manual override function
- Manual extra hour function
- 3 different pre-programmed profi les, customizable by user
- Boiler service interval indication & actions 1)
Designated use
- The programmer is used to control central heating zone systems or combi boilers and domestic hot water systems ("fully pumped" or "gravity-fed").
- Suitable for use in dry rooms only!
- Do not install in the vicinity of devices which generate inductive discharges (motors, transformers, etc.)
Technical data
| Dimensions H x W x D (mm) | 95 x 148 x 36 |
| Weight g (approx.) | 285 |
| Power supply | 230 V AC / 50-60 Hz |
| Power consumption | < 3 W |
| Power reserve | > 2h |
| Switching capacity | 3 A 250 V ~ resistive, cos φ = 1 3 A 250 V ~ inductive, cos φ = 0.6 |
| Time display | 24 h or 12 h AM/PM format |
Time setting resolution
| 1 min. 1 min. |
| Programmes | Selectable (daily, weekly, or week-weekend) |
| Number of switchings per day | 3 ON/OFF pairs (2 ON/OFF pairs selectable) |
| Operating temperature range | 0°C... + 45°C |
| Ambient temperature | -20°C... + 55°C |
| Humidity range | 10 to 90% RH, non condensing |
| Accuracy | Type ± 1 sec./day at +20°C |
| Terminal capacity | 2 x 2,5 mm 2 |
| Protection type | IP 30 |
| European standards | EN60730-2-7 Compliant with building regulations (Part L UK) (Part J Scotland) |
Installation and mounting
- Installation must be carried out by a professional electrician!
General information

Open/Close housing and Wall mounting

Wiring diagram

Quick-start guide – 3 clicks to total control
- Connect mains power.
- Press OK three times.
- The default Standard in-built programme runs.
- You can control the QEg with the Override, Extra Hour or Mode buttons.
Please read the full instructions if you want to know more.
Operation and configuration
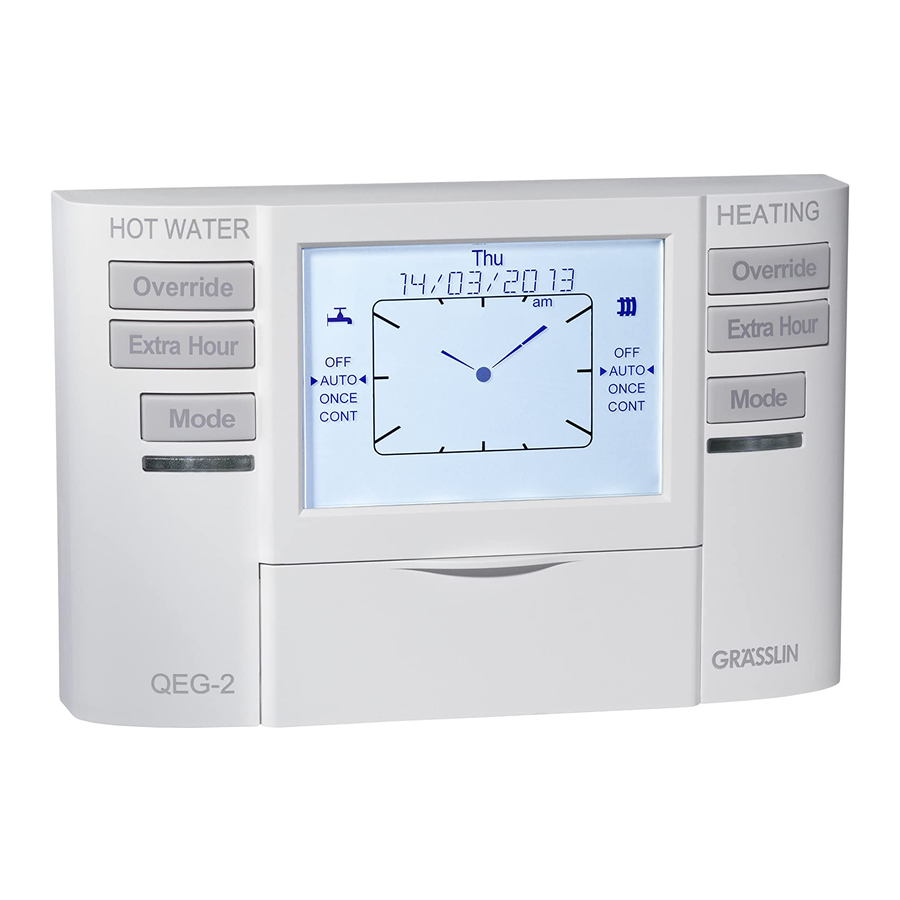
Display / Function keys

- Day of the week indicator
- Current day, month, year
- Central heating operating mode indicator
- Central heating override button
- Central heating extra hour button
- Central heating operating mode button
- Central heating indicator lamp
- Central heating extra hour indication
- Central heating programming period indication
- Select indicator lamps
- Select
- Ok button
- "-" and "+" button
- 1) Holiday button
- 1) Holiday icon
- Information text line
- Domestic hot water programming period indication
- Domestic hot water extra hour indication
- Domestic hot water indicator lamp
- Domestic hot water operating mode button
- Analog clock / current time
- Domestic hot water extra hour button
- Domestic hot water override button
- Domestic hot water icon
- Warning icon
- Domestic hot water operating mode indicatior
Commissioning
When first using the timer, you have to set programming type, date and time.

- Connect the programmer to power.
- Product name and version number are displayed briefly.
- The preset PROGRAMMING TYPE and OK are flashing.
 Depending on the product you can choose between three different settings: Daily, Weekly 1) or Week-Weekend 1).
| Daily | All days (Monday - Sunday) are programmed with the same ON/OFF time schedule |
| Weekly 1) | You can program each day (Monday, Tuesday, ...) with a different ON/OFF time schedule |
| Week-Weekend 1) | You can program Monday - Friday with a ON/ OFF time schedule and Saturday - Sunday with a different one. |
- Choose your desired programming type (DAILY, WEEKLY 1), WEEK-WEEKEND 1)),
![]() or
or ![]() , and confirm with
, and confirm with ![]() ..
..
 ..
..- Preset value DATE is flashing.
- Enter day,
![]() or
or ![]() , and confirm with
, and confirm with ![]() .
.
- Preset value MONTH is flashing.
- Enter month,
![]() or
or ![]() , and confirm with
, and confirm with ![]() .
.
- Preset value YEAR is flashing.
- Enter year,
![]() or
or ![]() , and confirm with
, and confirm with ![]() .
.
- Preset TIME is flashing.
- Enter hour,
![]() or
or ![]() , and confirm with
, and confirm with ![]() .
.
- Preset value MINUTE is flashing.
- Enter minute,
![]() or
or ![]() , and confirm with
, and confirm with ![]() .
.
- The date and time are saved.
- The programmer goes to RUN mode.
Set date and time
If you wish to change the date or time, follow the instructions below:

- Press the SELECT
![]() until menu DAY/TIME is selected.
until menu DAY/TIME is selected.
- Select indicator lamp DAY/TIME is ON.
- Enter day,
![]() or
or ![]() , and confirm with
, and confirm with ![]() .
.
- Preset value MONTH is flashing.
- Enter month,
![]() or
or ![]() , and confirm with
, and confirm with ![]() .
.
- Preset value YEAR is flashing.
- Enter year,
![]() or
or ![]() , and confirm with
, and confirm with ![]() .
.
- Preset TIME is displayed.
- Enter hour,
![]() or
or ![]() , and confirm with
, and confirm with ![]() .
.
- Preset value MINUTE is flashing.
- Enter minute,
![]() or
or ![]() , and confi rm with
, and confi rm with ![]() .
.
- The date and time are saved. Holidays DAY/ DHW CH RUN TIME OK
- Press the SELECT
![]() until indicator lamp RUN is ON.
until indicator lamp RUN is ON.
Change AM/PM time display to 24 hour clock
Your programmer can operate on the 12 hour AM/PM or 24 hour clock formats.
If you wish to change the clock format, follow the instructions below:

- Make sure the device is working in RUN mode.
- Press and hold
![]() buttons at the same time for 10 seconds.
buttons at the same time for 10 seconds.
 buttons at the same time for 10 seconds.
- INST MENU opens and OK is flashing.
- Confirm with
![]() .
.
- The menu item DIGI CLOCK is displayed.
- Press
![]() to edit settings.
to edit settings.
- Setting NO is flashing.
- Press
![]() or
or ![]() to scroll through the menu. Choose YES and confirm with
to scroll through the menu. Choose YES and confirm with ![]() .
.
- Setting AM PM is flashing.
- Press
![]() or
or ![]() to scroll through the menu. Choose AM PM or 24 HRS and confirm with
to scroll through the menu. Choose AM PM or 24 HRS and confirm with ![]() .
.
- The chosen setting is saved.
- The next menu item bACKLIGHT is displayed.
- Press the SELECT
![]() until indicator lamp RUN is ON.
until indicator lamp RUN is ON.
Running a built-in programme (default programmes)
With the date and time correct, your timer will now be operating to the built-in programmes. These have been designed to provide heating at typical times throughout the day.
The built-in programmes give you a starting point that you can personalise to your own requirements, please see the section "Review/Edit central heating program" or "Review/Edit domestic hot water program".
| Built-in programme STD (DEFAUlT) | ||||
| Daily | ON1: 06:30 am | ON2: 12:00 pm* | ON3: 04:30 pm | |
| OFF1: 08:30 am | OFF2: 12:00 pm* | OFF3: 10:30 pm | ||
| Weekly 1) | ON1: 06:30 am | ON2: 12:00 pm | ON3: 04:30 pm | |
| OFF1: 08:30 am | OFF2: 01:00 pm | OFF3: 10:30 pm | ||
| Week- Weekend 1) | ON1: 06:30 am | ON2: 12:00 pm | ON3: 04:30 pm | Mo - Fr |
| OFF1: 08:30 am | OFF2: 01:00 pm | OFF3: 10:30 pm | ||
| ON1: 06:30 am | ON2: 12:00 pm | ON3: 04:00 pm | Sa - Su | |
| OFF1: 09:30 am | OFF2: 01:00 pm | OFF3: 10:30 pm | ||
| Built-in programme HOME | ||||
| Daily | ON1: 06:30 am | ON2: 12:00 pm* | ON3: 04:00 pm | |
| OFF1: 09:30 am | OFF2: 12:00 pm* | OFF3: 11:00 pm | ||
| Weekly 1) | ON1: 06:30 am | ON2: 12:00 pm | ON3: 04:00 pm | |
| OFF1: 09:30 am | OFF2: 01:00 pm | OFF3: 11:00 pm | ||
| Week- Weekend 1) | ON1: 06:30 am | ON2: 12:00 pm | ON3: 04:30 pm | Mo - Fr |
| OFF1: 09:30 am | OFF2: 01:00 pm | OFF3: 11:00 pm | ||
| ON1: 06:30 am | ON2: 12:00 pm | ON3: 04:00 pm | Sa - Su | |
| OFF1: 09:30 am | OFF2: 01:00 pm | OFF3: 11:00 pm | ||
| Built-in programme ECO | ||||
| Daily | ON1: 06:30 am | ON2: 12:00 pm* | ON3: 05:30 pm | |
| OFF1: 07:30 am | OFF2: 12:00 pm* | OFF3: 10:00 pm | ||
| Weekly 1) | ON1: 08:30 am | ON2: 12:00 pm | ON3: 05:30 pm | |
| OFF1: 09:30 am | OFF2: 01:00 pm | OFF3: 10:00 pm | ||
| Week- Weekend 1) | ON1: 06:30 am | ON2: 12:00 pm | ON3: 05:30 pm | Mo - Fr |
| OFF1: 07:30 am | OFF2: 12:00 pm | OFF3: 10:00 pm | ||
| ON1: 08:30 am | ON2: 12:00 pm | ON3: 05:30 pm | Sa - Su | |
| OFF1: 09:30 am | OFF2: 01:00 pm | OFF3: 10:30 pm | ||
* On/off prgrammes with the same time cancel out - no switching will occur.
The built-in programmes can be selected in the INSTALLERS MENU.
To access to installers menu, the device must be working in RUN mode.

- Make sure the device is working in RUN mode.
- Press and hold
![]() buttons at the same time for 10 seconds.
buttons at the same time for 10 seconds.
 buttons at the same time for 10 seconds.
- INST MENU opens and OK is flashing.
- Confirm with
![]() .
.
- Installers menu is activated.
- Press 3 x
![]() until PROG TYPE is displayed.
until PROG TYPE is displayed. - Press
![]() to edit settings.
to edit settings.
- Preset value is flashing.
- Press
![]() or
or ![]() to scroll through the menu. Choose your desired setting (DAILY, WEEKLY 1), 5-2 DAYS 1)) and confirm with
to scroll through the menu. Choose your desired setting (DAILY, WEEKLY 1), 5-2 DAYS 1)) and confirm with ![]() .
.
- The chosen setting is saved.
- The next menu item NR PERIODS is displayed.


- Press
![]() to go to DEFAULT PROG.
to go to DEFAULT PROG. - Press
![]() to edit settings.
to edit settings.
- Preset value is flashing.
- Press
![]() or
or ![]() to scroll through the menu. Choose your desired setting (STD, HOME or ECO) and confirm with
to scroll through the menu. Choose your desired setting (STD, HOME or ECO) and confirm with ![]() .
.
- The chosen setting is saved
- The next menu item PUMP GRAVITY is displayed.
- Press the SELECT
![]() until indicator lamp RUN is ON.
until indicator lamp RUN is ON.
Domestic hot water systems
"fully pumped system" or "gravity-fed system
| Fully pumped Domestic Hot Water system (PUMPED) | The term for any boiler that uses a pump to move all the heat from the boiler to every part of the system is "fully pumped". As a rule one pump is used to circulate the water through valves which divert the fl ow to the relevant part of the system (Central heating or Domestic Hot water). In this type of systems, both channels of the programmer can work independently. |
| Gravity-fed Domestic Hot Water system (GRAVITY) | In gravity fed hot water systems, whenever the boiler comes on to service heating, there will inevitably be some circulation through the hot water storage tank, which will then heat up. Then there is no possibility to have independent programs for heating and hot water. |
You can choose the desired system in the INSTALLERS MENU.
To access to installers menu, the device must be working in RUN mode.

- Make sure the device is working in RUN mode.
- Press and hold
![]() buttons at the same time for 10 seconds.
buttons at the same time for 10 seconds.
 buttons at the same time for 10 seconds.
- INST MENU opens and OK is flashing.
- Confirm with
![]() .
.
- Installers menu is activated.
- Press 6 x
![]() until PUMP GRAVITY is displayed.
until PUMP GRAVITY is displayed. - Press
![]() to edit settings.
to edit settings.
- Preset value is flashing.
- Press
![]() or
or ![]() to scroll through the menu. Choose your desired setting (PUMPED OR gRAVITY) and confirm with
to scroll through the menu. Choose your desired setting (PUMPED OR gRAVITY) and confirm with ![]() .
.
- The chosen setting is saved.
- The next menu item RESET is displayed.
- Press the SELECT
![]() until indicator lamp RUN is ON.
until indicator lamp RUN is ON.
Review/Edit central heating (CH) program
Depending on the product you can choose between three different settings: Daily, Weekly1) or Week-Weekend (5-2 days) 1).
| Daily | All days (Monday - Sunday) are programmed with the same ON/OFF time schedule |
| Weekly 1) | You can program each day (Monday, Tuesday, ...) with a different ON/OFF time schedule |
| Week-Weekend 1) | You can program Monday - Friday with a ON/ OFF time schedule and Saturday - Sunday with a different one. |
You can choose the desired setting in the INSTALLERS MENU.
Every programme has three pairs of ON/OFF switching times per day. Each time can be set between 3.00 am and 2.50 am (on the next day).
1) Function not available for all products.
Example 1: Daily programming CH, built-in programme STD

- Press the SELECT
![]() until indicator lamp CH is ON.
until indicator lamp CH is ON.
- Preset value ON1 (06:30) is flashing.
Set time:
Press  or
or  briefly to increase/decrease the time in 1 minute steps.
Press and hold or longer than 2 seconds to increase/ decrease the time quickly.
Or press OK to confirm a displayed (flashing) value
- Enter hour and minute for the new ON1 command,
![]() or
or ![]() , and confirm with
, and confirm with ![]() .
.
- Preset value OFF1 (08:30) is flashing.
- Enter hour and minute for the new OFF1 command,
![]() or
or ![]() , and confirm with
, and confirm with ![]() .
.
- Preset value ON2 (12:00) is flashing.
- Enter hour and minute for the new ON2 command,
![]() or
or ![]() , and confirm with
, and confirm with ![]() .
.
- Preset value OFF2 (12:00) is flashing.
- Enter hour and minute for the new OFF2 command,
![]() or
or ![]() , and confirm with
, and confirm with ![]() .
.
- Preset value ON3 (16:30) is flashing.
- Enter hour and minute for the new ON3 command,
![]() or
or ![]() , and confirm with
, and confirm with ![]() .
.
- Preset value OFF3 (22:30) is flashing.
- Enter hour and minute for the new OFF3 command,
![]() or
or ![]() , and confirm with
, and confirm with ![]() .
.
- Set value ON1 is flashing.
- Press the SELECT
![]() until indicator lamp RUN is ON.
until indicator lamp RUN is ON.
- The program is saved.
Example 2: Weekly programming CH, built-in programme STD Holidays DAY/ DHW CH RUN TIME OK
- Press the SELECT until indicator lamp CH is ON.
- Day MON is flashing.
You have the possibility to edit each day individually or you can create dayblocks, e.g. Tue, Wed, Fri and Sat, where you can set the same ON and OFF sequence.
Days you do not select will keep the preset values.
Set day:
- Select the first desired day,
![]() or
or ![]() , and confirm with
, and confirm with ![]() .
.
- The menu item ADD DAY is displayed.
ADD DAY: YES
- Choose YES,
![]() or
or ![]() , if you want to create a dayblock and confirm with
, if you want to create a dayblock and confirm with ![]() .
. - The next day is flashing.
- Select the next day you want to add to the dayblock,
![]() or
or ![]() , and confirm with
, and confirm with ![]() .
. - The menu item ADD DAY is displayed.
- Repeat this process until the desired days have been selected.
On the last day selected, choose NO for ADD DAYS and confirm with![]() .
. - The selected days are shown in the display.
- The preset time ON1 (06:30) is blinking.
ADD DAY: NO
Choose NO, or , if you want to edit each day individually
- The preset time ON1 (06:30) is blinking.
Set time:
Press or briefly to increase/decrease the time in 1 minute steps.
Press and hold or longer than 2 seconds to increase/ decrease the time quickly.
Or press OK to confirm a displayed (flashing) value
- Enter hour and minute for the new ON1 command,
![]() or
or ![]() , and confirm with
, and confirm with ![]() .
.
- Preset value OFF1 (08:30) is flashing.
- Enter hour and minute for the new OFF1 command,
![]() or
or ![]() , and confirm with
, and confirm with ![]() .
.
- Preset value ON2 (12:00) is flashing.
- Enter hour and minute for the new ON2 command,
![]() or
or ![]() , and confirm with
, and confirm with ![]() .
.
- Preset value OFF2 (13:00) is flashing.
- Enter hour and minute for the new OFF2 command,
![]() or
or ![]() , and confirm with
, and confirm with ![]() .
.
- Preset value ON3 (16:30) is flashing.
- Enter hour and minute for the new ON3 command,
![]() or
or ![]() , and confirm with
, and confirm with ![]() .
.
- Preset value OFF3 (22:30) is flashing.
- Enter hour and minute for the new OFF3 command,
![]() or
or ![]() , and confirm with
, and confirm with ![]() .
.
- The time is saved.
- The menu item SELECT DAY is displayed.
- You can select and edit a new day,
![]() or
or ![]() , or press the SELECT
, or press the SELECT ![]() until programming menu RUN is selected to exit.
until programming menu RUN is selected to exit.
Review/Edit domestic hot water (DHW) program
Depending on the product you can choose between three different settings: Daily, Weekly 1) or Week-Weekend (5-2 days) 1)
| Daily | All days (Monday - Sunday) are programmed with the same ON/OFF time schedule |
| Weekly 1) | You can program each day (Monday, Tuesday, ...) with a different ON/OFF time schedule |
| Week-Weekend 1) | You can program Monday - Friday with a ON/ OFF time schedule and Saturday - Sunday with a different one. HEATING |
You can choose the desired setting in the INSTALLERS MENU.
Every programme has three pairs of ON/OFF switching times per day. Each time can be set between 3.00 am and 2.50 am (on the next day). To review or edit your doemstic hot water programme, press the SELECT  until menu DHW is selected.
Example: Daily programming DHW, built-in programme STD

- Press the SELECT
![]() until indicator lamp DHW is ON.
until indicator lamp DHW is ON.
- Preset value ON1 (06:30) is flashing.
- Enter hour and minute for the new ON1 command,
![]() or
or ![]() , and confirm with
, and confirm with ![]() .
.
- Preset value OFF1 (08:30) is flashing.
- Enter hour and minute for the new OFF1 command,
![]() or
or ![]() , and confirm with
, and confirm with ![]() .
.
- Preset value ON2 (12:00) is flashing.
- Enter hour and minute for the new ON2 command,
![]() or
or ![]() , and confirm with
, and confirm with ![]() .
.
- Preset value OFF2 (12:00) is flashing.
- Enter hour and minute for the new OFF2 command,
![]() or
or ![]() , and confirm with
, and confirm with ![]() .
.
- Preset value ON3 (16:30) is flashing.
- Enter hour and minute for the new ON3 command,
![]() or
or ![]() , and confirm with
, and confirm with ![]() .
.
- Preset value OFF3 (22:30) is flashing.
- Enter hour and minute for the new OFF3 command,
![]() or
or ![]() , and confirm with
, and confirm with ![]() .
.
- Set value ON1 is flashing.
- Press the SELECT
![]() until indicator lamp RUN is ON.
until indicator lamp RUN is ON.
- The program is saved.
The settings for a weekly programming DHW is done in the same way as the weekly programming for central heating (CH), see example „Weekly programming CH" on the left side.
Operating modes
The operating mode may only be changed when RUN mode is activated (green indicator lamp RUN must be ON).
| OFF | The system will remains OFF. |
| AUTO | The system will be switched ON and OFF according to the adjusted program. |
| ONCE | The heating will come ON at the first programmed ON time, and go OFF at the last programmed OFF time. |
| CONTINUOUS | The system will remain ON continuously. |
OVERRIDE mode
The Override function (temporary program override) allows the user to finish the current running program prematurely or start a program to run before its scheduled start. This depends on the current channel status.
The Override function applies only to the current program and remains active until the next program change. After that, the programmer returns to AUTO mode.
The Override function is only available when the device is running in AUTO and ONCE operating mode.


Example
AUTO mode

Example 1

Example 2
Extra hour mode
Holidays DAY/ TIME OK The extra hour button allows you to switch the system ON for up to 3 extra hours without altering the program.
- When the blue central heating indicator lamp is OFF, pressing an EXTRA HOUR button switches the heating ON for just one hour.
- When the blue central heating indicator lamp is ON, pressing an EXTRA HOUR button extends the programmed ON period by one hour.
- Further presses of the EXTRA HOUR button will increase the extra hour period by one hour for each button press, up to a maximum of 3 hours.
- To cancel the extra hours, just keep pressing the EXTRA HOUR button until the message EXT HOUR disappears from the display. The system returns to previous status.

Example
AUTO mode

Example 1

Example 2
Holiday mode
The Holiday function allows you to switch OFF your heating system for a specified number of days (from 1-90 days). This lets you save energy and related costs when you are away from home, but resumes normal operation on the day of your return.

- Make sure the device is working in RUN mode.
- Press the HOLIDAY button.
- Select desired numbers of days,
![]() or
or ![]() , and confirm with
, and confirm with ![]() .
.
- Holiday mode is activated.
To cancel the Holiday function, just press the HOLIDAY button again. If you use the holiday function during winter you should ensure that you have a secondary frost protection device in your system to prevent frost damage.
Installers menu
The programmer has a special installers menu where some features can be adjusted to suit your lifestyle or preferences.
To access to installers menu (INST MENU) the device must be working in RUN mode (green indicator lamp RUN must be ON).
If you wish to change the settings in the installers menu, follow the instructions below:

- Make sure the device is working in RUN mode.
- Press and hold
![]() buttons at the same time for 10 seconds.
buttons at the same time for 10 seconds.
 buttons at the same time for 10 seconds.
- INST MENU opens and OK is flashing.
- Confirm with
![]() .
.
- Installers menu is activated, you can change the settings.
- Press
![]() or
or ![]() to scroll through the menu.
to scroll through the menu. - Press
![]() to edit/confirm settings and
to edit/confirm settings and ![]() or
or ![]() to select settings.
to select settings. - To cancel installers menu, press
![]() button.
button.
The following settings are possible:
| Digital clock (DIGI ClOCK) | Shows the current time (hours/minutes) in a digital and analog clock format Setting possibilities: NO: Digital clock not shown (Default value). YES: Digital clock shown. If digital clock is set YES, you can choose between 12 HRS (AM-PM) or 24 HRS format. |
| Backlight (BACKLIGHT) | Setting possibilities: PERMANENT ON: Backlight always ON (Default value). PERMANENT OFF: Backlight always OFF. BUTTON PRESSED: Backlight ON when any pushbutton is pressed. Backlight goes OFF 20 seconds after the last pushbutton press. |
| Auto Summer/ Wintertime changeover (S W CHANgE) | Automatic Summer/Winter time change. Summer time starts on the last Sunday of March (1:00 am to 2:00 am) and ends on last Sunday of October (2:00am to 1:00am), then Winter time starts Setting possibilities: ON: S/W time change will be done automatically (Default value) OFF: S/W time change must be done manually. |
| Programming type 1) (PROG TYPE) | Menu to select daily, week-weekend1), weekly1) programming. This value will be applied to both central heating and domestic hot water programming method. Daily: All days (Monday - Sunday) are programmed with the same ON/OFF time schedule Weekly 1) : You can program each day (Monday, Tuesday, ...) with a different ON/OFF time schedule Week-Weekend 1): You can program Monday - Friday with a ON/ OFF time schedule and Saturday - Sunday with a different one. |
| Number of periods (NR PERIODS) | Number of adjustable time periods defined by ON-OFF pairs to control central heating or domestic hot water. Setting possibilities: 3 ON-OFF: adjust maximum 3 ON-OFF time periods (Default value). 2 ON-OFF: adjust maximum of 2 ON-OFF time periods. |
| Default programmes (DEFAULT PROG) | Time programme that will appear by default when running in AUTO mode or as base point to customize according to users´ lifestyle Setting possibilities: STD: Standard Profile (Default value) HOME: Home Profile ECO: ECO Profile Detailed explanation of the profiles see chapter "Running a built-in programme" |
| Fully pumped/gravity systems (PUMP GRAVITY) | Fully pumped systems (PUMPED) (Default value) Central heating (CH) and domestic hot water (DHW) channels run independently Gravity systems (GRAVITY) Domestic hot water (DHW) is ON every time that Central heating (CH) is ON. |
| Reset (RESET) | Reset all parameters of installation menu to factory default |
Service menu
This mode is a countdown of the operating running time. Service period time, action and message shown will be set into service menu (for service variants only).
To access to service menu (SERV MENU) the device must be working in RUN mode (green indicator lamp RUN must be ON).
Service mode is PIN code protected. The preset value is 1234. You can change the PIN code in the installers menu.
If you wish to change the settings in the service menu, follow the instructions below:

- Make sure the device is working in RUN mode.
- Press and hold
![]() buttons at the same time for 10 seconds.
buttons at the same time for 10 seconds.
 buttons at the same time for 10 seconds.
- INST MENU opens and OK is flashing.
- Press
![]() button.
button.
 button.
- Service menu (SERV MENU) is selected.
- OK is flashing.
- Confirm with
![]() .
.
- First number of PIN CODE is flashing.
- Enter first number of PIN code,
![]() or
or ![]() , and confirm with
, and confirm with ![]() .
.
- Second number of PIN CODE is flashing.
- Enter second number of PIN code,
![]() or
or ![]() , and confirm with
, and confirm with ![]() .
.
- Third number of PIN CODE is flashing.
- Enter third number of PIN code,
![]() or
or ![]() , and confirm with
, and confirm with ![]() .
.
- Fourth number of PIN CODE is flashing.
- Enter fourth number of PIN code,
![]() or
or ![]() , and confirm with
, and confirm with ![]() .
.
- If PIN code is correct, service menu is activated, you can change the settings.
- Press
![]() or
or ![]() to scroll through the menu.
to scroll through the menu. - Press
![]() to edit/confirm settings and
to edit/confirm settings and ![]() or
or ![]() to select settings.
to select settings. - To cancel service menu, press
![]() button.
button.
The following settings are possible:
| Service mode (SERV MODE) | NO: Functionality is disabled (Default value) YES: Functionality is enabled. |
| Service days (SERV DAYS) | You can set the number of days (1 to 400) after which a service message is to appear. It will be shown on the display as soon as the counter has reached the number of days set by you. |
| Days notice (DAYS NOTICE) | Number of days to „show" service message on screen. Adjustable from 0 to 30 days. |
| Action type (ACTION TYPE) | TIMED: After service days due, heating system will be OFF, with possibility to switch ON manually the channels in 1 hour time fractions by pressing Extra hour button, up to 3 hours (maximum nr. of times: Timed Boost) (Default value) REMIND: After service days due, system will remind by a message to call installer for revision and system restart. TOTAL OFF: After service days due, heating system will be off until installer restarts the device (all push buttons and running modes will be disabled) |
| Timed boost (TIMED BOOST) | Available only if action type is set as TIMED. It gives the possibility to run manually for an undefined time (in 1 hour fraction times) or during a maximum number of times. Setting possibilities: NO LIMIT (Default value) SELECTABLE, 1 to 99 times, |
| Phone number (INST PHONE) | Show/Hide Installer´s phone nr. on screen, after service due day Setting possibilities: NO: Hide phone Nr. (Default value) YES: Show Phone Nr. |
| Installer's phone number (INST PHONE INPUT) | Menu reserved to introduce installer´s own phone nr. (max. 12 digits) Setting possibilities: EMPTY (Default value) Inserted PHONE NUMBER, if installers place any phone number. |
| Service reset (SERV RESET) | Reset all parameters of service menu to factory default |
PIN code
Service mode is PIN code protected. The preset value is 1234.
If you wish to change the PIN code, follow the instructions below:

- Make sure the device is working in RUN mode.
- Press and hold
![]() buttons at the same time for 10 seconds.
buttons at the same time for 10 seconds.
 buttons at the same time for 10 seconds.
- INST MENU opens and OK is flashing.
- Press 2 x
![]() until CHANGE PIN is displayed.
until CHANGE PIN is displayed.
- OK is flashing.
- Confirm with
![]() .
.
- First number of OLD PIN CODE is flashing.
- Enter old PIN code.
- Press
![]() or
or ![]() to set a numeric value.
to set a numeric value. - Press
![]() to set the next number.
to set the next number. - If old PIN code was correct, first number of NEW PIN CODE is flashing.
- Enter new PIN code.
- Press
![]() or
or ![]() to set a numeric value.
to set a numeric value. - Press
![]() to set the next number.
to set the next number. - New PIN code is saved.
Disposal / Recycling
Dispose of the packing material correctly according to legal requirements and regulations.
Observe the following notes for disposing of defective system components or the system after its service life:
- Dispose of appropriately, i.e. separating the parts to be disposed of according to material groups.
- Do not throw electrical and electronic components in the bin. Bring these parts to the recycling centers.
- Always ensure the environmentally sound disposal conform to the state-of-the-art environment protection, recycling and disposal engineering.
Grässlin GmbH
Bundesstraße 36
D-78112 St. georgen
Germany
Phone: +49 7724 933-0
Fax: +49 7724 933-240
www.graesslin.de
info@graesslin.de

VideosGrasslin QEG-2 Digital Programmer Installation and Setup Video
Documents / Resources
References
Download manual
Here you can download full pdf version of manual, it may contain additional safety instructions, warranty information, FCC rules, etc.
Advertisement


Need help?
Do you have a question about the QEG-2 and is the answer not in the manual?
Questions and answers