Table of Contents
Advertisement
Quick Links
Advertisement
Table of Contents

Subscribe to Our Youtube Channel
Related Manuals for Waves IONIC 16


Summary of Contents for Waves IONIC 16
- Page 2 Safety Instructions for IONIC 16 ARNING LECTRICAL AZARD To ensure your safety, please read this manual thoroughly before using the unit. Please observe these safety rules. 1. Keep this user guide for future reference. 8. Protect the power cord from being walked on or 2.
-
Page 3: Table Of Contents
Presets ..................................21 Device ID ..................................21 RESETTING THE UNIT ..............................21 SPECIFICATIONS ................................22 Dimensions ................................24 Installing IONIC 16 in a Rack ............................. 25 Waves Inc 2800 Merchants Drive, Knoxville, TN 37912 USA 1-865-909-9200 www.waves.com IONIC 16 / User Guide... -
Page 4: Introduction
100 meters from the SoundGrid-compatible Ethernet switch. The 2U, 19" rack-mountable cabinet can be mounted in a flight case or rack. IONIC 16 has two power supply options: 100 V–240 V mains and a 24 VDC external power supply. -
Page 5: Hardware And Connections
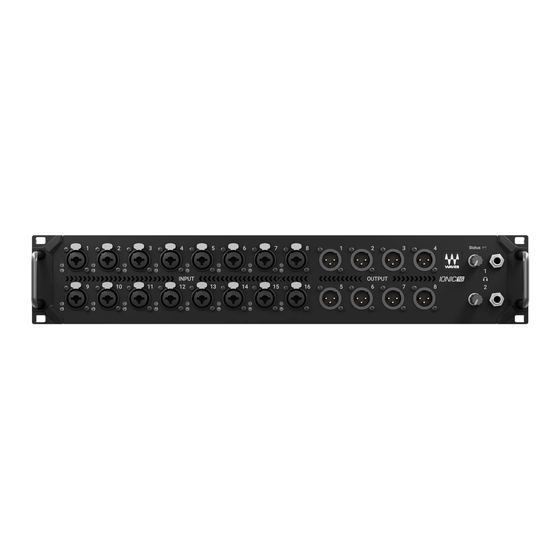
Hardware and Connections Front Panel Analog Inputs 1–16, XLR mic/line; TRS, line Analog Outputs 1–8, XLR Two headphone jacks and controls SoundGrid status LED IONIC 16 / User Guide... -
Page 6: Rear Panel
Warning Before changing the fuse, confirm that the mains cable and the external power supply cables are disconnected from the IONIC 16 device. Fuse: 2 amp slow blow External power supply: 24VDC / 4-pin XLR: pin 1positive, pin 4 negative... -
Page 7: Getting Started
I/O on stage. All I/Os can be up to 100 meters from the switch. SoundGrid Server The power of the server determines the plugin count. SG switch For an up-to-date list of approved SG switches, visit this support article. IONIC 16 / User Guide... - Page 8 LV1 license. You can also add up to eight servers (max: four active servers and four redundant servers). Note that in this example there is an additional Ethernet switch onstage. However large the system, basic hardware connections are always the same. IONIC 16 / User Guide...
-
Page 9: Download And Install Software
Download and Install Software IONIC 16 operates in a SoundGrid environment, so a SoundGrid app (such as eMotion LV1) must be installed on the host computer. If a SoundGrid app is not currently installed, use Waves Central to install it. Waves Central is an app used to install all Waves software products and to manage licenses. - Page 10 IONIC 16 driver. Install. ICENSES You do not need a license to use IONIC 16. However, many hosts or specific host configurations do require a license. Refer to the LV1 product page for details. Plugins and bundles likely require licenses.
-
Page 11: Configure The System
Next, it scans the SoundGrid network for devices. It then assigns devices and patches them to the host. We recommend that you let Auto-Config take care of device assignment, at least for your initial setup. IONIC 16 / User Guide... -
Page 12: Status Indicators
(circled here in yellow) to open the Device Menu, then select an IONIC 16 from the Network Devices submenu. If more than one IONIC 16 is connected to the SoundGrid network, each will appear in the Device Menu. Any device that is not already in use will be available for assignment (‘Free”). -
Page 13: Updating Firmware
Do not disconnect the device or turn off the computer before Done appears. Once the update is ready, turn the device off and on to reset it. If a driver is missing or damaged, you may need to reinstall it from Waves Central (see page 10). Grey... -
Page 14: Ionic 16 Control Panel
RIVER ONTROL ANEL Open the driver control panel and then click the Hardware Control Panel button. The driver control panel is located here in the host computer: PC: C:\Program Files (x86)\Waves\SoundGrid\Driver Control Panel Mac: System HD/Applications/Waves/SoundGrid ONTROL ANEL AGES The Clock, Input, and Output pages are used to set up and manage the unit. The About and System Info pages provide information about the unit, such as MAC address, SOE master, firmware version, and more. -
Page 15: Input Page
Preamp controls Presets: load and save Input meters Device name in Inventory Preamp input gain adjust Device status: when red, device is offline AES input meters Clip level indicator selector Power source: Int/Ext Device ID on/off IONIC 16 / User Guide... - Page 16 Turns Waves Harmonic Enhancer on or off. Harmonic enhancement usually results in a more natural-sounding, warmer sound, as found in classic analog equipment. Bypass HMX for a more neutral sound. The AES signal’s sample rate is always converted to match the sample rate of the IONIC 16 device. NPUT EVEL DJUST Controls the gain of the IONIC 16 preamps.
- Page 17 Range: -6 dB to 0 dB PSU I NDICATOR This indicates the IONIC 16 power source. 110 v to 240 v internal power supply Redundant 24 VDC external power supply; 4-pin XLR— pin 1 negative, pin 4 positive IONIC 16 / User Guide...
-
Page 18: Output Tab
Analog output meters, dBFS -60 dB to 0 dB, +18 dBu and +24 dBu full scale line output levels AES output meter Level indication only; no input control Headphone meters One meter for each headphone channel IONIC 16 / User Guide... -
Page 19: Clock Tab
Use the Clock tab to manage the clock relationship between the IONIC 16 and the SoundGrid network. The following image shows IONIC 16 locked to the network via Sync Over Ethernet (SOE). The device can also serve as the SOE clock master. -
Page 20: System Info Tab And About Tab
When IONIC 16 is the SOE clock master and is set to internal clock, this drop-down menu is used to set the device’s sample rate (and hence the sample rate of the SOE Sample Rate network). When IONIC 16 is not the clock master, this window displays the SOE network sample rate. -
Page 21: Presets
Device ID Click the ID button to identify the IONIC 16 device that relates to this control panel. A flashing, multi- colored light on the front panel of the device will remain lit until you turn off the ID button. -
Page 22: Specifications
THD+N: -100 dB @ +24 dBu, -105 dB @ +18 dBu (997 Hz, 20 kHz BW) • Crosstalk: > 90 dB (20 Hz to 20 kHz) • Residual output noise: -87 dBu (A-Weighted) • Output impedance: 150 ohms • IONIC 16 / User Guide... - Page 23 W x D x H 482.1 mm (w) x 305.9 mm (d) x 87 mm (h) (19 in x 12 in x 3.42 in) Weight 5.3 kg (11.7 lbs) Specifications are subject to change without notice. IONIC 16 / User Guide...
-
Page 24: Dimensions
Dimensions IONIC 16 is intended for rack installation and is sized accordingly. Dimensions below are in millimeters. NIC16 482.1 443.8 BY: YUVAL R. 01/2023 IONIC 16 / User Guide... -
Page 25: Installing Ionic 16 In A Rack
Installing IONIC 16 in a Rack Care must be taken when mounting the IONIC 16 on a rack rail. Improper screw alignment or incorrect screws can damage the device and possibly cause injury. Four screws are needed to rack the device. We recommend using M5 or M6 screws, depending on the rack specifications.
Need help?
Do you have a question about the IONIC 16 and is the answer not in the manual?
Questions and answers